
User Manual
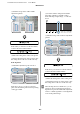
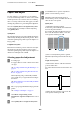
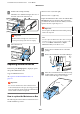
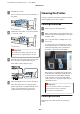
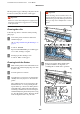
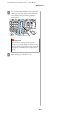
Table Of Contents
- Copyrights and Trademarks
- Contents
- Notes on Manuals
- Introducing the Software
- Basic Operations
- Using the Optional Hard Disk Unit
- Using the Printer Driver(Windows)
- Using the Printer Driver(Mac)
- Printing Varieties
- Printing with Darker Tones of Black (Black Enhance Overcoat)
- Correct color and print
- Printing Black and White Photos
- Borderless Printing
- Enlarged/Reduced Printing
- Multi-Page Printing
- Poster Printing (Enlarge to cover several sheets and print - Windows only)
- Printing at Non-Standard Sizes
- Banner printing (on roll paper)
- Layout Manager(Windows Only)
- Color Management Printing
- Menu List
- Maintenance
- Problem Solver
- What to do When a Message is Displayed
- SpectroProofer Error
- When an Error Message and Error Code are Displayed
- Troubleshooting
- You cannot print (because the printer does not work)
- The printer does not turn on.
- The printer turns off automatically.
- The printer driver is not installed properly (Windows).
- The printer driver is not installed properly (Mac).
- The printer is not communicating with the computer.
- You cannot print under the network environment.
- The printer has an error.
- The printer stops printing.
- Your problem is not listed here.
- The printer sounds like it is printing, but nothing prints
- The prints are not what you expected
- Print quality is poor, uneven, too light, or too dark.
- The color is not exactly the same as another printer.
- I am worried about the print quality at the leading edge of the paper
- The print is not positioned properly on the media.
- Vertical ruled lines are misaligned.
- The printed surface is scuffed or soiled.
- Cleaning around the print head and caps
- The paper is creased.
- Print outs are wrinkled
- The reverse side of the printed paper is soiled.
- Too much ink is fired.
- Margins appear in borderless printing.
- Feeding or ejecting problems
- Others
- The control panel display keeps turning off.
- Color ink runs out quickly even when printing in the Black&White mode or when printing black data.
- The paper is not cut cleanly.
- A light is visible inside the printer.
- The administrator password has been lost
- Head cleaning is performed automatically
- The noise made by the drying fan during color measurement is slightly louder than in previous models.
- When an error occurs during color measurement (when using the SpectroProofer mounter), the colors do ...
- Cannot update the firmware for the printer
- Printing stops when printing in a VPN (Virtual Private Network) environment
- The printer turned off due to a power cut
- You cannot print (because the printer does not work)
- Appendix
- Where To Get Help
- Technical Support Web Site
- Contacting Epson Support
- Before Contacting Epson
- Help for Users in North America
- Help for Users in Europe
- Help for Users in Taiwan
- Help for Users in Australia/New Zealand
- Help for Users in Singapore
- Help for Users in Thailand
- Help for Users in Vietnam
- Help for Users in Indonesia
- Help for Users in Hong Kong
- Help for Users in Malaysia
- Help for Users in India
- Help for Users in the Philippines

Paper Feed Adjust
Use this setting if you are unable to resolve banding
issues (horizontal striped lines or uneven colors) in the
standard print area (for cut sheets, the area excluding
the 1 to 2 cm strip at the bottom of the paper) even after
cleaning the print head or performing head alignment.
Select from Quality First and Length Accuracy First
for adjustment. We normally recommend adjusting
using Quality First.
Quality First
The adjustment patterns are printed. Make adjustments
while visually checking the adjustment patterns. This is
suitable for printing images that require an emphasis on
image quality.
Length Accuracy First
Prints the measurement positions. Measure and adjust
the distance for the measurement positions. This is
suitable for printing images that require an emphasis on
dimensions and length such as CAD.
Selecting paper feed adjustment
A
Load the paper.
Load paper that is 400 mm or wider and 560 mm
or longer.
U “Loading and Removing the Roll Paper” on
page 22
U “Loading and Removing Cut Sheets/Poster
Board” on page 28
When adjusting using commercially available
paper, make sure you register the Custom Paper
in advance.
U “Before Printing on Commercially Available
Paper” on page 168
B
Choose a paper type that matches the paper in the
printer.
U “Setting Loaded Paper” on page 30
C
Select Menu - Paper Setting - Print
Adjustments - Paper Feed Adjust on the control
panel.
D
Select Quality First or Length Accuracy First.
E
Touch Start button to print an adjustment
pattern or measurement positions.
F
Check the printed adjustment pattern or
measurement positions, and then enter the set
value into the control panel.
Quality First
(1) Check the adjustment pattern.
Look for the pattern with the least visible lines
and note the pattern number.
For example, the following illustration shows
that "0" has the least lines. Enter "0" into the
control panel, and then press OK.
(2) the second adjustment pattern is printed.
Check the adjustment pattern in the same way as
(1).
Length Accuracy First
(1) Measure the distance of the measurement
positions with a ruler.
Use a ruler that can measure in increments of 0.5
mm.
(2) Enter the measurement positions into the
control panel, and then press OK.
SC-P9500 Series/SC-P7500 Series User's Guide
Maintenance
122