
User Manual
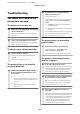
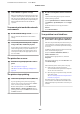
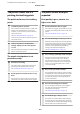

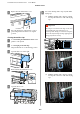
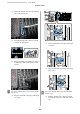
Table Of Contents
- Copyrights and Trademarks
- Contents
- Notes on Manuals
- Introducing the Software
- Basic Operations
- Using the Optional Hard Disk Unit
- Using the Printer Driver(Windows)
- Using the Printer Driver(Mac)
- Printing Varieties
- Printing with Darker Tones of Black (Black Enhance Overcoat)
- Correct color and print
- Printing Black and White Photos
- Borderless Printing
- Enlarged/Reduced Printing
- Multi-Page Printing
- Poster Printing (Enlarge to cover several sheets and print - Windows only)
- Printing at Non-Standard Sizes
- Banner printing (on roll paper)
- Layout Manager(Windows Only)
- Color Management Printing
- Menu List
- Maintenance
- Problem Solver
- What to do When a Message is Displayed
- SpectroProofer Error
- When an Error Message and Error Code are Displayed
- Troubleshooting
- You cannot print (because the printer does not work)
- The printer does not turn on.
- The printer turns off automatically.
- The printer driver is not installed properly (Windows).
- The printer driver is not installed properly (Mac).
- The printer is not communicating with the computer.
- You cannot print under the network environment.
- The printer has an error.
- The printer stops printing.
- Your problem is not listed here.
- The printer sounds like it is printing, but nothing prints
- The prints are not what you expected
- Print quality is poor, uneven, too light, or too dark.
- The color is not exactly the same as another printer.
- I am worried about the print quality at the leading edge of the paper
- The print is not positioned properly on the media.
- Vertical ruled lines are misaligned.
- The printed surface is scuffed or soiled.
- Cleaning around the print head and caps
- The paper is creased.
- Print outs are wrinkled
- The reverse side of the printed paper is soiled.
- Too much ink is fired.
- Margins appear in borderless printing.
- Feeding or ejecting problems
- Others
- The control panel display keeps turning off.
- Color ink runs out quickly even when printing in the Black&White mode or when printing black data.
- The paper is not cut cleanly.
- A light is visible inside the printer.
- The administrator password has been lost
- Head cleaning is performed automatically
- The noise made by the drying fan during color measurement is slightly louder than in previous models.
- When an error occurs during color measurement (when using the SpectroProofer mounter), the colors do ...
- Cannot update the firmware for the printer
- Printing stops when printing in a VPN (Virtual Private Network) environment
- The printer turned off due to a power cut
- You cannot print (because the printer does not work)
- Appendix
- Where To Get Help
- Technical Support Web Site
- Contacting Epson Support
- Before Contacting Epson
- Help for Users in North America
- Help for Users in Europe
- Help for Users in Taiwan
- Help for Users in Australia/New Zealand
- Help for Users in Singapore
- Help for Users in Thailand
- Help for Users in Vietnam
- Help for Users in Indonesia
- Help for Users in Hong Kong
- Help for Users in Malaysia
- Help for Users in India
- Help for Users in the Philippines

Cleaning around the print head and
caps
If print head clogging cannot be cleared using automatic
cleaning, clean the print head and the area around the
caps.
c
Important:
❏ Never touch any parts or circuit boards other
than those that need to be cleaned. Doing so
may cause the printer to malfunction or print
quality to decline.
❏ Always use new cleaning sticks. Re-using a stick
that has already been used may actually apply
dirt to the printer.
❏ Do not touch the tip of the cleaning stick with
your hand. Sebum may stick to it reducing the
cleaning effect.
❏ Before starting work, touch a metal object to
discharge static electricity.
❏ Do not wipe the caps with an organic solvent
such as alcohol. Doing so may damage the print
head.
❏ Do not move the print head by hand. Doing so
could damage the printer.
❏ If paper is loaded in the printer, we recommend
removing it before starting work.
Cleaning the Print Head
A
Touch Cleaning the Maintenance Parts on the
printer's control panel.
B
Touch Wiping the Print Head.
The print head moves to the cleaning position.
Wait for the print head to stop moving.
C
Remove the rear maintenance cover.
D
Use the cleaning stick to wipe in the directions
indicated by the arrows to remove any ink, fluff,
or trash.
c
Important:
Do not touch the parts indicated in the image.
Doing so may cause the printer to malfunction
or print quality to decline.
SC-P9500 Series/SC-P7500 Series User's Guide
Problem Solver
138