User’s Guide NPD4278-02 EN
AcuLaser C3900 Series User’s Guide Copyright Notice No part of this publication may be reproduced, stored in a retrieval system, or transmitted in any form or by any means, mechanical, photocopying, recording, or otherwise, without the prior written permission of Seiko Epson Corporation. No patent liability is assumed with respect to the use of the information contained herein. Neither is any liability assumed for damages resulting from the use of the information contained herein.
AcuLaser C3900 Series User’s Guide 4. You may assign its rights under this Agreement to an assignee of all of Licensee’s right and interest to such Software and Documentation (“Assignee”) provided you transfer to Assignee all copies of such Software and Documentation Assignee agrees to be bound by all of the terms and conditions of this Agreement. 5. You agree not to modify, adapt or translate the Software and Documentation. 6.
AcuLaser C3900 Series User’s Guide About Adobe Color Profile ADOBE SYSTEMS INCORPORATED COLOR PROFILE LICENSE AGREEMENT NOTICE TO USER: PLEASE READ THIS CONTRACT CAREFULLY. BY USING ALL OR ANY PORTION OF THE SOFTWARE YOU ACCEPT ALL THE TERMS AND CONDITIONS OF THIS SOFTWARE YOU ACCEPT ALL THE TERMS AND CONDITIONS OF THIS AGREEMENT. IF YOU DO NOT AGREE WITH THE TERMS OF THIS AGREEMENT, DO NOT USE THE SOFTWARE. 1.
AcuLaser C3900 Series User’s Guide 4. DISCLAIMER OF WARRANTY Adobe licenses the Software to you on an “AS IS” basis. Adobe makes no representation as to the adequacy of the Software for any particular purpose or to produce any particular result. Adobe shall not be liable for loss or damage arising out of this Agreement or from the distribution or use of the Software or any other materials.
AcuLaser C3900 Series User’s Guide 8.
AcuLaser C3900 Series User’s Guide This is the standard for color reproduction of sheet-fed offset press on Coated paper made by TOYO INK MFG.CO., LTD. (“TOYO INK”). This standard is made from printing test with using TOYO INK’s sheet-fed offset printing inks and TOYO INK’s own printing conditions. “TOYO INK Standard Color on Coated paper” is compatible with “JAPAN COLOR”. Agreement 1.
AcuLaser C3900 Series User’s Guide THIS LICENSE AGREEMENT IS A LEGAL AGREEMENT BETWEEN YOU (EITHER AN INDIVIDUAL OR, IF ACQUIRED BY OR FOR AN ENTITY, AN ENTITY) AND DIC CORPORATION, A JAPANESE COMPANY (“DIC”). THIS LICENSE AGREEMENT PROVIDES A LICENSE TO USE THE PROFILE AND CONTAINS WARRANTY INFORMATION AND LIABILITY DISCLAIMERS. IF YOU DO NOT AGREE TO BE BOUND BY ALL OF THESE TERMS, YOU MAY NOT USE THE PROFILE. 1.
AcuLaser C3900 Series User’s Guide 4. License Method and Restrictions a. You may install and use the Profile on a single desktop computer; provided, however, that, notwithstanding anything contrary contained herein, you may not use the Profile on any network system or share, install or use the Profile concurrently on different computers, or electronically transfer the Profile from one computer to another or over a network. b.
AcuLaser C3900 Series User’s Guide 6.
AcuLaser C3900 Series User’s Guide Contents Software License Agreement. . . . . . . . . . . . . . . . . . . . . . . . . . . . . . . . . . . . . . . . . . . . . . . . . . . . . . . . . . . . . . 2 About Adobe Color Profile. . . . . . . . . . . . . . . . . . . . . . . . . . . . . . . . . . . . . . . . . . . . . . . . . . . . . . . . . . . . . . . 4 ICC Profile for TOYO INK Standard Color on Coated paper (TOYO Offset Coated 3.0). . . . . . . . . . . . 6 DIC STANDARD COLOR PROFILE LICENSE AGREEMENT. . . . . .
AcuLaser C3900 Series User’s Guide Chapter 3 Printer Control Panel and Configuration Menu About the Control Panel. . . . . . . . . . . . . . . . . . . . . . . . . . . . . . . . . . . . . . . . . . . . . . . . . . . . . . . . . . . . . . . . . 29 Control Panel Indicators and Keys. . . . . . . . . . . . . . . . . . . . . . . . . . . . . . . . . . . . . . . . . . . . . . . . . . . . 29 Message Window. . . . . . . . . . . . . . . . . . . . . . . . . . . . . . . . . . . . . . . . . . . . . . . . . . . . . . .
AcuLaser C3900 Series User’s Guide Chapter 6 Replacing Consumables and Maintenance Parts About Toner Cartridges. . . . . . . . . . . . . . . . . . . . . . . . . . . . . . . . . . . . . . . . . . . . . . . . . . . . . . . . . . . . . . . . . 81 Replacing a Toner Cartridge. . . . . . . . . . . . . . . . . . . . . . . . . . . . . . . . . . . . . . . . . . . . . . . . . . . . . . . . . . . . . 83 Replacing a Photoconductor Unit. . . . . . . . . . . . . . . . . . . . . . . . . . . . . . . . . . . . . . . . . .
AcuLaser C3900 Series User’s Guide Hard Disk Drive (C12C824511). . . . . . . . . . . . . . . . . . . . . . . . . . . . . . . . . . . . . . . . . . . . . . . . . . . . . . . . . 149 Installing the Hard Disk Drive. . . . . . . . . . . . . . . . . . . . . . . . . . . . . . . . . . . . . . . . . . . . . . . . . . . . . . 149 500-Sheet Paper Cassette Unit (C12C802651). . . . . . . . . . . . . . . . . . . . . . . . . . . . . . . . . . . . . . . . . . . . . . 151 Installing a 500-Sheet Paper Cassette Unit. . . .
AcuLaser C3900 Series User’s Guide Chapter 1 Introduction Getting Acquainted with Your Printer Space Requirements To ensure easy operation, consumable replacement and maintenance, adhere to the recommended space requirements detailed below.
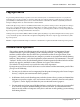
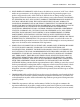
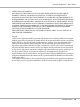
AcuLaser C3900 Series User’s Guide Printer Parts Front View 6 3 2 7 14 1 13 12 8 5 9 4 11 10 13 14 11 1. Control panel 2. Output tray 3. Paper stopper 4. Tray 1 (Manual feed tray) 5. Tray 2 6. Eject cover 7. Fuser unit 8. Right side cover 9. Transfer roller 10. Transfer belt unit 11. Photoconductor unit(s) 12. Front cover 13. Waste toner bottle 14.
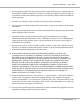
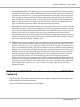
AcuLaser C3900 Series User’s Guide Rear View 6 1 5 4 3 2 1. USB memory port 2. Power switch 3. Power connection 4. USB port 5. 10Base-T/100Base-TX/1000Base-T Ethernet Interface port 6. Ventilation grilles Software Disc PostScript Drivers/PCL Drivers Operating System Use/Benefit Windows 7/Vista/Server 2008/XP/Server 2003/ 2000 These drivers give you access to all of the printer features, including finishing and advanced layout. See also “Using the PostScript and PCL Printer Driver” on page 21.
AcuLaser C3900 Series User’s Guide PPD Files Operating System Use/Benefit Macintosh OS X (10.3.9/10.4/10.5/10.6) Macintosh OS X Server (10.3.9/10.4/10.5/10.6) These files are required in order to use the printer driver for each operating system. For details of the Linux printer drivers, refer to the Reference Guide.
AcuLaser C3900 Series Windows XP Home/Professional (Service Pack 2 or later) Edition Professional x64 Edition Windows 2000 (Service Pack 4 or later) Windows Server 2008 R2 Standard/Enterprise Edition Windows Server 2008 Standard/Enterprise Edition Standard/Enterprise x64 Edition Windows Server 2003 R2 Standard/Enterprise Edition Standard/Enterprise x64 Edition Windows Server 2003 Standard/Enterprise Edition Standard/Enterprise x64 Edition User’s Guide ❏ Mac OS X (10.3.
AcuLaser C3900 Series User’s Guide Chapter 2 Using the Printer Driver Selecting Driver Options/Defaults (for Windows) Before you start working with your printer, you are advised to verify/change the default driver settings. Also, in case you have options installed, you should “declare” the options in the driver. 1. Choose the driver’s properties. 2. If you have installed options, proceed with the next step. Otherwise, skip to step 9. 3. Select the Configure tab. 4.
AcuLaser C3900 Series User’s Guide Note: Depending on the version of the operating system, Apply may not appear. If this is the case, continue with the next step. 8. Select the General tab. 9. Click Printing Preferences. Printing Preferences dialog box appears. 10. Select the default settings for your printer, such as the default media format you use, in the appropriate tabs. 11. Click Apply. 12. Click OK to exit from the Printing Preferences dialog box. 13.
AcuLaser C3900 Series User’s Guide OK Click to exit the Properties dialog box, saving any changes made. Cancel Click to exit the Properties dialog box without saving any changes made. Apply Click to save all changes without exiting the Properties dialog box. Help Click to view the help. Favorite Setting This allows the current settings to be saved. To save the current settings, specify the desired settings, and then click Add. Specify the settings described below, and then click OK.
AcuLaser C3900 Series User’s Guide Note: This button does not appear on the Advanced tab. ❏ Paper View Click the button to display a sample of the page layout in the figure area. When this button is clicked, it changes to the Printer View button. Note: This button does not appear on the Quality tab. ❏ Quality View Click the button to display a sample of the settings selected in the Quality tab. When this button is clicked, it changes to the Printer View button.
AcuLaser C3900 Series User’s Guide ❏ Specify the PostScript output method ❏ Specify whether or not the error messages of a print job are printed ❏ Print a mirror image ❏ Specify whether or not the application can directly output PostScript data My Tab My Tab allows you to ❏ Display the most frequently used functions (from each tab) whose settings are often changed ❏ Add or remove displayed functions by clicking Edit My Tab.
AcuLaser C3900 Series User’s Guide ❏ Print on the back side of paper that has already been printed on Note: ❏ Use paper that has been printed on with this printer. In addition, the page printed with this setting is not guaranteed. ❏ Do not use the following types of paper.
AcuLaser C3900 Series User’s Guide Watermark/Overlay Tab Note: Be sure to use overlays with print jobs with a media size and orientation that matches the overlay form. In addition, if settings have been specified for “N-up” or “Booklet” in the printer driver, the overlay form cannot be adjusted to match the specified settings.
AcuLaser C3900 Series User’s Guide ❏ Control the darkness of an image (Brightness) ❏ Specify the printer color settings (Quick Color) ❏ Perform color separation ❏ Select whether or not economy printing is used ❏ Set the edge strength to Low, Middle or High ❏ Specify the amount of details in graphic patterns (PCL printer driver only) ❏ Specify the format of fonts that are to be downloaded (PCL and Postscript printer driver only) ❏ Print using the printer’s fonts (PCL and Postscript printer driver only) ❏ C
AcuLaser C3900 Series User’s Guide ❏ Server and client combinations Server: Windows Server 2003/XP/2000/Server 2008/Vista Client: Windows Server 2003/XP/2000/Server 2008/Vista ❏ Functions with limitations applied Booklet, Skip Blank Pages, Front Cover Page, Back Cover Page, Separator Page, Create Overlay, Print in Overlay, Watermark *JOBNAME, USERNAME, and HOSTNAME output of PJL Using the Printer Driver 28
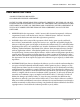
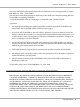
AcuLaser C3900 Series User’s Guide Chapter 3 Printer Control Panel and Configuration Menu About the Control Panel 2 3 4 3 4 1 MESSAGE WINDOW Control Panel Indicators and Keys No. 1 Key Function ❏ Press to cancel the setting that is currently displayed ❏ Cancels one or all print jobs that are currently being printed or processed: 1. Press the Cancel key. or 2. Press the keys to select either CURRENT JOB or ALL JOBS. 3. Press the Menu/Select key.
AcuLaser C3900 Series No. Key User’s Guide Function ❏ 4 ❏ Moves left and right through menus, options, or choices , appears in the message window Message Window 1 2 3 5 4 No. Details 1 The printer status is indicated by the color of the indicator and lighting/flashing of the message window.
AcuLaser C3900 Series User’s Guide Help Screens The help screens appear when the that the error can be corrected. key is pressed after an error occurred, such as a media misfeed, so Configuration Menu Overview PROOF/PRINT MENU Note: This menu appears only if an optional hard disk drive is installed. With this menu, print jobs that were set to be saved on the hard disk by using Job Retention on the Basic tab of the printer driver can be printed or deleted.
AcuLaser C3900 Series User’s Guide Deleting a Stored Job 1. Follow the step 1 to 3 of “Printing a Stored Job” on page 31. 2. Select DELETE, and then press the Menu/Select key. 3. Select YES or NO, and then press the Menu/Select key. Entering the Password If the print job selected in the PROOF/PRINT MENU is a secured job, a screen for entering the password appears. Follow the procedure described below to type in the four-digit password specified from the printer driver. 1.
AcuLaser C3900 Series Items Settings (default in bold)/Description CONFIGURATION PG PRINT/CANCEL STATISTICS PAGE PRINT/CANCEL User’s Guide Prints the statistics page such as the number of pages printed. FONT LIST POSTSCRIPT PRINT/CANCEL PCL PRINT/CANCEL MENU MAP PRINT/CANCEL DIRECTORY LIST*1 PRINT/CANCEL Prints the directory list of the hard disk. *1 This item appears only if an optional hard disk drive is installed. PAPER MENU With this menu, the paper used for printing can be managed.
AcuLaser C3900 Series Items PAPER SOURCE User’s Guide Settings (default in bold)/Description TRAY1/TRAY2/TRAY3*1 DEFAULT TRAY Select the setting for the default tray.
AcuLaser C3900 Series Items User’s Guide Settings (default in bold)/Description PAPER TYPE ANY/PLAIN PAPER/RECYCLED/THICK 1/THICK 2/LABEL/ POSTCARD/LETTERHEAD/GLOSSY 1/GLOSSY 2/SGL SIDE ONLY/ SPECIAL PAPER Select the setting for the type of paper loaded into Tray 2. TRAY 3*1 PAPER SIZE The size of paper (LETTER, LEGAL, GOVT LEGAL, EXECUTIVE, A4 or B5(JIS)) loaded in Tray 3 is indicated. This item only shows the current setting. This setting cannot be changed.
AcuLaser C3900 Series Items Settings (default in bold)/Description COLLATE*5 ON/OFF User’s Guide If ON is selected, all pages of the document are printed before the next copy is printed. If OFF is selected, all copies of the document are not printed separately. The setting specified in the printer driver will override this menu setting. *1 These items appear only if the optional 500-sheet paper cassette unit is installed.
AcuLaser C3900 Series Items HALFTONE User’s Guide Settings (default in bold)/Description IMAGE PRINTING/TEXT PRINTING/ GRAPHICS PRINTING LINE ART/DETAIL/SMOOTH (for image) LINE ART/DETAIL/SMOOTH (for text/graphic) Select how halftones in image/text/graphic are reproduced. If LINE ART is selected, halftones are reproduced with high precision. If DETAIL is selected, halftones are reproduced with detail. If SMOOTH is selected, halftones are reproduced with smoothness.
AcuLaser C3900 Series Items PCL SETTING User’s Guide Settings (default in bold)/Description CONTRAST -15%/-10%/-5%/0%/+5%/+10%/+15% The contrast of the image can be adjusted. IMAGE PRINTING/ TEXT PRINTING/ GRAPHICS PRINTING RGB SOURCE DEVICE COLOR/sRGB Specify the color space for RGB image/text/graphics data. If DEVICE COLOR is selected, no color space is specified.
AcuLaser C3900 Series Items PS SETTING User’s Guide Settings (default in bold)/Description IMAGE PRINTING/ TEXT PRINTING/ GRAPHICS PRINTING RGB SOURCE DEVICE COLOR/sRGB/Apple RGB/Adobe RGB (1998)/ ColorMatch RGB/Blue Adjust RGB Specify the color space for RGB image/text/graphics data. If DEVICE COLOR is selected, no color space is specified. RGB source profiles downloaded with the Web-Based EpsonNet Config are available as RGB SOURCE.
AcuLaser C3900 Series Items User’s Guide Settings (default in bold)/Description DESTINATION PROF AUTO Specify the destination profile. If AUTO is selected, a destination profile that the printer automatically adapts is selected based on a combination of the specified color matching, halftones and other profiles. Destination profiles downloaded with the Web-Based EpsonNet Config are available as DESTINATION PROF.
AcuLaser C3900 Series Items User’s Guide Settings (default in bold)/Description CALIBRATI ON TONE CALIBRATION ON/OFF If ON is selected, image adjustments are applied. If OFF is selected, image adjustments are not applied. AIDC PROCESS EXECUTE/CANCEL If EXECUTE is selected, image adjustments are performed immediately. If CANCEL is selected, image adjustments are not performed. Note: The AIDC PROCESS function consumes toner.
AcuLaser C3900 Series User’s Guide Items Settings (default in bold)/Description LIST OF FILES*1 Select the file that you wish to output, and then press the Menu/Select key. If the file to be printed is in a folder, select the folder, and then press the Menu/Select key. Note: A maximum of 99 folders and files can be displayed. Empty folders are not displayed.
AcuLaser C3900 Series User’s Guide INTERFACE MENU With this menu, interface settings can be specified. Note: ❏ Restart the printer after changing settings in the ETHERNET menu. ❏ If SYS DEFAULT MENU/SECURITY/LOCK PANEL is set to ON, the password must be entered in order for the contents of INTERFACE MENU to be displayed. For details on LOCK PANEL, refer to “SYS DEFAULT MENU” on page 46.
AcuLaser C3900 Series Items User’s Guide Settings (default in bold)/Description ARP/PING*1 ON/OFF Select whether or not the IP address is automatically acquired. HTTP*1 ENABLE YES/NO FTP*1 ENABLE YES/NO TELNET*1 ENABLE/DISABLE Select whether to enable or disable Telnet transmissions. BONJOUR* ENABLE YES/NO DYNAMIC DNS*1 ENABLE YES/NO IPP*1*2 ENABLE YES/NO RAW PORT*1 ENABLE YES/NO BIDIRECTIONA L*3 ON/OFF 1 If ON is selected, Raw port transmissions are enabled.
AcuLaser C3900 Series Items User’s Guide Settings (default in bold)/Description IP ADDRESS FILTER*1 ACCESS PERMISSION ENABLE/DISABLE Select whether to enable or disable access granting. ACCESS REFUSE ENABLE/DISABLE Select whether to enable or disable access blocking. IPv6*1 ENABLE YES/NO AUTO SETTING*4 YES/NO If YES is selected, auto configuration of IPv6 is enabled. LINK LOCAL*4 Displays the Link-Local address. GLOBAL ADDRESS*4 Displays the global address.
AcuLaser C3900 Series User’s Guide SYS DEFAULT MENU With this menu, settings can be specified to adjust the operation of the printer, such as the display language of the message window and the time until the machine enters Energy Saver mode. Note: If SYS DEFAULT MENU/SECURITY/LOCK PANEL is set to ON, the password must be entered in order for the contents of SYS DEFAULT MENU to be displayed. For details on LOCK PANEL, refer to “SYS DEFAULT MENU” on page 46.
AcuLaser C3900 Series Items User’s Guide Settings (default in bold)/Description BLACK OVERPRINT TEXT/GRAPHIC, TEXT/OFF Specify whether black objects are printed (superimposed) on a neighboring color in order to prevent white space around black characters or figures. If TEXT/GRAPHIC is selected, superimposed printing is applied to text and graphics. If TEXT is selected, superimposed printing is applied to text.
AcuLaser C3900 Series Items PAPER User’s Guide Settings (default in bold)/Description DEFAULT PAPER PAPER SIZE LETTER, LEGAL, EXECUTIVE, A4, A5, A6, B5(JIS), B6(JIS), GOVT LETTER, STATEMENT, FOLIO, SP FOLIO, UK QUARTO, FOOLSCAP, GOVT LEGAL, 16K, PHOTO 4×6*2, KAI 16, KAI 32, ENV C6, ENV DL, ENV MONARCH, ENV CHOU#3, ENV CHOU#4, B5(ISO), ENV #10, JPOST, JPOST-D, 8 1/8x13 1/4, 8 1/2x13 1/2, CUSTOM Select the size of media that is normally used.
AcuLaser C3900 Series Items STARTUP OPTIONS User’s Guide Settings (default in bold)/Description DO STARTUP PAGE ON/OFF Select whether or not a startup page is printed when the printer is turned on. AUTO CONTINUE ON/OFF Select whether or not printing continues if the size or type of media in the selected tray is different from the size or type of media for the print job. If AUTO CONTINUE is set to ON, printing automatically continues after about 10 seconds under the following conditions.
AcuLaser C3900 Series Items SECURITY User’s Guide Settings (default in bold)/Description CHANGE PASSWORD Specify the password for locking the control panel. If the password is set to 0000 (default), the control panel is not locked. In order to lock the control panel, be sure to specify a password other than 0000. LOCK PANEL OFF/MINIMUM/ON Specify how the control panel is locked. If OFF is selected, the control panel is not locked.
AcuLaser C3900 Series Items ENABLE WARNING User’s Guide Settings (default in bold)/Description PAPER EMPTY TRAY1 ON/OFF Select whether or not a warning appears when Tray 1 runs out of media. TRAY2 ON/OFF Select whether or not a warning appears when Tray 2 runs out of media. TRAY3*4 ON/OFF Select whether or not a warning appears when Tray 3 runs out of media. TONER LOW ON/OFF Select whether or not a warning appears when the toner is about to run out.
AcuLaser C3900 Series Items PRINT MENU User’s Guide Settings (default in bold)/Description EVENT LOG PRINT/CANCEL Prints the event log. HALFTONE 64 CYAN 64/MAGENTA 64/YELLOW 64/BLACK 64 PRINT/CANCEL Prints the halftone pattern using a 25% density for each CMYK color. HALFTONE 128 CYAN 128/MAGENTA 128/YELLOW 128/BLACK 128 PRINT/CANCEL Prints the halftone pattern using a 50% density for each CMYK color.
AcuLaser C3900 Series Items User’s Guide Settings (default in bold)/Description TRANSFER POWER SIMPLEX PASS MANUAL DUPLEX IMG ADJ THICK PLAIN PAPER/ THICK 1/ THICK 2/ POSTCARD/ ENVELOPE/ LABEL/ GLOSSY 1/ GLOSSY 2 -8-7 PLAIN PAPER/ THICK 1/ THICK 2/ POSTCARD/ ENVELOPE/ LABEL/ GLOSSY 1/ GLOSSY 2 -8-7 CYAN/MAGENTA/YELLOW/ BLACK Adjusts the 2nd image transfer output (ATVC) for simplex (single-sided) printing of plain paper/thick 1 paper/thick 2 paper/ postcards/envelopes/ labels/glossy 1 media/gloss
AcuLaser C3900 Series Items User’s Guide Settings (default in bold)/Description FINE LINE ADJ -3-0-2 Adjust how fine lines are reproduced by changing the applied voltage (VC) to the electrostatic roller. AIDC MODE MODE 1/ MODE 2 Select the AIDC operation mode.
AcuLaser C3900 Series Items QUICK SETTING*2 User’s Guide Settings (default in bold)/Description UPDATE SETTING EXECUTE/CANCEL Update printer settings according to the printer setting definition file stored in the USB memory device. If EXECUTE is selected, the printer settings are updated. If CANCEL is selected, the settings are not updated. BACKUP SETTING EXECUTE/CANCEL Store, as a definition file, the current printer setting information in the USB memory device.
AcuLaser C3900 Series User’s Guide Chapter 4 Memory Direct Memory Direct PDF, XPS, JPEG and TIFF files saved on USB memory devices can be printed by plugging the USB memory device into the printer. Note: ❏ Memory direct can be used only if the optional hard disk drive is installed. ❏ Encrypted USB memory devices are not supported. ❏ For details on specifying settings with the control panel, refer to “MEMORY DIRECT” on page 41. Printing From a Connected USB Memory Device 1.
AcuLaser C3900 Series User’s Guide 3. From the file list, select the file that you wish to print, and then press the Menu/Select key. If the file to be printed is in a folder, select the folder, and then press the Menu/Select key. Note: ❏ A maximum of 99 folders and files can be displayed. ❏ Up to 8 folder levels can be displayed. 4. Select PRINT, and then press the Menu/Select key. When printing is finished, the status screen appears again.
AcuLaser C3900 Series User’s Guide Chapter 5 Media Handling Print Media Specifications Media Media Size Tray*1 Duplex*2 (double-sided) Inch Millimeter Letter 8.5 x 11.0 215.9 x 279.4 1/2/3 Yes Legal 8.5 x 14.0 215.9 x 355.6 1/3 Yes Statement 5.5 x 8.5 139.7 x 215.9 1/2 No Executive 7.25 x 10.5 184.2 x 266.7 1/2/3 Yes A4 8.2 x 11.7 210.0 x 297.0 1/2/3 Yes A5 5.9 x 8.3 148.0 x 210.0 1/2 No A6 4.1 x 5.8 105.0 x 148.0 1/2 No B5 (JIS) 7.2 x 10.1 182.0 x 257.
AcuLaser C3900 Series Media Media Size User’s Guide Tray*1 Duplex*2 (double-sided) Inch Millimeter Kai 32 5.1 x 7.3 130.0 x 185.0 1/2 No 8 1/2 x 13 1/2 8.5 x 13.5 215.9 x 342.9 1 Yes 8 1/8 x 13 1/4 8.125 x 13.25 206.4 x 336.6 1 Yes Japanese Postcard 3.9 x 5.8 100.0 x 148.0 1 No Japanese Postcard-D 5.8 x 7.9 148.0 x 200.0 1 No B5 (ISO) 6.9 x 9.8 176.0 x 250.0 1 No Envelope #10 4.125 x 9.5 104.8 x 241.3 1 No Envelope DL 8.7 x 4.3 220.0 x 110.
AcuLaser C3900 Series User’s Guide Media Types Keep media on a flat, level surface in its original wrapper until it is time to load it. Note: Before printing a large number of copies on special paper (other than plain paper), perform a trial print to check the quality of the print result. Plain Paper (Recycled Paper) Capacity Orientation Tray 1 Up to 100 sheets, depending on the paper weight. Tray 2 Up to 250 sheets, depending on the paper weight.
AcuLaser C3900 Series User’s Guide ❏ Paper that has been printed on with a monochrome/color laser printer/copier ❏ Paper that has been printed on with a heat-transfer printer ❏ Paper that has been printed on with any other printer or fax machine ❏ Dusty ❏ Wet (or damp) Note: Keep media between 35% and 85% relative humidity. Toner does not adhere well to moist or wet paper.
AcuLaser C3900 Series Capacity Orientation Tray 1/2 Up to 20 sheets, depending on their thickness. Tray 3 Not supported Tray 1 Face down Tray 2 Face up Driver Media Type Thick 1 (91–150 g/m2) Thick 2 (151–210 g/m2) Weight 91–210 g/m2 Duplexing See “Specifications” on page 58 for supported sizes User’s Guide Envelope Print on the front (address) side only. Some parts of the envelope consist of three layers of paper—the front, back, and flap.
AcuLaser C3900 Series User’s Guide DO NOT use envelopes that have ❏ Sticky flaps ❏ Tape seals, metal clasps, paper clips, fasteners, or peel-off strips for sealing ❏ Transparent windows ❏ Too rough of a surface ❏ Material that will melt, vaporize, offset, discolor, or emit dangerous fumes ❏ Been presealed Label A sheet of labels consists of a face sheet (the printing surface), adhesive, and a carrier sheet: ❏ The face sheet must follow the plain paper specification.
AcuLaser C3900 Series User’s Guide ❏ Have labels that easily peel off or have parts of the label already removed ❏ Have backing sheets that have peeled away or have exposed adhesive Note: Labels may stick to the fuser, causing them to peel off and media misfeeds to occur. ❏ Are precut or perforated Do not use OK to use Shiny backed paper Full-page labels (uncut) Letterhead You can print continuously with letterhead.
AcuLaser C3900 Series User’s Guide Postcard You can print continuously with postcards. However, this could affect the media feed, depending on the media quality and printing environment. If problems occur, stop the continuous printing and print one sheet at a time. Try printing your data on a sheet of plain paper first to check placement.
AcuLaser C3900 Series User’s Guide Note: If the postcard is warped, press on the warped area before putting it in the tray. Glossy Media You can print continuously with glossy media. However, this could affect the media feed, depending on the media quality and printing environment. If problems occur, stop the continuous printing and print one sheet at a time. Check your application documentation for more information on printing glossy media.
AcuLaser C3900 Series Capacity Orientation Tray 1 Up to 100 sheets, depending on the paper weight. Tray 2 Up to 250 sheets, depending on the paper weight. Tray 3 Up to 500 sheets, depending on the paper weight.
AcuLaser C3900 Series Weight 60–90 g/m2 Duplexing See “Print Media” on page 58 for supported sizes. User’s Guide Use special paper that is ❏ Approved for laser printers DO NOT use special paper that is ❏ Not approved for use as plain paper Printable Area The printable area on all media sizes is up to 4.2 mm from the edges of the media. a a a * a a=4.
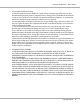
AcuLaser C3900 Series User’s Guide ❏ The bottom margin is 14.2 mm. Envelopes Envelopes can only be printed on their front sides (side where the recipient’s address is written). In addition, printing on the front side in the area overlapping the back flap cannot be guaranteed. The location of this area differs depending on the envelope type. 1 2 a a 3 a a a=4.2 mm Front side (can be printed) Back side (cannot be printed) 1. Non-printable area 2. Non-guaranteed printable area 3.
AcuLaser C3900 Series User’s Guide Loading Media Note: ❏ Do not mix media of different types and sizes, as this will cause media misfeeds or machine trouble. ❏ Paper edges are sharp and may cause injuries. When refilling media, first remove any media remaining in the tray. Stack it with the new media, even the edges, then reload it. Tray 1 (Manual Feed Tray) For details on the types and sizes of media that can be printed from Tray 1, refer to “Print Media” on page 58. 1. Open Tray 1. 2.
AcuLaser C3900 Series User’s Guide 3. Press down on the center of the paper-lifting plate until the left and right locking tabs (white) lock into place. 4. Load the paper face down in the tray. Note: ❏ Do not load so much paper that the top of the stack is higher than the maximum limit guide. Up to 100 sheets (80 g/m2 [22 lb]) of plain paper can be loaded into the tray at one time.
AcuLaser C3900 Series User’s Guide ❏ For the maximum paper capacity for each paper source, see “Media Types” on page 60. ❏ Before loading envelopes, press them down to make sure that all air is removed, and make sure that the folds of the flaps are firmly pressed; otherwise the envelopes may become wrinkled or a media misfeed may occur. ❏ For envelopes with the flap along the long edge (Envelope C6, Envelope Monarch, and Envelope DL), load the envelopes with the flap side up. 5.
AcuLaser C3900 Series User’s Guide Tray 2 1. Pull out Tray 2. 2. Press down the media pressure plate to lock it into place. 3. Slide the media guides to provide more space between them.
AcuLaser C3900 Series User’s Guide 4. Load the paper face up in the tray. Note: ❏ Do not load above the d mark. Up to 250 sheets (80 g/m2 [22 lb]) of plain paper can be loaded into the tray at one time. ❏ For the maximum paper capacity for each paper source, see “Media Types” on page 60. 5. Slide the media guides against the edges of the paper.
AcuLaser C3900 Series User’s Guide 6. Close Tray 2. 7. Select PAPER MENU/PAPER SOURCE/TRAY 2/PAPER SIZE and PAPER TYPE in the configuration menu, and then select the setting for the size and type of paper that are loaded. See also “PAPER MENU” on page 33. 500-Sheet Paper Cassette Unit (Tray 3) 1. Pull out Tray 3.
AcuLaser C3900 Series User’s Guide 2. Press down the media pressure plate to lock it into place. 3. Slide the media guides to provide more space between them. 4. Load the paper face up in the tray.
AcuLaser C3900 Series User’s Guide Note: Do not load above the d mark. Up to 500 sheets (80 g/m2 [22 lb]) of plain paper can be loaded into the tray at one time. 5. Slide the media guides against the edges of the paper. 6. Close Tray 3. 7. Select PAPER MENU/PAPER SOURCE/TRAY 3/PAPER TYPE in the configuration menu, and then select the setting for the type of paper that is loaded. See also “PAPER MENU” on page 33.
AcuLaser C3900 Series User’s Guide Duplexing (Epson AcuLaser C3900DN only) Select paper with high opacity for duplex (double-sided) printing. Opacity refers to how effectively paper blocks out what is written on the opposite side of the page. If the paper has low opacity (high translucency), then the printed data from one side of the page will show through to the other side. Check your application for margin information. For best results, print a small quantity to make sure the opacity is acceptable.
AcuLaser C3900 Series If “Right Binding” is selected, the pages can be folded as a right-bound booklet. 1 2 3 User’s Guide 3 1 1. Load plain paper into the tray. 2. From the printer driver, specify duplex (double-sided) printing (Layout tab in Windows). 3. Click OK. Note: With autoduplexing, the back side is printed first, and then the front side is printed. Output Tray All printed media is output to the face-down output tray on top of the printer.
AcuLaser C3900 Series User’s Guide Media Storage ❏ Keep media on a flat, level surface in its original wrapper until it is time to load it. Media that has been stored for a long time out of its packaging may dry up too much and cause misfeeding. ❏ If media has been removed from its wrapper, place it in its original packaging and store in a cool, dark place on a level surface. ❏ Avoid moisture, excessive humidity, direct sunlight, excessive heat (above 35˚C [95˚F]), and dust.
AcuLaser C3900 Series User’s Guide Chapter 6 Replacing Consumables and Maintenance Parts Note: ❏ Failure to follow instructions as outlined in this manual could result in voiding your warranty. ❏ If an error message (REPLACE TONER, FUSER UNIT END OF LIFE, etc.) appears, print out the configuration page, and then check the status of the other consumables. For details on the error messages, refer to “Error Messages (Warning)” on page 141.
AcuLaser C3900 Series Type Parts Number Toner Cartridge (Yellow) 0590 Toner Cartridge (Magenta) 0591 Toner Cartridge (Cyan) 0592 Toner Cartridge (Black) 0593 Double Toner Cartridge (Black) 0594 User’s Guide Note: For optimum print quality and performance, use only the corresponded TYPE genuine Epson toner cartridges. Keep toner cartridges: ❏ In their packaging until you’re ready to install them. ❏ In a cool, dry location away from sunlight (due to heat).
AcuLaser C3900 Series User’s Guide Replacing a Toner Cartridge Note: Be careful not to spill toner while replacing a toner cartridge. If toner spills, immediately wipe it off with a soft, dry cloth. If TONER LOW on the SYS DEFAULT MENU/ENABLE WARNING is set to ON, the message TONER LOW X (where “X”. represents the color of the toner) appears when toner cartridge becomes near empty. Follow the steps below to replace the toner cartridge.
AcuLaser C3900 Series User’s Guide 3. Grab the handle of the toner cartridge to be replaced, and then pull out the cartridge. The following instructions show the procedure to replace the toner cartridge(Y). Note: Dispose of the used toner cartridge according to your local regulations. Do not burn the toner cartridge. For details, refer to “About Toner Cartridges” on page 81. 4. Check the color of the new toner cartridge to be installed. 5. Remove the toner cartridge from the bag. 6.
AcuLaser C3900 Series User’s Guide 7. Peel off the protective film from the right side of the toner cartridge. 8. Make sure that the toner cartridge is the same color as the printer compartment, and then insert the toner cartridge into the printer. Note: Fully insert the toner cartridge. 9. Pull the lever to the right to lock it in place.
AcuLaser C3900 Series User’s Guide Note: ❏ The front lever should be securely returned to its original position; otherwise, the front cover of the printer cannot be closed. ❏ If it is difficult to operate the lever, push it in. 10. Make sure that the toner cartridge is securely installed, and then peel off the protective film. 11. Close the front cover. Note: When closing the front cover, press the area of the cover with small projections.
AcuLaser C3900 Series User’s Guide Replacing a Photoconductor Unit Type Parts Number Photoconductor Unit (Yellow) 1201 Photoconductor Unit (Magenta) 1202 Photoconductor Unit (Cyan) 1203 Photoconductor Unit (Black) 1204 Note: Do not touch the OPC drum surface. This could lower image quality. If P/U LOW on the SYS DEFAULT MENU/ENABLE WARNING is set to ON, the message P/U LOW X (where “X”. represents the color of the toner) appears when a photoconductor unit becomes near empty.
AcuLaser C3900 Series User’s Guide 3. Pull the front lever of the color toner cartridge indicated to the left. The replacement procedure for the photoconductor unit is the same for all colors (yellow: Y, magenta: M, cyan: C, and black: K). The following instructions show the procedure to replace the toner cartridge (K). Y M C K 4. Grab the handle of the toner cartridge to be removed, and then pull out the cartridge. Note: Do not tilt removed toner cartridge, otherwise toner may spill.
AcuLaser C3900 Series User’s Guide 5. Pull up the waste toner bottle to unlock it. 6. Grab the left and right handles of the waste toner bottle, and then slowly pull out the bottle. Note: Do not tilt removed waste toner box, otherwise waste toner may spill. 7. While pressing down the area marked “Push” on the photoconductor unit to be replaced, slide the unit completely out of the printer. The following instructions show the procedure to replace the photoconductor unit (Black).
AcuLaser C3900 Series User’s Guide Note: Dispose of the used photoconductor unit according to your local regulations. Do not burn the photoconductor unit. 8. Check the color of the new photoconductor unit to be installed. Note: In order to prevent toner from spilling, leave the photoconductor unit in the bag until step 7 is being performed. 9. Remove the photoconductor unit from the bag. 10. Hold the photoconductor unit with both hands, and then shake it twice as shown in the illustration.
AcuLaser C3900 Series User’s Guide 11. Remove the protective cover from the photoconductor unit. Remove all packing tape from the photoconductor unit. 12. Remove the paper from the photoconductor unit. Remove the protective cover from the photoconductor unit. 13. Make sure that the new photoconductor unit to be installed is the same color as the printer compartment, and then insert the photoconductor unit into the printer so it locks.
AcuLaser C3900 Series User’s Guide 14. Press in on the waste toner bottle until it locks into place. 15. Make sure that the toner cartridge is the same color as the printer compartment, and then insert the toner cartridge into the printer. Note: Fully insert the toner cartridge. 16. Pull the lever to the right to lock it in place.
AcuLaser C3900 Series User’s Guide Note: ❏ The front lever should be securely returned to its original position; otherwise, the front cover of the printer cannot be closed. ❏ If it is difficult to operate the lever, push it in. 17. Close the front cover. Note: When closing the front cover, press the area of the cover with small projections. Replacing the Waste Toner Bottle (0595) When the waste toner bottle becomes full, the message WASTE TONER FULL/REPLACE BOTTLE appears in the message window.
AcuLaser C3900 Series User’s Guide 2. Pull up the waste toner bottle to unlock it. 3. Grab the left and right handles of the waste toner bottle, and then slowly pull out the bottle. Note: Do not tilt removed waste toner box, otherwise waste toner may spill. 4. Remove the new waste toner bottle from its packaging. Insert the used waste toner bottle into the plastic bag included in the box, and then box it up.
AcuLaser C3900 Series User’s Guide Note: Dispose of the used waste toner bottle according to your local regulations. Do not burn the waste toner bottle. 5. Press in on the waste toner bottle until it locks into place. 6. Close the front cover. Note: ❏ When closing the front cover, press the area of the cover with small projections. ❏ If the waste toner bottle is not fully inserted, the front cover cannot be closed.
AcuLaser C3900 Series User’s Guide Replacing the Backup Battery When the backup battery is at its end of life, the printer’s date and time cannot be retained. Follow the procedure described below to replace the backup battery. Note: Only use the coin-shaped 3V lithium battery CR2032. It’s very important to protect the printer controller board and any associated circuit boards from electrostatic damage. Before performing this procedure, review the antistatic caution on“Antistatic Protection” on page 146.
AcuLaser C3900 Series User’s Guide 4. Remove the backup battery. 5. Insert a new backup battery. Note: ❏ When inserting the new backup battery, be sure that the + side faces front. ❏ Risk of explosion if battery is replaced by an incorrect type. Dispose of used batteries according to your local regulations. Do not burn the backup battery. 6. Reinstall the panel and tighten two screws. 7. Reconnect all interface cables. 8. Reconnect the power cord, and turn on the printer. 9.
AcuLaser C3900 Series User’s Guide Replacing the Fuser Unit (3041/3042) When the time to replace the fuser unit is reached, the message FUSER UNIT/END OF LIFE appears. Printing can continue even after this message appears; however, since the print quality is reduced, the fuser unit should be replaced immediately. 1. Turn off the printer. Note: There are extremely hot parts within the machine.
AcuLaser C3900 Series User’s Guide 4. Open the fuser unit cover. 5. Pull down the 2 levers. 6. Remove the fuser unit.
AcuLaser C3900 Series User’s Guide 7. Prepare a new fuser unit. Note: Be careful not to touch the surface of the fuser roller. 8. Pull down the 2 levers of a new fuser unit. 9. Insert the fuser unit until it locks into place.
AcuLaser C3900 Series User’s Guide 10. Lift up the two levers. 11. Close the fuser unit cover. 12. Close the eject cover.
AcuLaser C3900 Series User’s Guide 13. Close the right side cover. 14. Reset the counter in the MAINTENANCE MENU/SUPPLIES/REPLACE/FUSER UNIT menu.
AcuLaser C3900 Series User’s Guide Chapter 7 Maintaining the Printer Maintaining the Printer c Caution: Read all caution and warning labels carefully, making sure to follow any instructions contained in them. These labels are located on the inside of the printer’s covers and the interior of the printer body. Handle the printer with care to preserve its life. Abuse handling may cause damage and void your warranty.
AcuLaser C3900 Series User’s Guide ❏ Always close the printer’s covers gently. Never subject the printer to vibration. ❏ Do not cover the printer immediately after using it. Turn it off and wait until it cools down. ❏ Do not leave the printer’s covers open for any length of time, especially in well-lit places; light may damage the photoconductor units. ❏ Do not open the printer during printing. ❏ Do not tap media stacks on the printer. ❏ Do not lubricate or disassemble the printer.
AcuLaser C3900 Series c User’s Guide Caution: If you get toner in your eyes, wash it out immediately with cool water and consult a doctor. ❏ Make sure any parts removed during cleaning are replaced before you plug in the printer. Cleaning the Printer c Caution: Be sure to turn off the printer and unplug the power cord before cleaning.
AcuLaser C3900 Series User’s Guide Cleaning the Media Feed Rollers (Manual Feed Tray) 1. Open Tray 1. 2. Press down on the center of the paper-lifting plate until the left and right locking tabs (white) lock into place. 3. Clean the media feed rollers by wiping them with a soft, dry cloth.
AcuLaser C3900 Series User’s Guide 4. Close the tray. Cleaning the Media Feed Rollers (Tray 2/3) 1. Pull out the tray. 2. Clean the media feed rollers by wiping them with a soft, dry cloth.
AcuLaser C3900 Series User’s Guide 3. Close the tray. Cleaning the Media Transfer Rollers for Tray 3 1. Open the right side cover of Tray 3. Note: Before opening the right side cover of Tray 3, fold up Tray 1. 2. Clean the media transfer rollers by wiping them with a soft, dry cloth.
AcuLaser C3900 Series User’s Guide 3. Close the right side cover of Tray 3. Cleaning the Laser Lens This printer is constructed with four laser lenses. Clean all lenses as described below. The laser lens cleaning tool should be attached to the inside of the tray 2. 1. Pull out the tray 2. 2. Remove the cover.
AcuLaser C3900 Series User’s Guide Note: Since the cover will be used later, do not return it to its original position. 3. Remove the cleaning tool from the tray 2. 4. Close the tray 2. 5. Open the printer’s front cover.
AcuLaser C3900 Series User’s Guide 6. Remove the waste toner bottle and the toner cartridge and photoconductor unit for the color of laser lens to be cleaned. Note: ❏ For details on removing the toner cartridge, photoconductor unit or waste toner bottle, refer to “Replacing a Toner Cartridge” on page 83 or “Replacing a Photoconductor Unit” on page 87. ❏ Do not tilt removed toner cartridge, otherwise toner may spill. ❏ Do not tilt removed waste toner box, otherwise waste toner may spill. 7.
AcuLaser C3900 Series User’s Guide 8. Insert the laser lens cleaning tool into the photoconductor unit opening, pull it out, and then repeat this back and forth movement 2 or 3 times. 9. Install the removed toner cartridge, photoconductor unit and waste toner bottle. Note: For details on installing the toner cartridge, photoconductor unit or waste toner bottle, refer to “Replacing a Toner Cartridge” on page 83 or “Replacing a Photoconductor Unit” on page 87. 10. Close the front cover.
AcuLaser C3900 Series User’s Guide Note: When closing the front cover, press the area of the cover with small projections. 11. Pull out the tray 2. 12. Return the laser lens cleaning tool to its holder on the inside of the tray 2. 13. Close the cover.
AcuLaser C3900 Series User’s Guide 14. Close the tray 2. 15. Clean between each of the laser lenses in the same way. Note: The laser lens cleaning tool is included with the printer. Safely store the laser lens cleaning tool so that it will not be lost.
AcuLaser C3900 Series User’s Guide Chapter 8 Troubleshooting Printing a Configuration Page 1. Press the Menu/Select key. 2. Select PRINT MENU, and then press the Menu/Select key. 3. Select CONFIGURATION PG, and then press the Menu/Select key. 4. Select PRINT, and then press the Menu/Select key. Preventing Media Misfeeds Make sure that... Media matches the printer specifications. Media is flat, especially on the leading edge. The printer is on a hard, flat, level surface.
AcuLaser C3900 Series User’s Guide Avoid... Allowing the output tray to overfill (the output tray has a 200-sheet capacity—misfeeding may occur if you allow more than 200 sheets of media to accumulate at one time). Clearing Media Misfeeds To avoid damage, always remove misfed media gently, without tearing it. Any piece of media left in the printer, whether large or small, can obstruct the media path and cause further misfeeds. Do not reload media that has misfed.
AcuLaser C3900 Series User’s Guide Media Misfeed Message Page Reference PAPER JAM FUSER/EXIT “Clearing a Media Misfeed from the Fuser Unit” on page 124 PAPER JAM TRAY1 “Clearing a Media Misfeed from Tray 1 (Manual Feed Tray) and Transfer Roller” on page 128 PAPER JAM SECOND TRANS “Clearing a Media Misfeed from Tray 1 (Manual Feed Tray) and Transfer Roller” on page 128 PAPER JAM VERTICAL TRANS “Clearing a Media Misfeed in Tray 3” on page 120, “Clearing a Media Misfeed from Tray 1 (Manual Feed Tray
AcuLaser C3900 Series User’s Guide 2. Carefully pull out the misfed media. c Caution: The area around the fuser unit is extremely hot. Touching anything other than the indicated levers may result in burns. If you get burned, immediately cool the skin under cold water, and then seek professional medical attention. Note: Decreased print quality may result if the surface of the image transfer belt or the transfer roller is touched.
AcuLaser C3900 Series User’s Guide 3. Close the right side cover. 4. Pull out Tray 2, and then remove all media from the tray.
AcuLaser C3900 Series User’s Guide 5. Fan the media you removed and then align it well. 6. Load the media face up in Tray 2. Note: ❏ Make sure that the media is flat. ❏ Do not load paper above the d mark. 7. Close Tray 2. Clearing a Media Misfeed in Tray 3 1. Open the right side cover of Tray 3.
AcuLaser C3900 Series User’s Guide Note: Before opening the right side cover of Tray 3, fold up Tray 1. 2. Carefully pull out the misfed media. 3. Close the right side cover of Tray 3. 4. Pull out Tray 3, and then remove all paper from the tray.
AcuLaser C3900 Series User’s Guide 5. Fan the paper you removed and then align it well. 6. Load the paper face up in Tray 3. Note: ❏ Make sure that the paper is flat. ❏ Do not load paper above the d mark. ❏ Slide the media guides against the edges of the paper. 7. Close Tray 3.
AcuLaser C3900 Series User’s Guide Clearing a Media Misfeed from the Duplex (Epson AcuLaser C3900DN only) 1. Pull the lever, and then open the right side cover. Note: Before opening the right side cover, fold up Tray 1. 2. Carefully pull out the misfed media. 3. Close the right side cover.
AcuLaser C3900 Series User’s Guide Clearing a Media Misfeed from the Fuser Unit 1. Pull the lever, and then open the right side cover. Note: Before opening the right side cover, fold up Tray 1. 2. Open the eject cover. 3. Lift up the 2 levers.
AcuLaser C3900 Series User’s Guide 4. Open the fuser unit cover. 5. Carefully pull out the misfed media. Note: If the misfed media cannot be removed by pulling it down, pull it from the top of the fuser unit.
AcuLaser C3900 Series c User’s Guide Caution: The area around the fuser unit is extremely hot. Touching anything other than the indicated levers may result in burns. If you get burned, immediately cool the skin under cold water, and then seek professional medical attention. Note: Decreased print quality may result if the surface of the image transfer belt or the transfer roller is touched. Be careful not to touch the surface of the image transfer belt or transfer roller.
AcuLaser C3900 Series User’s Guide 6. Close the fuser unit cover. 7. Push down the 2 levers. 8. Close the eject cover.
AcuLaser C3900 Series User’s Guide 9. Close the right side cover. Clearing a Media Misfeed from Tray 1 (Manual Feed Tray) and Transfer Roller 1. Pull the lever, and then open the right side cover. Note: Before opening the right side cover, fold up Tray 1. 2. Carefully pull out the misfed media.
AcuLaser C3900 Series c User’s Guide Caution: The area around the fuser unit is extremely hot. Touching anything other than the indicated levers may result in burns. If you get burned, immediately cool the skin under cold water, and then seek professional medical attention. Note: Decreased print quality may result if the surface of the image transfer belt or the transfer roller is touched. Be careful not to touch the surface of the image transfer belt or transfer roller.
AcuLaser C3900 Series User’s Guide 3. Close the right side cover. Solving Problems with Media Misfeeds Note: Frequent misfeeds in any area indicate that area should be checked, repaired, or cleaned. Repeated misfeeds may also happen if you’re using unsupported print media. Symptom Cause Solution Several sheets go through the printer together. The front edges of the media are not even. Remove the media and even up the front edges, then reload it. The media is moist from humidity.
AcuLaser C3900 Series User’s Guide Symptom Cause Solution Duplex misfeeds. Unsupported media (wrong size, thickness, type, etc.) is being used. Use Epson-approved media. See “Print Media” on page 58. Only plain paper, special paper and thick stock, 60–210 g/m2 (16–55.9 lb) can be autoduplexed. See “Print Media” on page 58. Make sure that you have not mixed media types in Tray 1 or 2. Do not duplex (double-sided) envelopes, labels, letterhead, postcards, glossy or single side only paper.
AcuLaser C3900 Series Symptom Cause Solution Media is misfeeding. Unsupported media (wrong size, thickness, type, etc.) is being used. Use Epson-approved media. The media roller is dirty. Clean the media supply roller. User’s Guide See “Print Media” on page 58. For more details, refer to “Media Rollers” on page 105. Solving Other Problems Symptom Cause Solution Printer power is not on. The power cord is not correctly plugged into the outlet.
AcuLaser C3900 Series User’s Guide Symptom Cause Solution Printing from a USB memory device is not possible. The file format (file extension) is not one that can be printed. Only files with the format (extension) for JPEG, TIFF, XPS or PDF can be printed. MEMORY DIRECT for the printer is set to DISABLE. Change the setting for INTERFACE MENU/MEMORY DIRECT to ENABLE. A public user is not specified for user authentication. Contact the printer administrator. Encrypted USB memory devices are used.
AcuLaser C3900 Series User’s Guide Symptom Cause Solution Printer resets or turns off frequently. The power cord is not correctly plugged into the outlet. Turn off the printer, confirm that the power cord is correctly plugged into the outlet, and then turn on the printer. A system error occurred. Contact Technical Support with the error information. The message PORT AUTH ACTIVE remains displayed in the message window. IEEE 802.1X authentication failed.
AcuLaser C3900 Series User’s Guide Symptom Cause Solution Media is wrinkled. The media is moist from humidity or having water spilled on it. Remove the moist media and replace it with new, dry media. The transfer roller or fuser unit is defective. Check them for damage. If necessary, contact Technical Support with the error information. Unsupported media (wrong size, thickness, type, etc.) is being used. Use Epson-approved media. See “Print Media” on page 58.
AcuLaser C3900 Series User’s Guide Solving Problems with Printing Quality Symptom Cause Solution Nothing is printed, or there are blank spots on the printed page. One or more of the photoconductor units may be defective. Remove the photoconductor units and check it for damage. If it is damaged, replace it. The media is moist from humidity. Adjust the humidity for media storage. Remove the moist media and replace it with new, dry media.
AcuLaser C3900 Series User’s Guide Symptom Cause Solution Image is too dark. One or more of the photoconductor units may be defective. Remove the photoconductor units and check them for damage. If one is damaged, replace it. Image is blurred; background is lightly stained; there is insufficient gloss of the printed image. One or more of the photoconductor units may be defective. Remove the photoconductor units and check them for damage. If one is damaged, replace it.
AcuLaser C3900 Series User’s Guide Symptom Cause Solution There is insufficient fusing or the image comes off when rubbed. The media is moist from humidity. Remove the moist media and replace it with new, dry media. Unsupported media (wrong size, thickness, type, etc.) is being used. Use Epson-approved media. See “Print Media” on page 58. Media type is set incorrectly.
AcuLaser C3900 Series User’s Guide Symptom Cause Solution Image defects. The laser lens is dirty. Clean the laser lens. A toner cartridge may be leaking. Remove the toner cartridges and check them for damage. If one is damaged, replace it. A photoconductor unit may be defective. Remove the photoconductor unit with the color causing the abnormal image. Replace it with a new photoconductor unit. The printer is not level. Place the printer on a flat, hard, level surface.
AcuLaser C3900 Series User’s Guide Status, Error, and Service Messages Status, error, and service messages are displayed in the control panel message window. They provide information about your printer and help you locate many problems. When the condition associated with a displayed message has changed, the message is cleared from the window. Standard Status Messages This message... means... do this...
AcuLaser C3900 Series User’s Guide Error Messages (Warning) This message... means... do this... AUTH TIMEOUT The user is automatically logged off due to IEEE802.1X port authentication. Reauthorize the IEEE802.1X port, and then log on. DEVICE NOT SUPPORTED An incompatible device is connected. Do not connect an incompatible device. FUSER UNIT END OF LIFE The fuser unit has reached the end of its life.
AcuLaser C3900 Series User’s Guide This message... means... do this... PAPER EMPTY TRAY X Tray X (Tray 1, 2 or 3) is empty. (Appears when SYS DEFAULT MENU/ENABLE WARNING/PAPER EMPTY/TRAY X is set to ON.) Load media into the specified tray. Tray X (Tray 2 or 3) is not correctly installed. (Appears when SYS DEFAULT MENU/ENABLE WARNING/PAPER EMPTY/TRAY X is set to ON.) Correctly install the specified tray. PORT AUTH ACTIVE IEEE802.1X port is processing.
AcuLaser C3900 Series User’s Guide This message... means... do this... COVER OPEN SIDE COVER The printer’s right side cover is open. Close the right side cover. COVER OPEN TRAY3 COVER The right side cover of Tray 3 is open. Close the right side cover of the tray. HOLD JOB ERROR UNABLE TO STORE JOB The specified print job saved on the hard disk is sent while the hard disk is not installed. Print jobs can be saved only if a hard disk is installed. If desired, install a hard disk.
AcuLaser C3900 Series User’s Guide This message... means... do this... PAPER ERROR “SIZE” “MEDIA” The media size/type set in the printer driver is different from the size/type of media loaded (Appears when PAPER MENU/ PAPER SOURCE/TRAY CHAINING is set.) Load the correct media size and type. PAPER JAM DUPLEX1 Media has misfed in the duplex. PAPER JAM DUPLEX2 Media has misfed in the duplex. Press the key to display the help screen.
AcuLaser C3900 Series User’s Guide This message... means... do this... TRAYX PAPER ERR “SIZE” “MEDIA” The media size/type set in the printer driver is different from the size/type of media loaded. This message appears when the PAPER MENU/PAPER SOURCE/ TRAY CHAINING menu is set to OFF. Load the correct media size and type. TRAYX SIZE ERR ADD “SIZE” The media size set in the printer driver is different from the size of media loaded. Load the correct media size into the specified tray.
AcuLaser C3900 Series User’s Guide Chapter 9 Installing Accessories Introduction Note: Use of accessories not manufactured or supported by Epson will void your warranty. Dual In-Line Memory Module (DIMM) 512 MB DIMM 500-Sheet Paper Cassette Unit (Tray 3) 500-sheet tray included Hard Disk Drive SATA Hard Disk Note: ❏ Installing accessories always requires that the printer and accessories are turned off and unplugged during installation. ❏ This printer does not support CompactFlash card.
AcuLaser C3900 Series User’s Guide Dual In-Line Memory Module (DIMM) Note: You may need additional memory (DIMM) for complex graphics and for duplex (double-sided) printing. This machine detects only half of the amount of the installed memory. Dual in-line memory module (or DIMM) is compact circuit board with surface-mount memory chips. There is 256 MB of onboard memory and one available memory expansion slot. The memory can be expanded to a maximum of 768 MB (256 MB + 512 MB).
AcuLaser C3900 Series User’s Guide 3. Slide the panel slightly to the down and lift it off the printer. 4. Insert the DIMM at an angle (about 45˚) into the connector, making sure that the notch on the unit aligns with the tab on connector, and then press down carefully until it clicks into place. Note: ❏ Be sure to handle the DIMM by the edges only. ❏ You will hear a click when the DIMM is properly placed. 5. Reinstall the panel and tighten two screws. 6. Reconnect all interface cables. 7.
AcuLaser C3900 Series User’s Guide Hard Disk Drive (C12C824511) If you install a Hard Disk Drive, the followings can be performed: ❏ Collate printing ❏ Job printing/saving ❏ Fonts/forms download ❏ User Authentication/Account Track ❏ Direct printing Installing the Hard Disk Drive Note: It’s very important to protect the printer controller board and any associated circuit boards from electrostatic damage.
AcuLaser C3900 Series User’s Guide 3. Slide the panel slightly to the down and lift it off the printer. 4. Attach the two cables to the hard disk drive. 5. Plug the two cables on the hard disk drive into the connector.
AcuLaser C3900 Series User’s Guide 6. Insert the four mounting pins on the hard disk drive into the holes to mount the hard disk drive. 7. Reinstall the panel and tighten two screws. 8. Reconnect all interface cables. 9. Reconnect the power cord, and turn on the printer. 10. Declare the Hard Disk in the Windows printer driver (Properties/Configure tab). 500-Sheet Paper Cassette Unit (C12C802651) You can install up to one optional 500-sheet paper cassette unit (Tray 3).
AcuLaser C3900 Series User’s Guide 3. Open the right side cover of the 500-sheet paper cassette unit. Note: The right side cover of the 500-sheet paper cassette unit must be opened before the feeder can be installed onto the printer. 4. With another person’s help, place the printer on top of the 500-sheet paper cassette unit, making sure that the positioning pins on the 500-sheet paper cassette unit correctly fit into the holes on the bottom of the printer.
AcuLaser C3900 Series User’s Guide 5. Close the right side cover of the 500-sheet paper cassette unit. 6. Reconnect all interface cables. 7. Reconnect the power cord, and turn on the printer. 8. Declare Paper Source Unit 3 in the Windows printer driver (Properties/Configure tab).
AcuLaser C3900 Series User’s Guide Appendix A Appendix Technical Specifications Printer Type Desktop Tandem Full Color A4 laser beam printer Print system Electro photographic Printing System Exposure system 4 laser diode and 1 polygon mirror Developing system Mono-component SMT Resolution 600 dpi × 600 dpi × 3 bits Media sizes Tray 1 Paper width: 92 to 216 mm Paper length: 148 to 356 mm Tray 2 Paper width: 92 to 216 mm Paper length: 148 to 297 mm Tray 3 Paper/Media B5 (JIS) - Legal ❏ Pl
AcuLaser C3900 Series Input capacity Tray1 User’s Guide Plain/Recycled/Single side only/Special paper: 100 sheets Envelope: 10 envelopes Label/Postcard/Thick 1/Thick 2/Glossy 1/Glossy 2/Letterhead: 20 sheets Tray2 Plain/Recycled/Single side only/Special paper: 250 sheets Label/Postcard/Thick 1/Thick 2/Glossy 1/Glossy 2/Letterhead: 20 sheets Tray3 Plain/Recycled/Single side only/Special paper: 500 sheets Output capacity Output tray 200 sheets (Plain paper:80 g/m2) Operating temperature 10 to 30˚
AcuLaser C3900 Series Weight User’s Guide Epson AcuLaser C3900N: approximately 22 kg (49 lb) (without consumables) approximately 27 kg (60 lb) (with consumables) Epson AcuLaser C3900DN: approximately 23 kg (51 lb) (without consumables) approximately 27 kg (60 lb) (with consumables) Interface USB 2.
AcuLaser C3900 Series User’s Guide Index 5 L 500-sheet paper cassette unit...........................................151 Labels.....................................................................................63 Letterhead.............................................................................64 Loading media.....................................................................70 A Accessories.........................................................................
AcuLaser C3900 Series User’s Guide O Output tray...........................................................................79 P Plain paper............................................................................60 Postcards...............................................................................65 Preventing media misfeeds..............................................115 Print quality.......................................................................136 Printable area.......................