
Service manual


REV.-A
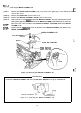
3.2.5.2 Removing the FRAME ASSEMBLY, REAR
[STEP
11
[STEP 2]
[STEP 31
[STEP 41
[STEp 51
[STEp 61
[STEp 71
[STEp 81
[STEp 91
Remove the PAPER GUIDE ASSEMBLY, top cover, front cover, paper eject cover and tractor unit.
(See Section 3.2.1.)
Remove the PANEL UNIT. (See Section 3.2.2.)
Remove the HOUSING ASSEMBLY, UPPER. (See Section 3.2.4.)
Remove the PRINTER MECHANISM. (See Section 3.2.5.)
Remove the PLATEN ASSEMBLY. (See Section 3.2.5.1.)
Remove the four CBS
(M3X8)
screvvs
securing the
LEFT
FRAME of the
pRINTER
MECHANISM~
and the nut and washer securing the LEVER, G, ADJUST. Remove the BUSHING, PARALLEL,
ADJUST. Remove the LEFT FRAME.
Remove the FFC cables from the RIGHT FRAME of the PRINTER MECHANISM, and then the two
CBS
(M3X8)
screws securing the RIGHT FRAME.
Remove the FRAME ASSEMBLY, REAR.
Push the clip on the back of the FRAME ASSEMBLY, REAR. Slide out the FRAME, REAR.
=
L EFT FRAME
.
Hexagon
Outside
Lock
W
BUS
<
CBS (M3X8)
PAPER GUIDE ASSEMBLY, REAR
~
I
/\\
Y>
Figure 3-9. Removing the FRAME ASSEMBLY, REAR
3-11