
Service manual


REV.-A
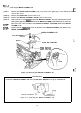
3.2.5.6 Removing the CARRIAGE GUIDE ASSEMBLY
[STEP
11
[STEP 21
[STEP 31
[STEP 41
[STEP 51
[STEP 61
[STEP 71
[STEP 81
[STEP 91
[STEp
101
Remove the PAPER GUIDE ASSEMBL’f, top cover, front cover, paper eject cover and tractor unit.
(See Section 3.2.1.)
Remove the PANEL UNIT. (See Section 3.2.2.)
Remove the PRINTHEAD. (See Section 3.2.3.)
Remove the HOUSING ASSEMBLY, UPPER. (See Section 3.2.4.)
Remove the PRINTER MECHANISM. (See Section 3.2.5.)
Remove the PLATEN ASSEMBLY.
(See
Section
3.2.5-1”)
Remove the
LEH
FRAME of the PRINTER MECHANISM. (See Section 3.2.5.2.)
Disengage the TIMING BELT from
the MOTOR ASSEMBLY, CR. (See Section 3.2.5.3.)
Release the TIMING BELT from the two clips at the
bottom of the CARRIAGE ASSEMBLY.
Move the
CARRIAGE ASSEMBLY to the MOTOR ASSEMBLY,
CR. Remove the CARRIAGE
ASSEMBLY from the rack.
HOLDER, RIBBON MASK
I
DE
Figure 3-15. Removing the CARRIAGE GUIDE ASSEMBLY
3-15