
Service manual
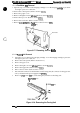


EPL-56@
/ActkmLa~
16(M
Sarvke Manual
A@atmeW
4.1 ADJUSTMENT
@
This section describes the adjustment procedure for the
EPL-5600
and
ActicxLaser
1600.
This
adjustment must be performed after every servicing operation, especially when any component or
part is
replaod
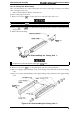
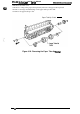
4.1.1 Print Position Adjustment
You can adjust the vertical print position on a sheet of paper by turning the image synchronizing
volume control on the engine
amtroller
board
(PWB-A).
After the engine
mntmller
board
(PWB-A)
is replaced, be sure to adjust the print position following the procedure below.
1. Set Language Setting to ENGLISH in Language Setting Mode,
2. Printa STATUS SHEET using
SelecType.
3. Check that the registration gap between the leading edge of paper and the printing of a
horizontal line is the correct value as follows.
S’I’ATUSSHEETpage
tbr
EPL-5600
(A4paper)
: 19.1
k
2.5
mm(O.75
t
O.10inch)
STATUS SHEET page for ActionLaser
NXXI(letterpaper)
: 143
+
25
mm(056f
O.10inch)
<-
.-:
.’”
.
‘i.:
If not, adjust the print position as described in the next few steps.
19.1
m
(0.75 inch)
w
/
14.3
Ilnl
(0.56 inch)
Leading
Ed!&
h
EPSON
status
Shset
Figure 4-1. Print Position Adjustment
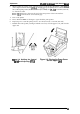
4. Turn the printer power off.
~
.
5.
@en
the
upper
unit,
open
the
paper cover, and remove the one
screw
samring
the
~td
panel.
Figure 4-2. Opening the Upper Unit, Paper Cover, and
Removing 1 Screw
Rev. A
4-1