
Service manual

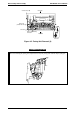


3.2.6 Transfer Unit Removal
1. Remove the outer covers. (Refer to Section 3.2.1.)
2. Remove the Fusing unit. (Refer to Section 3.2.2.)
3. Remove the C207 MAIN Board. (Refer to Section 3.2.4.)
4. Remove the rear panel. (Refer to Section 3.2.5.)
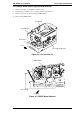
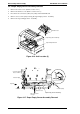
5. Remove 1 CCB screw (3X8) securing the transfer unit.
6. Remove the Transfer Unit by pushing aside the left frame in the direction indicated by the
arrow.
Don’t touch the surface of the Transfer Roller with your bare hands.
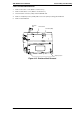
Assembly Note
When assembling the transfer Unit, ensure that the pins on the Transfer Unit fit into the holes in
the Drive Unit.
CAUTION
Transfer Unit
CCB Screw (3X8)
Left Frame
Refer to the figure below.
Rear Side
Figure 3-11. Transfer Unit Removal
Disassembly and Assembly EPL-N2000 Service Manual
3-14 Rev. A