
Service manual


DFX-5000+ Service Manual
Product Description
4.
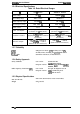
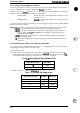
Use DIP switches 3-5 and 3-6 to set the paper type.
Table 1-11. Setting the Paper Type
Paper Type
Sw
3-5
Sw
34
Normal paper
OFF
OFF
Forms with a label
OFF
ON
Overlapping forms ON
OFF
Overlapping forms with a label
I
ON
[
ON
5.
Hold down both MICRO FEED buttons and turn on the printer.
6.
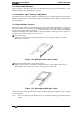
If you are using forms with a label, indicate the label’s position by following these steps:
(1) Open the printer cover.
(2) Align the pointer on the ribbon mask with one of the label’s comers.
– To feed the paper up or down, press the appropriate MICRO FEED button.
– To move the pointer right or left, move the
printhead
by hand.
(3) Press the TOP OF FORM button.
(4) Move the pointer to the comer of the label diagonally opposite the first comer.
(5) Press the TOP OF FORM button.
(6) Close the printer cover.
7. Use the printer beeps to confirm that the paper format and thickness information has been
saved properly. If the printer beeps once or twice, the information has been saved correctly
in
memory area
1
or
2. If the printer beeps 10 times, the information has not been saved; carefully
follow steps 1 through 7 in this section again.
1.4.9 Automatic Tear Off Function
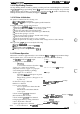
Use DIP switch 3-8 to enable or disable the automatic tear off function. When the tear off function is
enabled, the printer automatically feeds fanfold paper until its perforation reaches the tear off
position of the printer cover under these conditions:
Cl
The paper is advanced to the
TOFposition
after a print job.
Q
The printer receives an FFcode and then no other codes or characters for at least3 seconds. (The
printer has finished a print job.)
Ll
The pull tractor is not being used.
D
The paper memory function is not being used.
Then, if the printer receives more data, it automatically feeds the paper backward to the original
position and printing starts.
1.4.10 Paper Jam Detection
When a paper jam is detected, the printer beeps, stops feeding the paper, and enters pause mode.
The PAPER OUT indicator flashes. Remove the paper and load new paper properly. Then press the
PAUSE button to turn off pause mode so the printer is ready to print.
1.4.11 Automatic Interface Selection
When the printer does not receive any data
tbr
the set time over
the
currently selected interface, it checks
the parallel
interfam,
serial
interfam,
and optional
interfam,
and selects the
intert%ce
that receives data
fit.
The standby time can beset to 10 seconds or30 seconds using DIP switches 24,2-5, and
245.
Note:
The built-in serial interface and Type B simple serial interface card cannot be used at the
same time. The simple serial interface card takes precedence over the built-in serial
interface.
1.4.12 Thermal Protection
The
printhead
has a thermistor inside it, and the
printhead
cooling fan also has a thermistor. When
the pnnthead or cooling fan is too hot, the printer stops printing while it cools.
Rev. A
1-21