
Specifications


EPSON FX-880+/FX-1180+
10/01 EPSON FX-880+/FX-1180+
-
15
To turn Lock-out mode off, repeat steps 1 and 2. The printer
beeps once, indicating that the Lock-out mode has been turned
off.
Changing the Lock-out mode setting
You can select which printer functions you want to be locked
while Lock-out mode is on. Follow these steps:
1. Make sure paper is loaded and the printer is turned off.
2. Turn on the printer while holding down the
LF/FF
and
Pause
buttons. The printer enters the Lock-out setting
mode and prints the instructions. (You’ll need three sheets
of A4 or letter size single-sheet paper or three pages of
continuous paper that is at least 11 inches [279 mm] long
and 8.3 inches [210 mm] wide.)
3. Follow the instructions to change the settings as desired.
4. Turn off the printer.
See the instructions above to turn on Lock-out mode after you
change the Lock-out mode setting.
Emulating the Okidata Microline 320
Turbo
If you have the EPSON FX-880+, you can make it work like
the Okidata
®
Microline
®
320 Turbo by turning the printer on
in a different mode. In this mode, the printer emulates Okidata
functions, including the following. Default settings are bold.
* As measured by EPSON.
If you want to use your printer in Okidata mode, do not
install the Windows driver that came with your
FX-880+. If you have been using an Okidata driver, you
can continue to use it with your FX-880+ in Okidata
mode.
To enter Okidata mode, make sure the printer is turned off.
Then hold down the
Tear Off/Bin
and
Pause
buttons while
you turn on the printer. The printer beeps once. Now turn the
printer off, wait 5 seconds, and turn it back on (with just the
power switch) to begin using it in Okidata mode.
The printer remains in Okidata mode until you repeat the
above procedure. To return to FX-880+ mode, hold down the
Tear Off/Bin
and
Pause
buttons while you turn on the printer.
The printer beeps twice. Turn it off, wait 5 seconds, and then
turn it back on to begin using the printer in FX-880+ mode.
You can print the default settings for the printer when it
is in Okidata mode to check the current settings and
change them if necessary. See “Changing default
settings” on page 14.
Aligning Vertical Lines in Your
Printout
If you notice that the vertical lines in your printout are not
properly aligned, you can use the printer’s bidirectional
adjustment mode to correct this problem. During bidirectional
adjustment, the printer prints three sheets of alignment
patterns, labeled High Speed Draft, Draft, and NLQ (near
letter quality). You select the best alignment pattern from each
sheet.
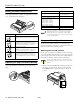
To print the instruction sheet and alignment patterns, you need
five single sheets or five pages of continuous paper of at least the
following sizes:
If you use single sheets, you need to load a new sheet of paper
each time the printer ejects a printed sheet from the paper
guide.
Follow these steps to perform the bidirectional adjustment:
1. Make sure paper is loaded, then turn off the printer.
2. While holding down the
Pause
button, turn on the printer.
The printer enters the bidirectional adjustment mode and
then prints instructions and the first set of alignment
patterns.
3. As described in the instructions, compare the alignment
patterns and select the pattern with the best alignment.
Then select the pattern with the best alignment for each of
the remaining sets of alignment patterns.
4. After you select the best pattern in the final set of alignment
patterns, save your selection by turning off the printer.
Feature
EPSON FX-880+ in
Okidata mode
Okidata ML320
Turbo
Software emulation IBM
®
PPDS, EPSON
ESC/P
®
, Oki ML 320T
IBM ProPrinter III,
EPSON ESC/P, Oki
ML 320T
Printable area
Top margin
Bottom margin
22 mm
24 mm
22 mm *
24 mm *
Line spacing (lines per
inch)
6 LPI, 8 LPI 6 LPI, 8 LPI
Paper out override Off, On Off, On
Paper type FX-880+ FX-1180+
Continuous paper (including
perforated border)
9.5 × 11 inches
(241 × 279 mm)
14.8 × 11 inches
(376 × 279 mm)
Single sheet A4 or letter size A3 landscape