Epson Stylus® C88+ Quick Guide
Contents Introduction . . . . . . . . . . . . . . . . . . . . . . . . . . . . . . . . . . . . . . . . . . . . 3 Loading Paper . . . . . . . . . . . . . . . . . . . . . . . . . . . . . . . . . . . . . . . . . . 4 Basic Printing . . . . . . . . . . . . . . . . . . . . . . . . . . . . . . . . . . . . . . . . . . . 6 Printing in Windows . . . . . . . . . . . . . . . . . . . . . . . . . . . . . . . . . . . . . . . . 6 Printing with Macintosh OS X . . . . . . . . . . . . . . . . . . . . . . . . . . . . . . . . .
Introduction The Epson Stylus® C88+ printer is the ideal desktop printer for business and home use. With its exceptional speed and print resolutions, it is practical for everyday tasks, yet capable of delivering superior photo printing. Your printer features Epson’s exclusive DURABrite® Ultra pigment inks. These quick-drying inks are resistant to water, fading, and smudging on plain and photo paper—so your prints stand the test of time.
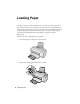
Loading Paper The type of paper you choose affects the way your printout looks, so be sure to select the correct paper for your job. If you are just printing a rough draft, plain paper is fine. For best results, however, you’ll want to use one of Epson’s special ink jet papers designed for your printer. For example, your photos will look great printed on Epson Premium Glossy Photo Paper. See page 13 for more information. Follow these steps to load paper in your printer: 1.
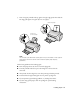
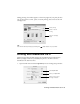
3. Insert the paper, printable side up, against the right edge guide. Then slide the left edge guide against the paper (but not too tightly). Letter-size paper 4 x 6-inch or 5 x 7-inch paper Note: You can load up to 100 sheets of plain paper and up to 20 sheets of most types of photo paper. (See the on-screen User’s Guide for specific paper capacity guidelines.) Follow these guidelines when loading paper: ■ Don’t load paper above the arrow on the left edge guide. ■ Load the printable side face-up.
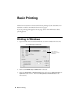
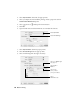
Basic Printing Follow the instructions in this section for basic printing of your documents. For Windows, see below. For Macintosh OS X, see page 9. If you are printing photographs, also see page 15 for more information about printing photos. Printing in Windows 1. Open the File menu and select Print. You see a Print window like this one: Select EPSON Stylus C88 Series Click here to open your printer software 2. Make sure EPSON Stylus C88 Series is selected. 3. Click the Properties or Preferences button.
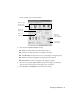
You see the basic print settings window: Select the type of document you’re printing Select your paper Type Select your paper Size Select your document or image orientation Click here for more options 4.
7. For more printing options, click the Advanced button. Then select the following settings as necessary.
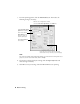
During printing, this window appears to show the progress of your print job. You can use the buttons to cancel, pause, or resume printing. You can also see the ink cartridge status. Cancel printing Pause or resume printing Check ink cartridge status Tip: You can also cancel printing by pressing the paper button on your printer. Printing with Macintosh OS X Follow the steps below for basic printing of your Macintosh OS X documents.
2. Select Stylus C88 in the Format for pop-up menu. 3. Select your Paper Size. For borderless printing, choose a paper size with the Sheet Feeder-Borderless option. 4. Select portrait or landscape for the orientation. 5. Click OK. 6. Open the File menu and select Print. You see a window like this one: Select Stylus C88 Select Print Settings 7. Select Stylus C88 in the Printer pop-up menu. 8. Select Print Settings from the pop-up menu. 9.
Depending on your settings, you can choose these other options from the pop-up menu: ■ Copies & Pages: Select the number of copies you want, or a page range. ■ Layout: Select page layout options. ■ Output Options: Save your print job as a PDF file. ■ Scheduler: Schedule your print job to print at a later time. ■ Paper Handling: Select page printing options, such as Reverse print order.
. To monitor the progress of your print job, click the appears in the dock on the bottom of your desktop. printer icon when it If you’re using OS X, click the Print Center icon instead, then double-click Stylus C88 in the Printer List window. You see a screen like this: Pause printing Resume printing Cancel printing Select the print job Tip: You can also cancel printing by pressing the paper button on your printer. 13. When you’re finished, close the printer window or Print Center.
Using Special Papers You can use the following special Epson papers in your Epson Stylus C88+. Paper name Size Part number Epson Ultra Premium Glossy Photo Paper Borderless 4 × 6 inches S041934 Letter (8.5 × 11 inches) S041935 Epson Premium Bright White Paper Letter (8.5 × 11 inches) S041586 Epson Premium Glossy Photo Paper Borderless 4 × 6 inches S041808 S041727 Borderless 5 × 7 inches S041464 Borderless 8 × 10 inches S041465 Letter (8.
Selecting the Correct Paper Type Be sure to select the correct Type or Media Type setting in your printer software: For this paper Select this setting Plain paper Epson Premium Bright White Paper Plain Paper/Bright White Paper Epson Ultra Premium Glossy Photo Paper Ultra Premium Glossy Photo Paper Epson Premium Glossy Photo Paper Premium Glossy Photo Paper Epson Premium Semigloss Photo Paper Premium Semigloss Photo Paper Epson Glossy Photo Paper Glossy Photo Paper Epson Matte Paper Heavyweight E
Printing Photos You can print beautiful snapshots and enlargements with or without white borders. With proper care, photographs from your Epson Stylus C88+ will last for many years. For best results, always use Epson papers. (See “Using Special Papers” on page 13 for more information.
You see a window like this one: Select Photo or Best Photo Click here for photos without white borders Click here for more settings; then see page 17 3. Select Photo or Best Photo as the Quality Option setting. 4. Select the paper Type for the paper you’re using. (See page 14.) 5. For pictures without white borders, click the Borderless checkbox. Read the message and click OK. 6. Select your paper Size setting. 7. Select Portrait or Landscape as the orientation setting. 8.
Customizing Your Photo Settings 1. On the Main tab, click the Advanced button in the bottom right corner of the window. If you see a warning note, click Continue. 2. Select the following advanced settings as necessary: Select a color management method (To choose No Color Adjustment, click ICM first) Click here to select Photo RPM (5760 × 1440) for the best print quality on certain paper types Adjust colors here Note: For the highest print quality, select Photo RPM.
4. Select the following page layout settings as necessary: Select image position options here Select image resizing options here Adjust borderless setting here (see step 6, below) Note: Some layout settings may not be available, depending on other settings you chose. 5. Select image position or resizing options as necessary. These affect only your printed image, and are not available for borderless printing. 6.
Printing Photos with Macintosh OS X 1. Start your photo program and open your photo file. 2. Open the File menu and select Page Setup. You see a window like this one: Select Stylus C88 Select your Paper Size 3. Select Stylus C88 in the Format for pop-up menu. 4. Select your Paper Size. For borderless photos, choose one of the following: ■ 4 x 6 (Sheet Feeder-Borderless) ■ 5 x 7 (Sheet Feeder-Borderless) ■ 8 x 10 (Sheet Feeder-Borderless) ■ Letter (Sheet Feeder-Borderless) 5.
8. Select Stylus C88 in the Printer menu and select Print Settings from the pop-up menu. You see a window like this one: Select Print Settings from the list Select Stylus C88 Click Advanced for more options 9. Select the correct Media Type option to match the paper you’re using. (See “Selecting the Correct Paper Type” on page 14 for more information.) 10. Select Quality (for higher quality) or Speed (for faster printing) using the slider. 11. Do one of the following: ■ Click Print.
Customizing Your Photo Settings 1. Click the Advanced button. 2. Select these advanced settings as necessary: For color management settings, select Color Management from the list Click here to select Photo RPM (5760 × 1440) for the best print quality on certain paper types Note: For the highest print quality, select Photo RPM. Note that printing will take longer in this mode.
4. Adjust the Expansion slider to choose Min, Max, or the in-between setting. Min is the least amount of image expansion; there may be a small white edge on the borders of the print. Max expands the image to ensure that there are no unprinted edges, but the edges of the image may not appear in the print. 5. Click Print.
Replacing Ink Cartridges When the red ink light flashes, one or more ink cartridges are low on ink. When the red ink light stays on, you need to replace the cartridge(s). When you print, you’ll also see a message on your screen telling you which cartridge is low or needs to be replaced. When a cartridge is more than six months old, you may need to replace it if printouts don’t look their best.
Ink Cartridge Precautions Warning: Keep ink cartridges out of the reach of children. If ink gets on your hands, wash them thoroughly with soap and water. If ink gets in your eyes, flush them immediately with water. Caution: Don’t remove the cartridge label, or ink will leak. Don’t remove the green IC chip from the cartridge. Installing a cartridge without an IC chip can damage the printer. Avoid touching the green IC chip, as this can damage the ink cartridge.
Removing and Installing Ink Cartridges Be sure you have a new ink cartridge before you begin. Once you start replacing a cartridge, you must complete all the steps in one session. Caution: Leave all ink cartridges installed until you have obtained a replacement, or the ink remaining in the print head nozzles may dry out. 1. Make sure the printer is turned on (the green but not flashing). power light should be on, 2. Open the printer cover. 3. Press and release the ink button.
4. Press the ink button again. ■ If more than one cartridge needs to be replaced, the next cartridge moves under the ink replacement mark. ■ If all the cartridges to be replaced have been identified, the print head moves right to the ink cartridge replacement position, shown below. 5. Open the cartridge cover.
6. Squeeze the back tab of the used cartridge and lift it out of the printer. Don’t take the cartridge apart or try to refill it. Warning: If ink gets on your hands, wash them thoroughly with soap and water. If ink gets into your eyes, flush them immediately with water. 7. Before you remove the new cartridge from its package, shake it four or five times. Then remove it from the package. Caution: Do not remove or tear the label on the cartridge; otherwise ink will leak.
8. Lower the cartridge into the holder and push it down until it clicks into place 9. If you need to replace other ink cartridges, repeat steps 6 through 8 before continuing. 10. Close the ink cartridge cover and make sure you hear it click into place. 11. Close the printer cover. 12. Press the ink button. The printer begins charging the ink delivery system. The green power light flashes and the printer makes noise. Charging takes about half a minute.
Solving Problems If you have a problem with your Epson Stylus C88+, check the printer’s lights (as described below) to diagnose what may be causing it. You can also see “Problems and Solutions” on page 30 for basic troubleshooting suggestions, or read your on-screen User’s Guide for more detailed help. If you cannot solve the problem, see “Where To Get Help” on page 32.
Lights Explanation Red paper and ink lights flash alternately Paper may be blocking movement of the print head. Turn off the printer, then open the cover and remove any jammed paper or other foreign objects. Turn the printer back on. If the lights are still on, contact Epson as described on page 32. Green power light is off; red paper and ink lights flash The printer may have an internal error. Turn off the printer, wait a few seconds, and turn it on again.
Macintosh OS X: Open the Applications folder and select Epson Printer Utility. Select Stylus C88 in the printer list, click OK, and select Head Cleaning. 3. Click Start or Next. Cleaning takes several seconds. The printer makes noise and the green power light flashes. Caution: Never turn off the printer while head cleaning is in progress. You may damage the printer. 4.
Your paper doesn’t feed correctly or jams in the printer. ■ If multiple pages feed at once, remove the paper from the sheet feeder, fan the edges to separate the sheets, then reload it. ■ If paper jams, press the paper button for several seconds to clear the jam. If that doesn’t work, open the cover and pull the paper out from the front, including small pieces that may have torn off. Reload the paper and press the paper button.
Speak to a Support Representative Before you call for support, please have the following information ready: ■ Product name (Epson Stylus C88+) ■ Product serial number (located on the back of the printer) ■ Proof of purchase (such as a store receipt) and date of purchase ■ Computer configuration and operating system version ■ Description of the problem Then call: ■ U.S.: (562) 276-7525, 6 AM to 8 PM, Pacific Time, Monday through Friday and 7 AM to 4 PM, Saturday.
Requirements and Notices Windows System Requirements ■ A Microsoft® Windows compatible PC with a Pentium®-equivalent processor (233 MHz or faster recommended) ■ Microsoft Windows 98SE, Windows Me, Windows 2000, or Windows XP ■ At least 256MB RAM (512MB recommended) ■ 200MB free hard disk space (300MB or more recommended) ■ SVGA with at least 256 color display ■ CD-ROM or DVD drive for installing the printer software ■ Parallel connection: a high-speed, bidirectional IEEE-1284 compliant parallel
Important Safety Instructions Before using your printer, read these safety instructions to make sure you use it safely and effectively: ■ Be sure to follow all warnings and instructions marked on the printer. ■ Use only the type of power source indicated on the printer’s label. ■ Connect all equipment to properly grounded power outlets. Avoid using outlets on the same circuit as photocopiers or air control systems that regularly switch on and off.
■ Unplug the printer and refer servicing to qualified service personnel under the following conditions: If the power cord or plug is damaged; if liquid has entered the printer; if the printer has been dropped or the case damaged; if the printer does not operate normally or exhibits a distinct change in performance. Adjust only those controls that are covered by the operating instructions. Ink Cartridge Safety Instructions ■ Keep ink cartridges out of the reach of children.
FCC Compliance Statement For United States Users This equipment has been tested and found to comply with the limits for a Class B digital device, pursuant to Part 15 of the FCC Rules. These limits are designed to provide reasonable protection against harmful interference in a residential installation. This equipment generates, uses, and can radiate radio frequency energy and, if not installed and used in accordance with the instructions, may cause harmful interference to radio or television reception.
Declaration of Conformity According to 47CFR, Part 2 and 15 for Class B Personal Computers and Peripherals; and/ or CPU Boards and Power Supplies used with Class B Personal Computers: We: Epson America, Inc. Located at: MS: 3-13 3840 Kilroy Airport Way Long Beach, CA 90806 Telephone: (562) 290-5254 Declare under sole responsibility that the product identified herein, complies with 47CFR Part 2 and 15 of the FCC rules as a Class B digital device.
Epson America, Inc. Limited Warranty What Is Covered: Epson America, Inc. ("Epson") warrants to the original retail purchaser that the Epson printer covered by this limited warranty statement, if purchased and operated only in the United States or Canada, will be free from defects in workmanship and materials for a period of one (1) year from the date of original purchase. For warranty service, you must provide proof of the date of original purchase.
fail to be properly maintained or fail to function properly as a result of misuse, abuse, improper installation, neglect, improper shipping, damage caused by disasters such as fire, flood, and lightning, improper electrical current, software problems, interaction with non-Epson products, or service other than by an Epson Authorized Servicer. If a claimed defect cannot be identified or reproduced, you will be held responsible for the costs incurred.
Copyright Notice All rights reserved. No part of this publication may be reproduced, stored in a retrieval system, or transmitted in any form or by any means, electronic, mechanical, photocopying, recording, or otherwise, without the prior written permission of Seiko Epson Corporation. The information contained herein is designed only for use with this Epson product. Epson is not responsible for any use of this information as applied to other equipment.
Requirements and Notices
CPD-21495R1 Printed in XXXXXX