EPSON ® ATA/IDE CD-ROM DRIVE USER’S MANUAL CMD-2260 6X CD-ROM Drive
FEDERAL COMMUNICATIONS COMMISSION (FCC) RADIO FREQUENCY INTERFERENCE STATEMENT Class B Computing Device Note: This equipment has been tested and found to comply with the limits for a class B digital device, pursuant to part 15 of the FCC Rules. These limits are designed to provide reasonable protection against harmful interference in a residential installation.
USER’S MANUAL FOR CMD-2260 6X ATA/IDE CD-ROM DRIVE UNIT TABLE OF CONTENTS Laser Safety Information 4 Handling Precautions 5 Drive Parts and Functions 6 Hardware Installation 8 Software Installation 10 Device Driver Installation 13 MSCDEX.
LASER SAFETY INFORMATION Class 1 LASER Product This equipment is certified to comply with DHHS Rule 21 CFR Chapter 1, Subchapter J in effect as of date of manufacture. Caution: Use of controls or adjustments or performance of procedures other than those specified herein may result in hazardous (1) radiation exposure. The drive is designed to be incorporated into a computer-based system or unit which has an enclosing cover. (2) It is not allowed to use the drive alone.
HANDLING PRECAUTIONS DISC HANDLING Hold the disc by the edges. Do not touch the surface of the disc, especially the bottom of the disc. To remove dust or finger prints, use a clean soft dry cloth. Do not use thinners or cleaners on the disc. Do not write with a hard tip pen on the surface. direct sunlight. Do not store the disc in a high temperature area or leave in a car under Do not bend or drop the disc.
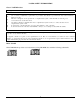
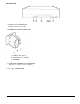
DRIVE PARTS AND FUNCTIONS FRONT PANEL 1. HEAD PHONE JACK Connects headphone, use 3.5mm stereo mini plug. 2. VOLUME Adjust audio output level. 3. BUSY INDICATOR Power on and drive ready/busy indicator. 4. DISC TRAY Accepts a CD-ROM disc. 5. REVERSE SELECT - Audio CD Function Only Manually steps backwards for track selection 6. PLAY/PAUSE 7. FORWARD SELECT - Audio CD Function Only Manually steps forwards for track selection 8. EJECT/LOAD BUTTON Load and unload the CD-ROM tray with a disc using this button.
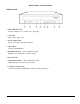
REAR PANEL 1. AUDIO OUT CONNECTOR Standard card connector pins 2. INTERFACE MODE SELECTOR A. CSEL (Cable Select) B. SLAVE (Factory Default) C. MASTER 3. 40 PIN IDE INTERFACE CONNECTOR Interface to connect to host computer 4.
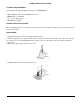
HARDWARE INSTALLATION SYSTEM REQUIREMENTS You need the following equipment to install your CD-ROM Drive: l l l l IDE compatible sound card or IDE interface card IBM PC/AT or compatible 3.5” or 5.25” floppy drive MS-DOS 6.0 or higher HARDWARE INSTALLATION Before installing the drive, be sure that you have turned off the computer, and the power cord is disconnected from the wall socket. PROCEDURE 1. Install the drive into a 5-l/4” bay using mounting screws. 2.
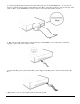
5. Connect the 40-pin drive interface and sound cable at the rear of the CD-ROM drive. To prevent an incorrect connection and possible system damage, place Pin 1 of the cable connector (red colored edge of the cable) to Pin 1 on the ATAPI drive connector. Do not force the cable and the connector. 6. The four pin audio cable must be connected from your CD-ROM to your sound card to enable the capability to play audio CD’s with your unit. 7.
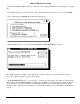
SOFTWARE INSTALLATION 1. Insert the installation disk into Drive A or Drive B. (Not required for Windows ‘95 installations - see page 20). 2. At the DOS prompt, type the drive letter where the disk is inserted, followed by a colon. Press ENTER 3. Type install and press ENTER. The following menu appears: 4. The next menu allows you to specify where the MS-DOS MSCDEX.EXE tile is located. The default selection is C:\DOS.
6. The defaults provided by the program are: Primary Primary/Secondary: Master/Slave: Slave Next Available Drive ** Assigned Drive Letter: 12 ** Memory Buffer Size On ** Verbose Mode: ** These settings are utilized by the MSCDEX.EXE program. Complete documentation is available in your MS-DOS manual. It is suggested that you accept the default settings unless you have sound card or adapter documentation which require different settings. 7.
8. Your computer MUST now be rebooted for all changes to become effective.
DEVICE DRIVER INSTALLATION The Device Driver, EPSON. SYS, is described below. DEVICE=[drive:\][path\]EPSON.SYS /D:device-name /M: /P: /I: /V For example: DEVICE=C:\EPCDROM/EPSON.SYS /D:EPSON00l /M:S /P: 1F0s /I:14 /V . [drive:\][path\] specifies the drive and the path name in use. . /D: Specifies the device name that will be used in conjunction with the MSCDEX.EXE tile, so that the MSCDEX.EXE tile can find and communicate with the Device Driver. . [/M:S] Specifies the data transfer mode.
MSCDEX.EXE INSTALLATION INSTRUCTIONS MSCDEX.EXE must be included in the AUTOEXEC.BAT tile. The MSCDEX.EXE will be invoked each time the system boots up. The syntax is as follows: C: \ \MSCDEX.EXE / D:/M: Example: C:DOS\MSCDEX.EXE /D:EPSON00l /M: 12 Path-filename The path where the MSCDEX.EXE tile is located. Device-name The same name that was used with the DEVICE DRIVER in the CONFIG.SYS tile. Buffer Size Specifies the number of sector buffers.
Additional Installation Instructions Installing CD Audio Player For Windows If “CD Audio” is not available in your Windows Accessories Group “Media Player”, you must complete the following steps to install it: 1) 2) 3) 4) 5) 6) Go to “Control Panel” and then to “Drivers”; If [MCI] CD Audio is not listed go to add; Chose [MCI] CD Audio and install the file; If [MCI] CD Audio was listed choose setup and your CD-ROM should be detected; Exit Windows and then restart Windows; Go to Media Player and choose CD A
PRODUCT FEATURES CMD-2240 CD-ROM DRIVE CMD-2260 CD-ROM DRIVE CD-ROM Mode 1, CD-DA, CD-I; CD-ROM XA Mode 2, Form 1 &2 12cm, 8cm CD-ROM Mode 1, CD-DA, CD-I; CD-ROM XA Mode 2, Form 1 &2 12cm, 8cm 750KB/sec 2.7MB/sec ATAPI Mode 0 5.2MB/sec ATAPI Mode 1 8.3MB/sec ATAPI Mode 2 11.1 MB/set ATAPI Mode 3 900KB/sec 2.7MB/sec ATAPI Mode 0 5.2MB/sec ATAPI Mode 1 8.3MB/sec ATAPI Mode 2 11.
Technical Support TROUBLESHOOTING Check the table below for common problems and solutions. PROBLEM l l l l CORRECTIVE ACTION When you play a CD there is no image on the screen. There are several probable causes for this problem. The disc might be an audio CD with no screen images. You could have inserted the disc upside down (with the label facing down instead of up). Also, the disc could be defective.
Technical Support Options The following Technical Support options are available if you have questions or concerns: Call Epson Technical Support at 800-922-8911 On CompuServe, GO EPSON or contact us directly at 76004,1432 Using Test Directory Contained On Installation Disk The test directory contained on your installation disk is for use as directed by technical support. These programs provide information that will enable you to receive a quick solution to many common technical support problems.