PRINTER USER'S GUIDE GUIDA OPERATIVA GUIDE D'UTILISATION BEDIENUNGSANLEITUNG GUIA OPERATIVA ®
alcohol, solvent GB I F D E To clean the machine, use a pneumatics air or soft cloth. First remove the mains plug from the wall socket. Do not use alcohol, solvents, or hard brushes. Do not let water or other liquids get inside the machine. Per pulire la macchina, utilizzare aria compressa o un panno morbido.. Prima di ogni operazione, scollegare il cavo di alimentazione elettrica dalla presa di rete. Non utilizzare alcol, solventi o spazzole dure..
GB The and , marks affixed to the product certifythat the product satisfies the basic quality requirements. S PRODUCT SERVICE Production monitored Safety tested I I requisiti qualitativi di questo prodotto sono attestati dall'apposizione della marcatura e sul prodotto. S PRODUCT SERVICE Production monitored Safety tested F Les qualités requises pour ce produit sont garanties par le label appliqué sur le produit même.
Blank Page
Table of contents Indice Table des matières Inhaltsverzeichnics Indice SETUP AUTOTEST Installation for drivers Windows 95/98 Windows ME Windows NT/2000 Appendix: ..
Blank Page
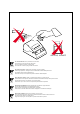
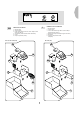
GB I UNPACKING THE PRINTER 1. External carton 2. Internal packing 3. Power supply cable (for Neo’s-S; Neo’s- USB) or Power supply (for Neo’s-P) 4. User manual (and/or CD-ROM, and/or data sheet ) 5. Printer 6. Paper roll (inside the printer) DISIMBALLO DELLA STAMPANTE 1. Bauletto esterno 2. Imballo interno 3. Cavo di alimentazione (per Neo’s-S; Neo’s-USB) o Alimentatore (per Neo’s-P) 4. Manuale utente (e/o CD-ROM, e/o foglio informativo) 5. Stampante 6.
Blank Page
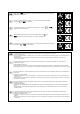
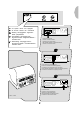
= off - spento - éteint - aus - apagado = lit - acceso - allumé - ein - encendido = flashing - lampeggiante - clignotant blinkt - parpadeante = slow flashing - lampeggio lento clignotement lent - langsames Blinken centelleo lento · · · · · = fast flashing - lampeggio veloce clignotement rapide - schnelles Blinken centelleo veloz · Neo’s - S 220V 2 Insert serial connector Inserire il connettore seriale Introduire le connecteur sériel Den seriellen Verbinder in die Buchse stecken Introducir el conectador
· · · · · 3 Switch printer on Accendere la stampante Brancher l'imprimante Den Drucker einschalten Conectar la impresora · · · · · ON ACCESO ALLUMÉ EINGESCHALTET CONECTADO · · · · · OFF SPENTO ÉTEINT AUSGESCHALTET APAGADO
= off - spento - éteint - aus - apagado = lit - acceso - allumé - ein - encendido = flashing - lampeggiante - clignotant blinkt - parpadeante = slow flashing - lampeggio lento clignotement lent - langsames Blinken centelleo lento = fast flashing - lampeggio veloce clignotement rapide - schnelles Blinken centelleo veloz parallela · Neo’s - S/P 24V 4 · · · · · Insert serial or parallel interface connector Inserire il connettore di interfaccia seriale o parallela Introduire le connecteur d'interface en sé
5 · · · · · Switch printer on Accendere la stampante Brancher l'imprimante Den Drucker einschalten Conectar la impresora · · · · · ON ACCESO ALLUMÉ EINGESCHALTET CONECTADO · · · · · OFF SPENTO ÉTEINT AUSGESCHALTET APAGADO
= off - spento - éteint - aus - apagado = lit - acceso - allumé - ein - encendido = flashing - lampeggiante - clignotant blinkt - parpadeante = slow flashing - lampeggio lento clignotement lent - langsames Blinken centelleo lento · · · · · = fast flashing - lampeggio veloce clignotement rapide - schnelles Blinken centelleo veloz · Neo’s - USB 220V 6 Insert USB connector Inserire il connettore USB Introduire le connecteur USB Den USB Verbinder in die Buchse stecken Introducir el conectador USB · · · ·
7 · · · · · Switch printer on Accendere la stampante Brancher l'imprimante Den Drucker einschalten Conectar la impresora · · · · · ON ACCESO ALLUMÉ EINGESCHALTET CONECTADO · · · · · OFF SPENTO ÉTEINT AUSGESCHALTET APAGADO
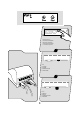
! ! ! ! ! Paper roll insertion Inserimento del rotolo carta Introduire le rouleau de papier Einsetzen der Papierrolle Introducir el rollo de papel ON 8
9
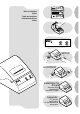
! ! ! ! ! Paper jam Inceppamento carta Bourrage papier Papierstau Atasco del papel GB I Lift the lever to allow the paper to move freely. If the paper comes out at the front in the print area, carefully tear off and remove the part of the paper which is jammed; alternatively, remove the paper from the print mechanism by pulling it upwards. Alzate la levetta, rimuovete la carta dal meccanismo di stampa tirandola verso l'alto.
Printer with cutter Stampante con taglierina ! ! ! ! ! Cutter jam Inceppamento taglierina Massicot bloqué Schneidblech verklemmt Guillotina atascada GB I F D E Carefully remove all scraps of paper from the cutter zone. If you have difficulty in doing so, use tweezers. DO NOT insert any kind of object inside the cutter. Rimuovete delicatamente ogni frammento di carta dalla zona della taglierina. In caso di difficolta’ utilizzare delicatamente delle pinzette.
GB Contact Customer Service. I Chiamate l'Assistenza tecnica. F Contacter le Service après-vente. D Den Kundendienst kontaktieren. E Llamar al Servicio de Asistencia Técnica. HOT LINE +0039-0521680163 Monday-Friday at 9-12 and 14-17 e-mail: support@custom.
Blank Page 13
GB Go into SETUP mode by pressing Key FEED and Key PRINT and turn power on at the same time. 2. The printer should print all list of the parameters: 1. - Printer emulation: ESC/POSTM *, CUSTOM DPT24, CUSTOM DPT42 or CBM iDP560RS. - Protocol(1): No Addressable* or Addressable - Baud Rate(1): 57600, 38400,19200 *,9600, 4800, 2400, 1200. - Data length(1): 7, 8 bits/chr *. - Parity(1): None*, even or odd. - Handshaking(1): XON/XOFF* or Hardware.
Blank Page 15
AUTOTEST Font test printout Stampa test caratteri Graphic test printout Stampa test grafico GB 1 Go into AUTOTEST mode by pressing Feed key and turn power on at the same time. 2 The printer should print the logo and all list of the fonts. I Modalità AUTOTEST: - tenere premuto il tasto FEED ed accendere contemporaneamente la stampante per ottenere la stampa della lista di tutti i fonts; - tenere premuto il tasto PRINT ed accendere contemporaneamente la stampante per ottenere la stampa del test grafico.
Blank Page 17
GB 1 Download the SW from the “www.custom.it” web site at the Support/Download/Drivers section. 2 Use the following procedure to install the printer driver software: a) WINDOWS 95/98/ME/NT/2000 ! From the START menu, press Enter and key-in the path where the SW was saved on your PC, then click OK. ! Follow the instructions that appear on the screen to extract the printer driver. ! Follow the instructions that appear on the screen to install the driver.
Blank Page 19
A1 TECHNICAL TECNICAL SPECIFICATION SPECIFICATION TECHNICAL SPECIFICATIONS Neo's-S Neo's-P Neo's-U Standard interfaces RS232 serial CENTRONICS USB Baud rate From 1200 to 57600 bps None None Resolution 204 DPI (8 dot/mm) Paper specifications Type of paper Recommended types of paper Thermal rolls Heat-sensitive side on outside of roll KF50 (58g/m 2 ± 5gm 2) KANZAN or Equivalent Paper thickness 0,063 ± 0,005 mm (KF50) Paper roll size 60 mm ± 0,5 mm External roll diameter max.
Mechanical specifications Neo's-S no Neo's-S Neo's-P no Neo's-P Neo's-U no Neo's-U cutter with cutter cutter with cutter cutter with cutter length mm 170 170 170 170 170 170 120 120 120 120 120 120 height mm 100 110 100 110 100 110 without paper roll gr. 645 806 580 740 645 806 with paper roll gr.
A2 ACCESSORIES AND SPARE PARTS A.2.1 Power supply for NEO’S 24V The following figure shows the power supply, that can be used to operate the printer. PPPW060-24V-DPT Power Supply Input specifications Input voltage 90 Vac to 264 Vac Input frequency 47 Hz to 63 Hz Output specifications Output voltage 24 V Output current 2.
A.2.2 PANEL SUPPORT ACCESSORIES PCDPMURO Kit Stirrup Assembly instructions 1) 2) 3) 4) Fit the pins in the printer by removing the front fastening screws from the body Makes two holes 6 mm distant between us 80 mm Secure the bracket using the two 6 mm screw anchors Fit the printer on the bracket. A.2.
Blank Page
Publication issued by: CUSTOM ENGINEERING S.p.A. Via Berettine 2 - 43010 Fontevivo (PARMA) - Italy All rights reserved Part Number : DOMM-NEOS Rev. 1.