
User`s guide

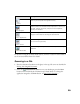


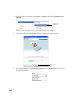


Table Of Contents
- Front Matter
- EPSON Stylus CX5400 User’s Guide
- EPSON Stylus CX5400 Parts
- Loading Paper
- Copying
- Printing With Windows
- Printing With Macintosh OS X
- Printing With Macintosh OS 8.6 to 9.x
- Selecting Your Paper Type
- Scanning
- Cleaning the Print Head
- Purchasing Ink Cartridges
- Replacing an Ink Cartridge
- Aligning the Print Head
- Cleaning the Stylus CX
- Transporting the Stylus CX
- Solving Problems
- Uninstalling Your Software
- Setting Up Network Printing
- Where To Get Help
- Specifications
- System Requirements
- Important Safety Instructions
- Legal Notices

39
For details on using all the Smart Panel features, click the ? button in Smart Panel or
see the on-screen Smart Panel User Guide.
Scanning to a File
1. Place the document face-down on the glass, in the top, left corner as described in
Placing Your Original Document
.
2. Select the EPSON Smart Panel icon on your desktop or press the Scan
button on the EPSON Stylus CX5400 to open Smart Panel. (To change the
application assigned to the Scan button, see One-Touch Scanning.)
Edit Text
Scans text documents and converts them into editable text
files on your computer with great accuracy.
Photo Projects
Scans a photo into ArcSoft
®
PhotoImpression
TM
where you
can edit, retouch, enhance, and print it with templates,
frames, and borders.
Scan to Application
Scans an image or document and lets you choose which
program it launches for handling the scanned file.
Scan to E-mail
Scans an image or document and attaches it to an e-mail so
you can send it right away.
EPSON Photo Site
Scans an image and uploads it to EPSON’s photo-sharing
web site.
Smart Panel Features Description