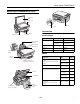
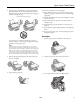
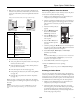
Epson Stylus CX6000 Series Epson Stylus CX6000 Series Parts Document cover Document table USB port AC inlet Accessories Memory card slots Output tray and extension Ink Cartridges Paper support extension Color Part number T code number Black 69 T069120 68 (High Capacity) T068120 (High Capacity) Cyan 69 T069220 Magenta 69 T069320 Yellow 69 T069420 Paper support Feeder guard Left edge guide Media Memory card cover USB external device connector (camera only) Size Epson Ultra Premium
Epson Stylus CX6000 Series Paper Part number Paper name Size Epson Photo Paper Glossy Epson Glossy Photo Paper 4 × 6 inches S041134 S041671 S041458 S041809 Letter (8.5 × 11 inches) S041141 S041649 S041271 S041272 Epson Premium Presentation Paper Matte Epson Matte Paper Heavyweight Letter (8.5 × 11 inches) S041257 Borderless 8 × 10 inches S041467 Epson Premium Presentation Paper Matte Double-Sided Epson Double-Sided Matte Paper Letter (8.
Epson Stylus CX6000 Series * Mechanical When printing with the borderless feature, print quality may decline in the expanded area. Before printing large jobs using the borderless setting, print a single sheet to confirm printout quality. Paper path Envelopes Sheet feeder, top entry Sheet feeder capacity About 100 sheets at 17 lb (64 g/m²) Dimensions Width: 18.2 inches (463 mm) Depth: 13.9 inches (354 mm) Height: 7.7 inches (196 mm) Weight 15.2 lb (6.
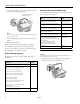
Epson Stylus CX6000 Series Memory Card Slots Compatible memory cards Voltage requirements * Loading Paper ™ CompactFlash Memory Stick™ Memory Stick PRO™ Memory Stick Duo™* Memory Stick PRO Duo™* MagicGate® Memory Stick MagicGate Memory Stick Duo* Microdrive™ SD™ (Secure Digital) SDHC miniSD™* miniSDHC* microSD* microSDHC* MultiMediaCard xD-Picture Card™ xD-Picture Card Type M xD-Picture Card Type H Single Sheets 1. Open the paper support and slide out the extensions. 2.
Epson Stylus CX6000 Series 4. Insert the paper, printable side up, against the right edge guide and beneath the tabs. (The printed side is whiter or brighter on some papers.) Always load paper short edge first, even for landscape printing. Follow these guidelines when loading paper: ❏ Don’t load paper above the arrow on the left edge guide. Make sure the paper is under the tabs on the left and right edge guides. ❏ Load the printable side face-up. It’s often brighter or whiter than the other side.
Epson Stylus CX6000 Series 4. Load up to 10 envelopes at a time, flap edge left, printable side up, against the right edge guide. Load the flap edge left, printable side up Selecting the Correct Media Type The table below lists the settings you should choose for your paper in the printer software: Note: For best results, press each envelope flat before loading, or load one envelope at a time. 5. Slide the left edge guide against the envelopes (but not too tightly). 6. Flip the feeder guard back.
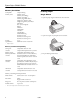
Epson Stylus CX6000 Series Positioning Multiple Photos 2. Close the document cover gently so that your original does not move. You can copy or scan two or more photos at the same time. Make sure each photo is larger than 1.2 × 1.6 inches (30 × 40 mm) and leave room between them. 0.2 inch (5 mm) Caution: Never open the document cover beyond where it stops and do not place heavy objects on top of the CX6000 Series. 1. Place your photos as shown here. Placing Large or Thick Documents 2.
Epson Stylus CX6000 Series 9. Press the x Start button to begin copying. The On light flashes and after a moment the CX6000 Series starts printing. Note: The copies may not be exactly the same size as the original. Making a Quick Copy If you need to stop copying, press the y Stop/ Clear Settings button. Do not pull out paper that is being printed; it will be ejected automatically to the output tray. If you want to make a copy quickly and do not need high quality, you can print a “draft” copy.
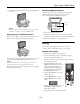
Epson Stylus CX6000 Series Selecting Photos from the Screen 3. Make sure the memory card access light is off and that no cards are in any of the slots. Then insert your card into the correct slot. The memory card access light flashes and then stays on. You can view the photos on your memory card on the photo viewer screen and select them for printing. 1. Make sure your CX6000 Series is not connected to your computer (or your computer is turned off).
Epson Stylus CX6000 Series 3. Insert the memory card if it is not already in the slot (see page 8). 2. Place the index sheet face-down on the glass, in the upper left corner, so that the top of the sheet is aligned against the left edge of the glass. 4. Press the C Memory Card button until Press Start to print an index sheet appears on the photo viewer screen. 5. Make sure Plain Paper and Letter are selected. 6. Press the x Start button.
Epson Stylus CX6000 Series 4. Press the C Memory Card button until the Print All/PictBridge light comes on. Follow the steps in one of the previous sections to print your photos. 5. If your memory card contains DPOF information, you see DPOF on the photo viewer screen. Printing From a Digital Camera If your camera is PictBridge™- or USB DIRECT-PRINT™compatible, you can print your JPEG photos by connecting your digital camera directly to your CX6000 Series.
Epson Stylus CX6000 Series ❏ Macintosh®: Double-click EPSON Scan in the Applications folder. Note: If your camera is not compatible with PictBridge or USB DIRECTPRINT, you see a screen like the one below. Epson cannot guarantee the compatibility of any camera. ❏ If you are scanning from an application, start your application. Then open the File menu, choose Import or Acquire, and select EPSON Stylus CX6000 Series.
Epson Stylus CX6000 Series ❏ Professional Mode: Scroll down to the Adjustments area and click the Color Restoration checkbox. Restoring Color in Faded Photos You can automatically transform an old, faded, or badly exposed color photo into one with true-to-life color and sharpness as you scan. Look for the Color Restoration option in EPSON Scan’s Full Auto, Home, and Professional Mode screens: 1. Place your original photo on the scanner as described on page 6. 7. Make any other necessary image adjustments.
Epson Stylus CX6000 Series Cleaning the Print Head Replacing Ink Cartridges If your printouts are unexpectedly light or faint, or you notice light or dark bands across your printout, you may need to clean the print head. This unclogs the nozzles so they can deliver ink properly. Run a nozzle check (as described above) to see if the print head needs cleaning.
Epson Stylus CX6000 Series Checking the Ink Supply Caution: Do not open ink cartridge packages until you are ready to install the ink. Cartridges are vacuum packed to maintain reliability. To check your ink supply, do the following: ❏ Windows: Double-click the printer icon on your taskbar (in the lower right corner of your screen). You see a window like the following: Install a new ink cartridge immediately after removing an expended one.
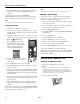
Epson Stylus CX6000 Series 5. Open the cartridge cover. Caution: If you do not remove the yellow tape before installing the ink cartridge, print quality may decline or you may not be able to print. Do not remove any other seals from the cartridges. Caution: Never attempt to open the cartridge cover when the print head is moving. Wait until the cartridges have moved to the replacement position. 9. Place the new ink cartridge into the cartridge holder and push it down until it clicks into place. 6.
Epson Stylus CX6000 Series 6. Click Print to print a black horizontal alignment sheet. After it’s printed, you see a window like this one: Aligning the Print Head If your printouts look grainy or blurry, or you see light or dark horizontal banding, you may need to align the print head. Note: Banding may also occur if your cartridges are low on ink or you need to clean the print head. 1. Turn on the CX6000 Series. 2. Load several sheets of paper. 3.
Epson Stylus CX6000 Series Transporting the CX6000 Series Related Documentation If you need to ship your CX6000 Series, you must prepare it for transportation by packing it in its original box or one of a similar size. CPD-21814 Epson Stylus CX6000 Series Start Here sheet CPD-21815 Epson Stylus CX6000 Series Quick Guide CPD-21816 Epson Stylus CX6000 Series CD-ROM (includes on-screen User’s Guide) 1. Turn off the CX6000 Series. 2. Remove any paper from the sheet feeder and close the paper support.