Quick Reference Copying, Printing, and Scanning Without a Computer Maintaining Your CX6400 Solving Problems CPD-16933R1 4049041-00
Copyright Notice All rights reserved. No part of this publication may be reproduced, stored in a retrieval system, or transmitted in any form or by any means, electronic, mechanical, photocopying, recording, or otherwise, without the prior written permission of SEIKO EPSON CORPORATION. The information contained herein is designed only for use with this EPSON product. EPSON is not responsible for any use of this information as applied to other equipment.
Contents Using Your Stylus CX6400 . . . . . . . . . . . . . . . . . . . . . . . . . . . . . . 5 EPSON Stylus CX6400 Parts . . . . . . . . . . . . . . . . . . . . . . . . . . . . . . . . . 6 Using the Security Lock . . . . . . . . . . . . . . . . . . . . . . . . . . . . . . . . . . . . . 7 Loading Paper . . . . . . . . . . . . . . . . . . . . . . . . . . . . . . . . . . . . . . . . 11 Loading Single Sheets . . . . . . . . . . . . . . . . . . . . . . . . . . . . . . . . . . . . . . 11 Using Special Papers .
Solving Problems . . . . . . . . . . . . . . . . . . . . . . . . . . . . . . . . . . . . . 40 Problems and Solutions . . . . . . . . . . . . . . . . . . . . . . . . . . . . . . . . . . . . . 40 Where To Get Help . . . . . . . . . . . . . . . . . . . . . . . . . . . . . . . . . . . . . . . 42 Notices. . . . . . . . . . . . . . . . . . . . . . . . . . . . . . . . . . . . . . . . . . . . . . . 44 Important Safety Instructions . . . . . . . . . . . . . . . . . . . . . . . . . . . . . . . . .
Using Your Stylus CX6400 You can use your EPSON Stylus® CX6400 to make color or black-and-white copies without turning on your computer. All you have to do is place your original on the glass and press a button. You can also print photos directly from your digital camera’s memory card—just insert the card, select the settings you want to use, and print. You don’t have to be connected to a computer.
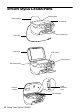
EPSON Stylus CX6400 Parts Feeder guard Paper support Scanner lid Output tray USB cable Scanner lid LCD screen Control panel Document table Scanner section Paper thickness lever Ink cartridges 6 Using Your Stylus CX6400
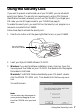
Using the Security Lock If you want to prevent unauthorized use of your CX6400, you can activate its security lock feature. The security lock requires you to enter a PIN (Personal Identification Number) whenever you turn on the CX6400. If you forget your PIN code, you can still regain access to your CX6400 (see page 9). To enable the security lock, you must first run the Security Lock program on a computer connected to the CX6400. Follow these steps to activate the security lock: 1.
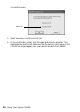
4. Make sure Security Lock On is selected and click OK. 5. At the confirmation screen, click OK again and close the program. You have now enabled the Security Lock menu on the CX6400. 6. On the control panel, press the Setup button, then use the Select buttons to display Security Lock on the LCD screen. Press Setup . . . Then press these buttons to display Security Lock on the screen 7. Press the Color button. 8. Press the button next to On (shown on the LCD screen). 9. Enter your 4-digit PIN code.
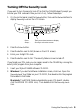
Turning Off the Security Lock If you want to turn the security lock off (so that the CX6400 doesn’t prompt you to enter your PIN code each time you turn it on), follow these steps: 1. On the control panel, press the Setup button, then use the Select buttons to display Security Lock on the LCD screen. Press Setup . . . Then press these buttons to display Security Lock on the screen 2. Press the Color button. 3. Press the button next to Off (shown on the LCD screen). 4. Enter your 4-digit PIN code. 5.
You see this screen: Select off 3. Select Security Lock Off and click OK. 4. At the confirmation screen, click OK again and close the program. This deactivates the security lock feature so that the Security Lock menu on the CX6400 no longer appears. You now have full access to the CX6400.
Loading Paper Follow the guidelines in this chapter to load paper in your CX6400 and select compatible EPSON papers for high-quality results. See these sections: ■ “Loading Single Sheets” (below) ■ “Using Special Papers” on page 12 Loading Single Sheets 1. Extend the output tray. 2. Insert your paper against the right edge of the sheet feeder. Note: Do not place the paper in front of the feeder guard. 3. Slide the left edge guide against the paper (but not too tightly).
Also be sure to: ■ Load the printable side face-up. It’s often whiter or brighter than the other side. ■ Load letterhead or preprinted paper top-edge first. ■ If the paper has a cut corner, position it in the upper-right corner as you load it in the sheet feeder. ■ Load paper short-edge first, even for landscape-oriented documents and photos. ■ Check the paper package for additional instructions on using special papers.
* Paper name* Size Part number EPSON Premium Semigloss Photo Paper Letter (8.5 x 11 inches) S041331 EPSON Ink Jet Transparencies Letter (8.5 x 11 inches) S041064 EPSON DURABrite® Ink Glossy Photo Paper Letter (8.5 x 11 inches) S041731 4 x 6 inches S041734 PremierArtTM Matte Scrapbook Paper for Epson Letter (8.5 x 11 inches) SCR1002 The availability of paper types varies by location.
Copying Follow the instructions in this chapter to use your CX6400 as a stand-alone copy machine. See these sections: ■ “Copying Without a Computer” (below) ■ “Changing Copy Settings” on page 15 Copying Without a Computer 1. Open the scanner lid. 2. Place your document face-down on the glass, in the upper-left corner. Move your document about 1/8 inch from the top and side edge so your entire document is scanned.
3. Close the scanner lid. 4. Press the Copy button to enter Copy Mode. 5. The default copy settings are displayed on the LCD screen. Change any necessary copy settings, as described in “Changing Copy Settings” (below). 6. Press the Color Copy button (to make color copies) or B&W Copy button (to make black-and-white copies). Your document is scanned and then printed.
Number of Copies Use the number keypad to select the number of copies you want to print (up to 99). If you’re using the 2-up or 4-up Copy mode setting (see “Copy Layout” on page 18), you can’t select more than one copy. Paper Type Paper type If you have loaded special paper, use this button to select one of the paper type settings listed below: If you have loaded this kind of paper... Select this setting...
Paper Size Use this button to select the size of paper you’ve loaded. Choose one of these sizes: A4, LTR (letter), 4 × 6, 5 × 7, or 8 × 10. Paper size Note: If printing 4 × 6 photos, do not use paper with with micro perforated edges. Instead, select one of the papers listed on pages 12 and 13. Reduce or Enlarge Reduce/enlarge Use this button to reduce or enlarge the size of your copied image.
Copy Layout If you want to make copies with a special layout (for example, borderless copies or several copies on one sheet), use the Copy Layout menu. To select a special layout: 1. Press the Menu button. 2. Press the green button next to the LCD screen until you see Copy Layout displayed, then press OK. 3. Continue pressing the green button until you see the desired layout setting, then press OK.
Copy Layout Results Poster Prints the original image on separate sheets (4, 9, or 16) that you can paste together to make a large poster 2-up Copies two originals onto one sheet 4-up Copies four originals onto one sheet * If print quality declines at the bottom of the page, use the Standard layout setting. Copy Density To make your copies lighter or darker, use the Copy Density menu: 1. Press the Menu button. 2.
Using Memory Cards This chapter tells you what kinds of memory cards to use with your CX6400, and how to insert them. See these sections: ■ “Compatible Memory Cards” (below) ■ “Inserting a Card” on page 21 ■ “Using Your CX6400 as a Card Reader” on page 22 See also “Printing from a Card” on page 25 and “Scanning to a Card” on page 32.
Inserting a Card 1. Make sure the CX6400 is turned on. 2. If you will be printing from or scanning to the card, make sure your CX6400 is not connected to your computer (or your computer is turned off ). If you want to copy images between the card and your computer, leave the computer connected. Any images stored on the card will be automatically copied to your computer once you insert the card (see page 22). 3. Open the memory card cover. 4.
After the CX6400 reads the card, if it finds any images saved in a compatible format (see note below), you see the following screen: Found Images... Total XXX OK 5. Press the button next to OK (shown on the screen). To remove the card, pull it straight out of its slot. On a Macintosh, drag the card icon on your desktop to the Trash icon before removing the card. Caution: Do not remove the card or turn off the CX6400 while the memory card light is flashing, or you may lose data on the card.
3. Once the card is inserted, it appears as a removable drive icon on your computer. Copy images to or from the card, as needed. Note: If you copy images to the card, the number of images shown on the LCD screen does not automatically change. You must remove and reinsert the card to make the CX6400 recognize the new images. Using EPSON CardMonitor You can use EPSON CardMonitor to copy images automatically to your computer whenever you insert a card.
Macintosh 1. Open the Applications folder on your hard drive, then double-click ImageCapture. You see this screen: 2. From the Image Capture menu, select Preferences. You see this screen: Select Other 3. From the Camera Preferences drop-down list, select Other. A new Applications folder opens. 4. Open the EPSON CardMonitor folder, then click the EPSON CardMonitor icon. 5. Click the Open button. 6. Close the Image Capture utility. 7. CardMonitor will now open automatically when you insert a card.
Printing from a Card The Stylus CX6400 lets you print photos directly from your digital camera’s memory card—you don’t even have to connect the CX6400 to a computer. If your memory card contains photos taken with a camera that supports DPOF (Digital Print Order Format), you can pre-select the photos you want to print while the card is still in the camera.
4. Load several sheets of plain, letter-size paper. (If there are more than 36 images on the card, you will need multiple sheets to print the index.) 5. Press the Color button to print the index. After the index form prints, Scan Index appears on the LCD screen. Leave your memory card in the printer and see the instructions below for printing your photos.
4. Make sure Scan Index appears on the control panel, then press OK. (If it doesn’t appear, press the Card Print button, press the green button next to the LCD screen until you see Scan Index, then press OK.) 5. Place the index form face-down on the scanner, so that the top of the form is aligned against the left edge of the glass (see page 31). 6. Press the Color button. The form is scanned and your photos are automatically printed. Selecting Photos from the Control Panel 1.
Printing with DPOF Follow these steps if you’ve already selected the photos you want to print using your camera’s DPOF feature. 1. Insert a memory card containing DPOF image files (see “Inserting a Card” on page 21). 2. Load the type of paper you want to print on. 3. Press the Card Print button to enter Card Print mode. 4. Using the number keypad, enter the number of copies of each photo you want to print (up to 99), then press OK.
Choosing Print Settings Before printing your selected photos, you may need to adjust some of these settings. Paper Type Paper type If you have loaded special paper, use this button to select one of the paper type settings listed below: If you have loaded this kind of paper... Select this setting...
Layout Use this button to select one of these layout settings: Layout Setting Results B-Free Prints without margins (BorderFree) so that the image covers the whole page. 1-up 2-up 4-up 8-up 20-up 80-up Prints one or more photos per page. For example, 8-up prints up to 8 photos per page. (The actual number may be less, depending on the number of photos or the number of copies you’ve selected. For example, if you select 5 copies for an 8-up layout, only 5 photos will print on the page.
Scanning to a Card Follow the instructions in this chapter to scan your photos and other documents directly to a memory card. See these sections: ■ “Placing Your Original Document” (below) ■ “Scanning to a Card” on page 32 Placing Your Original Document 1. Open the scanner lid. 2. Place your document face-down on the glass, in the upper left corner. Move your document about 1/8 inch from the top and side edge so your entire document is scanned. Move the document about 1/8 inch in from the edges 3.
Scanning to a Card Follow these steps to scan an image to a memory card and save it in JPEG format: 1. Make sure your CX6400 is not connected to your computer (or your computer is turned off ), then insert a memory card (see page 21). Note: If the card is not properly formatted, you see a message on the LCD screen. Press the button indicated on the screen to format the card. Any data stored on the card will be erased. 2. Press the Scan button to enter Scan Mode. 3.
8. Make sure your original document is placed in the scanner, then press the Color button to start scanning. Your image is saved to the “epscan” folder on the memory card. Caution: Never open the scanner section while scanning or copying, or you could damage the CX6400. 9. Wait until scanning finishes and the memory card light goes off, then remove the card.
Maintaining Your CX6400 If you notice a decline in print quality, follow the instructions in this chapter to check and clean the print head. You’ll also find instructions on checking ink levels and replacing the ink cartridges. See these sections: ■ “Cleaning the Print Head” (below) ■ “Replacing Ink Cartridges” on page 36 Cleaning the Print Head If your printouts are unexpectedly light or faint, or you notice light or dark bands across your printout, you may need to clean the print head.
4. After the nozzle check finishes printing, make sure each line is complete, without any gaps or missing dots: If any dots are missing, as shown below, clean the print head as described in the next section. Running the Head Cleaning Utility If you need to clean the print head, follow these steps: 1. Press the Setup button to enter Setup Mode. 2. Press the green button next to the LCD screen until you see Head Cleaning displayed, then press the Color button.
Replacing Ink Cartridges To check ink levels, follow these steps: 1. Press the Setup button to enter Setup Mode. 2. Press the green button next to the LCD screen until Ink Levels is displayed, then press the Color button. You see the amount of ink available in each cartridge: C (Cyan), M (Magenta), Y (Yellow), K (Black). Note: To view all the ink levels, wait for them to scroll across the screen. Ink levels C:50% M:50% Y:50% 3. When done, press the OK button.
Follow these steps to replace a cartridge: Caution: Leave the empty cartridge installed until you have obtained a replacement, or the ink remaining in the print head nozzles may dry out. To ensure good results, use genuine EPSON ink cartridges and do not refill them. Other products may cause damage to your CX6400 not covered by EPSON’s warranty. 1. If an ink cartridge is empty: Look at the LCD screen to see which cartridge is empty, then press the Color button.
4. Identify the cartridge you need to replace. Press in the tab at the back of the cartridge, then lift it straight out. Dispose of it carefully. Warning: If ink gets on your hands, wash them thoroughly with soap and water. If ink gets in your eyes, flush them thoroughly with water. Keep cartridges out of the reach of children. 5. Before unwrapping the new cartridge, shake it gently four or five times. Then remove it from its wrapper. 6. Insert the new cartridge into the holder.
7. Close the ink cartridge cover, then lower the scanner section. The CX6400 begins charging the ink delivery system and “Charging . . .” appears on the LCD screen. Wait for charging to finish before using your CX6400.
Solving Problems If you have a problem with your Stylus CX6400, check the messages on the LCD screen, run a nozzle check (see page 34), or see “Problems and Solutions” below. For problems with scanning or printing from your computer, double-click the CX6400 Reference Guide icon on your computer desktop. If none of these solutions solves your problem, see “Where To Get Help” on page 42. Problems and Solutions Check the solutions below if you’re having trouble using your CX6400 in stand-alone mode.
Paper Feeding Problems ■ If paper doesn’t feed, remove it from the sheet feeder. Fan the paper, load it against the right side, behind the feeder guard, and slide the left edge guide against the paper (but not too tightly). ■ If paper jams, follow these steps: 1. Press the On button to turn off the CX6400. 2. Lift up the scanner section and remove any paper that’s inside, including any small pieces that may have torn off. Caution: Clear paper jams by pulling the paper out towards the front of the CX6400.
Where To Get Help If you need help with your EPSON Stylus CX6400 or EPSON Scan software, see “EPSON Support” below. If you need help with any other software that came with your CX6400, see “Other Software Technical Support” on page 43. EPSON Support EPSON provides technical assistance 24 hours a day through the electronic support services and automated telephone services listed in the following table: Service Access World Wide Web From the Internet, you can reach EPSON Support at http://support.epson.
Before you call, please have the following information ready: ■ Product name (EPSON Stylus CX6400) ■ Product serial number (located on the back of the unit) ■ Proof of purchase (such as a store receipt) and date of purchase ■ Computer configuration ■ Description of the problem You can purchase ink cartridges, paper, manuals, and accessories from the EPSON Store at (800) 873-7766 or visit www.epsonstore.com (U.S. sales only). In Canada, please call (800) 463-7766 for dealer referral.
Notices Important Safety Instructions Before using your EPSON Stylus CX6400, read and follow these safety instructions: ■ Be sure to follow all warnings and instructions marked on the Stylus CX6400. ■ Use only the type of power source indicated on the Stylus CX6400 label. ■ Connect all equipment to properly grounded power outlets. Avoid using outlets on the same circuit as air control systems or other high-load devices that regularly switch on and off.
■ Do not block or cover openings in the Stylus CX6400 case or insert objects through the slots. ■ Except as specifically explained in your documentation, do not attempt to service the Stylus CX6400 yourself.
■ Do not touch the green IC chip on the side of the cartridge. This may affect normal operation and printing. ■ If you remove an ink cartridge for later use, protect the ink supply area from dirt and dust and store it in the same environment as the Stylus CX6400. Note that there is a valve in the ink supply port, making covers or plugs unnecessary, but care is needed to prevent the ink from staining items that the cartridge touches. Do not touch the ink cartridge ink supply port or surrounding area.
to Epson or its authorized service center, where the printer will be fixed and sent back to you. You are responsible for packing the printer and for all costs to and from the Epson authorized service center. When warranty service involves the exchange of the printer or a part, the item replaced becomes Epson property. The replacement printer or part may be new or refurbished to the Epson standard of quality, and, at Epson’s option, may be another model of like kind and quality.
damages, so the above limitations and exclusions may not apply to you. This warranty gives you specific legal rights and you may have other rights which vary from jurisdiction to jurisdiction. Epson America, Inc. ■ P. O. Box 93012 ■ Long Beach, CA 90809-3012 FCC Compliance Statement For United States Users This equipment has been tested and found to comply with the limits for a Class B digital device, pursuant to Part 15 of the FCC Rules.
Declaration of Conformity According to 47CFR, Part 2 and 15 for: Class B Personal Computers and Peripherals; and/or CPU Boards and Power Supplies used with Class B Personal Computers: We: Located at: EPSON AMERICA, INC. MS 3-13 3840 Kilroy Airport Way Long Beach, CA 90806 Telephone: (562) 290-5254 Declare under sole responsibility that the product identified herein, complies with 47CFR Part 2 and 15 of the FCC rules as a Class B digital device.
Printed in XXXXXX XX.