Epson Stylus ® CX7000F Series Basics Guide
Copyright Notice All rights reserved. No part of this publication may be reproduced, stored in a retrieval system, or transmitted in any form or by any means, electronic, mechanical, photocopying, recording, or otherwise, without the prior written permission of Seiko Epson Corporation. The information contained herein is designed only for use with this Epson product. Epson is not responsible for any use of this information as applied to other equipment.
Contents Loading Paper . . . . . . . . . . . . . . . . . . . . . . . . . . . . . . . . . . . . . . . . . 6 Copying a Photo or Document . . . . . . . . . . . . . . . . . . . . . . . . . . 8 Placing the Original on the Glass . . . . . . . . . . . . . . . . . . . . . . . . . . . . . . . 8 Copying . . . . . . . . . . . . . . . . . . . . . . . . . . . . . . . . . . . . . . . . . . . . . . . . 9 Printing From a Memory Card . . . . . . . . . . . . . . . . . . . . . . . . . . Compatible Cards and Image Formats . .
Checking the Ink Status . . . . . . . . . . . . . . . . . . . . . . . . . . . . . . . . . . . . 46 Replacing Ink Cartridges . . . . . . . . . . . . . . . . . . . . . . . . . . . . . . . . . . . . 47 Solving Problems . . . . . . . . . . . . . . . . . . . . . . . . . . . . . . . . . . . . . 52 Error Messages . . . . . . . . . . . . . . . . . . . . . . . . . . . . . . . . . . . . . . . . . . . 52 Problems and Solutions . . . . . . . . . . . . . . . . . . . . . . . . . . . . . . . . . . . . .
Introduction After you have set up your Epson Stylus® CX7000F Series all-in-one as described on the Start Here sheet, turn here to: ■ Load paper ■ Make a quick copy of a photo or document ■ Print photos stored on a memory card ■ Print photos directly from your camera ■ Print a basic document or photo from your computer ■ Fax a photo or document ■ Scan a photo or document, including restoring a color photo as you scan ■ Perform routine maintenance ■ Solve simple problems This book tells you
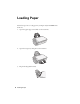
Loading Paper Follow the steps here to load paper in your Epson Stylus CX7000F Series all-in-one. 1. Open the paper support and slide out the extensions. 2. Open the output tray and pull out the extension. 3. Flip the feeder guard forward.
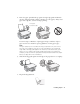
4. Insert the paper, printable side up, against the right edge guide and beneath the tabs. (The printed side is whiter or brighter on some papers.) Always load paper short edge first, even for landscape printing. Place paper beneath the tabs You can load up to 100 sheets of plain paper and up to 20 sheets of photo paper (see the User’s Guide for capacity guidelines on other paper types).
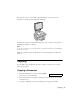
Copying a Photo or Document Follow the instructions in this section to: ■ Position your photo or document correctly on the glass (see below) ■ Make copies of a photo or document (see page 9) Placing the Original on the Glass 1. Open the document cover and place your original face-down on the glass, in the upper left corner. 2. Close the cover gently so you don’t move the original.
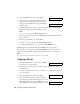
If you need to copy or scan a thick or large document, you can remove the document cover. Just open it and pull it straight up. If you need to press the document flat while you copy or scan it, do not press too hard and be careful not to move it. Note: Do not use excessive force on the document cover and do not twist it. You may damage the document cover. When you are done, replace the document cover by inserting the tabs back into the slots. Copying You can make copies using letter-size (8.
4. Press the Copy button. You see this display: 5. If you want your copies automatically reduced or enlarged to fit the loaded paper size (Fit to Page mode), press the Copy button again. The display changes to this: Copies:1 100% Copies:1 FitPage 6. To make multiple copies (up to 99), press the number keys on the numeric keypad. The display shows the number you select. Note: To exit Copy mode, press the y Cancel/Back button. 7. Press the paper type button to select Plain Paper.
6. To make multiple copies (up to 99), press the number keys on the numeric keypad. The display shows the number you select. Note: To exit Copy mode, press the y Cancel/Back button. 7. Press the paper type button to select Photo Paper. 8. Press the paper size button to select Letter, 4"× 6", or 5"× 7". 9. To make a color copy, press the x Start Color/OK button. To make a black and white copy, press the x Start B&W button. Printing appears on the display and the CX7000F Series starts copying.
Printing From a Memory Card The Epson Stylus CX7000F Series all-in-one lets you print color photos directly from your digital camera’s memory card; just insert it into a memory card slot on the CX7000F Series and you’re ready to print. If your digital camera supports DPOF™ (Digital Print Order Format), you can pre-select the photos you want to print while the card is still in the camera. Then, when you insert the card in the CX7000F Series, it knows which photos to print and how many copies of each.
Compatible Cards and Image Formats You can use the following types of cards with your CX7000F Series: Right slot Slot Type of card Right slot CompactFlash® Microdrive™ Left slot SD™ SDHC™ miniSD™* miniSDHC* microSD* microSDHC* MultiMediaCard™ Memory Stick™ Memory Stick Duo™* Memory Stick PRO™ Memory Stick PRO Duo™* MagicGate™ Memory Stick MagicGate Memory Stick Duo™* SmartMedia™ xD-Picture Card™ xD-Picture Card Type H xD-Picture Card Type M Memory card access light Left slot The CX7000F Series supp
Inserting the Card 1. Make sure the CX7000F Series is turned on. 2. Open the memory card door. 3. Make sure the memory card access light is off and that no cards are in any of the slots. Then insert your card into the correct slot (see page 13 for details). The memory card access light flashes and then stays on. Left slot Insert just one card at a time Right slot Memory card access light 4.
Printing an Index Sheet to Select Photos You can print an index sheet (which is like a photographer’s contact or proof sheet) to see small “thumbnail” images of all the pictures on your card. Then you can mark the pictures on the index sheet that you want to print, scan the sheet, and let the CX7000F Series automatically print the selected photos. Printing the Index Sheet 1. Make sure your CX7000F Series is not connected to your computer (or your computer is turned off ). 2.
7. Press the x Start Color/OK button again. The CX7000F Series starts printing the index sheet(s). This may take a few minutes. For multiple index sheets, the pages containing the most recent images are printed first. If you want to cancel printing more sheets, press the y Cancel/Back button. Now follow the instructions below to select which photos to print. Selecting Photos on the Index Sheet 1.
2. Place the index sheet face-down on the glass, in the upper left corner, so that the top of the sheet is aligned against the left edge of the glass. 3. Close the document cover. Note: Don’t remove the memory card while you’re printing from an index sheet. 4. Load up to 100 sheets of plain paper or up to 20 sheets of photo paper at a time. (See page 7 for details.) You can load more paper later as necessary to print all your selected photos.
Printing All Photos or DPOF Photos Follow the steps below to print one copy of each photo on the card or to print only those photos that were pre-selected with your camera’s DPOF (Digital Print Order Format) feature. 1. Load up to 100 sheets of plain paper or up to 20 sheets of photo paper at a time. (See page 7 for details.) You can load more paper later as necessary to print all your photos. 2. Insert the memory card. See page 14 for details. 3.
Printing From a Digital Camera If your camera is PictBridge- or USB DIRECT-PRINT™-compatible, you can print your JPEG photos by connecting your digital camera directly to your Epson Stylus CX7000F Series all-in-one. Your photos must be sized from 80 × 80 pixels to 9200 × 9200 pixels. 1. Make sure your CX7000F Series is turned on, but not printing. 2. Remove any memory cards from the slots. 3. Load the type of paper you want to use (see page 6). Load enough sheets for the number of photos you’ll be printing.
Printing From Your Computer This section describes the basic steps for printing a photo or document stored on your Windows or Macintosh computer. Note: For detailed instructions on printing, see the on-screen User’s Guide. Before you start, make sure you’ve installed your printer software and connected the Epson Stylus CX7000F Series all-in-one to your computer as described on the Start Here sheet.
3. Open the File menu and select Print. You see a window like this one: Select EPSON Stylus CX7000F Series 4. Make sure EPSON Stylus CX7000F Series is selected, then click the Preferences or Properties button. (If you see a Setup, Printer, or Options button, click it. Then click Preferences or Properties on the next screen.) 5.
Make sure you choose the correct paper Type setting for the paper you are using (see page 28 for details). Note: For more information about print settings, click the ? or Help button. 6. For more printing options, click the Advanced button.
8. Click OK to save your settings, then click OK or Print to start printing. This window appears and shows the progress of your print job. w Check ink cartridge status Pause or resume printing Cancel printing Printing With a Macintosh 1. Load paper (see page 6). 2. Open the photo or document in a printing program. 3. Select Page Setup from the File menu.
5. Select Print from the File menu. You see a window like this one: Select Stylus CX7000F Select Print Settings 6. Choose Print Settings from the pop-up menu and select the following settings as necessary: Select your Media Type (see page 26) Select Color or Black ink Select higher quality or faster printing Select Automatic mode Note: In certain programs, you may need to select Advanced before you can select Print Settings. For more information about printer settings, click the ? button. 7.
■ Paper Handling: Select page printing options, such as Reverse print order. ■ ColorSync or Color Management: Select ColorSync® or adjust the color controls, change the gamma setting, or turn off color adjustments in the printer software. ■ Cover Page (OS X 10.4.x only): Add a cover page before or after the document. ■ Expansion: Reduce or enlarge the image size for borderless printing. ■ Summary: View a list of all your selections. 8. Click the Advanced button to change additional settings.
You see a screen like this: Pause printing Resume printing Cancel printing Select the print job 11. When you’re finished, close the printer window or Print Center. Using Special Papers Epson offers a wide array of high quality papers, making it easy to maximize the impact of your photos, presentations, and creative projects. Paper category Description Photo Papers For lab quality photos—from everyday snapshots to professional portraits. Available in glossy, semi-gloss, and luster finishes.
Paper name Size Part number Epson Ultra Premium Photo Paper Glossy Epson Ultra Premium Glossy Photo Paper Borderless 4 × 6 inches S041934 Letter (8.5 × 11 inches) S041935 Epson Premium Photo Paper Glossy Epson Premium Glossy Photo Paper Borderless 4 × 6 inches S041808 S041727 Borderless 5 × 7 inches S041464 Borderless 8 × 10 inches S041465 Letter (8.5 × 11 inches) S041286 S041667 Epson Premium Photo Paper Semi-gloss Epson Premium Semigloss Photo Paper Letter (8.
Paper name Size Part number PremierArt Matte Scrapbook Photo Paper for Epson Letter (8.5 × 11 inches) SCR1002 Select the correct Type (see page 21) or Media Type (see page 24) setting for your paper in your printer software. For this paper . . . Select this Type or Media Type setting . . .
Faxing a Photo or Document Your Epson Stylus CX7000F Series all-in-one lets you send faxes by entering fax numbers or selecting entries from a speed dial list. You can customize the fax header information, and select various report printing and send/receive settings. You can also set up your CX7000F Series to automatically receive faxes or select to receive them only when you’ve confirmed that you’re receiving a fax.
You also need to set up your CX7000F Series to receive faxes manually. See page 39 for details. Setting Up Your Fax Features Before sending or receiving faxes, you may want to create a fax header, select your fax preferences, and set up a speed dial list of frequently used fax numbers. Creating Header Information 1. Press the Fax button once to enter Fax mode. The Fax button lights up and you see this display: Enter Fax Number 2. Press the Setup button. You see this display: 1.Select Speed D 3.
8. Press the u or d button, or press the 2 key on the numeric keypad, to display this option: 9. Press the x Start Color/OK button. You see this display (to indicate the two-digit month, day, and year): 2.Date/Time MM:DD:YY 10. Press the keys on the numeric keypad to enter the date. You can enter the numbers 0 to 9. 11. Press the x Start Color/OK button. You see this display (to indicate the hour and minute): HH:MM AM 12. Press the keys on the numeric keypad to enter the time in a 12-hour format.
Selecting Send/Receive Settings Your CX7000F Series is set up to send and receive faxes using the default settings below. For more information about these and other fax settings, see the User’s Guide. Setting and Options Description Paper Size Letter (8.5 × 11; default) Legal (8.5 × 14) A4 (8.3 × 11.7) Indicates the size of the paper loaded in the CX7000F Series for printing received faxes.
To change the fax settings listed above, follow these steps: 1. Press the Fax button once to enter Fax mode. The Fax button lights up and you see this display: Enter Fax Number 2. Press the Setup button. You see this display: 1.Select Speed D 3. If you need to change the Paper Size, Automatic Reduction, or Last Transmission Report settings, press the u or d button, or press the 4 key on the numeric keypad, to display this option: 4. Press the x Start Color/OK button. You see this display: 4.
10. To change the Dial Mode setting, press x Start Color/OK and go to step 11. To change another Communication setting, press the u or d button, or press the 2, 3, 4, or 5 key on the numeric keypad, to display one of these options: ■ 2.DRD ■ 3.ECM ■ 4.V.34 ■ 5.Rings to Answer Then press the x Start Color/OK button. 11. Press the u or d button until the setting option you want is displayed, then press the x Start Color/OK button to select it. 12. Repeat steps 10 and 11 to change any other settings.
7. Press the keys on the numeric keypad to enter the fax number of the first speed dial entry. You can enter the numbers 0 to 9, and the characters * and #, up to 64 digits total. Press the x Start Color/OK button. Note: If you need to change a character to the left, press the l button to delete the character and re-enter it. Press the r button if you need to move the cursor to the right. 8. The screen displays Name. Press the x Start Color/OK button. 9.
4. You see Telephone Number on the display. Press the x Start Color/OK button. 5. Press the r button to move to the digits you want to edit. Press the 0 to 9 number keys to enter new numbers or press the l button to delete digits to the left. When you’re finished, press the x Start Color/OK button. 6. The name for the selected entry is displayed. Edit the name the same way as in step 5. When you’re finished, press the x Start Color/OK button to return to the 2.Edit Entry display. 7.
Sending a Fax Before you fax, place your original photo or document on the document table glass as described on page 8. Then send your fax by manually entering a fax number, redialing the previous fax number, or selecting an entry from your speed dial list. Manually Entering or Redialing a Fax Number 1. Press the Fax button once to enter Fax mode. The Fax button lights up and you see this display: Enter Fax Number 2. Press the keys on the numeric keypad to enter the fax number.
If you need to fax another page, press the 1 key (for Yes). Open the document cover, remove your first original, place your next original, and close the document cover. Then press the x Start Color/OK button to fax the next page. Repeat this step to fax all the necessary pages. Note: If you’re sending a color fax, or a large document that fills up the memory area, the CX7000F Series scans and faxes one page at a time. It then asks if you want to send another page.
If you need to fax another page, press the 1 key (for Yes). Open the document cover, remove your first original, place your next original, and close the document cover. Then press the x Start Color/OK button to fax the next page. Repeat this step to fax all the necessary pages. Note: If you’re sending a color fax, or a large document that fills up the memory area, the CX7000F Series scans and faxes one page at a time. It then asks if you want to send another page.
Receiving Faxes When the CX7000F Series receives a fax with Auto Answer mode turned on, the message Printing appears on the display. When the CX7000F Series receives a fax in manual answer mode, the connected phone begins ringing. Once you answer the phone to confirm that the call is a fax, press the x Start B&W or x Start Color/OK button to receive the fax. The message Printing appears on the display. After the CX7000F Series receives all the pages, it begins printing the fax.
Scanning a Photo or Document You can use your Epson Stylus CX7000F Series all-in-one to scan a photo or document and save it on your computer or other device. You can even automatically restore faded color photographs as you scan (see page 43 for details). The Epson Scan software provides three scanning modes for progressive levels of control over your scanned image: ■ Full Auto Mode scans quickly and easily using automatic settings.
Note: If you need to scan a thick document, you can remove the document cover (see page 9). 2. Close the cover gently so you don’t move the original. 3. Do one of the following to start Epson Scan: ■ Windows: Double-click the EPSON Scan icon on your desktop. ■ Macintosh: Double-click EPSON Scan in the Applications folder. ■ If you are scanning from an application, start your application. Then open the File menu, choose Import or Acquire, and select Epson Stylus CX7000F Series.
Restoring Color in Faded Photos You can automatically transform an old, faded, or badly exposed color photo into one with true-to-life color and sharpness as you scan. Look for the Color Restoration option in Epson Scan’s Full Auto, Home, and Professional Mode windows: Full Auto Mode Click the Customize button, click the Color Restoration button, click OK, and click Scan. Home Mode Click the Color Restoration button, preview your image, and click Scan.
Maintaining Your CX7000F Series If you notice a decline in print quality, follow the instructions in this chapter for: ■ “Checking the Print Head Nozzles” (see below) ■ “Cleaning the Print Head” on page 45 ■ “Checking the Ink Status” on page 46 ■ “Replacing Ink Cartridges” on page 47 Checking the Print Head Nozzles If your printouts are faint or have gaps in them, some of the nozzles in the print head may be clogged or ink may be running low in one or more of the ink cartridges.
5. Press the x Start Color/OK button. The CX7000F Series prints a test pattern like this: Print head nozzles are clean: Print head needs to be cleaned: 6. Press the y Cancel/Back button to return to the screen displaying the date. If the pattern does not look good, try cleaning the print head as described below. Cleaning the Print Head If your printouts are unexpectedly light or faint, or you notice light or dark bands across your printout, you may need to clean the print head.
6. If there are still gaps or lines, or the test patterns are faint, run another cleaning cycle and check the nozzles again. Note: If you don’t see any improvement after cleaning the print head four times, turn off the CX7000F Series and wait at least six hours. This lets any dried ink soften. Then try cleaning the print head again. If quality still does not improve, one of the ink cartridges may be old or damaged and needs to be replaced (see page 47).
Replacing Ink Cartridges If you see a message like this on the display, one or more cartridges are low on ink: C:Ink low M:50% When you see a message like this on the display, you need to replace one or more cartridges: Replace Cyan ink You cannot print when a cartridge is empty. Note: You’ll also see a low ink or cartridge replacement message on your computer screen when you print from your computer. If a cartridge is more than six months old, print quality may decline.
Removing and Installing Ink Cartridges Note: Leave the expended cartridge installed until you have obtained a replacement or the ink remaining in the print head nozzles may dry out. Make sure you have a new ink cartridge before you begin. Once you start replacing a cartridge, you must complete all the steps in one session. Do not open ink cartridge packages until you are ready to install the ink. Cartridges are vacuum packed to maintain reliability.
6. Open the cartridge cover. 7. Squeeze the tab at the back of the cartridge and lift it straight out. Dispose of it carefully. Do not take the used cartridge apart or try to refill it. Warning: If ink gets on your hands, wash them thoroughly with soap and water. If ink gets into your eyes, flush them immediately with water. 8. Before you open the new ink cartridge package, shake it four or five times. Then remove it from the package. Caution: Do not touch the green chip on the front of the cartridge.
9. Remove the yellow tape from the bottom of the ink cartridge. Caution: If you do not remove the yellow tape before installing the ink cartridge, print quality may decline or you may not be able to print. Do not remove any other seals from the cartridges. 10. Place the new ink cartridge into the cartridge holder and push it down until it clicks into place. 11. Replace any other cartridges that need to be replaced. 12. Close the ink cartridge cover and press it until it clicks into place.
13. Close the scanner. 14. Press the x Start Color/OK button. The CX7000F Series begins charging ink and Charging appears on the display. Start Color OK Charging takes about one minute. When it’s finished, 5.Replace Cartridge appears on the display. Caution: Never turn off the CX7000F Series while Charging appears on the display or you’ll waste ink. Note: If you see an ink cartridge error message on the display, the ink cartridge may not be installed correctly.
Solving Problems If you have a problem with your Epson Stylus CX7000F Series all-in-one, check the display on the control panel to diagnose the cause. You can also check “Problems and Solutions” on page 54 for basic troubleshooting suggestions, or double-click the User’s Guide icon on your computer desktop for more detailed help.
Display message Cause and solution [Cyan, Magenta, Yellow, Black] Ink cartridge error -> Cartridge replacement is necessary. Press the OK button to begin. An ink cartridge that is not supported by the CX7000F Series is installed. See page 47 for replacement instructions. No memory card A memory card is inserted that is not supported by the CX7000F Series. Remove the incompatible memory card. See page 13 for details. No photos on memory card The inserted memory card does not contain any valid images.
Display message Cause and solution Paper thickness lever is set for printing sheets of paper. The paper thickness lever is set to the m L position. If you are printing on paper sheets, press x Start Color/OK or x Start B&W to continue. If you’re printing on envelopes, set the lever to the ^ H position. Service required. See your documentation for details. A CX7000F Series part needs to be replaced. Contact your local authorized servicer or contact Epson for a referral. See page 57 for details.
Faxing Problems ■ If you have problems sending a fax, make sure the phone cable is connected correctly and verify that the phone line works by connecting a phone to it. Also make sure that your recipient’s fax machine is turned on and working. ■ If you have problems receiving a fax, make sure paper is loaded, the phone cable is connected correctly, and the phone line works. To automatically receive faxes, make sure you see a Y on the screen displaying the date. (See page 39 for details.
Print Quality Problems If you have any problems with the copy or print quality, try these solutions: ■ Make sure the document is placed flat against the document table glass and the CX7000F Series is not tilted or placed on an uneven surface. ■ Load the paper printable side up (usually the whiter, brighter, or glossy side). ■ Make sure your paper isn’t damp or curled. ■ Use a support sheet with special paper or load your paper one sheet at a time.
Where To Get Help Epson Technical Support Epson provides these technical support services: Internet Support Visit Epson’s support website, epson.com/support, for solutions to common problems. You can download drivers and documentation, get FAQs and troubleshooting advice, or e-mail Epson with your questions.
Other Software Technical Support Software Telephone/Fax Online and E-mail ArcSoft PhotoImpression (510) 440-9901 8:30 AM - 5:30 PM, Pacific Time, Monday - Friday www.arcsoft.com support@arcsoft.com Fax: (510) 440-1270 ABBYY® FineReader® Sprint Plus 58 Solving Problems (510) 226-6717 abbyyusa.com/support support@abbyyusa.
Notices Important Safety Instructions Before using your Epson Stylus CX7000F Series all-in-one, read and follow these safety instructions: ■ Be sure to follow all warnings and instructions marked on the CX7000F Series. ■ Use only the type of power source indicated on the CX7000F Series label. ■ Use only the power cord that comes with the CX7000F Series. Use of another cord may cause fires or shock. Do not use the cord with any other equipment.
■ Unplug the CX7000F Series and refer servicing to qualified service personnel under the following conditions: if the power cord or plug is damaged; if liquid has entered the product; if the product has been dropped or the case damaged; if the product does not operate normally or exhibits a distinct change in performance. Adjust only those controls that are covered by the operating instructions.
Declaration of Conformity According to 47CFR, Part 2 and 15 for: Class B Personal Computers and Peripherals; and/or CPU Boards and Power Supplies used with Class B Personal Computers: We: Located at: Epson America, Inc. MS 3-13 3840 Kilroy Airport Way Long Beach, CA 90806 Telephone: (562) 290-5254 Declare under sole responsibility that the product identified herein, complies with 47CFR Part 2 and 15 of the FCC rules as a Class B digital device.
for this product is part of the product identifier that has the format US: BKMOT00BC321A. The digits represented by 00 are the REN without a decimal point (e.g., 00 is a REN of 0.0). For earlier products, the REN is separately shown on the label. This equipment may not be used on coin service provided by the telephone company. Connection to party lines is subject to state tariffs. Should this equipment cause harm to the telephone network, the telephone company may discontinue your service temporarily.
If your home has specially wired alarm equipment connected to the telephone line, ensure the installation of this equipment Model C321A does not disable your alarm equipment. If you have questions about what will disable alarm equipment, consult your telephone company or a qualified installer. This equipment has been tested and found to comply with the limits for a Class B digital device, pursuant to Part 15 of the FCC Rules.
L’indice d’équivalence de la sonnerie (IES) sert à indiquer le nombre maximal de terminaux qui peuvent être raccordés à une interface téléphonique. La terminaison d’une interface peut consister en une combinaison quelconque de dispositifs, à la seule condition que la somme d’indices d’équivalence de la sonnerie de tous les dispositifs n’excède pas 5. This Class B digital apparatus complies with Canadian ICES-003. Cet appareil numérique de la classe B est conforme à la norme NMB-003 du Canada.
not considered normal use; damage, maintenance or service from such use will not be covered under this warranty. This warranty is not transferable. This warranty does not cover any color change or fading of prints or reimbursement of materials or services required for reprinting. This warranty does not cover damage to the Epson product caused by parts or supplies not manufactured, distributed or certified by Epson.
Notices
Index A D ABBYY FineReader Sprint Plus, 58 Accessories, 57 Aligning print head, 56 Answer mode, fax, 39 to 40 Answering machine, connecting, 29 ArcSoft PhotoImpression, 41, 58 Date setting, 30 to 31 Declaration of Conformity, 61 Digital camera, printing from, 19 Display messages, 52 to 54 DPOF printing, 18 Draft mode, copying in, 11 Drivers, updating, 20 DSL, 55 B Borderless copies, 10 printing, Macintosh, 23 printing, Windows, 20 to 21 C Camera, printing from, 19 Cleaning document table glass, 56 prin
H N Head cleaning, 45 to 46 Header, creating fax, 30 to 31 Help, 57 to 58 Nozzle check, 44 to 45 I Paper feeding problems, 55 jams, 52 loading, 6 special types, 26 to 28 type settings, 28 Paper size copying, selecting, 10 to 11 fax, selecting, 31 to 33 Macintosh, selecting, 23 Windows, selecting, 21 Paper thickness lever, 53, 54, 56 Photo papers, 26 to 28 PictBridge camera, printing from, 19 Print head aligning, 56 checking nozzles, 44 to 45 cleaning, 45 to 46 Printing from camera, 19 from computer, 20
R T Receiving fax, 39 to 40 Technical support, 57 to 58 Telephone connecting, 29 safety instructions, 60 Thickness lever, 53, 54, 56 Time setting, 30 to 31 Troubleshooting, 52 to 58 S Safety instructions, 59 to 60 Scanning photos or documents, 41 to 43 problems, 56 restoring color, 43 Sending fax, 37 to 39 Service, 57 to 58 Speed dial dialing from list, 38 to 39 printing list, 36 setting up list, 34 to 36 Supplies, 57 Support, 57 to 58 U Updating drivers, 20 USB DIRECT-PRINT camera, printing from, 19
Index
CPD-22473R1 Printed in XXXXXX XX.