
User manual


2-10
Using EPSON Photo!3
L
Proof Sign-off:
E. Omori _______
M. Fujimori _______
K. Pipa _______
EPSON Photo!3
Rev. C3
A5 size CHAP2.FM
9/8/99 Pass 0
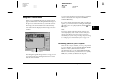
1. Click the thumbnails of the images you want to
erase, or click the
Select All
button to erase all the
photos in the memory card.
2. Click the
Erase Photos
button. A dialog box
appears asking you to confirm that you want to
erase these photos.
3. Click
Yes
. The images you selected are erased.
If any of the photos have an attached audio
recording file, a dialog box appears asking you
whether you want to erase both the photos and
audio files, or just the audio files. Click
Erase
Photo and Audio
to erase the photo and audio
files. Click
Audio Only
to erase the audio files
only.
If any of the photos are locked, a dialog box
appears asking you whether you want to leave the
photos in your camera or erase them. Click
Yes
to
leave the photos in your camera, or click
No
to
erase them.
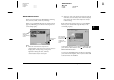
Getting photo information
You can see an enlarged view of any thumbnail in the
selection window by clicking the
Photo Info
button.
The image of the selected thumbnail is shown in
double-size, along with following information.
The following information is always displayed.
❏
Date and time the photo was taken
❏
Image size
❏
Camera model
❏
Camera ID
❏
Directory and file number
The following information is displayed when you use
these features.
❏
Digital zoom
×
2.0
❏
Image Quality (HyPict, Super-fine, Fine, or
Standard)
❏
Flash state
❏
Macro state
❏
Locked state