
User's Guide Digitial Camera


Working with Your Pictures
4-9
A
4
3
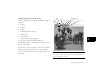
Click the Remove Red-Eye button. You see a window like the one
below:
4
Drag the slider until the eyes look normal in the After sample.
5
Click OK to save your changes to the picture.
Cutting, Copying, Pasting, and Flipping
You can choose Cut, Copy, or Paste from the Edit menu to take a
selected part of one picture and add it to another picture. You can also
“reverse” your picture or turn it into a mirror image.
❙
Choose Cut from the Edit menu to remove a selected area. A white
“hole” appears where you made the cut. EasyPhoto places the cut-
out area on the Clipboard.
❙
Choose Copy from the Edit menu to place a copy of the selected
area (or the entire picture if there is no selection) on the Clipboard.
The original picture is not affected.
❙
Choose Paste from the Edit menu to paste an image from the
Clipboard into another picture.
❙
From the Edit menu, choose Flip Horizontal to flip your picture
from left to right or Flip Vertical to flip it from top to bottom.
Saving and Printing Your Pictures
When you’re finished working with your picture in the Photo Workshop,
you should save it. Then you can place it in one of your documents or
just print it out.
❙
Choose Save from the File menu to save your picture.
❙
Choose Print from the File menu to print your picture. You can also
use a gallery’s menu to print out all the thumbnails.
Drag to fix
red-eye