Operating Instructions Digital Video Recorder Models: DLR3-16N/160CDV, DLR3-16N/410CDV, DLR3-16N/660CDV
Safety instructions EMC class ► This video recorder (DVR) is a class A device in accordance with EN 55022. ► This device may cause interference to other equipment in domestic use. In such cases the persons operating the DVR are required to provide appropriate countermeasures, for which they themselves bear the cost. Importance of these Operating Instructions ► Please read the safety instructions and the other information contained in the Operating Instructions before connecting up and operating the DVR.
Table of contents Overview 7 Package contents 7 Basic functions 7 Features 7 Requirements for operation 7 Control options 7 Connections on the rear 8 Front panel controls 9 Key to controls 10 Function buttons 10 PTZ camera functions 10 Playback functions 10 Menu structure 11 Getting started 13 Checklist for DVR operation 13 Switching on the DVR 14 Accessing the Setup menu 14 Switching off the DVR 14 Administration 15 Saving your system setup 15 Loading your system se
Table of contents Devices – Camera 35 Devices – Audio 36 Devices – Alarm-Out 37 Devices – Display 38 Devices – Remote Control 39 Record – Record 40 Record – Schedule 41 Record – Pre-Event 42 Event – Alarm-In 43 Event – Motion Detection 45 Event – Video Loss 47 Event – Text-In 49 Event – System Event 52 Event – Event Status 54 Specifications DLR3-16N/XX 55 Accessories 57 Supported PTZ cameras 58 Index 59 Notes on disposal 62 DLR3-16N/XX
Overview Package contents ● ● ● ● ● ● Digital video recorder (DVR) Mains power cord Operating instructions RAS (Remote Administration System) software on CD Operating instructions for RAS software on paper and CD Mounting kit for cabinet installation Basic functions ● ● ● ● Record video images using multiple cameras Even-based recording start Video playback Search for specific video sequences Features ● ● ● ● ● ● ● ● ● ● ● MPEG-4 compression / duplex mode 8 or 16 loop-through inputs / VGA, FBAS outputs
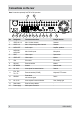
Connections on the rear Note: Connections optionally for NTSC or PAL operation.
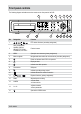
Front panel controls The following diagram and table set out the controls on the front panel of the DVR: 1 1 2 2 3 SPOT SEQUENCE DISPLAY GROUP 4 5 6 7 11 10 9 8 CAMEO 4 MENU PTZ 5 6 7 8 ZOOM 15 No.
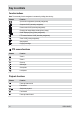
Key to controls Function buttons Note: The secondary function assignment is accessed by holding down the key.
Menu structure The following diagram shows the menu structure: Display Camera PIP 2x2 3x3 4x4 Previous Group Next Group Edit Group Sequence Freeze Zoom... PTZ... Spot Monitor... DLR3-16N/XX 1. CAM1 2. CAM2 3. CAM3 Camera Spot Monitor... Exit Group Edit Speed Auto Pan Tour Pattern Device Menu Light Pump Wiper Power Aux. Move to Origin Spot Monitor...
Menu structure, continued The following diagram shows the menu structure: Setup menu... Search System Information Date/Time Storage User Shutdown... Log out user1... Network Network Notification Devices Camera Audio Alarm-Out Display Remote Control Record Record Schedule Pre-Event Event Alarm-In Motion Detection Video Loss Text-In System Event Event Status Go to the First Go to the Last Go to the Date/Time... Calendar Search... Event Log Search... Text-In Search…. Motion Search... Clip-Copy...
Getting started Checklist for DVR operation Step Action 1 Connect peripheral devices as per planned setup. 2 Specify menu language. Setup Menu... > System > Information 3 Adjust date and time. Setup Menu... > System > Date/Time 4 Set up user. Setup Menu... > System > User 5 Set up network and desired notification channels (optional). Setup Menu... > Network > ... 6 Register peripherals with DVR. Setup Menu... > Devices > ... 7 Set up event types and associated responses. Setup Menu...
Getting started, continued Switching on the DVR Requirement: ● The start-up preparations are complete. Step Action 1 Plug in DVR mains plug. 2 Switch on monitor. Result: System starts up automatically and is ready to use. Accessing the Setup menu Requirement: ● The DVR is switched on. ● You have set up a custom user name and password or you are using the following default access data (only when first accessing the Setup menu): User name: admin Password: (blank) Step 1 2 Action Open Setup Menu...
Administration Saving your system setup You can save your DVR’s setup data, including its network configuration. Requirement: ● USB memory stick Step Action 1 Insert a USB memory stick into one of the USB ports. 2 Export your setup. 3 Specify a file name. 4 Export your setup. Menu path Setup menu... > System > Information > Setup Export... Export Loading your system setup You can load your stored DVR system setup with or without its network configuration.
Administration, continued Downloading software updates You can download software updates for your DVR from a USB memory stick. Requirement: ● USB memory stick with latest software release Step Action 1 Insert a USB memory stick into one of the USB ports. 2 Start update. 3 Install new release. Menu path Setup Menu... > System > Information > Upgrade... Hiding from specific users You can hide video images and camera data according to the preset user rights.
Administration, continued Determining the memory requirement of a recording The amount of memory recorded video sequences will take up depends on the following factors: ● Picture quality ● number of images per second ● duration The memory requirement for 1 camera is calculated by this formula: Memory requirement = picture size x duration of recording x images per second Calculation example: CIF resolution (PAL): Picture quality Picture size Duration of recording Low 2.4 kB Standard 4.
Searching for recordings Find first stored recording Search Go to the First… Find last stored recording Search Go to the Last… Find recording by date and time Search Go to the Date/Time... Calendar search For each camera the calendar search indicates: ● the days from which there are recordings ● the time ranges of recordings on those days Search Calendar Search...
Using calendar search Performing a calendar search Step 1 Action Menu path Open calendar search. Result: Calendar and time line are displayed. 2 Select day and time 3 Confirm input. Search Term Search > Calendar Search... Go Calendar Search...
Using event log search Performing an event log search Step 1 2 3 4 Action Menu path Open event log search. Result: The result of the last search is displayed. Define criteria. Search > Event Log Search... Option... Confirm input. Result: List of search results is displayed. Search Select desired entry from list. Search Term Event Log Search... Symbol Option...
Using text-in search Performing a text-in search Step 1 2 3 4 Action Open text-in search. Result: The result of the last search is displayed. Define text inputs. Confirm input. Result: List of search results is displayed. Menu path Search > Text-In Search... Option... Search Select desired entry from list.
Using text-in search, continued Search Term Text-In Search… Symbol Option... Meaning From First Start date To Last End date Channels Text input devices on which to search for events Type of text input: Any Text-In Product Generic Text Epson No. Numbers of text elements to search for Linking operator for different query conditions: - (blank) AND OR Name Text field by which the search should be made Comp.
Using motion search Performing a motion search Step Action Menu path 1 Display desired camera in single frame. Display > Camera > ... 2 Open motion search. Search > Motion Search... 3 Enter settings for motion search. Option... 4 5 Confirm input. Search Result: List of search results is generated. Select desired entry from list. Search Term Motion Search... Symbol Option...
Copying recordings Copying recordings to CD or USB memory stick Step 1 2 3 Action Menu path Find desired recordings. Note: Make a note of the data of the recordings you want to copy. Search > ... Define settings. Search > Clip-Copy... Start copying. Result: The recordings are copied. Search Term Start Clip-Copy...
Menu descriptions – Setup menu The Setup menu has the following sub-menus: System menu On the “System” menu ● the basic settings are made ● users are administered ● the system is shut down. Network menu On the “Network” menu the network settings are made. Network access provides access to all the functions of the DVR via ● RAS (Remote Administration System), independent of Internet Explorer The DVR can be configured so that alarms trigger a notification by e-mail or notify an RAS.
Setup menu System – Information On the “Information” menu ● basic information is entered and displayed ● software updates are installed ● recorded data are deleted as required Setup Menu... Term System Symbol Information Meaning Site Location of DVR System ID ID for remote keypad ● The remote keypad and DVR must be set to the same ID. Language Menu language Version Version of DVR software Upgrade... Starts installing latest version of software via USB port Import... Import setup Export...
Setup menu, continued System – Date/Time On the “Date/Time” menu ● time and date settings are made ● dates of public holidays are entered ● time synchronisation is configured. Setup Menu... Term System Symbol Date/Time Date/Time Meaning Date Date Format Date display format Time Time Format Time display format Time Zone Local time zone Use Daylight Saving Time Activates use of summertime Daylight Saving Time Setup Menu... Term System Symbol Date/Time Holiday Meaning No.
Setup menu, continued System – Storage On the “Storage” menu the status and usage of the available storage media is displayed. Setup Menu...
Setup menu, continued Setup Menu... Term System Symbol Storage Meaning Type Memory type Disk Bad Data carrier status Temperature Temperature status S.M.A.R.T. Result of S.M.A.R.T.
Setup menu, continued System – User On the “User” menu the user groups and individual users are set up. Setup Menu... Term System Symbol User Meaning Group & User, Group field Assignment of group access privileges Table of possible group access privileges >> Group & User, User field Set password + Group... Add a new group + User...
Setup menu, continued System – Shutdown Setup Menu... System Shutdown... System – Log out USER... Setup Menu... System System – Log out USER... Network – Network On the “Network” menu all settings required to ensure network access are made. Setup Menu...
Setup menu, continued Setup Menu... Term Network Symbol Network LAN Meaning Type of connection to DVR: Type Manual Manual connection required input of: ● IP Address ● Gateway ● Subnet Mask DHCP Automatic assignment of IP address of DNS server ADSL (with PPPoE) Requires following input as specified by provider: ● ID ● Password Note: Use of modem must not be activated. DNS Server Address of DNS server Port Number Setup...
Setup menu, continued Setup Menu...
Setup menu, continued Network – Notification On the “Notification” menu the method of notification is defined. Setup Menu... Term Network Symbol Notification Mail Meaning Enable Enables notification by e-mail SMTP Server IP address or domain name of SMTP server Port Port for SMTP server Default is port 25. Authentication Login to SMTP server Sender E-mail address of sender Recipient E-mail address of recipient Setup Menu...
Setup menu, continued Devices – Camera On the “Camera” menu the cameras are configured. Setup Menu... Term Devices Symbol Camera Settings Meaning No. Activates the cameras Title Name of camera Visibility of recordings and camera data depending on user access privileges: Use Setup Menu...
Setup menu, continued Devices – Audio On the “Audio” menu the audio outputs are assigned to the cameras. Setup menu... Term Devices Symbol Audio Meaning No.
Setup menu, continued Devices – Alarm-Out On the “Alarm-Out” menu the alarm outputs are configured. ● “Settings” tab: The alarm outputs are configured. ● “Schedule” tab: Time slots are defined in which the alarm outputs respond in specific ways. Setup Menu... Term Devices Symbol Alarm-Out Settings Meaning No. Number of alarm output Title Name of alarm output Contact method of alarm output: Type Dwell Setup Menu...
Setup menu, continued Devices – Display On the “Display” menu the mode of on-screen display is configured. ● “OSD” tab: Specify what additional information is displayed on-screen. ● “Main Monitor” tab: Specify how the camera images are displayed on the main monitor. ● “Spot Monitor” tab: Specify which cameras are displayed on the spot monitors. Setup Menu...
Setup menu, continued Setup Menu... Term Devices Symbol Display Main Monitor Meaning Modes of sequences in multiple playback: Mode Full Sequence All cameras are switched through sequentially. Cameo Only the image at the bottom right is switched through; cameras in „Covert“ mode are not displayed to users without „Covert“ access. Interval Time interval between picture refresh Event Monitoring On Displays image of relevant camera in full-screen mode when an event occurs Setup Menu...
Setup menu, continued Record – Record On the “Record” menu the basic settings for recordings and their quality are made. Setup Menu... Term Recycle Record Symbol Record Meaning Enables automatic overwriting of the oldest recordings when the hard disk is full Note: If not enabled, recording ends when the hard disk is full.
Setup menu, continued Record – Schedule On the “Schedule” menu the schedule for recording is defined. Setup Menu... Record Term Symbol Schedule On Schedule Meaning Enables schedule entries Note: A recording is made only if schedule entries are enabled. Otherwise only panic recording is possible. No.
Setup menu, continued Record – Pre-Event On the “Pre-Event” menu the settings for recording prior to the event are made. Setup Menu... Term Record Symbol Pre-Event Meaning No. Activates the cameras ips Number of recorded images per second prior to the event Quality Picture quality of the recorded images prior to the event Recording time prior to the event Dwell 42 Note: The pre-event recording memory capacity is limited.
Setup menu, continued Event – Alarm-In On the “Alarm-In” menu the alarm inputs and responses to events are configured. Setup Menu... Term Event Symbol Alarm-In Settings Meaning No. Enables the alarm inputs Title Name of alarm input Contact method of alarm input: Type Panic Record Setup Menu... Term NO Normally Open NC Normally Closed Panic recording of alarm input Event Symbol Alarm-In Actions 1 Meaning No.
Setup menu, continued Setup Menu... Term Event Symbol Alarm-In Actions 2 Meaning No.
Setup menu, continued Event – Motion Detection On the “Motion Detection” menu the motion-sensitive zones are defined and responses to events configured. Setup Menu... Term No.
Setup menu, continued Setup Menu... Term Event Symbol Motion Detection Actions 1 Meaning No. Number of alarm input Record Assignment of cameras to record in event of alarm These cameras must be in “Event” or “Time and Event” mode within the time slot: Setup Menu... > Record > Schedule Assign and enable ● alarm outputs ● internal beep by DVR Alarm-Out These alarm outputs and the internal beep must be enabled within the time slot: Setup Menu...
Setup menu, continued Event – Video Loss On the “Video Loss” menu checking for covert cameras and the responses to events are configured. Setup Menu... Term Event Symbol Video Loss Settings Meaning Sensitivity of check as to whether camera is covert: Check Obscuration Setup Menu... Term Event Symbol Never not checked 15 very sensitive Video Loss Actions 1 Meaning No.
Setup menu, continued Setup Menu... Term Event Symbol Video Loss Actions 2 Meaning No.
Setup menu, continued Event – Text-In On the “Text-In” menu the text input device is defined and the responses to text input are configured. Setup Menu... Term Event Symbol Text-In Meaning No.
Setup menu, continued Setup Term Port Symbol Meaning Interface Setting as specified by manufacturer of text input device (ATM, cash-till etc.
Setup menu, continued Setup Menu... Term Event Symbol Text-In Actions 1 Meaning No. Number of alarm input Record Assignment of cameras to record in event of alarm These cameras must be in “Event” or “Time and Event” mode within the time slot: Setup Menu... > Record > Schedule Assign and enable ● alarm outputs ● internal beep by DVR Alarm-Out These alarm outputs and the internal beep must be enabled within the time slot: Setup Menu...
Setup menu, continued Event – System Event On the “System Event” menu the self-diagnostics and corresponding messages are configured.. Setup Menu... Term Event Symbol System Event Health Check Meaning System System self-diagnostics interval Check Recording Setup... . Configuration of schedule >> Check Alarm-In Interval and status for checking alarm inputs Setup Term Symbol Meaning Schedule On Enables schedule entries No.
Setup menu, continued Setup Menu... Term Event Symbol System Event Actions Meaning Events (based on checks): Event Alarm-Out System System check failed Panic Record Panic recording in progress Check Recording Recording check failed Check Alarm-In Check of alarm inputs failed Disk Almost Full Preset limit value for hard disk capacity reached Disk Full Hard disk full Disk Bad Preset limit value for number of bad sectors reached Disk Temperature Preset temperature limit reached Disk S.M.
Setup menu, continued Event – Event Status The “Event Status” menu indicates the status of all possible events: ● Grey text: Event detection not enabled ● White text: Event detection enabled ● Flashing border: Message – acute event for 5 sec ● Yellow field: Pending event Setup Menu...
Specifications DLR3-16N/XX Model DLR3-16N/160CDV DLR3-16N/410CDV DLR3-16N/660CDV EDP No.
Specifications DLR3-16N/XX, continued Model DLR3-16N/160CDV Picture size Basic: 2/2.4 kB; Standard: 4/4.8 kB; High: 8/9.6 kB; Very high: 12/14.4 kB (NTSC/PAL). 2 times larger in High Resolution mode DLR3-16N/410CDV Hard disk capacity 160 GB ATA hard disk, expandable to as many as 3 internal hard disks Playback speed 25 half-screen images per sec at CIF resolution (336 x 272 pixels/PAL) and Duplex Export of picture data via USB 2.0, CD writer.
Accessories EDP No.
Supported PTZ cameras Manufacturer Designation Manufacturer Designation Costar CDC 2500 Ademco Video Orbiter Microsphere Dyna Color CDC2400 SysMania ORX_1000 Chilsung CRD-J6416 Linlin PIH-717 Fine CRR-1660s ELMO PTC-200C/CVAS Pelco D-log ELMO PTC-250C Dennard Dennard2060 Pacom Pacom 2036 Tokina DMP-1223 Dongyang Power Controller Dongyang Unitech DRX-500 Sungjin Receiver/MPU Dongyang DY-255RXC Costar SIC722V Sensormatic Delta Dome II/Ultra IV Samsung Techwin SPD 160
Index A D Accessories 57 Alarm Configuring inputs 43 Configuring outputs 37 Connecting inputs 8 Connecting outputs 8 Motion Detection 46 Resetting 9 Setting schedule for outputs 37 Setting signal duration 37 Ambient conditions 3 Assigning cameras Alarm-In 43 Motion Detection 45, 46 Text-In 51 Video Loss 47 Assigning PTZ cameras Alarm-In 44 Motion Detection 45, 46 Text-In 51 Video Loss 48 Date setting 27 Defining group access rights 30 Defining motion-sensitive zones 45 Display Configuring 38 Hiding 16, 3
Index, continued L S LAN Network configuration 32 Safety instructions 3 Schedule Setting for alarm 37 Setting for recording 41 Search Calendar search 19 Event log 20 Motion Search 23 Text-In 21 Setting a password 30 Setting automatic overwrite 40 Setting menu language 26 Setting recording quality 40 Setting system ID for remote control 26 Setting the duration of records in an event occurrence 40 Setting up a concealed camera 16, 35 Setting up Notification 34 Setting up user groups 30 Setting up users 30
Index, continued T Text-in search 21 Time Setting 27 Synchronising 27 DLR3-16N/XX 61
Notes on disposal Correct disposal of this DVR WEEE (Waste Electrical & Electronic Equipment) Applicable in the member states of the European Union and other European countries with a separate collection system The marking on the DVR and on the documentation stipulates that it must not be thrown away in normal domestic waste at the end of its useful life.
eneo® is a registered trademark of Videor Technical E. Hartig GmbH Exclusive distribution through specialised trade channels only. VIDEOR TECHNICAL E. Hartig GmbH Carl-Zeiss-Str. 8 · 63322 Rödermark, Germany Tel. +49 (0) 6074 / 888-0 · Fax +49 (0) 6074 / 888-100 www.videortechnical.com Operating Instructions version 02/2008 (V1.2(A)) Subject to technical change without notice.