
User`s guide


d
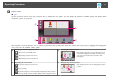
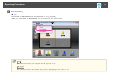
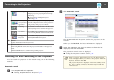
Project screens.
s p.22
On the projection control screen, the projection area is divided into four panels. You can change the number of available panels and change which
computer's screens are projected.
D
C
B
A
The computer's screen for the first user to connect is projected in the top left panel. Users who connect later can project by dragging and dropping the
user's icons into the available (white) panels.
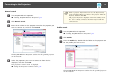
A
Changing the number of projected screens
: Project one screen at full screen.
: Divide the projected screen in two.
: Divide the projected screen in four.
C
Projecting the computer's screen
Drag and drop the user's icon to a white panel. Your
icon is always displayed on the left. You can project
your own screen as well as the screens for other
participants.
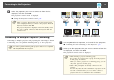
B
Operating your screen's status
: Project the computer's screen as it is.
: Stop projecting.
: Pause the computer's screen currently being displayed. The projected
screen does not change, even if you make changes on the computer's screen.
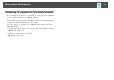
D
Changing the projection position
Drag and drop the user's icon to change the projection
position.
Operating Procedures
11