User’s Guide
Notations Used in This Guide f Safety indications So that you can use the product safely and correctly, symbols are applied in the User's Guide and on the product to indicate possible harm to the user or to others and the risk of damage to property. The indications and their meaning are as follows. Make sure you understand them properly before reading the guide. Warning This symbol indicates information that, if ignored, could possibly result in death or personal injury due to incorrect handling.
Contents Projector Features......................................................................................5 Features Common to Each Model ....................................................................... 5 EB-1735W/1725 Features.................................................................................... 6 Part Names and Functions ........................................................................7 Front/Top...........................................................................
Contents Connecting with a USB Cable and Projecting (USB Display EB-1735W/1725 only).......................................................95 Connecting ......................................................................................................... 95 Reading Problem Mail Notification Function (EB-1735W/1725 only) ..............................................................................98 ESC/VP21 Commands..............................................................................
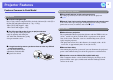
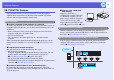
Projector Features Features Common to Each Model Ease of use f Compact and lightweight Easy to carry with its compact B5 file size body (202 mm (D) x 284 (W) x 65 mm (H)) and lightweight body (1.7 kg ~ 1.8 kg). *EB-1725/1735W:Approx. 1.8kg EB-1720/1730W:Approx. 1.7kg 5 Enhanced security functions f Password Protect to restrict and manage users By setting a password you can restrict who can use the projector. s p.
Projector Features EB-1735W/1725 Features You can make effective use of your network by using the supplied "EPSON Projector Software for Meeting & Presentation" to perform efficient and varied presentations and meetings. Multi-connection f Connect a computer to the projector via a network By connecting the projector to an already constructed network system via a supplied wireless LAN unit, you can have efficient meetings and so on as follows.
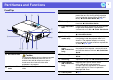
Part Names and Functions 7 Front/Top Name Name A Air exhaust vent Do not place objects that may become warped or otherwise affected by heat near the air exhaust vent and do not put your face or hands near the air exhaust vent while projection is in progress. B A/V mute slide knob C A/V mute slide Slide shut when not using the projector to protect the lens. By closing during projection you can hide the image and the sound (A/V Mute). s Quick Start Guide, s p.
Part Names and Functions Name M Lamp cover Function Rear Open this cover when replacing the projector's lamp. s p.80 Name Function A S-video input port For S-video signals from video sources. B Power inlet Connects to the power cable. s Quick Start Guide C Video input port For composite video signals from video sources. D Remote receiver Receives signals from the remote control.
Part Names and Functions Name Function G USB port (Type A) Connects the memory for compatible digital (EB-1735W/1725 cameras and USBs, and projects image/movie only) files and scenarios with the PC Free of EasyMP. s p.94 H USB port (Type B) Connects the projector to a computer by a USB cable, and the image on the computer is projected. (EB-1735W/1725 only) s Quick Start Guide Use this port also to connect with a computer to use the wireless mouse function. s p.
Part Names and Functions Base Name C Name Function A Ceiling mount fixing points (3 points) Attach the optional ceiling mount here when suspending the projector from a ceiling. s p.77, 85 B Rear foot When setup on a desk, turn to extend and retract to adjust the horizontal tilt. s Quick Start Guide Screw hole for the wireless LAN unit cover Function Screw hole to fix the wireless LAN unit cover.
Part Names and Functions Control Panel D E Name Function A Status indicators The color of the indicators and whether they are flashing or lit indicate the status of the projector. s p.64 B [t] button Turns the projector power on or off. s Quick Start Guide C [Source Search] button Changes to the next input source that is connected to the projector and is sending an image. s p.
Part Names and Functions Remote Control Name Function A [t] button Turns the projector power on or off. s Quick Start Guide B [Computer] button Changes to images from the computer input port. s p.16 C [S-Video] button Changes to images from the S-video input port. s p.16 D Numeric buttons Use when specifying password entry or remote control ID. s p.33, p.30 E [A/V Mute] button Turns the video and audio on or off. s p.18 F [Freeze] button Images are paused or unpaused. s p.
Part Names and Functions Name L [ M [Enter] button N O ] button [Esc] button [Volume] buttons [a] [b] Function When a configuration menu or help screen is displayed, it selects menu items and setting values. s p.38, p.63 When a configuration menu or a help screen is displayed, it accepts and enters the current selection and moves to the next level. s p.38, p.63 Acts as a mouse's left button when using the wireless mouse function. Stops the current function.
Useful Functions This chapter explains useful functions for giving presentations and so on, and the security functions. Changing the Projected Image .......................... 15 • Automatically Detect Incoming Signals and Change the Projected Image (Source Search) ................15 • Changing Directly from the Remote Control .................16 Functions for Enhancing Projection ................. 17 • Selecting the Projection Quality (Selecting Color Mode) ...............................................
Changing the Projected Image You can change the projected image in the following two ways. • Changing by Source Search The projector automatically detects signals being input from connected equipment, and the image being input from the equipment is projected. • Changing directly You can use the remote control buttons to change to the target input port. 15 Procedure When your video equipment is connected, start playback before beginning this operation.
Changing the Projected Image Changing Directly from the Remote Control You can change directly to the target image by pressing the following buttons on the remote control. Remote control Changes to images from the computer input port. Changes to the EasyMP image. (EB-1735W/1725 only) When using EB-1730W/ 1720, this does not function even if the button is pressed. Changes to images from the S-video input port. Changes to images from the video input port.
Functions for Enhancing Projection Selecting the Projection Quality (Selecting Color Mode) Mode Customized You can easily obtain the optimum image quality simply by selecting the setting that best corresponds to your surroundings when projecting. The brightness of the image varies depending on the mode selected. Mode 17 Application Select "Customized" to adjust "R,G,B,C,M,Y" from "Color Adjustment" in the configuration menu. s p.39 Procedure Application Game Ideal for use in a bright room.
Functions for Enhancing Projection Setting the Auto Iris Hiding the Image and Sound Temporarily (A/V Mute) By automatically setting the luminance according to the brightness of the displayed image, it lets you enjoy deep and rich images. You can use this when you want to focus the audience's attention on what you are saying, or if you do not want to show details such as when you are changing between files during presentations from a computer.
Functions for Enhancing Projection Freezing the Image (Freeze) q • If you use this function when projecting moving images, the images and sound continue to be played back by the source, and you cannot return to the point where A/V Mute was activated. • You can choose to display black, blue, or logo as the A/V mute display using the "Extended"-"Display"-"A/V Mute" setting from the configuration menu. s p.
Functions for Enhancing Projection Changing the Aspect Ratio Change the aspect ratiog when video equipment is connected so that images that have been recorded in digital video or onto DVDs can be viewed in 16:9 wide-screen format. Change the aspect ration when projecting computer images at full size. The changing methods and the types of aspect ratio are as follows.
Functions for Enhancing Projection f Changing the aspect for computer images (For EB-1725/1720) When projecting images input from a computer image input port, you can change the aspect as follows. Normal 4:3 Set Values When images are input from the computer input port Operation Projects to the full projection size retaining the aspect of the input image. Projects to the full projection size at an aspect of 4:3.
Functions for Enhancing Projection f Changing the aspect for computer images (For EB-1735W/1730W) When projecting images input from a computer image input port, you can change the aspect as follows. EB-1735W/1730W offer WXGA 1280 x 800 resolution (aspect ratio 16:10). When projecting onto 16:9 screens, set the aspect to "16:9". Operation Projects to the full projection size retaining the aspect of the input image.
Functions for Enhancing Projection Set Values Through q Operation Projects at the resolution of the input image size to the center of the screen. This is ideal for projecting clear images. If the image resolution exceeds 1280 ^ 800, the edges of the image are not projected.
Functions for Enhancing Projection Pointer Function (Pointer) This allows you to move a pointer icon on the projected image, and helps you draw attention to the area you are talking about. B Move the pointer icon. Remote control Procedure A Pointer icon Display the pointer. Remote control When pressed in conjunction with the adjacent [ ] button, the pointer can be moved diagonally in addition to up/down and left/right. q Each time you press the button, the pointer appears or disappears.
Functions for Enhancing Projection Enlarging Part of the Image (E-Zoom) This is useful when you want to expand images to see them in greater detail, such as graphs and tables. the cross to the area of the image that you B Move want to enlarge. Remote control Procedure A Start E-Zoom. Cross Remote control When pressed in conjunction with the adjacent [ ] button, the pointer can be moved diagonally in addition to up/down and left/right.
Functions for Enhancing Projection C Enlarge. Remote control Each time the button is pressed, the area is expanded. You can expand quickly by holding the button down. You can reduce the enlarged image by pressing the [x] button. Press the [Esc] button to cancel. q • The enlargement ratio appears on the screen. The selected area can be enlarged to between 1 to 4 times in 25 incremental steps. • Press the [ ] button to scroll the image.
Functions for Enhancing Projection Using the Remote Control to Operate the Mouse Pointer (Wireless Mouse) Connect the USB port of a computer and the USB port (TypeB) on the rear of the projector with a commercially available USB cable*. If the "Extended" - "USB TypeB" setting in the configuration menu is set to "Wireless Mouse", you can use the projector's remote control like a wireless mouse to control the computer's mouse pointer. s p.
Functions for Enhancing Projection Once the connection has been made, the mouse pointer can be operated as follows. Moving the mouse pointer When pressed in conjunction with the adjacent [ ] button, the pointer can be moved diagonally in addition to up/down and left/right. Drag and drop Mouse clicks Left click Right click Double-click: Press twice in rapid succession. This is useful for displaying the previous or next slide in a PowerPoint slideshow.
Restrictions in the Target Projector when Using Multiple Projectors 29 When an ID is set for the projector and the remote control, you can use the remote control to operate only the projector with a matching ID. This is very useful when managing multiple projectors. You can set an ID for the projector within a range of "1" to "9". While the projector’s ID setting is "OFF" (default setting), the remote control can be used regardless of the ID setting on the remote control.
Restrictions in the Target Projector when Using Multiple Projectors Setting the Projector ID Setting the Projector ID on the Remote Control Set the ID on the remote control each time you switch the projector power on. Procedure projection, press the [Menu] button on the A During projector and select "Extended" - "Projector ID" from the configuration menu. s "Using the Configuration Menu" p.
Correcting Color for Multiple Projectors (Multi-Screen Color Adjustment) When multiple projectors are lined up and projecting images, you can correct the brightness and color tone of each projector's image with multi-screen color adjustment so that the colors of images from each projector match closely. In some cases the brightness and color tone may not match completely even after correction.
Correcting Color for Multiple Projectors (Multi-Screen Color Adjustment) "Color Correct. (G/R)" and "Color D Correcting Correct. (B/Y)". Each time the [Enter] button is pressed the image displayed changes between the pattern display and the actual image, and you can check the correction results and make corrections in the actual image. procedures 2 to 4 until corrections are E Repeat finished. all corrections are finished, press the [Menu] F When button to close the configuration menu.
Security Functions The projector has the following enhanced security functions. • Password protect You can limit who can use the projector. • Control Panel Lock You can prevent people changing the settings on the projector without permission. • Anti-Theft Lock The projector is equipped with various types of anti-theft security devices. s p.8 Managing Users (Password Protect) 33 3.
Security Functions B Turn on "Power On Protect". (1) Select "Power On Protect", and then press the [Enter] button. (2) Select "On", and then press the [Enter] button. (3) Press the [Esc] button. C Turn on "User's Logo Protect". Remote control Numeric buttons Keep pressed (1) Select "User's Logo Protect", and then press the [Enter] button. (2) Select "On", and then press the [Enter] button. (3) Press the [Esc] button. D Turn on "Network Protect".
Security Functions f Entering the Password When the password entry screen is displayed, enter the password using the numeric buttons on the remote control. Procedure While holding down the [Num] button, enter the password by pressing the numeric buttons. When you enter the correct password, projection begins. Attention • If an incorrect password is entered three times in succession, the message "The projector's operation will be locked.
Security Functions B Select either "Full Lock" or "Partial Lock". "Yes" when the confirmation message is C Select displayed. The control panel buttons are locked according to the setting you chose. q You can release the control panel lock by one of the following two methods. • From the remote control, select "Off" in "Settings" "Control Panel Lock" from the configuration menu.
Configuration Menu This chapter explains how to use the configuration menu and its functions. Using the Configuration Menu .......................... 38 List of Functions ................................................. 39 • • • • • Image Menu .......................................................................39 Signal Menu .......................................................................41 Settings Menu ....................................................................43 Extended Menu ......
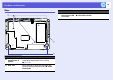
Using the Configuration Menu from the A Selecting top menu from the B Selecting sub menu 38 the C Changing selected item D Exit Top menu Guide Sub menu (Settings) Buttons used Using the control panel Select the setting to change Using the remote control
List of Functions 39 Image Menu Items that can be set vary depending on the image signal currently being projected as shown in the following screen shots. Setting details are saved for each image signal. Computer image/EasyMP (EB-1735W/1725 only) Sub Menu Component videog/Composite videog/S-videog Function Color Mode You can select the quality of the image to suit your surroundings. s p.17 Brightness You can adjust the image brightness.
List of Functions Sub Menu Reset Function You can reset all adjustment values for the "Image" menu functions to their default settings. To return all menu items to their default settings, see s p.
List of Functions Signal Menu Items that can be set vary depending on the image signal currently being projected as shown in the following screen shots. Setting details are saved for each image signal. You cannot make settings on the "Signal" menu when the source is EasyMP. (EB-1735W/1725 only) Computer image Sub Menu Auto Setup Resolution Trackingg Sync.
List of Functions Sub Menu Reset Function You can reset all adjustment values on the "Signal" menu to their default settings, except for "Input Signal". To return all menu items to their default settings, see s p.
List of Functions Settings Menu EB-1735W/1725 EB-1730W/1720 Sub Menu Function Keystone You can correct keystone distortion in the vertical directions. s Quick Start Guide Auto Keystone Turn "On" to perform Auto Keystone. (Executed only when "Front" is selected from the "Extended" - "Projection" menu.) Control Panel Lock You can use this to restrict operation of the projector's control panel. s p.35 Pointer shape You can select the shape of the pointer. s p.
List of Functions Sub Menu Function User Button You can select the item assigned from the configuration menu with the remote control's [User] button. By pressing the button the assigned menu item selection/adjustment screen is displayed, allowing you to make one-touch settings/adjustments. You can assign one of the following six items to the [User] button.
List of Functions Extended Menu EB-1735W/1725 Sub Menu EB-1730W/1720 Function Display You can make settings related to the projector's display. Messages: You can set whether or not (On/Off) to display the source name when you change the input source, the color mode name when you change the color mode, a message when no image signal is input, and so on. Display Background*: You can set the screen status for when no image signal is available to "Black", "Blue", or "Logo".
List of Functions Sub Menu Function Operation Direct Power On: You can set whether or not (On/Off) to enable Direct Power On. When it is set to "On" and the projector power cable is connected to an electrical outlet, be aware that sudden surges of electricity when power comes back on after a power outage may cause the projector to turn on automatically. Sleep Mode: When set to "On", this automatically stops projection when no image signal is being input and no operations are carried out.
List of Functions Network Menu (EB-1735W/1725 only) When "Network Protect" is set to "On" in "Password Protect", a message is displayed and the settings cannot be changed. You can make changes after setting "Network Protect" to "Off". s p.33 Sub Menu Network Configuration q Function The following menus are available for setting network items. "Basic", "Wireless LAN", "Security", "Wired LAN", "Mail", "Others", "Reset" and "Setup complete".
List of Functions f Notes on operating the network menu Selecting from the top menu and sub menus, and changing of selected items are the same as operations in the configuration menu. When done, make sure you go to the "Complete menu", and select one of "Yes", "No", or "Cancel". When you select "Yes" or "No", you return to the configuration menu. Yes: Saves the settings and exits the network menu. No: Exits to the network menu without saving the settings.
List of Functions f Basic Menu Sub Menu Function Projector name Displays the projector name used to identify the projector when connected to a network. When editing, you can enter up to 16 single-byte alphanumeric characters. PJLink Password Set a password to use when you access the projector using compatible PJLink software. s p.102 You can enter up to 32 single-byte alphanumeric characters.
List of Functions f Wireless LAN menu Sub Menu Function Connection mode Use EMP NS Connection to set the mode, how the computer connect to the projector. Set to "Quick Connection Mode" when you want make a quick wireless connection. Set to "Advanced Connection Mode" when you want to connect to a network system via an access point.
List of Functions Sub Menu Function MAC Address Displays the MAC address. SSID Display To prevent the SSID from being displayed on the EasyMP Standby screen, set this to Off. IP Address Display To prevent the IP address from being displayed on the EasyMP Standby screen, set this to Off.
List of Functions f Security menu Sub Menu Security Function Select the security type from the items that are displayed. When setting up security, follow the instructions from the administrator of the network system you are about to access. Type of security When the supplied wireless LAN unit is installed and being used in Manual Mode, it is strongly recommended that you set security. Select one of the following security methods.
List of Functions System Authentication EAP-TLS Electronic certification, CA certification EAP-TTLS User ID, Password PEAP/MS-CHAPv2 User ID, Password PEAP/EAP-GTC User ID, Password LEAP User ID, Password EAP-Fast User ID, Password q • For setting details, follow the directions from the network administrator of your network. • If using EAP, you need to make settings at the projector that match the authentication server settings.
List of Functions f When WEP is selected Sub Menu Function WEP encryption You can set the encryption for WEP encoding. 128 bit: Uses 128 (104) bit encoding 64 bit: Uses 64 (40) bit encoding Format You can set the input method for the WEP encrypted key. ASCII: Input text. The method of inputting the encrypted WEP with text differs depending on the access point. Check with the network administrator for the network in which the projector participates, and then set to "ASCII".
List of Functions f When WPA-PSK (TKIP) or WPA2-PSK (AES) are selected Sub Menu PSK (Encryption key) Function You can enter a Pre-Shared Key (encrypted key) in single-byte alphanumeric characters. Enter at least 8 and up to 63 characters. When the PreShared Key is entered and the [Enter] button is pressed, the value is set and displayed as an asterisk (*). You cannot enter more than 32 characters on the configuration menu. When setting from Web Control, you can enter more than 32 characters.
List of Functions f Wired LAN Menu Sub Menu Function DHCPg You can set whether or not (On/Off) to use DHCP. If this is set to "On" you cannot set any more addresses. IP Addressg You can input the IP address assigned to the projector. You can input a number from 0 to 255 in each field of the address. However, the following IP addresses cannot be used. 0.0.0.0, 127.x.x.x, 224.0.0.0 to 255.255.255.255 (where x is a number from 0 to 255) Subnet Maskg You can input the subnet mask for the projector.
List of Functions f Mail menu When this is set, you receive an e-mail notification if a problem or warning occurs in the projector. For information on the contents of the sent e-mail, s "Reading Problem Mail Notification Function (EB-1735W/1725 only)" p.98 Sub Menu Function Mail Notification function You can set whether or not (On/Off) to be notified by e-mail. SMTP server You can input the IP addressg for the SMTP server for the projector.
List of Functions f Others menu Sub Menu Function SNMP trap IP addressg 1/ SNMP trap IP address 2 You can register up to two for the SNMPg trap notification destination. You can input a number from 0 to 255 in each field of the address. However, the following IP addresses cannot be used. 127.x.x.x, 224.0.0.0 to 255.255.255.255 (where x is a number from 0 to 255) To use SNMP to monitor the projector, you need to install the SNMP manager program on your computer.
List of Functions f Reset Menu Resets all of the network settings. Sub Menu Reset all network settings. Function To reset all of the network settings, select Yes. After you reset all the settings, the Basic menu appears.
List of Functions Info Menu (Display Only) Lets you check the status of the image signals being projected and the status of the projector. Items displayed vary depending on the image signal currently being projected as shown in the following screen shots. Computer image/Component videog Composite videog/S-videog Sub Menu EasyMP(EB-1735W/1725 only) Function * Lamp hours You can display the cumulative lamp operating time .
List of Functions Reset Menu Sub Menu Function Reset all You can reset all items in all menus to their default settings. The following items are not reset to their defaults: "Input Signal", "User's Logo", "Multi-screen", all items for "Network" menus, "Lamp Hours", and "Language". Reset Lamp Hours You can clear the cumulative lamp hours use time, and return it to "0H". Reset when you replace the lamp.
Troubleshooting This chapter describes how to identify problems and what to do if a problem is found. Using the Help..................................................... 63 Problem Solving ................................................. 64 • Reading the Indicators......................................................64 [t] Power indicator lights red .......................................................65 m o Indicator is lit or flashing orange...........................................
Using the Help 63 If a problem occurs with the projector, Help uses on-screen displays to assist you in solving the problem. You can solve problems by answering the questions. C Confirm the selection. Using the remote control Procedure Using the control panel A Press the [Help] button. The help screen is displayed. Using the remote control Using the control panel Questions and solutions are displayed as shown on the screen below. Press the [Help] button to exit Help. B Select a menu item.
Problem Solving 64 If you are having a problem with the projector, first check the projector's indicators and refer to "Reading the Indicators" below. If the indicators do not show clearly what the problem might be, refer to "When the Indicators Provide No Help". s p.67 Reading the Indicators The projector is provided with the following three indicators that indicate the operating status of the projector. Indicates the operating status.
Problem Solving f [t] Power indicator lights red Abnormal : Lit Status Red Red Cause : Flashing: : Off Remedy or Status Red Internal Error Stop using the projector, disconnect the power cable from the electrical outlet, and contact your local dealer or the nearest address provided in the Support and Service Guide.
Problem Solving : Lit Status Red Red Cause Red Auto Iris Error Stop using the projector, disconnect the power cable from the electrical outlet, and contact your local dealer or the nearest address provided in the Support and Service Guide.
Problem Solving When the Indicators Provide No Help If any of the following problems occur and the indicators do not offer a solution, refer to the pages given for each problem. Problems when projection starts f Power does not turn on s p.72 Problems relating to images f No images appear s p.68 Projection does not start, the projection area is completely black, the projection area is completely blue, and so on. f Moving images are not displayed s p.
Problem Solving f Problems relating to images f No images appear Check Remedy Did you press the [t] button? Press the [t] button to turn the power on. Are the indicators switched off? The power cable is not connected correctly or power is not being supplied normally. Connect the projector's power cable correctly. s Quick Start Guide Check that your electrical outlet or power source is functioning correctly. Is A/V Mute active? Press the [A/V Mute] button on the remote control to cancel A/V Mute.
Problem Solving f The message "Not supported." is displayed. Check Is the image signal format setting correct? Remedy Change the setting according to the signal for the connected equipment. s "Signal" - "Video Signal" p.41 Only when projecting images from a video source Do the image signal resolution and the refresh rate correspond to the mode? Refer to the computer's documentation for how to change the image signal resolution and the refresh rate output from the computer.
Problem Solving Check Has condensation formed on the lens? Remedy If the projector is suddenly taken from a cold environment to a warm environment, or if sudden ambient temperature changes occur, condensation may form on the surface of the lens, and this may cause the images to appear fuzzy. Set the projector up in the room about one hour before it is used. If condensation forms on the lens, turn the projector off and wait for the condensation to disappear.
Problem Solving Check Is the computer set for dual display? Only when projecting computer images Is the correct resolution selected? Only when projecting computer images Remedy If dual display is activated in the "Display Properties" of the computer's control panel, only about half of the image on the computer screen is projected. To display the entire image on the computer screen, turn off the dual display setting.
Problem Solving f Problems when projection starts f Power does not turn on Check Remedy Did you press the [t] button? Press the t button to turn the power on. Are the indicators switched off? The power cable is not connected correctly or power is not being supplied normally. Disconnect and then reconnect the power cable. s Quick Start Guide Check that your electrical outlet or power source is functioning correctly. Check that the lamp cover is securely installed.
Problem Solving f Other problems f No sound can be heard or the sound is faint Check Remedy Is the audio source connected correctly? Disconnect the cable from the audio input port, and then reconnect the cable. Is the volume adjusted to the minimum setting? Adjust the volume so that sound can be heard. s p.43, s Quick Start Guide Is A/V Mute active? Press the [A/V Mute] button on the remote control to cancel A/V Mute. s p.
Problem Solving f E-mail is not received even if a problem occurs in the projector (EB-1735W/1725 only) Check Remedy Is "Standby Mode" set to "Network On"? To use the Mail Notification function when the projector is in standby, set "Network On" in "Standby Mode" from the configuration menu. s "Extended" - "Standby Mode" p.46 Did a fatal abnormality occur and the projector come to a sudden stop? When the projector comes to a sudden stop, e-mail cannot be sent.
Appendices This chapter provides information on maintenance procedures to ensure the best level of performance from the projector for a long time to come. Installation Methods ...........................................77 Cleaning ...............................................................78 • Cleaning the Projector's Surface .....................................78 • Cleaning the Lens..............................................................78 • Cleaning the Air Filter..............................
Reading Problem Mail Notification Function (EB-1735W/1725 only).........................................98 ESC/VP21 Commands ........................................99 • Command List...................................................................99 • Cable Layouts....................................................................99 USB connection ............................................................................. 99 • USB Connection Setup ...................................................
Installation Methods The projector supports the following four different projection methods. Install according to the conditions of the installation location. 77 • Project images from in front of the screen. (Front projection) • Project images from behind a translucent screen. (Rear projection) • Suspend the projector from the ceiling and project images from in front of the screen. (Front/Ceiling projection) • Suspend the projector from the ceiling and project images from behind a translucent screen.
Cleaning You should clean the projector if it becomes dirty or if the quality of projected images starts to deteriorate. Cleaning the Projector's Surface Clean the projector's surface by wiping it gently with a soft cloth. If the projector is particularly dirty, moisten the cloth with water containing a small amount of neutral detergent, and then firmly wring the cloth dry before using it to wipe the projector's surface.
Replacing Consumables This section explains how to replace the remote control batteries, the lamp, and the air filter. 79 B Replace the old batteries with new batteries. Caution Replacing the Remote Control Batteries Check the positions of the (+) and (-) marks inside the battery holder to ensure the batteries are inserted the correct way.
Replacing Consumables Replacing the Lamp Attention f Lamp replacement period It is time to replace the lamp when: • The message "Replace the lamp. Replace the lamp. "is displayed when you start projecting. A message is displayed. • The lamp indicator flashes orange. Flashing orange • The projected image gets darker or starts to deteriorate.
Replacing Consumables f How to replace the lamp The lamp can be replaced even when the projector is suspended from a ceiling. Warning When replacing the lamp because it has stopped illuminating, there is a possibility that the lamp may be broken. If replacing the lamp of a projector which has been installed on the ceiling, you should always assume that the lamp is broken, and you should stand to the side of the lamp cover, not underneath it. Remove the lamp cover gently.
Replacing Consumables C Loosen the two lamp fixing screws. D Take out the old lamp by pulling the handle. If the lamp is cracked, replace it with a new lamp, or contact your local dealer for further advice. s Epson Projector Contact List E Install the new lamp. Insert the new lamp along the guide rail in the correct direction so that it fits in place, push down firmly at the location marked "PUSH", and once it is fully inserted tighten the two screws.
Replacing Consumables F Replace the lamp cover. Attention • Make sure you install the lamp securely. If the lamp cover is removed, the lamp turns off automatically as a safety precaution. If the lamp or the lamp cover is not installed correctly, the lamp does not turn on. • This product includes a lamp component that contains mercury (Hg). Please consult your local regulations regarding disposal or recycling. Do not dispose of it with normal waste.
Replacing Consumables Replacing the Air Filter C Install the new air filter. Slide the air filter from the outside and press in until it firmly clicks into place. f Air filter replacement period It is time to replace the air filter when: • The air filter has been turned brown. • The message is displayed even though the air filter has been cleaned. f How to replace the air filter The air filter can be replaced even when the projector is suspended from a ceiling.
Optional Accessories and Consumables The following optional accessories and consumables are available. Please purchase these products as and when needed. The following list of optional accessories and consumables is current as of: 2008.04. Details of accessories are subject to change without notice and availability may vary depending on the country of purchase. f Optional accessories Soft carrying case ELPKS16B Use this case if you need to travel with the projector.
Saving a User's Logo You can save the image that is currently being projected as a user's logo. 86 "Extended" - "User's Logo" from the B Select configuration menu. s "Using the Configuration Menu" p.38 q Check the buttons you can use and the operations they perform in the guide under the menu. When a user's logo is saved, the previous user's logo is erased. Procedure the image you want to use as the user's A Project logo, and then press the [Menu] button.
Saving a User's Logo the box to select the part of the image to use D Move as the user's logo. "Select this image?" is displayed, select E When "Yes". the zoom factor from the zoom setting F Select screen. the message "Save this image as the User's G When Logo?" is displayed, select "Yes". Using the remote control Using the control panel The image is saved. After the image has been saved, the message "Completed." is displayed. q q You can save at up to 400 ^ 300 dots in size.
Making a WPS (Wi-Fi Protected Setup) Connection with a Wireless LAN Access Point (EB-1735W/1725 only) There are two methods for setting WPS. •Push Button Method SSID and security are set automatically when the [Enter] button is pressed on the projector's control panel and the dedicated button on the access point equipment. This method is recommended when the projector and access point are close together.
Making a WPS (Wi-Fi Protected Setup) Connection with a Wireless LAN Access Point (EB-1735W/1725 only) f Making a Connection Using the Push Button Method the button on the access point when C Press prompted by the screen. Procedure A Select "Push Button Method". This completes the setup. The Push Button Method screen is displayed. D Press the [Enter] button or the [Esc] button. the [Enter] button on the projector's control B Press panel when prompted by the screen.
Making a WPS (Wi-Fi Protected Setup) Connection with a Wireless LAN Access Point (EB-1735W/1725 only) E Select "Yes" from "Setup complete". f Making a connection using the PIN Code Method q Before you can make a connection using the "PIN Code Method", a connection must have already been setup between the computer and the access point. Procedure A Select "PIN Code Method". This completes the setup of the connection between the projector and the access point.
Making a WPS (Wi-Fi Protected Setup) Connection with a Wireless LAN Access Point (EB-1735W/1725 only) the PIN code displayed on the "PIN Code B Enter Method" screen from the computer to the access message "Setup by WPS complete. " is C The displayed. Press the [Enter] button or the [Esc] point, and then select "Start Setup". button. The progress is displayed. It returns to the Wireless LAN menu screen. D Select "Yes" from "Setup complete".
Screen Size and Distance 92 To find the appropriate screen size, see the following table to setup the projector. Values are just reference. Projection Distance for EB-1725/1720 Units:cm(in.) Units:cm(in.) Projection distance 4:3 Screen Size Projection distance Minimum Maximum (Wide) to (Tele) Minimum Maximum (Wide) to (Tele) 16:9 Screen size Minimum Maximum (Wide) to (Tele) Minimum Maximum (Wide) to (Tele) 30" 61×46 (24×18) 65 to 80 (26 to 32) 7 (2.
Screen Size and Distance Projection Distance for EB-1735W/1730W Units:cm(in.) Units:cm(in.) Projection distance 4:3 Screen Size Units:cm(in.) Projection distance Minimum (Wide) to Maximum (Tele) Minimum (Wide) to Maximum (Tele) 16:9 Screen size Projection distance Minimum (Wide) to Maximum (Tele) Minimum (Wide) to Maximum (Tele) 16:10 Screen size Minimum (Wide) to Maximum (Tele) Minimum (Wide) to Maximum (Tele) 30" 61×46 (24×18) 70 to 86 (28 to 34) 5 (2.
Connecting and Removing USB Devices (EB-1735W/1725 only) USB 2.0/1.1-compatible digital cameras, hard disk drives and USB storage devices can be connected to the projector. Image files that are stored inside the digital camera and scenarios, images and movies that are stored inside USB storage devices can be played back by EasyMP PC Free.
Connecting with a USB Cable and Projecting (USB Display EB-1735W/1725 only) By using a commercially available USB cable to connect the projector to a Windows computer you can project images from the computer. This function is called USB Display. Simply by connecting via a USB cable, images from the computer can be displayed. Attention Connect the projector directly to the computer and not via a USB hub. Connecting Procedure Turn the computer on. Connects to the USB cable.
Connecting with a USB Cable and Projecting (USB Display EB-1735W/1725 only) f Connecting for the first time When you are using Windows 2000, double-click "My Computer" "EPSON_PJ_UD" - "EMP_UDSE.EXE", on your computer. C Computer images are projected. It may take a while before computer images are projected. Until computer images are projected, leave the equipment as it is and do not disconnect the USB cable or turn off the power to the projector. A Driver installation starts automatically.
Connecting with a USB Cable and Projecting (USB Display EB-1735W/1725 only) f From the second time Computer images are projected. It may take a while before computer images are projected. Please wait.
Reading Problem Mail Notification Function (EB-1735W/1725 only) When the Mail Notification function is set to "On" and a problem/ warning occurs in the projector, the following e-mail is sent. Subject: EPSON Projector Line 1: The name of the projector where the problem has occurred Line 2: The IP address set for the projector where the problem has occurred. Line 3 and on: Details of the problem The details of the problem are listed line by line.
ESC/VP21 Commands 99 Command List Cable Layouts When the power ON command is transmitted to the projector, the power turns on and it enters warm-up mode. When the projector's power has turned on, a colon ":" (3Ah) is returned. When a command is input, the projector executes the command and returns a ":", and then accepts the next command. If the command being processed terminates abnormally, an error message is output and a ":" is returned.
ESC/VP21 Commands USB Connection Setup To control the projector using ESC/VP21 commands via a USB connection, the following preparations must be carried out. Procedure the USB driver (USB-COM Driver) from A Download the Epson Web site to your computer. Go to http://www.epson.com and select the support section of your local Epson Web site. the downloaded USB driver onto your B Install computer. Read the instructions displayed on the download screen.
Regarding Network Projector (EB-1735W/1725 only) There are two methods connecting the projector to a computer via a network and project images from the computer screen. • By "EMP NS Connection" The EMP NS Connection application on the supplied EPSON Projector Software for Meeting&Presentation provides a wide range of features for use in meetings and presentations, such as a distribution function, multiscreen display, movie sending mode, and a presentation mode.
About PJLink 102 PJLink Class 1 was established by the JBMIA (Japan Business Machine and Information System Industries Association) as a standard protocol for controlling network-compatible projector's as part of their efforts to standardize projector control protocols. The projector complies with the PJLink Class 1 standard established by the JBMIA.
List of Supported Monitor Displays 103 Supported Monitor Displays for EB-1725/1720 f Computer signals (analog RGB) Units: dots Signal Refresh rate (Hz) Resolution VGAEGA 70 VGA SVGA XGA Aspect mode Normal 4:3 16:9 640^350 1024^560 1024^768 1024^576 60/72/75/85/iMac*1 640^480/640^360*2 1024^768 1024^768 1024^576 56/60/72/75/85/iMac*1 800^600/800^450*2 1024^768 1024^768 1024^576 1024^768 1024^768 1024^576 *1 60/70/75/85/iMac 1024^768/1024^576 *2 60 1280^768 1024^614 1024^768
List of Supported Monitor Displays f Component Video Units: dots Signal Aspect mode Refresh rate (Hz) Resolution 4:3 16:9 SDTV(480i) 60 720^480/720^360* 1024^768 1024^576 SDTV(576i) 50 720^576/720^432* 1024^768 1024^576 60 720^480/720^360 * 1024^768 1024^576 SDTV(576p) 50 720^576/720^432* 1024^768 1024^576 HDTV(720p) 50/60 1280^720 1024^768 1024^576 HDTV(1080i) 50/60 1920^1080 1024^768 1024^576 HDTV(1080p) 50/60 1920^1080 1024^768 1024^576 SDTV(480p) * Letterb
List of Supported Monitor Displays Supported Monitor Displays for EB-1735W/1730W f Computer signals (analog RGB) Units: dots Signal Refresh rate (Hz) Resolution VGAEGA VGA SVGA XGA 70 60/72/75/85/iMac*1 56/60/72/75/85/iMac*1 60/70/75/85/iMac*1 60 60 60/75/85 60/75/85 60 70/75/85 60/75/85 60/75/85 60/75/85 60 67 75 75 60 75 640^350 640^480/640^360*2 800^600/800^450*2 1024^768/1024^576*2 1280^768 1360^768 1280^800 1440^900 1680^1050 1152^864 1280^1024 1280^960 1400^1050 1600^1200 640^480 832^624 10
List of Supported Monitor Displays f Component Video Units: dots Signal SDTV(480i) SDTV(576i) Aspect mode Refresh rate (Hz) Resolution Normal 16:9 Full Zoom Through 60 720^480/720^360* 1066^800 1280^720 1280^800 1280^800 640^480 50 720^576/720^432 * 1066^800 1280^720 1280^800 1280^800 768^576 * 1066^800 1280^720 1280^800 1280^800 640^480 SDTV(480p) 60 720^480/720^360 SDTV(576p) 50 720^576/720^432* 1066^800 1280^720 1280^800 1280^800 768^576 HDTV(720p) 50/60 1
Specifications Projector General Specifications Product name Dimensions Panel size Display method Resolution Focus adjustment Zoom adjustment Lamp Max. audio output Speaker Power supply Power consumption EB-1735W 100 to 120 V area 200 to 240 V area Operating altitude Operating temperature Storage temperature Mass EB-1730W EB-1725 EB-1720 284 (W) ^ 65 (H) ^ 202 (D) mm (not including protruding parts) 0.7" 0.
Specifications Product name Connectors Computer (Component Video) input port Audio-L/R input port Video input port S-Video input port USB port*1 USB port (wireless/wired LAN unit dedicated*2) EB-1735W 1 1 1 1 1 1 EB-1730W EB-1725 EB-1720 Mini D-Sub15-pin (female) blue USB connector (Type A) USB connector (Type B) USB connector (Type A) Stereo mini jack RCA pin jack Mini DIN 4-pin USB connector (Type A) USB connector (Type B) USB connector (Type B) - USB connector (Type B) USB connector (Type
Specifications Software Requirement The software supplied with the projector or the optional accessories runs on computers that meet the following requirements. EMP NS Connection, EMP SlideMaker2, USB Display, and Quick Wireless Connection are only supplied with EB-1735W/1725.
Specifications DECLARATION of CONFORMITY According to 47CFR, Part 2 and 15 Class B Personal Computers and Peripherals; and/or CPU Boards and Power Supplies used with Class B Personal Computers We: Located at: Tel: Epson America, Inc. 3840 Kilroy Airport Way MS: 3-13 Long Beach, CA 90806 562-290-5254 Declare under sole responsibility that the product identified herein, complies with 47CFR Part 2 and 15 of the FCC rules as a Class B digital device.
Appearance 111 Center of lens * Distance from center of lens to suspension bracket fixing point Units: mm
Glossary 112 This section explains easily terms that are used with the projector and difficult terms that are not explained in the text of this guide. For details, refer to other commercially available publications. AMX Device Discovery AMX Device Discovery is a technology developed by AMX to facilitate AMX control systems for easy operation of the target equipment. Epson have implemented this protocol technology, and have provided a setting to enable the protocol function (ON).
Glossary XGA A type of video signal with a resolution of 1,024 (horizontal) ^ 768 (vertical) dots that is used by IBM PC/AT-compatible computers. Aspect ratio The ratio between an image's length and its height. HDTV images have an aspect ratio of 16:9 and appear elongated. The aspect ratio for standard images is 4:3.
Index 114 A Display background .............................................45 A/V mute ............................................................. 18 Abs. Color Temp. ................................................ 39 Air exhaust vent .................................................... 7 Air filter replacement period ................................ 84 Angle of tilt ........................................................ 108 Audio-L/R input port ..............................................
Index Software keyboard ...............................................48 Source .................................................................60 Source search ...............................................11, 15 Specifications ....................................................107 Sports ..................................................................17 sRGB ...................................................................17 SSID ...............................................................
All rights reserved. No part of this publication may be reproduced, stored in a retrieval system, or transmitted in any form or by any means, electronic, mechanical, photocopying, recording, or otherwise, without the prior written permission of Seiko Epson Corporation. No patent liability is assumed with respect to the use of the information contained herein. Neither is any liability assumed for damages resulting from the use of the information contained herein.