Gebruikershandleiding
Gebruikte symbolen en tekens f Veiligheidssymbolen Voor een veilig en correct gebruik van de projector zijn in deze documentatie en op de projector zelf symbolen aanwezig om u te wijzen op mogelijk letsel voor de gebruiker of anderen en op het risico van schade aan uw eigendommen. De gebruikte symbolen hebben de volgende betekenis. Wees u goed bewust van de betekenis, voordat u de handleiding leest.
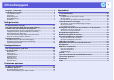
Inhoudsopgave Projector - Kenmerken ...............................................................................4 Onderdelen en functies..............................................................................5 Voorzijde/Bovenzijde............................................................................................ 5 Achterkant ............................................................................................................ 6 Bedieningspaneel........................................
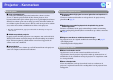
Projector - Kenmerken Gebruiksgemak f Korte-afstandprojectie De aanbevolen minimum projectieafstand tot het scherm is slechts 54 cm*. U kunt de projector dicht bij het scherm plaatsen. Als u bijvoorbeeld beelden op het scherm projecteert via plafondprojectie kunt u dicht bij het scherm gaan staan en uitleg geven bij de beelden zonder dat uw schaduw op het scherm te zien is. En als u met uw rug naar het scherm staat, zult u niet worden verblind door het licht van de projector.
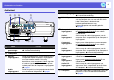
Onderdelen en functies 5 Voorzijde/Bovenzijde Naam I D Instelbare voet aan voorzijde Voor het instellen en vergroten van het geprojecteerde beeld nadat de projector op een oppervlak, bijvoorbeeld een bureau, is geplaatst. s Introductiehandleiding E Hendel voor instellen voet Trek het hendeltje naar buiten om de voet aan de voorzijde uit te schuiven en in te trekken. s Introductiehandleiding F Luchttoevoervent Via deze opening gaat lucht in de projector ilator (Luchtfilter) voor de koeling.
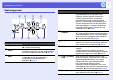
Onderdelen en functies Achterkant A H B Naam G C Naam F Voedingsingang Sluit aan op de voedingskabel. s Introductiehandleiding E RS-232C-poort Als u de projector vanaf een computer bedient, sluit de computer dan aan met een RS-232Ckabel. Deze poort is bestemd voor bedieningsdoeleinden en mag normaalgesproken niet worden gebruikt. s pag.67 F Computer1ingangspoort Ingang voor videosignalen van een computer en componentvideosignaleng van andere videobronnen.
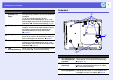
Onderdelen en functies Bedieningspaneel Naam A B Naam I C H D D [Enter]-knop Als deze knop tijdens de projectie van signaalbeelden van de computer wordt ingedrukt, stelt de projector automatisch tracking, synchronization, and position (frequentieafstemming, synchronisatie en positie) in voor een optimale beeldweergave. Als een configuratiemenu of een hulpscherm wordt weergegeven, accepteert de projector de huidige selectie en gaat verder naar het volgende niveau. s pag.
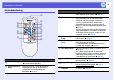
Onderdelen en functies Afstandsbediening Naam O A B C D E F Naam N M L K J I H G Functie Functie C [Menu]-knop D [Enter/Auto]-knop Als deze knop tijdens de projectie van signaalbeelden van de computer wordt ingedrukt, stelt de projector automatisch tracking, synchronization, and position (frequentieafstemming, synchronisatie en positie) in voor een optimale beeldweergave. s pag.
Onderdelen en functies Naam Functie K [Volume -/l]-knop Druk op [Volume -/l] om het volume te [Volume +/r]verlagen en op [Volume +/r] om het volume te knop verhogen. Als er een configuratiemenu of een hulpscherm wordt weergegeven, kunt u met deze knoppen menu-items en instellingswaarden selecteren. s Introductiehandleiding, pag.25 L [Esc]-knop Druk op deze knop om de huidige functie te stoppen.
Nuttige functies In dit hoofdstuk wordt ingegaan op nuttige functies voor het geven van presentaties e.d. en op de beveiligingsfuncties. De projectiemodus wijzigen .............................. 11 Beveiligingsfuncties ...........................................19 Het geprojecteerde beeld wijzigen (Bron zoeken) .... 12 • Gebruikers beheren (Wachtwoordbeveiliging) ............. 19 Functies voor het verbeteren van projecties..... 13 • De projectiekwaliteit selecteren (Kleurmodus selecteren)..............
De projectiemodus wijzigen De standaard projectiemodus is "Voorkant" waarbij de projector tegenover het scherm is opgesteld. Voor plafondprojectie wijzigt u de projectiemodus als volgt in "Voor/bovenkant". Procedure Houd de "A/V Mute"-knop op de afstandsbediening ongeveer 5 seconden ingedrukt. Het scherm wordt gewist en de projectiemodus wordt gewijzigd van "Voorkant" in "Voor/bovenkant". s pag.
Het geprojecteerde beeld wijzigen (Bron zoeken) De projector detecteert automatisch signalen die door een aangesloten apparaat worden doorgegeven, en projecteert het door dit apparaat doorgegeven beeld. Het gewenste beeld wordt sneller geprojecteerd, doordat ingangen waarop geen signaal binnenkomt, worden overgeslagen. Computer1 Computer2 S-video Video De ingangspoort die geen beeldsignaal doorgeeft wordt overgeslagen.
Functies voor het verbeteren van projecties De projectiekwaliteit selecteren (Kleurmodus selecteren) Voor optimale beeldkwaliteit selecteert u de instelling die het beste past bij de omgeving waarin u projecteert. De helderheid van het beeld is afhankelijk van de geselecteerde modus. Modus Dynamisch Presentatie Theater Foto Sport sRGBg Schoolbord Whiteboard Toepassing Deze modus is ideaal voor goed verlichte kamers. Dit is de helderste modus, die goed schaduwtinten weergeeft.
Functies voor het verbeteren van projecties Tijdelijk het beeld en geluid onderdrukken (A/V Mute) U kunt deze functie gebruiken als u de aandacht van het publiek wilt richten op wat u zegt, of als u bij presentaties vanaf een computer geen informatie wilt tonen terwijl u bestanden wisselt. Het beeld bevriezen (Bevriezen) Als het bewegende beeld in het scherm wordt bevroren, blijft de projectie doorlopen en kunt u een bewegend beeld frame voor frame, als foto projecteren.
Functies voor het verbeteren van projecties Hoogte-breedteverhouding wijzigen (Hoogte-breedte) De hoogte-breedteverhoudingg is de verhouding tussen de lengte en de breedte van een beeld. Op deze projector kunt u de verhouding wijzigen via de [Aspect]-knop op de afstandsbediening. De hoogte-breedteverhouding kan in zes standen worden ingesteld; "Automatisch", "Normaal", "16:9", "Volledig", "Zoom", en "Tot".
Functies voor het verbeteren van projecties Ingangssignaal Gecomprimeerd opgenomen beelden zoals van een videocamera of DVDsoftware Aanbevolen hoogtebreedteverhouding 16:9 Werking Beeld Opmerkingen Gecomprimeerd opgenomen beelden (beelden die in de "squeeze"-modus zijn opgenomen worden voor weergave De hoogtebreedteverhouding van het uitgerekt tot 16:9) ingangsbeeld wordt 1280 geconverteerd naar 16:9 zodat de volledige breedte van het projectiegebied 800 720 wordt gebruikt.
Functies voor het verbeteren van projecties Procedure Afstandsbediening Bij iedere druk op de knop wordt de naam van de hoogte-breedteverhouding weergegeven en verandert de hoogte-breedteverhouding. q U kunt dit ook instellen met "Hoogte-breedte" in het menu "Signaal" van het configuratiemenu. s pag.
Functies voor het verbeteren van projecties Deel van het beeld vergroten (E-Zoom) Met deze functie kunt u het beeld vergroten om het in detail te kunnen bekijken. Dit kan vooral handig zijn bij grafieken en tabellen. het kruis naar het gebied van het beeld B Verplaats dat u wilt vergroten. Afstandsbediening Kruis Procedure A E-zoom inschakelen. C Vergroten. Afstandsbediening Afstandsbediening Iedere keer als u op deze knop drukt, wordt het gebied vergroot.
Beveiligingsfuncties De projector beschikt over de volgende geavanceerde beveiligingsfuncties. • Wachtwoordbeveiliging U kunt het aantal gebruikers van de projector beperken. • Toetsvergrendeling U kunt voorkomen dat personen zonder toestemming de instellingen op de projector wijzigen. • Antidiefstalvergrendeling De projector is uitgerust met diverse antidiefstalbeveiligingen.
Beveiligingsfuncties B Schakel "Inschakelbeveiliging". (1) Selecteer "Inschakelbeveiliging" en druk vervolgens op de [Enter]-knop. (2) Selecteer "Aan" en druk vervolgens op de [Enter]-knop. (3) Druk op de [Esc]-knop. C Schakel "Gebr. logo beveil." in. D (1) Selecteer "Gebr. logo beveil." en druk vervolgens op de [Enter]-knop. (2) Selecteer "Aan" en druk vervolgens op de [Enter]-knop. (3) Druk op de [Esc]-knop. Schakel "Netwerkbeveil.". (1) Selecteer "Netwerkbeveil.
Beveiligingsfuncties f Wachtwoord invoeren Als het wachtwoordinvoerscherm wordt weergegeven, voer dan met de numerieke knoppen op de afstandsbediening het wachtwoord in. Procedure Voer met de numerieke knoppen het wachtwoord in. Als u het juiste wachtwoord invoert, start de projectie. Let op • Als u drie keer achter elkaar een onjuist wachtwoord invoert, wordt de melding "De projector wordt vergrendeld." ongeveer vijf minuten lang weergegeven, waarna de projector in standbymodus gaat.
Beveiligingsfuncties Bediening beperken (Bedieningsvergrendeling) Ga als volgt te werk om de knoppen op het bedieningspaneel te blokkeren. • Voll. vergrend. Alle knoppen op het bedieningspaneel zijn geblokkeerd. U kunt de projector via het bedieningspaneel niet meer bedienen, inclusief in- en uitschakelen. • Toetsvergrendeling Alle knoppen op het bedieningspaneel, behalve de [t]-knop, zijn geblokkeerd.
Beveiligingsfuncties Antidiefstalvergrendeling Aangezien projectors vaak worden geïnstalleerd met ophangbeugels en in ruimtes zonder toezicht worden achtergelaten, is het mogelijk dat iemand probeert de projector mee te nemen en daarom is de projector uitgerust met de volgende beveiligingsvoorzieningen. • Beveiligingssleuf De beveiligingssleuf is compatibel met het door Kensington geproduceerde Microsaver Security System.
Configuratiemenu In dit hoofdstuk wordt ingegaan op het gebruik van het configuratiemenu en de daarin opgenomen functies. Het configuratiemenu gebruiken....................... 25 Lijst met functies ................................................ 26 • • • • • • • Beeld-menu ........................................................................26 Signaal-menu .....................................................................27 Instellingen-menu..........................................................
Het configuratiemenu gebruiken hoofdmenu A Uit selecteren submenu B Uit selecteren 25 geselecteerde C Het item wijzigen D Afsluiten Hoofdmenu Infobalk Submenu (Settings) (Instellingen) Gebruikte knoppen Op het bedieningspaneel Selecteer de te wijzigen instellingen Op de afstandsbediening
Lijst met functies 26 Beeld-menu Welke items kunnen worden ingesteld is afhankelijk van het beeldsignaal dat op dat moment wordt geprojecteerd (zie onderstaande schermafdrukken). De instellingsgegevens worden voor elk beeldsignaal opgeslagen. Computerbeeld Submenu Kleurmodus Helderheid Contrastg Kleurverzadiging Tint Scherpte Kleuraanpassing Resetten Componentvideog/Composietvideog/S-videog Functie Stel hier de beeldkwaliteit in die bij uw omgeving past. s pag.
Lijst met functies Signaal-menu Welke items kunnen worden ingesteld is afhankelijk van het beeldsignaal dat op dat moment wordt geprojecteerd (zie onderstaande schermafdrukken). De instellingsgegevens worden voor elk beeldsignaal opgeslagen. Computerbeeld Submenu Autom. configuratie Resolutie Trackingg Sync.
Lijst met functies 28 Instellingen-menu Submenu Keystone Zoomen Toetsvergrendeling Helderheidsaanp. Volume Externe receiver Testpatroon Resetten Functie U kunt verticale trapeziumvertekening (keystone) in beelden corrigeren. s Introductiehandleiding Stelt de beeldgrootte in. (Tele/Wide) U kunt dit gebruiken om het gebruik van het bedieningspaneel van de projector te beperken. s pag.22 U kunt hier de helderheid van de projectorlamp op een of twee manieren regelen.
Lijst met functies 29 Uitgebreid-menu Submenu Weergeven Gebruikerslogo*1 Projectie Bewerking Functie Hier kunt u instellingen vastleggen voor het venster van de projector. Bericht: U kunt hier instellen of u de naam van de bron wilt weergeven (Aan) of niet (Uit) als u de invoerbron wijzigt, de naam van de kleurmodus als u de kleurmodus wijzigt, of er een melding wordt gegeven bij geen beeldsignaal, enzovoort. Achtergrond weerg.
Lijst met functies Submenu Stand-by modus 30 Functie Als u "Netwerk Aan" instelt, kunt u het netwerk en functies beheren terwijl de projector zich in standby-modus bevindt. Voor het beheren en controleren van de projectorstatus in het netwerk kunt u SNMPg gebruiken of de "EMP Monitor"-software die bij dit product wordt meegeleverd. Taal U kunt hier de taal van meldingen instellen. Resetten U kunt hier "Weergeven*1" en "Bewerking*2" in het "Uitgebreid"-menu herstellen naar hun standaardwaarden. Zie s pag.
Lijst met functies Netwerk-menu Als "Netwerkbeveil." onder "Wachtwoordbeveiliging" is ingesteld op "Aan", wordt er een melding weergegeven en kunnen de instellingen niet worden gewijzigd. U kunt wijzigen doorvoeren nadat u "Uit" voor "Netwerkbeveil." hebt ingesteld. s pag.19 Submenu Vast netwerk Wachtwoord PJLink Wachtwoord webcontr. Functie Hier kunt u netwerkinstellingen opgeven. DHCP: U kunt instellen of u DHCP wel (Aan) of niet (Uit) wilt gebruiken.
Lijst met functies Submenu SNMPg Functie U kunt SNMP-instellingen opgeven. Trap IP Adres 1/Trap IP Adres 2: U kunt tot twee IP-adressen aanmelden voor de SNMP Trap-melding. Het IP-adres dat is aangemeld bij "Trap IP Adres 2" wordt gebruikt als het IP-adres van "Trap IP Adres 1" niet toegankelijk is. Om de projector te bewaken met SNMP moet u het SNMP-beheerprogramma op uw computer installeren. SNMP moet door een netwerkbeheerder worden beheerd.
Lijst met functies *2 Wanneer de functie E-mailmelding op "Aan" staat en er doet zich een probleem of waarschuwing voor met betrekking tot de projector, wordt het volgende e-mailbericht verzonden. Onderwerp: EPSON Projector Eerste regel: De naam van de projector waarbij een probleem is opgetreden Tweede regel: Het IP-adres van de projector waarbij een probleem is opgetreden Derde regel en verder: Details van het probleem Regel voor regel worden meer bijzonderheden over het probleem gegeven.
Lijst met functies Informatie-menu Hier kunt u de status van de beeldsignalen die worden geprojecteerd en de status van de projector controleren. Welke items worden weergegeven is afhankelijk van het beeldsignaal dat op dat moment wordt geprojecteerd (zie onderstaande schermafdrukken). Computerbeeld/Componentvideog Submenu Lampuren Composietvideog/S-videog Functie U kunt hier de opgetelde bedrijfsuren van de projectorlamp weergeven*.
Lijst met functies Resetten-menu Submenu Alle standaardw. Lampuren terugzetten Functie Hier kunt u alle onderdelen van alle menu's herstellen naar hun standaardwaarden. De volgende onderdelen worden niet naar hun standaardwaarden hersteld: "Computer1-ingang", "Computer2-ingang", "Gebruikerslogo", alle onderdelen in het "Netwerk"-menu, "Lampuren" en "Taal". U kunt hier het totale aantal Lampuren wissen en de waarde terugzetten naar "0H". Herstel de waarde als u de projectorlamp vervangt.
Problemen oplossen In dit hoofdstuk leest u hoe u problemen kunt opsporen en hoe u ze kunt oplossen. De Help-knop gebruiken .................................... 37 Problemen oplossen .......................................... 38 • De indicatielampjes aflezen ..............................................38 t Voedingsindicatielampje brandt rood ........................................39 i o Indicatielampje brandt of knippert oranje .............................
De Help-knop gebruiken Als er een probleem optreedt met de projector, kunt u gebruikmaken van de Help-functie om het probleem op te lossen. De Help-functie wordt op het scherm weergegeven. 37 C Bevestig de selectie. Op de afstandsbediening Op het bedieningspaneel Procedure A Druk op de [Help]-knop. Het hulpscherm wordt weergegeven. Op de afstandsbediening Op het bedieningspaneel Vragen en oplossingen worden op het onderstaande schermweergegeven. Druk op de [Help]-knop om de Help af te sluiten.
Problemen oplossen 38 Als u een probleem hebt met de projector, controleer dan eerst de indicatielampjes op de projector en raadpleeg "De indicatielampjes aflezen" verderop in deze handleiding voor meer informatie. Als de indicatielampjes niet duidelijk aangeven wat het probleem zou kunnen zijn, raadpleeg dan "Als de indicatielampjes geen uitkomst bieden". s pag.41 De indicatielampjes aflezen De projector is uitgerust met drie indicatielampjes die de bedrijfsstatus van de projector aangeven.
Problemen oplossen f t Voedingsindicatielampje brandt rood Probleem : Brandt Status Rood : Knippert : Uit Oorzaak Internal Error (Interne fout) Oplossing of status Schakel de projector uit, haal de stekker van de voedingskabel uit het stopcontact en neem contact op met uw plaatselijke dealer of met het dichtstbijzijnde adres in de Service- en Ondersteuningsgids.
Problemen oplossen f i o Indicatielampje brandt of knippert oranje Waarschuwing : Brandt Status Rood : Knippert : Uit : Is afhankelijk van de status van de projector Oorzaak High Temp Warning (Waarschuwing voor hoge temperatuur) Oplossing of status (Dit is geen probleem. Als de temperatuur echter opnieuw te hoog wordt, stopt de projectie automatisch.) • Controleer of het luchtfilter en de luchtafvoerventilator schoon zijn en dat de projector niet tegen een muur is geplaatst.
Problemen oplossen Als de indicatielampjes geen uitkomst bieden Als een van hieronder beschreven problemen zich voordoet en de indicatielampjes geen oplossing bieden, raadpleeg dan de betreffende pagina. Problemen bij het starten van de projectie f De projector start niet s pag.46 Overige problemen Problemen met het beeld f Geen beeld s pag.42 De projectie start niet, het projectiegebied is geheel zwart, het projectiegebied is geheel blauw, enzovoort. f Geen bewegende beelden s pag.
Problemen oplossen f Problemen met het beeld f Geen beeld Controleer Hebt u op de [t]-knop gedrukt? Zijn de indicatielampjes uitgeschakeld? Is A/V dempen ingeschakeld? Zijn de instellingen in het configuratiemenu correct? Is het geprojecteerde beeld geheel zwart? Oplossing Druk op de [t]-knop om de projector in te schakelen. De voedingskabel is niet op de juiste manier aangesloten of er zijn problemen met de stroomvoorziening. Sluit de voedingskabel van de projector op de juiste manier aan.
Problemen oplossen f De melding "Niet ondersteund." wordt weergegeven Controleer Is de instelling voor het beeldsignaal juist? Alleen als er videobeelden worden geprojecteerd Komen de resolutie van het beeldsignaal en de verversingsfrequentie overeen met de modus? Alleen als er computerbeelden worden geprojecteerd Oplossing Wijzig de instelling in het signaal dat afkomstig is van het aangesloten apparaat. s "Signaal""Videosignaal" pag.
Problemen oplossen f Interferentie of vervormd beeld Controleer Is de instelling voor het beeldsignaal juist? Alleen als er videobeelden worden geprojecteerd Zijn de kabels op de juiste manier aangesloten? Gebruikt u een verlengsnoer? Hebt u de juiste resolutie geselecteerd? Alleen als er computerbeelden worden geprojecteerd Oplossing Wijzig de instelling in het signaal dat afkomstig is van het aangesloten apparaat. s "Signaal""Videosignaal" pag.
Problemen oplossen f De beeldkleuren zijn niet juist Controleer Oplossing Komen de instellingen van de invoersignalen overeen met de Wijzig de volgende instellingen overeenkomstig het signaal van het aangesloten apparaat. signalen van het aangesloten apparaat? Als u beelden projecteert van apparaten die zijn aangesloten op de Computer1- of Computer2-ingangspoort, raadpleeg dan s "Signaal"-"Computer1/2-ingang" pag.
Problemen oplossen f Problemen bij het starten van de projectie f De projector start niet Controleer Hebt u op de [t]-knop gedrukt? Zijn de indicatielampjes uitgeschakeld? Oplossing Druk op de [t]-knop om de projector in te schakelen. De voedingskabel is niet op de juiste manier aangesloten of er zijn problemen met de stroomvoorziening. Sluit de voedingskabel van de projector op de juiste manier aan. s Introductiehandleiding Controleer of het stopcontact en de voedingsbron goed werken.
Problemen oplossen f De afstandsbediening werkt niet Controleer Wijst de LED van de afstandsbediening naar de afstandsbedieningsontvanger op de projector als deze wordt bediend? Is de afstandsbediening te ver van de projector verwijderd? Schijnt er rechtstreeks zonlicht of vel licht van tl-lampen op de afstandsbedieningsontvanger? Is de juiste instelling voor de externe receiver geselecteerd? Zijn de batterijen leeg of verkeerd geplaatst? Is de knop op de afstandsbediening langer dan 30 seconden ingedru
Appendices In dit hoofdstuk vindt u informatie over de onderhoudsprocedures waarmee uw projector gedurende een lange periode de beste prestaties zal leveren. Installatiemethoden ............................................ 49 Reiniging ............................................................. 50 LAN-kabel aansluiten..........................................62 Optionele accessoires en verbruiksmateriaal..63 • Het oppervlak van de projector reinigen ........................50 • De lens reinigen .......
Installatiemethoden De projector ondersteunt vier verschillende projectiemethoden. Waarschuwing • Als u de projector aan het plafond wilt ophangen (met ophangbeugel), dan moet u de projector op een speciale manier monteren. Als u de projector niet goed monteert, kan hij naar beneden vallen en letsel veroorzaken.
Reiniging U moet de projector reinigen als deze vies wordt of als de kwaliteit van de geprojecteerde beelden minder begint te worden. Het oppervlak van de projector reinigen U reinigt het oppervlak van de projector door dit met een zachte doek zachtjes schoon te vegen. Als de projector erg smerig is, gebruik dan een doek met water en een klein beetje normaal schoonmaakmiddel, wring de doek vervolgens goed uit een veeg het oppervlak van de projector schoon.
Verbruiksmateriaal vervangen Hier vindt u informatie over het vervangen van de batterijen van de afstandsbediening, de projectorlamp en het luchtfilter. 51 B Vervang de oude batterijen door nieuwe. Let op De batterijen van de afstandsbediening vervangen Als de afstandsbediening niet meer snel reageert of als de afstandsbediening niet meer werkt nadat deze enige tijd niet meer is gebruikt, betekent dit waarschijnlijk dat de batterijen leeg zijn. Vervang in dat geval de batterijen.
Verbruiksmateriaal vervangen De lamp vervangen Let op f Vervangingsperiode projectorlamp U moet de projectorlamp vervangen als: • De melding "Vervang de lamp." wordt weergegeven. Een melding wordt weergegeven. • Het indicatielampje van de projectorlamp oranje knippert. Knippert oranje • Het geprojecteerde beeld donkerder wordt of in kwaliteit afneemt.
Verbruiksmateriaal vervangen f Procedure voor het vervangen van de projectorlamp Waarschuwing • Als u de projectorlamp vervangt omdat hij niet meer brandt, dan is de projectorlamp mogelijk gebroken. Als u de projectorlamp van een aan het plafond opgehangen projector moet vervangen, ga er dan altijd van uit dat de lamp is gebroken en ga naast en niet onder de lampdeksel staan. Verwijder de lampdeksel voorzichtig. Er kunnen kleine stukjes glas naar beneden vallen als de lampdeksel wordt geopend.
Verbruiksmateriaal vervangen de twee bevestigingsschroeven van de lamp C Draai los. D Verwijder de oude projectorlamp. Als de lamp is gebroken, vervang de lamp dan door een nieuwe of neem contact op met u plaatselijke dealer voor advies. Als u zelf de projectorlamp vervangt, wees dan voorzichtig en voorkom dat u in aanraking komt met gebroken glas. E Installeer de nieuwe lamp.
Verbruiksmateriaal vervangen F Plaats de projectorlamp opnieuw. Let op • Controleer of u de lamp goed hebt geïnstalleerd. Als de lampdeksel wordt verwijderd, wordt de projectorlamp uit veiligheidsoverwegingen automatisch uitgeschakeld. Als de lampdeksel of de projectorlamp niet goed zijn geïnstalleerd, kunt u de lamp niet inschakelen. • Dit product bevat een component dat kwik (Hg) bevat. Informeer u over de lokale wetgeving m.b.t. weggooien of recycling.
Verbruiksmateriaal vervangen Het luchtfilter vervangen C Installeer het nieuwe luchtfilter. Schuif het luchtfilter van buitenaf in de projector en druk het aan tot het vastklikt. f Vervangingsperiode luchtfilter U moet het luchtfilter vervangen als: • Het luchtfilter is gescheurd. • Het bericht wordt weergegeven ook al is het luchtfilter gereinigd. f Procedure voor het vervangen van het luchtfilter Het luchtfilter kan ook worden vervangen als de projector aan het plafond is bevestigd.
Belangrijke informatie voor het vervoeren van de projector In de projector zijn veel glazen onderdelen en precisiecomponenten aanwezig. Voorkom schade tijdens het transport. Ga als volgt met de projector om. Verplaatsen over kleine afstanden Controleer de volgende punten en voer ze dan zorgvuldig uit. • Schakel de projector uit en maak alle kabels los. • Doe de dop op de lens. • Berg de voetjes op.
Een gebruikerslogo opslaan U kunt het beeld dat momenteel wordt geprojecteerd als gebruikerslogo opslaan. 58 "Uitgebreid" - "Gebruikerslogo" in het B Selecteer configuratiemenu. s "Het configuratiemenu gebruiken" pag.25 q In de infobalk onder het menu ziet u welke knoppen u kunt gebruiken en waar ze voor dienen. Als een gebruikerslogo wordt opgeslagen, wordt het vorige gebruikerslogo gewist. Procedure het beeld dat u als gebruikerslogo wilt A Projecteer gebruiken en druk vervolgens op de [Menu]-knop.
Een gebruikerslogo opslaan het kader om het deel van het beeld dat D Verplaats u als gebruikerslogo wilt gebruiken, te selecteren. Op de afstandsbediening Op het bedieningspaneel "Dit beeld kiezen?" wordt weergegeven, E Als selecteer dan "Ja". de zoomfactor in het instellingsvenster F Selecteer voor zoom. de melding "Dit beeld opslaan als G Als gebruikerslogo?" wordt weergegeven, selecteer dan "Ja". Het beeld wordt opgeslagen. Nadat het beeld is opgeslagen, wordt de melding "Voltooid" weergegeven.
Beeldschermgrootte en afstand 60 Raadpleeg onderstaande tabel voor de beste positie voor de projector. De waarden zijn slechts indicaties. De aanbevolen projectieafstand ligt tussen de 54 en 122 cm.
Op externe apparatuur aansluiten Op een externe monitor aansluiten Computerbeelden die worden ingevoerd via de Computer1-ingangspoort kunnen tegelijkertijd op een externe monitor en het scherm worden weergegeven indien aangesloten op de projector. Dit betekent dat u de geprojecteerd beelden kunt controleren op een externe monitor tijdens het geven van presentaties, zelfs als u het scherm niet kunt zien. Sluit de externe monitor aan met de kabel die is geleverd bij de monitor.
LAN-kabel aansluiten Sluit een in de handel verkrijgbare 100baseTX of 10baseT type LANnetwerkkabel aan. Naar LAN-poort LAN-kabel (in de winkel verkrijgbaar) Naar LAN-poort Let op Gebruik een categorie 5 afgeschermde LAN-kabel om storingen te voorkomen.
Optionele accessoires en verbruiksmateriaal De volgende accessoires en verbruiksmaterialen zijn als optie verkrijgbaar. U kunt deze producten naar wens aanschaffen. De volgende lijst met optionele accessoires en verbruiksmateriaal is van toepassing vanaf: 2009.03. De accessoiregegevens kunnen zonder voorafgaande opgaaf van redenen worden gewijzigd en de beschikbaarheid van accessoires verschilt per land.
Woordenlijst 64 Hier vindt u een korte uitleg van technische termen die in deze handleiding worden gebruikt. Raadpleeg eventueel andere in de winkel verkrijgbare publicaties voor meer informatie. AMX Device Discovery Componentvideo Composietvideo Contrast DHCP Dolby Digital Gateway-adres HDTV Hoogte-breedteverhouding Interliniëring IP-adres Progressief SDTV AMX Device Discovery is een technologie voor systeemconfiguratie die is ontwikkeld door AMX Corporation.
Woordenlijst SNMP SNMP Trap IP Adres sRGB Subnetmasker SVGA S-video SXGA Synchronisatie Tracking (Frequentieafstemming) Vergrotingsmodus Vernieuwingssnelheid VGA WXGA XGA 65 Een afkorting voor Simple Network Management Protocol, het protocol voor controle en beheer van apparaten zoals routers en computers die zijn aangesloten op een TCP/IP-netwerk.
ESC/VP21-commando's Lijst met commando's Communicatieprotocol Als het commando power ON naar de projector wordt gestuurd, schakelt de projector in en gaat hij over in opwarmmodus. Als de projector is ingeschakeld, wordt een dubbele punt ":" (3Ah) teruggestuurd. Als een commando wordt ingevoerd, voert de projector het commando uit en stuurt een ":" terug. Vervolgens accepteert hij het volgende commando.
ESC/VP21-commando's Kabelindelingen f Seriële aansluiting • Stekkervorm : 9-pins D-sub (mannetje) • Projectoringangsconnector : RS-232C Computer Signaal GND 5 5 GND GND Aarde RD 2 3 TD TD Verzenden TD 3 2 RD RD Ontvangen DTR 4 6 DSR DSR Data Set Ready DSR 6 4 DTR DTR Data Terminal Ready Projector (seriële pc-kabel) Functie
PJLink 68 Als onderdeel van hun pogingen om beheerprotocollen voor projectors te standaardiseren, heeft de JBMIA (Japan Business Machine and Information System Industries Association) PJLink Klasse 1 als standaardprotocol voor het beheren van netwerkcompatibele projectors ingesteld. De projector voldoet aan de door de JBMIA opgestelde PJLink Klasse 1-standaard. Hij voldoet aan alle commando's, behalve aan de volgende door PJLink Klasse 1 gedefinieerde commando's; de overeenkomst is door PJLink bevestigd.
Lijst met ondersteunde monitorbeeldschermen 69 f Computerbeeld (RGB analoog) Eenheid: beeldpunt Signaal VGAEGA VGA SVGA XGA WXGA WXGA+ WSXGA+*3 SXGA SXGA+ UXGA MAC13 MAC16" MAC19" MAC21" Verversingsfrequentie (Hz) Resolutie 70 60/72/75/85/iMac*1 56/60/72/75/85/iMac*1 60/70/75/85/iMac*1 60 60 60/75/85 60/75/85 60 70/75/85 60/75/85 60/75/85 60/75/85 60 67 75 75 60 75 640^350 640^480/640^360*2 800^600/800^450*2 1024^768/1024^576*2 1280^768 1360^768 1280^800 1440^900 1680^1050 1152^864 1280^1024 1280^960
Lijst met ondersteunde monitorbeeldschermen f Componentvideo Eenheid: beeldpunt Signaal Verversingsfrequentie (Hz) Hoogte-breedteverhouding Resolutie Normaal 16:9 Volledig Zoom Tot 60 720^480/720^360 * 1066^800 1280^720 1280^800 1280^800 640^480 50 720^576/720^432* 1066^800 1280^720 1280^800 1280^800 768^576 SDTV (480p) 60 720^480/720^360 * 1066^800 1280^720 1280^800 1280^800 640^480 SDTV (576p) 50 720^576/720^432* 1066^800 1280^720 1280^800 1280^800 768^576 HDT
Technische gegevens Productnaam Afmetingen Paneelgrootte Weergavemethode Resolutie Scherpte instellen Zoom instellen Projectorlamp Max.
Afmetingen 72 242,0 137,0 126,0 58,0 83,5 Lensmidden 157,0 14,0 39,0 12,0 95,0 25,5 92,0 144,0 70,0* 258,0 20,5 327,0 * Afstand van lensmidden tot bevestigingspunten ophangbeugel 5-M4 ^ 9 Eenheid: mm
Index A 73 D A/V Mute ............................................................. 14 Aanvraagcode ..................................................... 21 Achtergrond weerg. ............................................. 29 Achterkant ........................................................... 29 Achterscherm ...................................................... 49 Achterste voet ....................................................... 9 Afstandsbediening .................................................
Index N S Netwerkbeveil. ..................................................... 20 Netwerkmenu ...................................................... 31 Numerieke knoppen .............................................. 8 Schermgrootte .....................................................60 Scherpstelring ........................................................5 Scherpte ..............................................................26 Schoolbord ..........................................................
Alle rechten voorbehouden. Niets uit deze uitgave mag worden verveelvoudigd, opgeslagen in een geautomatiseerd gegevensbestand of openbaar worden gemaakt in enige vorm of op enige wijze, hetzij elektronisch, mechanisch, door fotokopiëren, opnamen of enige andere manier, zonder voorafgaande schriftelijke toestemming van Seiko Epson Corporation. Er wordt geen aansprakelijkheid voor octrooien aanvaard in verband met gebruik van de informatie in deze uitgave.