User’s Guide
Notations Used in This Guide • Safety indications The documentation and the projector use graphical symbols to show how to use the projector safely. Please understand and respect these caution symbols in order to avoid injury to persons or property. Warning This symbol indicates information that, if ignored, could possibly result in personal injury or even death due to incorrect handling.
Contents 3 Notations Used in This Guide. . . . . . . . . . . . . . . . . . . . . . . . . . 2 Introduction Changing the Aspect for computer images (EB-826W). . . . . . . . . . . . . . . Pointer Function (Pointer). . . . . . . . . . . . . . . . . . . . . . . . . . . . . . . . . . . . Enlarging Part of the Image (E-Zoom). . . . . . . . . . . . . . . . . . . . . . . . . . . . . Operating the Mouse Pointer by Remote Control (Wireless Mouse). . . . . . . . . . . . . . . . . . . . . . . . .
Contents 4 Saving a User's Logo. . . . . . . . . . . . . . . . . . . . . . . . . . . . . . . . . . . . . . . . 76 Troubleshooting Using the Help. . . . . . . . . . . . . . . . . . . . . . . . . . . . . . . . . . . . . . . . . . . . . . 54 Problem Solving. . . . . . . . . . . . . . . . . . . . . . . . . . . . . . . . . . . . . . . . . . . . 55 Reading the Indicators. . . . . . . . . . . . . . . . . . . . . . . . . . . . . . . . . . . . t Indicator is lit or flashing red. . . . . . . . . . . . . . . . . .
Contents Composite Video/S-Video. . . . . . . . . . . . . . . . . . . . . . . . . . . . . . . . . Supported Monitor Displays (EB-826W). . . . . . . . . . . . . . . . . . . . . . . . . Computer signals (analog RGB). . . . . . . . . . . . . . . . . . . . . . . . . . . . . Component Video. . . . . . . . . . . . . . . . . . . . . . . . . . . . . . . . . . . . . . Composite Video/S-Video. . . . . . . . . . . . . . . . . . . . . . . . . . . . . . . . . 5 . . . . . . . . . . . . . . . . . . . . . . . . . .
Introduction This chapter explains the projector's features and the part names.
Projector Features Features Common to Each Model Easy to handle • The A/V mute slide knob makes it easy to project and store You can stop and resume projection easily by opening and closing the A/V mute slide knob which makes giving clear presentations easier. 7 • Projection screen for WXGA (EB-826W) With a computer that has a 16:10 WXGA wide LCD display, the image can be projected in the same aspect. You can use whiteboards and other landscape format screens.
Projector Features • Equipped with various anti-theft devices The projector is equipped with the following types of anti-theft security devices. s p.32 • Security slot • Security cable installation point EB-826W/825/85 Features Taking full advantage of a network connection You can make effective use of your network by using the supplied "EPSON Projector Software for Meeting & Monitoring" to perform efficient and varied presentations and meetings.
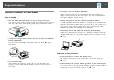
Part Names and Functions 9 Name Front/Top Name A Air exhaust vent Caution Do not place objects that may become warped or otherwise affected by heat near the Air exhaust vent and do not put your face or hands near the vent while projection is in progress. B Remote Receiver C A/V mute slide knob Slide the knob to open and close the A/V mute slide knob. D Foot adjust lever Pull out the Foot adjust lever to extend and retract the Front adjustable foot.
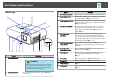
Part Names and Functions 10 Name Rear Function G Audio Out Port (EB-826W/825/85/84 only) Outputs the image currently being projected and audio from the Mic Input Port to an external speaker. s p.88 H Lamp Cover Fixing Screw Screw to fix the Lamp cover in place. s p.69 I S-Video Input Port For S-video signals from video sources. Video Input Port Audio-L/R input port J Computer1 Input Port For composite video signals from video sources.
Part Names and Functions Name 11 Function L USB indicator (EB-826W/825/824/85 only) The following explains the status of USB devices connected to USB port. (TypeA). OFF: USB device is not connected Orange Light ON: USB device is connected Green Light ON: USB device is operating Red Light ON: Error M USB Port (TypeA) (EB-826W/825/824/85 only) Projects a JPEG image Slideshow when memories or digital cameras are connected to the USB compatible port.
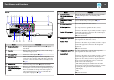
Part Names and Functions 12 Name Control panel Name Function A Status indicators The color of the indicators and whether they are flashing or lit indicate the status of the projector. s p.55 B [t] button Turns the projector power on or off. s Quick Start Guide C [Source Search] button Changes to the next input source that is connected to the projector and is sending an image. s p.
Part Names and Functions Remote Control 13 Name Function A [t] button Turns the projector power On or Off. s Quick Start Guide B [Computer] button Each time the button is pressed, the image changes from the Computer1 input port to the Computer2 input port. s p.17 C [Video] button Each time the button is pressed, the image changes from the Video input port to the S-Video input port. s p.17 D Numeric buttons Use when entering a password. s p.
Part Names and Functions Name 14 Function M [Enter] button When a Configuration Menu or a Help screen is displayed, it accepts and enters the current selection and moves to the next level. s p.34, p.54 Acts as a mouse's left button when using the Wireless Mouse function. s p.27 N [Return] button Stops the current function. If pressed when a Configuration Menu is displayed, it moves to the previous level. s p.34, p.54 Acts as a mouse's right button when using the Wireless Mouse function. s p.
Useful Functions This chapter explains useful tips for giving presentations, and the Security functions.
Changing the Projected Image You can change the projected image in the following two ways. • Changing by Source Search The projector automatically detects signals being input from connected equipment, and the image being input from the equipment is projected. • Changes to the target image. You can use the Remote Control buttons to change to the target input port. 16 E F USB Display G LAN: When the projector is connected to a computer via a network, and images from EMP NS Connection are projected.
Changing the Projected Image q The following screen showing the status of image signals is displayed when only the image that the projector is currently displaying is available, or when no image signal can be found. You can select the input port where the equipment you want to use is connected. If no operation is performed after about 10 seconds, the screen closes. USB is only displayed for EB-826W/825/824/85. LAN is only displayed for EB-826W/825/85.
Functions for Enhancing Projection Selecting the Projection Quality (Selecting Color Mode) 18 Procedure Remote Control You can easily obtain the optimum image quality simply by selecting the setting that best corresponds to your surroundings when projecting. The brightness of the image varies depending on the mode selected. Mode Application Dynamic Ideal for use in a bright room. This is the brightest mode, and reproduces shadow tones well.
Functions for Enhancing Projection 19 Setting the Auto Iris By automatically setting the luminance according to the brightness of the displayed image, it lets you enjoy deep and rich images. Procedure A Press the [Menu] button and select Image - Auto Iris from Procedure the Configuration Menu. s "Using the Configuration Menu" Using the Remote Control Remote Control Using the Control panel B Select On. Body Each time you press the button, or open/close the lens cover A/V Mute turns on or off.
Functions for Enhancing Projection Freezing the Image (Freeze) When the moving image on the screen is frozen, the image continues to project, so you can project a moving image one frame at a time like a still photo. Also, you can perform operations such as changing between files during presentations from a computer without projecting any images if the freeze function is activated beforehand.
Functions for Enhancing Projection Changing the Aspect for video equipment images EB-825/824/85/84 Each time you press the button, it switches between 4:3 and 16:9. EB-826W Each time the button is pressed, it changes in the order Normal, 16:9, Full, Zoom, and Through.
Functions for Enhancing Projection 22 Changing the Aspect for computer images (EB-825/824/85/84) You can change the Aspect as follows. Set Values Operation Projection example Normal Projects to the full projection size retaining the Aspect of the input image. 4:3 Projects to the full projection size at an Aspect of 4:3. This is ideal for when you want to project images at an Aspect of 5:4 (1280 x 1024) to the full projection size. When a 1280x1024 signal is input 16:9 Projects at a 16:9 Aspect.
Functions for Enhancing Projection 23 Changing the Aspect for computer images (EB-826W) You can change the Aspect as follows. EB-826W offers WXGA 1280x800 resolution (Aspect Ratio 16:10). When projecting onto 16:9 screens, set the Aspect to 16:9. Set Values Operation Projection example Normal Projects to the full projection size retaining the Aspect of the input image. When a 1024x768 signal is input 16:9 Projects to the full projection size at an Aspect of 16:9.
Functions for Enhancing Projection Set Values Through q 24 Operation Projection example Projects at the resolution of the input image size to the When an 800x600 signal is input center of the screen. This is ideal for projecting clear images. If the image resolution exceeds 1280x800, the edges of the image are not projected. When an 1400x1050 signal is input If parts of the image are missing, set Wide or Normal in Resolution from the Configuration Menu depending on the size of the computer panel.
Functions for Enhancing Projection Pointer Function (Pointer) 25 B Move the Pointer icon ( ). Remote Control This allows you to move a Pointer icon on the projected image, and helps you draw attention to the area you are talking about. Procedure A Display the Pointer. Remote Control When pressed in conjunction with the adjacent [ [ ], [ ], and [ ] buttons, the pointer can be moved diagonally in addition to up/down and left/right.
Functions for Enhancing Projection Enlarging Part of the Image (E-Zoom) 26 B Move the ( ) to the area of the image that you want to enlarge. This is useful when you want to expand images to see them in greater detail, such as graphs and tables. Remote Control Procedure A Start E-Zoom. Remote Control When pressed in conjunction with the adjacent [ ], ], [ ], and [ ] buttons, the pointer can be moved [ diagonally in addition to up/down and left/right.
Functions for Enhancing Projection 27 C Enlarge. can use the projector's Remote Control like a Wireless Mouse to control the computer's mouse pointer. Remote Control Each time the button is pressed, the area is expanded. You can expand quickly by holding the button down. You can reduce the enlarged image by pressing the [x] button. Press the [Return] button to cancel. q • The enlargement ratio appears on the screen. The selected area can be enlarged to between 1 to 4 times in 25 incremental steps.
Functions for Enhancing Projection Once the connection has been made, the mouse pointer can be operated as follows. Moving the mouse pointer Mouse clicks Left click: Press the Enter button. Right click: Press the Return button. Double click: Press quickly twice. Drag and drop Switch PowerPoint screens This is useful for displaying the previous or next slide in a PowerPoint Slideshow. : Keep pressed 1. While holding down the [Enter] ], button, press the [ [ ], [ ], or [ ] button. 2.
Security Functions The projector has the following enhanced security functions. • Password Protect You can limit who can use the projector. • Control Panel Lock You can prevent people changing the settings on the projector without permission. s p.31 • Anti-Theft Lock The projector is equipped with various types of anti-theft security devices. s p.32 29 2. User's Logo Protect Even if someone tries to change the User's Logo set by the owner of the projector, it cannot be changed.
Security Functions Procedure A During projection, hold down the [Freeze] button for about five seconds. The Password Protect setting menu is displayed. Remote Control 30 D Turn on Network Protect.(EB-826W/825/85/84 only) (1) Select Network Protect, and then press the [Enter] button. (2) Select On, and then press the [Enter] button. (3) Press the [Return] button. E Set the Password. (1) Select Password, and then press the [Enter] button.
Security Functions Procedure While holding down the [Num] button, enter the Password by pressing the numeric buttons. When you enter the correct Password, projection begins. Attention 31 • Partial Lock All of the buttons on the Control panel, except for the [t] button, are locked. This is useful at events or shows when you want to deactivate all buttons and only project, or at schools when you want to limit button operation. The projector can still be operated using the Remote Control.
Security Functions B Select either Full Lock or Partial Lock. C Select Yes when the confirmation message is displayed. The Control panel buttons are locked according to the setting you chose. q You can release the Control panel lock by one of the following two methods. • From the Remote Control, select Off in Settings - Control Panel Lock from the Configuration Menu. • Press and hold down the [Enter] button on the Control panel for about seven seconds, a message is displayed and the lock is released.
Configuration Menu This chapter explains how to use the Configuration Menu and its functions.
Using the Configuration Menu Selecting from the top menu 34 Selecting from the sub menu Changing the selected item Exit
List of Functions 35 Image Menu Items that can be set vary depending on the image signal and Source currently being projected as shown in the following screen shots. Setting details are saved for each image signal and Source. Depending on the model used, some input sources are not supported. s p.16 Component Videog/Composite videog/S-Video g Computer Signal/USB /USB Display/LAN Sub Menu Function Color Mode You can select the quality of the image to suit your surroundings. s p.
List of Functions 36 Sub Menu Function You can reset all adjustment values for the Image menu functions to their default settings. To return all menu items to their default settings, see s p.52 Reset Signal Menu Items that can be set vary depending on the image signal currently being projected as shown in the following screen shots. Setting details are saved for each image signal. You cannot make settings on the Signal menu when the source is LAN.
List of Functions 37 Sub Menu Function Progressive (Component Video can only be adjusted when 480i/576i/1080i signals are being input) Off: IP conversion is carried out for each field in the screen. This is ideal for viewing images with a large amount of movement. On: Interlaceg (i) signal is converted to Progressiveg (p). Applies to still images. Noise Reduction Smoothes out rough images. There are two modes. Select your favorite setting.
List of Functions 38 Sub Menu Function Control Panel Lock You can use this to restrict operation of the projector's Control panel. s p.31 Pointer Shape You can select the shape of the pointer. s p.25 Pointer 1: Pointer 2: Pointer 3: Brightness Control You can set the Lamp brightness to one of two settings. Select Low if the images being projected are too bright such as when projecting images in a dark room or onto a small screen.
List of Functions 39 Extended Menu Sub Menu Function Display You can make settings related to the projector's display. Messages: You can set whether or not (On/Off) to display the Source name when you change the Source, the Color Mode name when you change the Color Mode, a message when no image signal is input, and so on. Display Background*1: You can set the screen status for when no image signal is available to Black, Blue, or Logo.
List of Functions 40 Sub Menu Operation Function Direct Power On: You can set whether or not (On/Off) to enable Direct Power On. When it is set to On and the power cable is plugged in, be aware that the projector turns on automatically in case such as a power outage is restored. Sleep Mode: When set to On, this automatically stops projection when no image signal is being input and no operations are carried out.
List of Functions 41 Network Menu (EB-826W/825/85/84 only) When Network Protect is set to On in Password Protect, a message is displayed and the settings cannot be changed. You can make changes after setting Network Protect to Off. s p.29 EB-826W/825/85/84 Sub Menu EB-84 Function Network Information You can confirm the setting status for each network as follows. Network Configuration The following menus are available for setting Network items.
List of Functions 42 Notes on operating the Network menu Selecting from the top menu and sub menus, and changing of selected items are the same as operations in the Configuration Menu. When done, make sure you go to the Setup complete menu, and select one of Yes, No, or Cancel. When you select Yes or No, you return to the Configuration Menu. Each time the [CAPS] key is selected, it sets and changes between upper case and lower case letters.
List of Functions 43 Basic Menu EB-826W/825/85 Sub Menu EB-84 Function Projector Name Displays the projector name used to identify the projector when connected to a Network. When editing, you can enter up to 16 single-byte alphanumeric characters. PJLink Password Set a Password to use when you access the projector using compatible PJLink software. s p.92 You can enter up to 32 single-byte alphanumeric characters.
List of Functions 44 Wireless LAN Menu (EB-826W/825/85 only) Settings are enabled when the optional Wireless LAN unit is installed. Sub Menu Function Connection mode Use EMP NS Connection to set the mode, how the computer connect to the projector. Set to Quick Connection Mode when you want to make a quick wireless connection. Set to Advanced Connection Mode when you want to connect to a network system via an access point. Wireless LAN system Sets the Wireless LAN system. SSIDg Enter an SSID.
List of Functions 45 Sub Menu IP Address Display Function To prevent the IP Address from being displayed on Network Info in the Network Menu and on the LAN Standby screen, set this to Off. Security Menu (EB-826W/825/85 only) Settings are enabled when the optional Wireless LAN unit is installed. Sub Menu Security Function Select one type of security from the following items. When setting up Security, follow the instructions from the administrator of the network system you are about to access.
List of Functions 46 When WEP is selected You can set the following items. Sub Menu Function WEP encryption You can set the encryption for WEP encryption. 128bit: Uses 128 (104) bit encoding 64bit: Uses 64 (40) bit encoding Format You can set the input method for the WEP encryption key. ASCII: Input text. HEX: Input in HEX (hexadecimal). Key ID Selects the WEP encryption ID key. Encryption key 1 Encryption key 2 Encryption key 3 Encryption key 4 You can enter the key used for WEP encryption.
List of Functions 47 Wired LAN Menu Sub Menu IP Settings Function You can make settings related to the following addresses. DHCPg: Select whether or not (On/Off) to use DHCP. If this is set to On you cannot set any more addresses. IP Addressg: You can input the IP Address assigned to the projector. You can input a number from 0 to 255 in each field of the address. However, the following IP Addresses cannot be used. 0.0.0.0, 127.x.x.x, 224.0.0.0 to 255.255.255.
List of Functions 48 Mail Menu When this is set, you receive an e-mail notification if a problem or warning occurs in the projector. For information on the contents of the sent Mail, see "Reading Problem Mail Notification Function (EB-826W/825/85/84 only)" s p.89 Sub Menu Function Mail Notification You can set whether or not (On/Off) to be notified by e-mail. SMTP Server You can input the IP Addressg for the SMTP Server for the projector.
List of Functions 49 Others Menu EB-826W/825/85 Sub Menu Trap IP Address 1 Trap IP Address 2 EB-84 Function You can register up to two for the SNMPg trap notification destination. You can input a number from 0 to 255 in each field of the address. However, the following IP Addresses cannot be used. 127.x.x.x, 224.0.0.0 to 255.255.255.255 (where x is a number from 0 to 255) To use SNMP to monitor the projector, you need to install the SNMP manager program on your computer.
List of Functions 50 Reset Menu Resets all of the Network settings. Sub Menu Reset network settings. Function To reset all of the Network settings, select Yes. After you Reset all the settings, the Basic menu appears.
List of Functions 51 Info Menu (Display Only) Lets you check the status of the image signals being projected and the status of the projector. Items that can be displayed vary depending on the image signal and Source currently being projected as shown in the following screen shots. Depending on the model used, some input sources are not supported. s p.16 Computer Signal/Component Videog/USB /USB Display Composite videog/S-Videog Sub Menu Function time*.
List of Functions 52 Reset Menu Sub Menu Function Reset All You can reset all items in the Configuration Menu to their default settings. The following items are not reset to their defaults: Input Signal, User's Logo, all items for Network menus, Lamp Hours, and Language. Reset Lamp Hours You can clear the cumulative Lamp Hours use time, and return it to "0H". Reset when you replace the Lamp.
Troubleshooting This chapter explains how to identify problems and what to do if a problem is found.
Using the Help 54 If a problem occurs with the projector, the Help screen is displayed to assist you by pressing the [Help] button. You can solve problems by answering the questions. C Confirm the selection. Using the Remote Control Using the Control panel Procedure A Press the [Help] button. The Help screen is displayed. Using the Remote Control Using the Control panel Questions and solutions are displayed as shown on the screen below. Press the [Help] button to exit Help. B Select a menu item.
Problem Solving 55 If you are having a problem with the projector, first check the projector's indicators and refer to "Reading the Indicators" below. If the indicators do not show clearly what the problem might be, refer to "When the Indicators Provide No Help". s p.58 Reading the Indicators The projector is provided with the following three indicators that indicate the operating status of the projector. A Indicates the operating status.
Problem Solving 56 If all indicators are off, check that the power cable is connected correctly and that the power is being supplied normally. Sometimes, when the power cable is unplugged, the t indicator remains lit for a short period, but this is not a fault.
Problem Solving Status 57 Cause Remedy or Status If it is cracked: Replace it with a new lamp, or contact your local dealer for further advice. If replacing the lamp yourself, be careful to avoid pieces of broken glass (you cannot continue projecting until the Lamp is replaced). s Epson Projector Contact List Check that the lamp cover and lamp are securely installed. s p.69 If the lamp cover or the lamp are not installed correctly, the lamp does not turn on.
Problem Solving When the Indicators Provide No Help If any of the following problems occur and the indicators do not offer a solution, refer to the pages given for each problem. Problems relating to images • "No images appear" s p.59 Projection does not start, the projection area is completely black, the pro‐ jection area is completely blue, and so on. • "Moving images are not displayed" s p.59 Moving images being projected from a computer appear black and noth‐ ing is projected.
Problem Solving 59 Problems relating to images No images appear Check Remedy Did you press the [t] button? Press the [t] button to turn the power on. Are the indicators switched off? The power cable is not connected correctly or power is not being supplied normally. Connect the projector's power cable correctly. s Quick Start Guide Check that your electrical outlet or power source is functioning correctly. Is A/V Mute active? Press the [A/V Mute] button on the Remote Control to cancel A/V Mute.
Problem Solving 60 The message "Not supported" is displayed. Check Is the image signal format setting correct? Remedy Change the setting according to the signal for the connected equipment. s Signal Menu - Video Signal p.36 Only when projecting images from a video source Do the image signal Resolution and the Refresh Rate correspond to the mode? Refer to the computer's documentation for how to change the image signal Resolution and the Refresh Rate output from the computer.
Problem Solving 61 Check Has condensation formed on the lens? Remedy If the projector is suddenly taken from a cold environment to a warm environment, or if sudden ambient temperature changes occur, condensation may form on the surface of the lens, and this may cause the images to appear fuzzy. Set the projector up in the room about one hour before it is used. If condensation forms on the lens, turn the projector off and wait for the condensation to disappear.
Problem Solving 62 Check Is the computer set for dual display? Only when projecting computer images Is the correct resolution selected? Only when projecting computer images Remedy If dual display is activated in the "Display Properties" of the computer's Control panel, only about half of the image on the computer screen is projected. To display the entire image on the computer screen, turn off the dual display setting.
Problem Solving 63 Problems when projection starts No power supplied Check Remedy Did you press the [t] button? Press the [t] button to turn the power on. Are the indicators switched off? The power cable is not connected correctly or power is not being supplied normally. Disconnect and then reconnect the power cable. s Quick Start Guide Check that your electrical outlet or power source is functioning correctly.
Problem Solving 64 Check Is the Mic Input Volume turned down too low? Remedy Adjust the Mic Input Volume so that sound can be heard. s Settings Menu - Mic Input Volume p.37 The Remote Control does not work Check Remedy Is the Remote Control light-emitting area pointing towards the Remote receiver on the projector when it is operated? Point the remote control towards the Remote Receiver. Is the remote control too far from the projector? The operating range for the remote control is about 6 m.
Appendix This chapter provides information on maintenance procedures to ensure the best level of performance from the projector for a long time to come.
Installation Methods The projector supports the following four different projection methods. Install according to the conditions of the installation location. 66 • Project images from in front of the screen. (Front projection) • Project images from behind a translucent screen. (Rear projection) • Suspend the projector from the ceiling and project images from in front of the screen. (Front/Ceiling projection) • Suspend the projector from the ceiling and project images from behind a translucent screen.
Cleaning You should clean the projector if it becomes dirty or if the quality of projected images starts to deteriorate. Cleaning the Projector's Surface Clean the projector's surface by wiping it gently with a soft cloth. If the projector is particularly dirty, moisten the cloth with water containing a small amount of neutral detergent, and then firmly wring the cloth dry before using it to wipe the projector's surface.
Replacing Consumables This section explains how to replace the Remote Control batteries, the Lamp, and the air filter. 68 B Replace the old batteries with new batteries. Replacing the Remote Control Batteries If delays in the responsiveness of the Remote Control occur or if it does not operate after it has been used for some time, it probably means that the batteries are becoming flat. When this happens, replace them with new batteries. Have two AA size manganese or alkaline batteries ready.
Replacing Consumables Replacing the Lamp 69 Attention • The lamp replacement message is set to appear after the following time Lamp replacement period It is time to replace the Lamp when: • The message "Replace the lamp. " is displayed when you start projecting. A message is displayed. • The Lamp indicator flashes orange. periods in order to maintain the initial brightness and quality of the projected images. s p.
Replacing Consumables Caution Wait until the Lamp has cooled down sufficiently before removing the Lamp cover. If the lamp is still hot, burns or other injuries may result. It takes about one hour after the power has been turned off for the Lamp to be cool enough. Procedure A After you turn off the projector's power and the confirmation buzzer beeps twice, disconnect the power cable. 70 B Wait until the Lamp has cooled down, then remove the Lamp cover.
Replacing Consumables C Loosen the two Lamp fixing screws. 71 E Install the new Lamp. Insert the new Lamp along the guide rail in the correct direction so that it fits in place, push down firmly at the location marked "PUSH", and once it is fully inserted tighten the two screws. D Take out the old Lamp by pulling the handle. If the Lamp is cracked, replace it with a new lamp, or contact your local dealer for further advice.
Replacing Consumables F Replace the Lamp cover. 72 Replacing the Air Filter Air filter replacement period It is time to replace the air filter when: • The air filter has turned brown. • The message is displayed even though the air filter has been cleaned. How to replace the air filter Attention • Make sure you install the Lamp securely. If the Lamp cover is removed, the Lamp turns off automatically as a safety precaution.
Replacing Consumables B Open the air filter cover. Slide the air filter cover open/close switch, and open the air filter cover. 73 C Remove the air filter. Grip the tab in the center of the air filter, and pull it straight out. D Install the new air filter. Press until it clicks into place.
Replacing Consumables E Close the air filter cover. q Dispose of used air filters properly in accordance with your local regulations.
Optional Accessories and Consumables The following optional accessories and consumables are available. Please purchase these products as and when needed. The following list of optional accessories and consumables is current as of: 2009.04. Details of accessories are subject to change without notice and availability may vary depending on the country of purchase. 75 Component video cable ELPKC19 (3 m - for mini D-Sub 15-pin/RCA male^3) Use to connect a Component Videog source.
Saving a User's Logo 76 You can save the image that is currently being projected as a User's Logo. B Select Extended - User's Logo from the Configuration Menu. s "Using the Configuration Menu" p.34 q When a User's Logo is saved, the previous User's Logo is erased. Check the buttons you can use and the operations they perform in the guide under the menu. Procedure A Project the image you want to use as the User's Logo, and then press the [Menu] button.
Saving a User's Logo 77 D Move the box to select the part of the image to use as the User's Logo. F Select the zoom factor from the zoom setting screen. G When the message Save this image as the User's Logo? is displayed, select Yes. The image is saved. After the image has been saved, the message Completed. is displayed. Using the Remote Control q Using the Control panel You can save at up to 400 ^ 300 dots in size. E When Select this image? is displayed, select Yes.
Screen Size and Projection Distance 78 To find the appropriate screen size, see the following table to setup the projector. Values are just reference.
Screen Size and Projection Distance 79 Units: cm 4:3 Screen Size Minimum (Wide) to Maximum (Tele) 16:10 Screen size Minimum (Wide) to Maximum (Tele) 40" 81x61 134 - 219 -1 50" 100x76 169 - 275 -2 30" 60x30 88 - 144 -1 60" 120x90 203 - 331 -2 40" 80x50 118 - 193 -1 80" 160x120 271 - 442 -3 50" 110x70 149 - 243 -2 100" 200x150 340 - 553 -4 60" 130x80 179 - 292 -2 120" 240x180 408 - 664 -4 80" 170x110 239 - 390 -2 150" 300x230 511 - 831 -5 100" 210x130 30
Connecting and Removing USB Devices (EB-826W/825/824/85 only) 80 USB memories and USB compatible digital cameras, hard disk drives, and the optional Document Camera can be connected to the projector. Images on the connected digital camera or JPEG files on the USB storage device can be played back as a Slideshow. s Projector Operation Guide "Slideshow Basic Operations" When the optional Document Camera is connected, images from the Document Camera will be projected.
Connecting and Removing USB Devices (EB-826W/825/824/85 only) Removing USB Devices After finishing projecting, follow the procedure below to remove USB devices from the projector. Procedure Remove the optional Document Camera from the projector's USB Port (TypeA). For digital cameras, hard disks, and so on, turn off the power to the device and then remove.
Connecting with a USB cable and Projecting (USB Display) By using the supplied USB cable to connect the projector to a Windows computer you can project images from the computer.This function is called USB Display. Simply by connecting via a USB cable, images from the computer can be displayed. Connecting B Connect to the power cable (supplied). C Turn the computer on. D Open the A/V mute slide knob. E Connect to the USB cable.
Connecting with a USB cable and Projecting (USB Display) Connecting for the first time Procedure A Driver installation starts automatically. When you are using a Windows 2000 computer, click Computer All Programs - EPSON Projector - EPSON USB Display - EPSON USB Display Vx.x. When using a computer running Windows 2000 under user authority, a Windows error message is displayed during installation and you may not be able to install the software.
Connecting with a USB cable and Projecting (USB Display) C Computer images are projected. It may take a while before computer images are projected. Until computer images are projected, leave the equipment as it is and do not disconnect the USB cable or turn off the power to the projector. 84 From the second time Computer images are projected. It may take a while before computer images are projected. Please wait.
Connecting a LAN Cable (EB-826W/825/85/84 only) Connect with a commercially available 100BASE-TX or 10BASE-T LAN cable. Depending on the model, the following diagrams and interfaces may differ. A B C To LAN port LAN cable (commercially available) To LAN port Attention To prevent malfunctions, use a category 5 shielded LAN cable.
Installing the Wireless LAN Unit (EB-826W/825/85 only) Procedure A Open the air filter cover. 86 B Install the Wireless LAN unit. Slide the air filter cover open/close switch, and open the air filter cover. C Secure the Wireless LAN unit using the screw included to avoid losing the unit.
Connecting to External Equipment Connecting to an external monitor (EB-826W/ 825/85/84 only) You can display computer images input from Computer1/2 Input Port on an external monitor and the screen connected to the projector at the same time. This means that you can check projected images on an external monitor when giving presentations even if you cannot see the screen. Connect using the cable supplied with the external monitor.
Connecting to External Equipment Connecting to an external speaker (EB-826W/ 825/85/84 only) You can connect speakers with built-in amplifiers to the projector's Audio Out port to enjoy a fuller quality of sound. Connect with a commercially available audio cable (such as pin plug W 3.5 mm stereo mini plug). Use an audio cable compatible with the connector on the external speakers.
Reading Problem Mail Notification Function (EB-826W/825/85/84 only) When the Mail Notification function is set to On and a problem/ warning occurs in the projector, the following e-mail will be sent. Subject: EPSON Projector Line 1: The Projector Name where the problem has occurred Line 2: The IP Address set for the projector where the problem has occurred. Line 3 and on: Details of the problem The details of the problem are listed line by line.
ESC/VP21 Commands 90 Item Command List Logo When the power ON command is transmitted to the projector, the power turns on and it enters warm-up mode. When the projector's power has turned on, a colon ":" (3Ah) is returned. When a command is input, the projector executes the command and returns a ":", and then accepts the next command. If the command being processed terminates abnormally, an error message is output and a ":" is returned.
ESC/VP21 Commands 91 • Projector input port name: RS-232C Signal Name (PC serial cable) Function GND Signal wire ground TD Transmit data RD Receive data DSR Data set ready DTR Data terminal ready Communications protocol • Default baud rate setting: 9600 bps • • • • Data length: 8 bit Parity: None Stop-bit: 1 bit Flow control: None
About PJLink 92 PJLink Class1 was established by the JBMIA (Japan Business Machine and Information System Industries Association) as a standard protocol for controlling network-compatible projector's as part of their efforts to standardize projector control protocols. The projector complies with the PJLink Class1 standard established by the JBMIA.
Supported Monitor Displays 93 Supported Monitor Displays (EB-825/824/85/84) Computer signals (analog RGB) Units: dots Signal Refresh Rate (Hz) Resolution Aspect Mode Normal 4:3 16:9 VGAEGA 70 640x350 1024x560 1024x768 1024x576 VGA 60/72/75/85/iMac*1 640x480/640x360*2 1024x768 1024x768 1024x576 SVGA 56/60/72/75/85/iMac*1 800x600/800x450*2 1024x768 1024x768 1024x576 XGA 60/70/75/85/iMac*1 1024x768/1024x576*2 1024x768 1024x768 1024x576 WXGA 60 1280x768 1024x614 1024x768 102
Supported Monitor Displays 94 Component Video Units: dots Signal Refresh Rate (Hz) Resolution Aspect Mode 4:3 16:9 SDTV(480i) 60 720x480/720x360* 1024x768 1024x576 SDTV(576i) 50 720x576/720x432* 1024x768 1024x576 SDTV(480p) 60 720x480/720x360* 1024x768 1024x576 SDTV(576p) 50 720x576/720x432* 1024x768 1024x576 HDTV(720p) 50/60 1280x720 1024x768 1024x576 HDTV(1080i) 50/60 1920x1080 1024x768 1024x576 HDTV(1080p) 50/60 1920x1080 1024x768 1024x576 * Letterbox signal Com
Supported Monitor Displays 95 Supported Monitor Displays (EB-826W) Computer signals (analog RGB) Units: dots Signal Refresh Rate (Hz) Resolution Aspect Mode Normal 16:9 Full Zoom Through VGAEGA 70 640x350 1280x700 1280x720 1280x800 1280x700 640x350 VGA 60/72/75/85/iMac*1 640x480/640x360*2 1066x800 1280x720 1280x800 1280x800 640x480 SVGA 56/60/72/75/85/iMac*1 800x600/800x450*2 1066x800 1280x720 1280x800 1280x800 800x600 XGA 60/70/75/85/iMac*1 1024x768/1024x576*2 1066x800
Supported Monitor Displays Signal MAC21" 96 Refresh Rate (Hz) 75 Resolution 1152x870 Aspect Mode Normal 16:9 Full Zoom Through 1059x800 1280x720 1280x800 1280x800 1152x800 *1 Connection is disabled if the equipment does not have a VGA output port. *2 Letterbox signal *3 Only compatible when Wide is selected as the Resolution from the Configuration Menu. s p.36 Even when signals other than those mentioned above are input, it is likely that the image can be projected.
Specifications 97 Projector General Specifications EB-826W Product name EB-825 Dimensions EB-85 EB-84 EB-824 327 (W) ^ 95 (H) ^ 250 (D) mm (not including raised section) 0.59" Wide Panel size 0.63" Polysilicon TFT active matrix Display method 1,024,000 pixels Resolution 786,432 pixels (1024 (H) ^ 768 (W) dots) ^ 3 WXGA (1280 (W) ^ 800 (H) dots) ^ 3 Focus adjustment Manual Zoom adjustment Manual (1 to 1.62) UHE lamp, 200 W Model No.: ELPLP50 Lamp Max.
Specifications 98 EB-826W Product name Connectors EB-825 EB-85 EB-84 EB-824 Computer1 Input Port 1 Mini D-Sub15-pin (female) blue Computer2 Input Port 1 Mini D-Sub15-pin (female) blue Audio1 Port 1 Stereo mini jack Audio2 Port 1 Stereo mini jack Video input port 1 RCA pin jack S-Video input port 1 Mini DIN 4-pin Audio Port 1 RCA pin jack x 2 (L, R) Mic Input Port 1 Stereo mini jack Audio Out Port 1 Stereo mini jack − Monitor Out Port 1 Mini D-Sub15-pin (female) black −
Specifications 99 Angle of tilt If you use the projector tilted at an angle of more than 30˚ it could be damaged and cause an accident. Software Requirement The software supplied with the projector or the optional accessories runs on computers that meet the following requirements. EMP NS Connection is only supplied with EB-826W/825/85. EMP NS Connection EMP Monitor USB Display OS Windows 2000 SP4/XP/XP SP1/XP SP2/XP SP3/ Windows 98 SE SP1/Me/NT4.
Specifications 100 DECLARATION of CONFORMITY According to 47CFR, Part 2 and 15 Class B Personal Computers and Peripherals; and/or Personal Computers We: Located at: Epson America, Inc. 3840 Kilroy Airport Way MS: 3-13 Long Beach, CA 90806 Tel: 562-290-5254 Declare under sole responsibility that the product identified herein, complies with 47CFR Part 2 and 15 of the FCC rules as a Class B digital device.
Appearance A B 101 Center of lens * Distance from center of lens to suspension bracket fixing point Units: mm
Glossary 102 This section explains easily terms that are used with the projector and difficult terms that are not explained in the text of this guide. For details, refer to other commercially available publications. AMX Device Discovery AMX Device Discovery is a technology developed by AMX to facilitate AMX control systems for easy operation of the target equipment. Epson have implemented this protocol technology, and have provided a setting to enable the protocol function (ON).
Glossary 103 Refresh Rate The light-emitting element of a display maintains the same luminosity and color for an extremely short time. Because of this, the image must be scanned many times per second to refresh the light-emitting element. The number of refresh operations per second is called the Refresh Rate and is expressed in hertz (Hz).
General Notes All rights reserved. No part of this publication may be reproduced, stored in a retrieval system, or transmitted in any form or by any means, electronic, mechanical, photocopying, recording, or otherwise, without the prior written permission of Seiko Epson Corporation. No patent liability is assumed with respect to the use of the information contained herein. Neither is any liability assumed for damages resulting from the use of the information contained herein.
General Notes The list of GPL Programs is as follows and the names of author are described in the source code of the GPL Programs The list of GPL Programs busybox-1.7.2 libgcc1(gcc-4.2.3) linux-2.6.20 patches udhcp 0.9.8 uvc rev.219 wireless_tools 29 Pixelworks PWC950 SDK drivers The GNU General Public License Version 2 is as follows. You also can see the GNU General Public License Version 2 at http://www.gnu.org/licenses/.
General Notes 1. 2. You may copy and distribute verbatim copies of the Program's source code as you receive it, in any medium, provided that you conspicuously and appropriately publish on each copy an appropriate copyright notice and disclaimer of warranty; keep intact all the notices that refer to this License and to the absence of any warranty; and give any other recipients of the Program a copy of this License along with the Program.
General Notes 4. 5. 6. 7. You may not copy, modify, sublicense, or distribute the Program except as expressly provided under this License. Any attempt otherwise to copy, modify, sublicense or distribute the Program is void, and will automatically terminate your rights under this License. However, parties who have received copies, or rights, from you under this License will not have their licenses terminated so long as such parties remain in full compliance.
General Notes 11. 12. NO WARRANTY BECAUSE THE PROGRAM IS LICENSED FREE OF CHARGE, THERE IS NO WARRANTY FOR THE PROGRAM, TO THE EXTENT PERMITTED BY APPLICABLE LAW. EXCEPT WHEN OTHERWISE STATED IN WRITING THE COPYRIGHT HOLDERS AND/OR OTHER PARTIES PROVIDE THE PROGRAM "AS IS" WITHOUT WARRANTY OF ANY KIND, EITHER EXPRESSED OR IMPLIED, INCLUDING, BUT NOT LIMITED TO, THE IMPLIED WARRANTIES OF MERCHANTABILITY AND FITNESS FOR A PARTICULAR PURPOSE.
General Notes GNU LGPL This projector product includes the open source software programs which apply the GNU Lesser General Public License Version 2 or later version ("LGPL Programs"). We provide the source code of the LGPL Programs until five (5) years after the discontinuation of same model of this projector product. If you desire to receive the source code of the LGPL Programs, please see the "EPSON Projector Contact List" in the User's Guide, and contact the customer support of your region.
General Notes Most GNU software, including some libraries, is covered by the ordinary GNU General Public License. This license, the GNU Lesser General Public License, applies to certain designated libraries, and is quite different from the ordinary General Public License. We use this license for certain libraries in order to permit linking those libraries into non-free programs.
General Notes a) b) The modified work must itself be a software library. You must cause the files modified to carry prominent notices stating that you changed the files and the date of any change. c) You must cause the whole of the work to be licensed at no charge to all third parties under the terms of this License.
General Notes 6. If such an object file uses only numerical parameters, data structure layouts and accessors, and small macros and small inline functions (ten lines or less in length), then the use of the object file is unrestricted, regardless of whether it is legally a derivative work. (Executables containing this object code plus portions of the Library will still fall under Section 6.
General Notes 9. You are not required to accept this License, since you have not signed it. However, nothing else grants you permission to modify or distribute the Library or its derivative works. These actions are prohibited by law if you do not accept this License.
General Notes 16.
General Notes THIS SOFTWARE IS PROVIDED BY THE REGENTS AND CONTRIBUTORS ``AS IS'' AND ANY EXPRESS OR IMPLIED WARRANTIES, INCLUDING, BUT NOT LIMITED TO, THE IMPLIED WARRANTIES OF MERCHANTABILITY AND FITNESS FOR A PARTICULAR PURPOSE ARE DISCLAIMED.
General Notes The Unix configuration script "configure" was produced with GNU Autoconf. It is copyright by the Free Software Foundation but is freely distributable. The same holds for its supporting scripts (config.guess, config.sub, ltconfig, ltmain.sh). Another support script, install-sh, is copyright by M.I.T. but is also freely distributable. It appears that the arithmetic coding option of the JPEG spec is covered by patents owned by IBM, AT&T, and Mitsubishi.
General Notes John Bowler Kevin BraceySam Bushell Sam Bushell Magnus Holmgren Greg Roelofs Tom Tanner libpng versions 0.5, May 1995, through 0.88, January 1996, are Copyright (c) 1995, 1996 Guy Eric Schalnat, Group 42, Inc. For the purposes of this copyright and license, "Contributing Authors" is defined as the following set of individuals: Andreas Dilger Dave Martindale Guy Eric Schalnat Paul Schmidt Tim Wegner The PNG Reference Library is supplied "AS IS". The Contributing Authors and Group 42, Inc.
General Notes If you use the zlib library in a product, we would appreciate *not* receiving lengthy legal documents to sign. The sources are provided for free but without warranty of any kind. The library has been entirely written by Jean-loup Gailly and Mark Adler; it does not include third-party code. If you redistribute modified sources, we would appreciate that you include in the file ChangeLog history information documenting your changes.
General Notes THE SOFTWARE IS PROVIDED "AS IS", WITHOUT WARRANTY OF ANY KIND, EXPRESS OR IMPLIED, INCLUDING BUT NOT LIMITED TO THE WARRANTIES OF MERCHANTABILITY, FITNESS FOR A PARTICULAR PURPOSE AND NONINFRINGEMENT. IN NO EVENT SHALL THE ABOVE COPYRIGHT HOLDERS BE LIABLE FOR ANY CLAIM, DAMAGES OR OTHER LIABILITY, WHETHER IN AN ACTION OF CONTRACT, TORT OR OTHERWISE, ARISING FROM, OUT OF OR IN CONNECTION WITH THE SOFTWARE OR THE USE OR OTHER DEALINGS IN THE SOFTWARE.
Index 120 Control Panel Lock.................................. 31, 38 Cross................................................................ 26 A A/V Mute........................................................ 19 Address 1 Setting........................................... 48 Address 2 Settings.......................................... 48 Address 3 Setting........................................... 48 Air exhaust vent............................................... 9 Air filter replacement period.........
Index 121 Remote Receiver........................................ 9, 10 Replacing batteries......................................... 68 Reset All.......................................................... 52 Reset Menu..................................................... 52 Resetting the lamp operating time........ 52, 72 Resolution....................................................... 51 O Operating temperature................................. Operation...................................................