User's Guide
Notations Used in This Guide • Safety indications The documentation and the projector use graphical symbols to show how to use the projector safely. The indications and their meaning are as follows. Make sure you understand them properly before reading the guide. Warning This symbol indicates information that, if ignored, could possibly result in personal injury or even death due to incorrect handling.
Contents 3 Notations Used in This Guide . . . . . . . . . . . . . . . . . . . . . . . . 2 Useful Functions Connecting with a USB cable and Projecting (USB Display) . . . . 18 Introduction Projector Features . . . . . . . . . . . . . . . . . . . . . . . . . . . . . . . . . . . . . . . . . . 7 Easy to handle and compact . . . . . . . . . . . . . . . . . . . . . . . . . . . . . . . . . . . . . . Compact and lightweight . . . . . . . . . . . . . . . . . . . . . . . . . . . . . . . . . . . . . .
Contents 4 Installing the wire lock . . . . . . . . . . . . . . . . . . . . . . . . . . . . . . . . . . . . . . . . 40 Making a Presentation with a Slideshow (EB-W10/X10 only) . . . . . . . . . . . . . . . . . . . . . . . . . . . . . . . . . . . . . . . . . . . . . . . . . . . . . . . . . . . 41 Specifications of Files that can be Projected in a Slideshow . . . . . . . . . . . . . Connecting and Removing USB Devices . . . . . . . . . . . . . . . . . . . . . . . . . . Connecting USB devices . . . . . . .
Contents 5 Connecting to External Equipment . . . . . . . . . . . . . . . . . . . . . . . . . . 86 Connecting to an external monitor (EB-W9/X9/S9 only) . . . . . . . . . . . . . . . . . . . . 86 Connecting to External Speakers (EB-S10/W9/X9/S9/X92/S92 only) . . . . . . . . . . . . 87 Monitoring and Controlling the Projector Using a Computer (ESC/VP21 Commands) . . . . . . . . . . . . . . . . . . . . . . . . . . . . . . . . . . . . . 88 Before You Begin . . . . . . . . . . . . . . . . . . . . . . . . . .
Introduction This chapter explains the projector's features and the part names.
Projector Features Easy to handle and compact Compact and lightweight 7 A single foot design means you do not have to make any difficult leveling adjustments You can easily make height adjustments with one hand. Its light and compact body makes it easy to carry. Front air exhaust vents Connecting with a USB cable and Projecting (USB Display) The front air exhaust vents direct hot air away from the presenter and computer equipment.
Projector Features 8 Enhanced security functions EB-W10/X10 Features Password Protect to restrict and manage users Projecting JPEG images on a USB storage or a digital camera without using a computer By setting a Password you can restrict who can use the projector. s p.37 Control Panel Lock restricts button operation on the Control panel By connecting a USB storage or a digital camera to the projector, you can project a Slideshow of JPEG images, such as pictures taken with a digital camera.
Part Names and Functions 9 Name Front/Top B Air exhaust vent The illustration is that of EB-W10/X10. From here on, all features will be explained using illustrations of EB-W10/X10 unless otherwise mentioned. Function Exhaust vent for air used to cool the projector internally. Caution Do not place objects that may become warped or otherwise affected by heat near the Air exhaust vent and do not put your face or hands near the vent while projection is in progress.
Part Names and Functions Name 10 Function Name Function M Focus ring Adjusts the image focus. s Quick Start Guide F Computer input port N Control panel s "Control Panel (EB-W10/X10/W9/X9/X92)" p.13 s "Control Panel (EB-S10/S9/S92)" p.14 For video signals from a computer and component video signals from other video sources. G USB indicator The following explains the status of USB devices connected to USB(TypeA) port.
Part Names and Functions 11 Name Rear (EB-S10) Name Function A Remote Receiver Receives signals from the remote control. s Quick Start Guide B Audio port Inputs audio from the audio out port on the other equipment. s Quick Start Guide C Power inlet Connects to the power cable. s Quick Start Guide D Video Input Port For composite video signals from video sources. E Lamp Cover Fixing Screw Screw to fix the Lamp cover in place. s p.
Part Names and Functions 12 Name Rear (EB-W9/X9/S9/X92/S92) Name Function A Remote Receiver Receives signals from the remote control. s Quick Start Guide B Audio port Inputs audio from the audio out port on the other equipment. s Quick Start Guide C Power inlet Connects to the power cable. s Quick Start Guide D Video Input Port For composite video signals from video sources. E Lamp Cover Fixing Screw Screw to fix the Lamp cover in place. s p.
Part Names and Functions 13 Name Base C Security cable installation point Function Pass a commercially available wire lock through here and lock it in place. s p.40 Control Panel (EB-W10/X10/W9/X9/X92) Name Name A [t] button Turns the projector power on or off. s Quick Start Guide B Status indicators The color of the indicators and whether they are flashing or lit indicate the status of the projector. s p.
Part Names and Functions Name 14 Function D [Enter] button If pressed during projection of computer signal images, it automatically adjusts the Tracking, Sync., and Position to project the optimum image. When a Configuration Menu or a Help screen is displayed, it accepts and enters the current selection and moves to the next level. E [w][v] button Corrects Keystone distortion. s Quick Start Guide However, when projecting in Slideshow (EB-W10/X10 only), the buttons only have the [ ] and [ ] functions.
Part Names and Functions Name 15 Function F [Help] button Displays and closes the Help screen which shows you how to deal with problems if they occur. s p.58 G [Esc] button Stops the current function. If pressed when a Configuration menu is displayed, it moves to the previous menu level. s p.48 H [Tele]/[Wide] buttons Adjusts the projection screen size. Pressing the [Tele] button reduces the projection screen size, and pressing the [Wide] button increases it.
Part Names and Functions Name 16 Function A [t] button Turns the projector power On or Off. s Quick Start Guide B [Computer] button Changes to images from the Computer input port. s p.23 C [Video] button Each time the button is pressed, the image cycles through the Video, S-Video, and HDMI (EB-W10/X10 only) input ports. s p.23 D [USB] button Each time the button is pressed, the image changes between USB Display and Slideshow (EB-W10/X10 only). s p.
Useful Functions This chapter explains useful tips for giving presentations, and the Security functions.
Connecting with a USB cable and Projecting (USB Display) By using a USB cable to connect the projector to a computer you can project images from the computer. This function is called USB Display. Simply by connecting via a USB cable, images from the computer can be displayed. System Requirements For Windows OS * Windows Windows Windows Windows Windows CPU Mobile Pentium III 1.2 GHz or faster Recommended: Pentium M 1.
Connecting with a USB cable and Projecting (USB Display) Procedure A Turn the computer on. B Connect to the power cable (supplied). C Turn the projector on. D Open the A/V mute slide. E Connect to the USB cable. To output audio from the projector's speaker, connect an audio cable (commercially available) to the Audio Input Port. s "Connecting for the first time" p.20 s "From the second time" p.21 Attention Connect the projector directly to the computer and not via a USB hub.
Connecting with a USB cable and Projecting (USB Display) Connecting for the first time When connecting for the first time, you need to install the driver. The installation procedure differs for Windows and Mac OS. 20 B Click "Agree". If the driver is not installed, you cannot start USB Display. Select Agree to install the driver. If you want to cancel installation, click Disagree. Procedure For Windows A Driver installation starts automatically.
Connecting with a USB cable and Projecting (USB Display) q • If it is not installed automatically, double-click My Computer EPSON_PJ_UD - EMP_UDSE.EXE, on your computer. • If nothing is projected for some reason, click All Programs EPSON Projector - EPSON USB Display - EPSON USB Display Vx.x, on your computer. See s "From the second time" p.21 when connecting the next time. For Mac OS A The Setup folder for USB Display is displayed in Finder. B Double-click the "USB Display Installer" icon.
Changing the Projected Image 22 You can change the projected image in the following two ways. F USB • Changing by Source Search The projector automatically detects signals being input from connected equipment, and the image being input from the equipment is projected. EB-S10/W9/X9/S9/X92/S92 • Changing directly to the target image You can use the Remote Control buttons to change to the target input port.
Changing the Projected Image When two or more pieces of equipment are connected, press the [Source Search] button until the target image is projected. q The following screen showing the status of image signals is displayed when only the image that the projector is currently displaying is available, or when no image signal can be found. You can select the input port where the equipment you want to use is connected. If no operation is performed after about 10 seconds, the screen closes.
Functions for Enhancing Projection Selecting the Projection Quality (Selecting Color Mode) 24 Procedure Remote Control You can easily obtain the optimum image quality simply by selecting the setting that best corresponds to your surroundings when projecting. The brightness of the image varies depending on the mode selected. Mode Application Dynamic Ideal for use in a bright room. This is the brightest mode, and reproduces shadow tones well.
Functions for Enhancing Projection Setting the Auto Iris By automatically setting the luminance according to the brightness of the displayed image, it lets you enjoy deep and rich images. Procedure 25 Hiding the Image and Sound Temporarily (A/V Mute) You can use this when you want to focus the audience's attention on what you are saying, or if you do not want to show details such as when you are changing between files during presentations from a computer.
Functions for Enhancing Projection q • If you use this function when projecting moving images, the images and sound continue to be played back by the source, and you cannot return to the point where A/V Mute was activated. • When activated from the remote control, you can choose to display Black, Blue, or Logo as the A/V Mute display using the Extended Display - A/V Mute setting from the Configuration menu. s p.
Functions for Enhancing Projection Changing the Aspect Ratio Change the aspect ratiog when video equipment is connected so that images that have been recorded in digital video or onto DVDs can be viewed in 16:9 wide-screen format. Change the aspect ratio when projecting computer images at full size. The changing methods and the types of Aspect Mode are as follows.
Functions for Enhancing Projection Changing the aspect ratio for video equipment images EB-X10/S10/X9/S9/X92/S92 28 EB-W10/W9 Each time the button is pressed, it changes in the order Normal*, 16:9, Full, Zoom, and Native. Each time you press the button, it switches between 4:3 and 16:9. When a signal is input from the HDMI port, it changes in the order Auto, 4:3, and 16:9. When Auto is set, it displays in an appropriate aspect ratio based on information from the input signal.
Functions for Enhancing Projection 29 Changing the aspect ratio for computer images (EB-X10/S10/X9/S9/X92/S92) When projecting images from the computer, you can change the aspect ratio as follows. Aspect Mode Operation Projection example Projects to the full projection size retaining the aspect ratio of Normal Displayed when the source is a computer. the input image. Auto (EB-X10 only) Displayed only when the source is HDMI.
Functions for Enhancing Projection 30 Changing the aspect ratio for computer images (EB-W10/W9) You can change the aspect ratio as follows. For EB-W10/W9, the projection size is 1280 x 800 dots (aspect ratio 16:10) due to WXGA panel resolution. When projecting onto 16:9 screens, set the Aspect Mode to 16:9. Aspect Mode Operation Projection example Normal Projects to the full projection size retaining the aspect ratio of When a 1024x768 signal is input the input image.
Functions for Enhancing Projection Aspect Mode 31 Operation Projection example Zoom Projects the input image at a lateral direction aspect ratio size When a 1024x768 signal is input as it is. Parts that extend beyond the projection size are not projected. Native Projects at the resolution of the input image size to the center When an 800x600 signal is input of the screen. This is ideal for projecting clear images. If the image resolution exceeds 1280x800, the edges of the image are not projected.
Functions for Enhancing Projection Pointer Function (Pointer) 32 B Move the Pointer icon ( ). Remote Control This allows you to move a Pointer icon on the projected image, and helps you draw attention to the area you are talking about. When pressed in conjunction with the adjacent [ Procedure A Display the Pointer. Remote Control [ q ], and [ or ], ] buttons, the pointer can also be moved diagonally.
Functions for Enhancing Projection Enlarging Part of the Image (E-Zoom) 33 B Move the ( ) to the area of the image that you want to enlarge. This is useful when you want to expand images to see them in greater detail, such as graphs and tables. Remote Control Procedure A Start E-Zoom. Remote Control When pressed in conjunction with the adjacent [ [ ], and [ ], [ ], ] buttons, the pointer can also be moved diagonally. C Enlarge.
Functions for Enhancing Projection q 34 • The enlargement ratio appears on the screen. The selected area can be enlarged to between 1 to 4 times in 25 incremental steps. • Press the [ ], [ ], [ ], or [ q You cannot use the Wireless Mouse function and the Page Up/Down function simultaneously. ] buttons to scroll the image.
Functions for Enhancing Projection After the computer and the projector have been connected with a USB cable, the mouse pointer can be operated as follows. Moving the mouse pointer Mouse clicks Left click: Press the [Enter] button. Right click: Press the [Esc] button. Double click: Press quickly twice. Drag and drop : Keep pressed 1. While holding down the [Enter] button, press the [ ], [ ], [ ], or [ ] buttons. 2. Release the [Enter] button to drop at the desired location.
Functions for Enhancing Projection Page Up/Down To page up/down with the remote control, set USB Type B to Page Up/Down from Extended in the Configuration Menu. When projecting in USB Display, you can page up/down without changing the setting. Example of page up/down operation This is useful for displaying the previous or next slide in a PowerPoint Slideshow.
Security Functions The projector has the following enhanced security functions. • Password Protect You can limit who can use the projector. • Control Panel Lock You can prevent people changing the settings on the projector without permission. s p.39 • Anti-Theft Lock The projector is equipped with various types of anti-theft security devices. s p.40 37 2. User's Logo Protect Even if someone tries to change the User's Logo set by the owner of the projector, it cannot be changed.
Security Functions q 38 Remote Control • If Password Protect is already activated, you must enter the Password. If the Password is entered correctly, the Password Protect setting menu is displayed. s "Entering the Password" p.38 • When the Password is set, stick the supplied Password protect sticker in a visible position on the projector as a further theft deterrent. (The Password protect sticker is not supplied with EB-X92/S92.) B Turn on "Power On Protect".
Security Functions Attention • If an incorrect password is entered three times in succession, the message "The projector's operation will be locked." is displayed for about five minutes, and then the projector switches to standby mode. If this happens, disconnect the power plug from the electrical outlet. Wait for approximately 30 seconds leaving the projector unplugged, and then plug it back in and turn on the projector.
Security Functions q You can release the Control panel lock by one of the following two methods. • From the Remote Control, select Off in Settings - Control Panel Lock from the Configuration Menu. • Press and hold down the [Enter] button on the Control panel for about seven seconds, a message is displayed and the lock is released.
Making a Presentation with a Slideshow (EB-W10/X10 only) In Slideshow, you can connect a USB storage device or a digital camera to the projector, and directly project the image files saved on the device. q 41 Example: Connecting a digital camera It may not be possible to use USB storage devices with security functions. Specifications of Files that can be Projected in a Slideshow Type File Type (ex‐ tension) Still image .jpg q Remarks The following cannot be projected.
Making a Presentation with a Slideshow (EB-W10/X10 only) Removing USB devices After finishing projecting, remove the USB device from the projector's USB(TypeA) port. For digital cameras, hard disks, and so on, turn off the power to the device and then remove. 42 q • You can insert a memory card into a USB card reader and connect it to the projector. However, it may not be possible to use some commercially available USB card readers with the projector.
Making a Presentation with a Slideshow (EB-W10/X10 only) 43 B Press the [Enter] button. The selected image is displayed. If a folder was selected, the files in the folder are displayed. On the screen showing the contents of the folder, if you select Back to Top and press the [Enter] button, the screen prior to opening the folder is displayed again. Rotating Images A Cursor • JPEG files are displayed as thumbnails (small images of the files' contents).
Making a Presentation with a Slideshow (EB-W10/X10 only) 44 Although the following steps are explained based on the Remote Control, you can perform the same operations from the projector's Control panel. Projecting an image Procedure A Start a Slideshow. s p.42 The file list screen appears. B Press the [ ], [ ], [ ] and [ ] buttons to set the cursor on the image file you want to project.
Making a Presentation with a Slideshow (EB-W10/X10 only) 45 Procedure A Start a Slideshow. s p.42 The file list screen appears. B Press the [ ], [ ], [ ], and [ ] buttons to set the cursor to the folder for which you want to run the Slideshow, and then press the [Enter] button. C Select "Slideshow" on the bottom of the file list screen and D If you press the [Esc] button, the file list screen is displayed again.
Making a Presentation with a Slideshow (EB-W10/X10 only) Image File Display Setting and Slideshow Operation Setting You can set the display order of the files and the operation of the Slideshow in the Option screen. Procedure A Press the [ ], [ ], [ ], and [ ] buttons to set the cursor to the folder for which you want to set the display requirements, then press the [Esc] button. Select "Option" from the displayed sub menu and press the [Enter] button. B Set each item in the following Option screen.
Configuration Menu This chapter explains how to use the Configuration Menu and its functions.
Using the Configuration Menu Selecting from the top menu 48 Selecting from the sub menu Changing the selected item Exit
List of Functions 49 Image Menu Items that can be set vary depending on the Source currently being projected as shown in the following screen shots. Setting details are saved for each Source and its signal status. Computer *1 /USB Display/HDMI *1*3 /USB *3 Computer *2 /S-Video/Video/HDMI *2*3 *1 When an RGB signal is input *2 When a Component Video signal is input *3 EB-W10/X10 only Sub Menu Function Color Mode You can select the quality of the image to suit your surroundings. s p.
List of Functions 50 Sub Menu Function Auto Iris (This item can be selected only if Dynamic or Theatre is selected as the Color Mode from the Image menu.) Set whether or not (On/Off) to adjust to the optimum light status for images being projected. s p.25 Reset You can reset all adjustment values for the Image menu functions to their default settings. To return all menu items to their default settings, see s p.
List of Functions Sub Menu 51 Function Progressive (When component video or RGB video signal is input, this setting can only be adjusted when 480i/576i signals are being input. This cannot be set when a digital RGB signal is input.) Off: IP conversion is carried out for each field in the screen. This is ideal for viewing images with a large amount of movement. On: Interlaceg (i) signal is converted to Progressiveg (p). Applies to still images.
List of Functions 52 Settings Menu EB-W10/X10 EB-W9/X9/X92 Sub Menu EB-S10/S9/S92 Function Keystone You can correct keystone distortion in the vertical directions. s Quick Start Guide Auto Keystone (EB-W10/X10 only) Turn On to perform Auto Keystone. (Auto Keystone is only executed when Front is selected from the Extended - Projection menu.) Zoom (EB-S10/S9/S92 only) You can adjust the projection screen size to Wide (Large) or Tele (Small).
List of Functions Sub Menu 53 Function You can reset all adjustment values on the Settings menu to their default settings, except for User Button. To return all menu items to their default settings, see s p.56 Reset Extended Menu Sub Menu Function Display You can make settings related to the projector's display. Messages: When set to Off, the following items will not be displayed.
List of Functions 54 Sub Menu Function Operation Direct Power On: You can set whether or not (On/Off) to enable Direct Power On. When it is set to On and the power cable is plugged in, be aware that the projector turns on automatically in case such as a power outage is restored. Sleep Mode: When set to On, this automatically stops projection when no image signal is being input and no operations are carried out.
List of Functions 55 Info Menu (Display Only) Lets you check the status of the image signals being projected and the status of the projector. Items that can be displayed vary depending on the Source currently being projected as shown in the following screen shots. Computer/HDMI * * USB Display/USB * S-Video/Video EB-W10/X10 only Sub Menu Function Lamp Hours You can display the cumulative Lamp operating time*1. When it reaches the lamp warning time, the characters are displayed in yellow.
List of Functions 56 Reset Menu Sub Menu Function Reset All You can reset all items in the Configuration Menu to their default settings. The following items are not reset to their defaults: Input Signal, User's Logo, Lamp Hours, and Language. Reset Lamp Hours You can clear the cumulative Lamp Hours use time, and return it to "0H". Reset when you replace the Lamp.
Troubleshooting This chapter explains how to identify problems and what to do if a problem is found.
Using the Help 58 If a problem occurs with the projector, the Help screen is displayed to assist you by pressing the [Help] button. You can solve problems by answering the questions. C Confirm the selection. Using the Remote Control Using the Control panel Procedure A Press the [Help] button. The Help screen is displayed. Using the Remote Control Using the Control panel Questions and solutions are displayed as shown on the screen below. Press the [Help] button to exit Help. B Select a menu item.
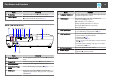
Problem Solving 59 If you are having a problem with the projector, first check the projector's indicators and refer to "Reading the Indicators" below. If the indicators do not show clearly what the problem might be, refer to "When the Indicators Provide No Help". s p.62 Reading the Indicators The projector is provided with the following three indicators that indicate the operating status of the projector. A Indicates the operating status.
Problem Solving 60 Sometimes, when the power cable is unplugged, the t indicator remains lit for a short period, but this is not a fault. t Indicator is lit or flashing red : Lit Status Cause : Flashing : Off Remedy or Status Internal Error Stop using the projector, disconnect the power cable from the electrical outlet, and contact your local dealer or the nearest address provided in the Support and Service Guide.
Problem Solving 61 m o Indicators are flashing or lit orange : Lit Status q Cause : Flashing : Off : Varies according to the projector status Remedy or Status High Temp Warning (This is not an abnormality. However, if the temperature rises too high again, projection stops automatically.) • Check that the air filter and Air exhaust vent are clear, and that the projector is not positioned against a wall. • If the air filter is clogged, clean or replace it. s p.73, p.
Problem Solving When the Indicators Provide No Help If any of the following problems occur and the indicators do not offer a solution, refer to the pages given for each problem. Problems relating to projection • "The projector does not turn on" s p.63 • "No images appear" s p.63 Projection does not start, the projection area is completely black, the projection area is completely blue, and so on. • "Moving images are not displayed (moving image sections are black)" s p.
Problem Solving 63 Problems relating to projection The projector does not turn on Check Remedy Did you press the [t] button? Press the [t] button to turn the power on. Are the indicators switched off? The power cable is not connected correctly or power is not being supplied normally. Disconnect and then reconnect the power cable. s Quick Start Guide Check that your electrical outlet or power source is functioning correctly.
Problem Solving 64 Moving images are not displayed (moving image sections are black) Check Is the computer's image signal being output to the LCD and the monitor? Remedy Change the image signal to external output only. s Check your computer's documentation. Only when projecting images from a laptop computer or a computer with a built-in LCD screen Projection stops automatically Check Is Sleep Mode set to On? Remedy Press the [t] button to turn on the power.
Problem Solving 65 Check Are the image signals being output to the projector? Only when projecting images from a laptop computer or a computer with a built-in LCD screen Remedy If the image signals are only being output to the computer's LCD monitor or to the accessory monitor, you need to change the output to an external destination as well as the computer's own monitor. For some computer models, when the image signals are output externally, they no longer appear on the LCD monitor or accessory monitor.
Problem Solving 66 Check Are the "Sync.g" and "Trackingg" settings adjusted correctly? Only when projecting computer images Remedy Press the [Auto] button on the Remote Control or the [Enter] button on the Control panel to perform automatic adjustment. If the images are not adjusted correctly after using automatic adjustment, you can make the adjustments using Sync. and Tracking from the Configuration Menu. s Signal Menu - Tracking, Sync. p.
Problem Solving 67 Check Remedy Is the Color Adjustment set correctly? Adjust the Color Adjustment setting from the Configuration Menu. s Image Menu - Color Adjustment p.49 Are the Color Saturation and Tint adjusted correctly? Adjust the Color Saturation and Tint settings from the Configuration Menu. s Image Menu - Color Saturation, Tint p.
Problem Solving 68 Problems relating to USB Display No images appear Check Remedy Is the Configuration menu setting correct? When using USB Display, set the USB Type B setting to USB Display. s Extended Menu - USB Type B p.53 Is the USB cable connected correctly? Check that the USB cable is connected correctly. Reconnect it if it is not connected or not connected properly.
Problem Solving 69 Other problems No sound can be heard or the sound is faint Check Remedy Is the audio source connected correctly? Disconnect the cable from the Audio port, and then reconnect the cable. Is the volume adjusted to the minimum setting? Adjust the volume so that sound can be heard. s p.52 s Quick Start Guide Is A/V Mute active? Press the [A/V Mute] button on the Remote Control to cancel A/V Mute. s p.
Appendix This chapter provides information on maintenance procedures to ensure the best level of performance from the projector for a long time to come.
Installation Methods 71 The projector supports the following four different projection methods. Install according to the conditions of the installation location. in front of the screen. (Front/ Ceiling projection) behind a translucent screen. (Rear/Ceiling projection) Warning • A special method of installation is required when suspending the projector from a ceiling (ceiling mount). If it is not installed correctly, it could fall causing an accident and injury.
Cleaning You should clean the projector if it becomes dirty or if the quality of projected images starts to deteriorate. Attention 72 Cleaning the Lens Use a commercially available cloth for cleaning glasses to gently wipe the lens. Turn off the projector's power before cleaning. Warning Cleaning the Projector's Surface Do not use sprays that contain flammable gas to remove dust and lint from the lens. The projector may catch fire due to the high internal temperature of the lamp.
Cleaning 73 Cleaning the Air Filter Clean the air filter and the Air intake vent when the following message is displayed. "The projector is overheating. Make sure nothing is blocking the air vent, and clean or replace the air filter." Attention • If dust collects on the air filter it can cause the internal temperature of the projector to rise, and this can lead to problems with operation and shorten the optical engine's service life. Clean the air filter immediately when the message is displayed.
Replacing Consumables 74 This section explains how to replace the Remote Control batteries, the Lamp, and the air filter. Replacing the Remote Control Batteries If delays in the responsiveness of the Remote Control occur or if it does not operate after it has been used for some time, it probably means that the batteries are becoming flat. When this happens, replace them with new batteries. Have two AA size manganese or alkaline batteries ready.
Replacing Consumables Replacing the Lamp 75 Attention • The lamp replacement message is set to appear after the following time periods Lamp replacement period It is time to replace the Lamp when: • The message "Replace the lamp." is displayed at the lower left of the projection screen when you start projecting. in order to maintain the initial brightness and quality of the projected images. s p.
Replacing Consumables Caution Wait until the Lamp has cooled down sufficiently before removing the Lamp cover. If the lamp is still hot, burns or other injuries may result. It takes about one hour after the power has been turned off for the Lamp to be cool enough. Procedure A After you turn off the projector's power and the confirmation buzzer beeps twice, disconnect the power cable. B Wait until the Lamp has cooled down, then remove the Lamp cover.
Replacing Consumables C Loosen the two Lamp fixing screws. 77 E Install the new Lamp. Insert the new Lamp along the guide rail in the correct direction so that it fits in place securely, and tighten the two screws. D Take out the old Lamp by pulling the handle. If the lamp is cracked, replace it with a new lamp, or contact your local dealer for further advice.
Replacing Consumables F Replace the Lamp cover. 78 Replacing the Air Filter Air filter replacement period It is time to replace the air filter when: • There is a tear in the air filter. • The message is displayed even though the air filter has been cleaned. How to replace the air filter Attention • Make sure you install the Lamp securely. If the Lamp cover is removed, the power turns off automatically as a safety precaution.
Replacing Consumables C Remove the air filter. 79 E Close the air filter cover. Grip the air filter cover tab and pull it straight out. q D Install the new air filter. Slide the air filter from the outside and press in until it firmly clicks into place. Dispose of used air filters properly in accordance with your local regulations.
Optional Accessories and Consumables The following optional accessories and consumables are available. Please purchase these products as and when needed. The following list of optional accessories and consumables is current as of: 2010.05. Details of accessories are subject to change without notice and availability may vary depending on the country of purchase.
Saving a User's Logo 81 You can save the image that is currently being projected as a User's Logo. q Once a User's Logo has been saved, the logo cannot be returned to the factory default. Procedure A Project the image you want to use as the User's Logo, and then press the [Menu] button. Using the Remote Control Using the Control panel q • If User's Logo Protect from Password Protect is set to On, a message is displayed and the user's logo cannot be changed.
Saving a User's Logo 82 G When the message "Save this image as the User's Logo?" is displayed, select "Yes". The image is saved. After the image has been saved, the message "Completed." is displayed. Using the Remote Control q Using the Control panel You can save at 400 ^ 300 dots in size. E When "Select this image?" is displayed, select "Yes". F Select the zoom factor from the zoom setting screen. q • When a User's Logo is saved, the previous User's Logo is erased.
Screen Size and Projection Distance 83 Units: cm Projection Distances (EB-W10/W9) A 16:9 Screen size A Projection distance B Distance from the center of the lens to the base of the screen (or to the top of the screen, if suspended from a ceiling) C Center of lens Minimum (Wide) to Maximum (Tele) B 40" 89x50 114 ~ 137 5 50" 110x62 143 ~ 172 6 60" 130x75 172 ~ 208 8 80" 180x100 231 ~ 278 10 100" 220x120 289 ~ 348 13 120" 270x150 348 ~ 418 15 150" 330x190 435 ~ 523 19 200"
Screen Size and Projection Distance 84 A 16:10 Screen size 320" 690x430 A Minimum (Wide) to Maximum (Tele) B 907 ~ 1089 62 Projection Distances (EB-X10/X9/X92) 4:3 Screen size Minimum (Wide) to Maximum (Tele) B 100" 200x150 302 ~ 363 -17 120" 240x180 363 ~ 436 -20 150" 300x230 454 ~ 546 -25 200" 410x300 607 ~ 729 -34 250" 510x380 759 ~ 912 -42 300" 610x460 912 ~ 1095 -51 Units: cm A 16:9 Screen size A Projection distance B Distance from the center of the lens to the bas
Screen Size and Projection Distance 85 Units: cm Projection Distances (EB-S10/S9/S92) 16:9 Screen size A Projection distance B Distance from the center of the lens to the base of the screen (or to the top of the screen, if suspended from a ceiling) C Center of lens Units: cm 4:3 Screen size A B Minimum (Wide) to Maximum (Tele) (Wide) 30" 61x46 87 ~ 119 -5 40" 81x61 117 ~ 159 -7 50" 100x76 147 ~ 200 -8 60" 120x91 177 ~ 240 -10 80" 160x120 237 ~ 321 -13 100" 200x150 297 ~ 402
Connecting to External Equipment Connecting to an external monitor (EB-W9/X9/S9 only) You can display computer images input from Computer Input Port on an external monitor connected to the projector and the screen at the same time. This means that you can check projected images on an external monitor when giving presentations even if you cannot see the screen. Connect using the cable supplied with the external monitor.
Connecting to External Equipment Connecting to External Speakers (EB-S10/W9/X9/ S9/X92/S92 only) You can connect speakers with built-in amplifiers to the projector's Audio Out port to enjoy a fuller quality of sound. Connect with a commercially available audio cable (such as pin plug W 3.5 mm stereo mini plug). Use an audio cable compatible with the connector on the external speakers.
Monitoring and Controlling the Projector Using a Computer (ESC/VP21 Commands) You can monitor and control the projector from a computer, via USB. This is done by connecting the projector and the computer with a USB cable, and entering communication commands (ESC/VP21 commands). Before You Begin To monitor and control the projector with ESC/VP21 commands, the following preparations must be carried out.
Monitoring and Controlling the Projector Using a Computer (ESC/VP21 Commands) Communications protocol • Default baud rate setting: 9600bps (the speed during communication complies with the USB 1.1 standard.
Supported Monitor Displays 90 Supported Monitor Displays (EB-W10/W9) Computer signals (analog RGB) Units: dots Signal Refresh Rate (Hz) Resolution VGA 60/72/75/85 SVGA XGA Aspect Mode Normal 16:9 Full Zoom Native 640x480 1066x800 1280x720 1280x800 1280x800 640x480 56/60/72/75/85 800x600 1066x800 1280x720 1280x800 1280x800 800x600 60/70/75/85 1024x768 1066x800 1280x720 1280x800 1280x800 1024x768 60 1280x768 1280x768 1280x720 1280x800 1280x768 1280x768 60 1360x768 128
Supported Monitor Displays 91 Component Video Units: dots Signal Refresh Rate (Hz) Resolution SDTV(480i) 60 SDTV(576i) Aspect Mode Normal 16:9 Full Zoom Native 720x480 1066x800 1280x720 1280x800 1280x800 640x480 50 720x576 1066x800 1280x720 1280x800 1280x800 768x576 SDTV(480p) 60 720x480 1066x800 1280x720 1280x800 1280x800 640x480 SDTV(576p) 50 720x576 1066x800 1280x720 1280x800 1280x800 768x576 HDTV(720p) 50/60 1280x720 1280x720 1280x720 1280x800 1280x720 12
Supported Monitor Displays 92 Refresh Rate (Hz) Resolution 60 SXGA+ Signal Aspect Mode 16:9 Full Zoom Native 1280x1024 1280x720 1280x800 1280x800 1280x800 60 1400x1050 1280x800 1280x800 1280x800 1280x800 UXGA 60 1600x1200 1280x720 1280x800 1280x800 1280x800 SDTV(480i) 60 720x480 1280x720 1280x800 1280x800 640x480 SDTV(480p) 60 720x480 1280x720 1280x800 1280x800 640x480 SDTV(576i) 50 720x576 1280x720 1280x800 1280x800 768x576 SDTV(576p) 50 720x576 1280x720
Supported Monitor Displays Signal 93 Refresh Rate (Hz) Resolution 60 Aspect Mode Normal 4:3 16:9 1280x1024 960x768 1024x768 1024x576 60 1280x960 1024x768 1024x768 1024x576 SXGA+ 60 1400x1050 1024x768 1024x768 1024x576 MAC13” 67 640x480 1024x768 1024x768 1024x576 MAC16” 75 832x624 1024x768 1024x768 1024x576 75 1024x768 1024x768 1024x768 1024x576 60 1024x768 1024x768 1024x768 1024x576 75 1152x870 1016x768 1024x768 1024x576 MAC19” MAC21” Even when signals oth
Supported Monitor Displays 94 Composite video/S-video Units: dots Signal Refresh Rate (Hz) Resolution TV(NTSC) 60 TV(PAL,SECAM) 50 Aspect Mode 4:3 16:9 720x480 1016x768 1024x576 720x576 1016x768 1024x576 Input signal from the HDMI port (EB-X10 only) Units: dots Signal Refresh Rate (Hz) Resolution VGA 60 SVGA Aspect Mode 4:3 16:9 640x480 1024x768 1024x576 60 800x600 1024x768 1024x576 XGA 60 1024x768 1024x768 1024x576 WXGA 60 1280x800 1024x768 1024x576 60 1280x960 1
Supported Monitor Displays 95 Supported Monitor Displays (EB-S10/S9/S92) Computer signals (analog RGB) Units: dots Signal Refresh Rate (Hz) Resolution VGA 60/72/75/85 SVGA XGA Aspect Mode Normal 4:3 16:9 640x4800 800x600 800x600 800x450 56/60/72/75/85 800x600 800x600 800x600 800x450 60/70/75/85 1024x768 800x600 800x600 800x450 60 1280x768 800x480 800x600 800x450 60 1360x768 800x451 800x600 800x450 60/75 1280x800 800x500 800x600 800x450 60 1440x900 800x500 800x600
Supported Monitor Displays 96 Component Video Units: dots Signal Refresh Rate (Hz) Resolution SDTV(480i) 60 SDTV(576i) Aspect Mode 4:3 16:9 720x480 800x600 800x450 50 720x576 800x600 800x450 SDTV(480p) 60 720x480 800x600 800x450 SDTV(576p) 50 720x576 800x600 800x450 HDTV(720p) 50/60 1280x720 800x600 800x450 HDTV(1080i) 50/60 1920x1080 800x600 800x450 Composite video/S-video Units: dots Signal Refresh Rate (Hz) Resolution TV(NTSC) 60 TV(PAL,SECAM) 50 Aspect Mode 4:
Specifications 97 Projector General Specifications Product name EB-W10 EB-X10 EB-S10 0.59" Wide 0.55" 1,024,000 WXGA (1280 (W) ^ 800 (H) dots) ^ 3 0.59" Wide 480,000 786,432 XGA (1024 (W) SVGA (800 (W) ^ 768 (H) dots) ^ ^ 600 (H) dots) ^ 3 3 Max. audio output EB-S92 480,000 SVGA (800 (W) ^ 600 (H) dots) ^ 3 Manual Manual (1 to 1.2) Digital (1 to 1.35) Manual (1 to 1.2) Digital (1 to 1.35) UHE lamp, 175 W Model No.
Specifications 220 to 240 V area Operating altitude 98 Operating: 265 W Standby power consumption (Communication On): 3.9 W Standby power consumption (Communication Off): 0.4 W Altitude 0 to 2,286 m Operating temperature +5 to +35˚C (No condensation) Storage temperature -10 to +60˚C (No condensation) Mass Approx. 2.3kg Operating: 234W Operating: 265W Standby power Standby power consumption consumption (Communica‐ (Communica‐ tion On): 3.9W tion On): 3.
Specifications 99 EB-W10 Product name Connec‐ tors EB-X10 EB-S10 EB-W9 EB-X9 EB-X92 Computer Input port 1 Mini D-Sub15-pin (female) blue Video input port 1 RCA pin jack 1 Mini DIN 4-pin EB-S9 EB-S92 Mini DSub15-pin (fe‐ male) black − S-Video Input port Audio Port HDMI port 1 RCA pin jack x 2 (L, R) Stereo mini jack 1 HDMI (Audio is only supported by PCM) − Monitor Output Port 1 Audio Out Port 1 − Stereo mini jack USB (TypeA) Port *1 1 USB connector (Type A) − USB (TypeB
Specifications 100 DECLARATION of CONFORMITY According to 47CFR, Part 2 and 15 Class B Personal Computers and Peripherals; and/or CPU Boards and Power Supplies used with Class B Personal Computers We: Located at: Tel: Epson America, Inc. 3840 Kilroy Airport Way MS: 3-13 Long Beach, CA 90806 562-290-5254 Declare under sole responsibility that the product identified herein, complies with 47CFR Part 2 and 15 of the FCC rules as a Class B digital device.
Appearance 101 EB-W10/X10/S10 EB-W9/X9/S9/X92/S92 Units: mm A B Center of lens Distance from center of lens to suspension bracket fixing point
Glossary 102 This section explains easily terms that are used with the projector and difficult terms that are not explained in the text of this guide. For details, refer to other commercially available publications. Aspect Ratio (Aspect Ratio) The ratio between an image's length and its height. HDTV images have an aspect ratio of 16:9 and appear elongated. The aspect ratio for standard images is 4:3.
Glossary 103 SXGA A type of video signal with a resolution of 1,280 (horizontal) ^ 1,024 (vertical) dots that is used by IBM PC/AT-compatible computers. Sync. The signals output from computers have a specific frequency. If the projector frequency does not match this frequency, the resulting images are not of a good quality. The process of matching the phases of these signals (the relative position of the crests and the troughs in the signal) is called Synchronization.
General Notes All rights reserved. No part of this publication may be reproduced, stored in a retrieval system, or transmitted in any form or by any means, electronic, mechanical, photocopying, recording, or otherwise, without the prior written permission of Seiko Epson Corporation. No patent liability is assumed with respect to the use of the information contained herein. Neither is any liability assumed for damages resulting from the use of the information contained herein.
Index 105 Contrast ........................................................ 49 Control Panel ......................................... 13, 14 Control Panel Lock ............................... 39, 52 Cross .............................................................. 33 A A/V Mute ...................................................... 25 Air exhaust vent ............................................. 9 Air filter replacement period ..................... 78 Air intake vent ................................
Index 106 Photo ............................................................. 24 Pointer ........................................................... 32 Pointer Shape ............................................... 52 Position ......................................................... 50 Power Consumption ................................... 52 Power inlet ....................................... 10, 11, 12 Power On Protect ........................................ 37 Presentation .............................