About the Manuals and Notations Used Types of Manual The documentation for your EPSON projector is divided into the following two manuals. Refer to the manuals in the order given below. Safety Instructions/Support and Service Guide This manual contains information on using the projector safely, and also includes a guide for warranty service, and a troubleshooting check sheet. Be sure to read this manual thoroughly before using the projector.
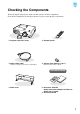
Checking the Components When you unpack the projector, make sure that you have all these components. If any of the components are missing or incorrect, please contact the place of purchase. ❏ Projector (with lens cover) ❏ Remote control ❏ Power cable (3.0m) Connect to the projector and to a wall outlet. ❏ AA-size alkali batteries (2 pcs.) Insert into the remote control.
Table of Contents ■ Features of the Projector............................. 4 ■ Part Names and Functions .......................... 6 Front / Top.................................................... 6 Control panel ................................................ 6 Remote control ............................................. 7 Rear.............................................................. 8 Base ............................................................. 8 ■ Appearance..................................
Table of Contents ■ Problem Solving ........................................ 37 Reading the indicators ............................... 37 • When the (warning) indicator is lit or flashing ...............................................................37 • Indicator statuses in normal operation..................38 When the indicators provide no help.......... 39 • Problems relating to images................................. 39 • Problems when projection starts ..........................
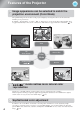
Features of the Projector Image appearance can be selected to match the projection environment (Color Mode) The optimum images for the location can be projected simply by selecting the desired color mode from the following seven preset modes. If "Natural", "Cinema Night", "x.v.Color", "HD" or "Silver Screen" is selected, the Epson Cinema Filter effect is applied automatically to increase the contrast and to make skin tones appear with more natural tints. p.
Features of the Projector Equipped with a wideangle lens shift function The lens shift function allows the position of the projected images to be adjusted vertically and horizontally without distorting the images. This can allow the projector to be set up with greater freedom, even if it is suspended from a ceiling or at an angle to the screen. p.16 Equipped with 2.1x short throw zoom lens For zoom adjustment, 2.1x short throw zoom lens is provided.
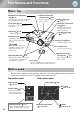
Part Names and Functions Front / Top • Horizontal lens adjustment dial • Remote control light- p.16 receiving area Turn the dial to move the position of the projection image to the left or right. • Lamp cover p.13 Receives signals from the remote control. See below • Vertical lens adjustment p.48 Open this cover when replacing the lamp inside. • Zoom ring • Control panel (top) dial p.16 Turn the dial to move the position of the projection image up or down. • Control panel (side) See below p.
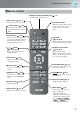
Part Names and Functions Remote control • Remote control light-emitting area p.13 Outputs remote control signals. • Power button p.14, 15 Turns the projector power on/off. Source buttons p.15 Switches the input source to the input terminals indicated on each button. • Default button p.26 Returns settings of the adjustment screen in the configuration menu to their default values when pressed while displaying the screen.
Part Names and Functions Rear • [S-Video] input port p.12 Connects to the S-Video out ports of the video equipment. • [Video] input port • [PC] input port p.12 Connects to the RGB out port of the computer. p.12 • [RS-232C] port Connects to a computer using an RS-232C cable to control the projector from the computer. This is not used in normal use. • Lamp cover open switch Inputs a general video signal (composite video). Connect to an image output port of a video source.
Appearance Centre of lens 136 148.3 72* 12.3 4.5 131 450 * Distance from centre of lens to suspension bracket fixing point 300 75 150 Centre of lens 56 45 134.7 389.
Setting up Adjusting the projection size When the projector is further away from the screen, the projection image size are larger. While referring to the table below, position the projector so that the images are projected onto the screen at the optimum size. The values should be used as a guide for setting up the projector. Screen Adjusting the projection size Centre of lens This is the height from the centre of the lens to the bottom of the projection images.
Setting up Projection methods If you use adhesives on the ceiling mount to prevent the screws from loosening, or if you use things such as lubricants or oils on the projector, the projector case may crack causing it to fall from its ceiling mount. This could cause serious injury to anyone under the ceiling mount and could damage the projector. When installing or adjusting the ceiling mount, do not use adhesives to prevent the screws from loosening and do not use oils or lubricants and so on.
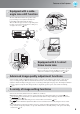
Connecting Image Sources • Turn the power off for both the projector and the signal source before connecting them. If the power for either device is on at the time of connection, damage may result. • Check the shapes of the cable connectors and the device ports before making the connections. If you try to force a connector to fit a device port with a different shape or number of terminals, a malfunction or damage to the connector or port may result. Video equipment (VHS VCR, DVD player, game console, etc.
Preparing the Remote Control Inserting batteries into the remote control At the time of purchase, the batteries are not inserted into the remote control. Insert the supplied batteries before using the remote control. Insert the batteries in the correct direction. Check the (+) and (-) indications inside the battery compartment and insert the batteries so that they face correctly. TIP Close the cover.
Starting and Stopping Projection Turning the power on and projecting images Do not look into the lens while projection is in progress. Remove the lens cover. Turn the power on. Control Panel Connect the power cable. (Commerciallyavailable) Remote Control Turn the power on for the connected equipment. Turn on the main power switch. ON If there is a problem with projection even though the projector is set up and connected correctly, refer to p.15, 37.
Starting and Stopping Projection When the expected images are not projected If more than one signal source has been connected, or if no images are projected, use the remote control or the projector's control panel buttons to select the signal source. For video devices, press the [Play] button on the video equipment first, then select the signal source. Using the remote control Using the control panel When the expected images are not projected When you press , the menu is displayed.
Adjusting the Projection Screen Focus adjustment Turn the focus ring to adjust the focus. Projection size adjustment (Zoom adjustment) Turn the zoom ring to adjust the size of the projected image.
Adjusting the Projection Screen Adjusting the tilt of the projector When an image from the projector that is placed on a flat surface is tilting horizontally ( front feet to correct the tilt. Extend Retract Extend ), use the Retract You can adjust zoom, focus, and color without having to connect video equipment. Press on the remote control to display the menu.
Basic Image Quality Adjustments Select Menu Operations Use to select an item. Press to confirm the selection. Selecting the color mode *If you press , the Select menu disappears. Press and select the Selecting Inputting a signal to the color modethe from color the menu.mode Setting is also possible using the configuration menu. HDMI1/HDMI2 terminals.
Basic Image Quality Adjustments : Ideal for using in a bright room. : Cinema Day Ideal for viewing programs such as sports matches or TV programs in a bright room. : Ideal for using in a dark room. Natural It is recommended that you start in this mode when making color adjustments. Vivid Cinema Night : Ideal for watching movies and concerts in a dark room. HD/Silver : Suitable for use in a completely darkened room.
Advanced Color Adjustments You can select "Image" - "Sharpness" or "Advanced" to adjust the images according to your own preferences. The adjustment screens for "Gamma" and "RGBCMY" can be displayed on the screen directly by pressing the corresponding buttons on the remote control. The adjustment values can be stored in the memory so that you can retrieve them and apply them to the projected images at any time. ( p.
Advanced Color Adjustments Hue Adjusts the tone of the entire image to bluish, greenish and reddish. Saturation Use or (UP or DOWN) to select and confirm the color, and then select either "Hue", "Saturation" or "Brightness" and then use or (LEFT or RIGHT) to make the adjustment. Adjusts the overall vividness of the images. To adjust another color, press . To return the adjustment results to their default settings, press .
Advanced Color Adjustments RGB adjustment (Offset, Gain) The image brightness can be adjusted by adjusting the individual R (red), G (green) and B (blue) components of the dark areas (offset) and bright areas (gain). Adjustment is not possible when "Color Mode" is set to "x.v. Color". Press and then select "Image" - "Advanced" - "RGB" in that order and confirm the selection. Offset If you would like dark areas to appear more clearly, change the setting to the + (right) side.
Examining Image Quality Further In addition to color adjustments, adjustments to advanced sharpness and the amount of light from the lamp can also be made to match the image in search of the best picture. Sharpness (Advanced) adjustment If "Thin Line Enhancement" is set in the + direction, hair and the detailed areas of clothing will be emphasized. If "Thick Line Enhancement" is set in the + direction, the areas emphasized by "Thin Line Enhancement" will be hardly emphasized.
Viewing Images at a Preset Image Quality(Memory Function) After using a subset of "Signal" and "Image" in the configuration menu to adjust the projected images, the adjusted values can then be saved (Save Memory). In addition, the saved data can be retrieved easily, so that you can enjoy viewing images with the adjusted settings at any time (Load Memory).
Viewing Images at a Preset Image Quality(Memory Function) Erase Memory This feature can be used to erase and clean up unwanted memories. Press , and select "Erase Memory". The Erase Memory screen will be displayed. Select the memory name to erase. A confirmation message will be displayed. If you select "Yes", the memory will be erased. The contents of a locked memory cannot be deleted. To erase all saved memories, select "Reset" "Reset Memory" in the Configuration menu. p.
Configuration Menu Functions The configuration menus can be used to make a variety of adjustments and settings involving image quality and input signals. The following two types of menu are available. ■ Full menu All items in the configuration menu can be checked while the settings are being made. Top menu Sub-menu ■ Line menu Some of the items in the "Image" menu in the Configuration menu can be adjusted.
Configuration Menu Functions Changing settings Example: Use or to adjust values. (green): Current setting value Use press If you press when an item with will be displayed. To return to a previous display, press TIP or to select an item, then . next to it is selected, the selection screen for that item . • For items such as "Brightness" which can be adjusted using an adjustment bar, the adjustment values can be reset to the default if you press while the adjustment bar is being displayed.
Configuration Menu Functions List of configuration menus When no image signals are being input, the "Image" menu and the "Signal" menu cannot be adjusted. Also, the items displayed in the "Image" menu, the "Signal" menu and the "Info" menu will vary depending on the type of image signals that are being projected. Displayed for input sources other than computer image Image Color Mode * This is displayed in the line menu. Vivid, Cinema Day, Natural, Cinema Night, HD,Silver Screen, p.30 ("x.v.
Direct Power On p.34 On, Off Sleep Mode p.34 Off, 5min., 10min., 30min. Child Lock p.34 On, Off Control Panel Lock p.34 On, Off Trigger Out p.34 On, Off High Altitude Mode p.34 On, Off Projection p.34 Illumination p.35 Display Front, Front/Ceiling, Rear, Rear/Ceiling On, Off Menu Position p.
Configuration Menu Functions "Image" menu Displayed for input sources other than computer image Color Mode *1 Seven different settings can be selected for the Color Mode, to match the images being projected or the projection environment. p.18 Brightness *2 (Adjustment is not possible when "Color Mode" is set to "x.v. Color".) Adjust this when the output level of the connected equipment is weak and you feel that images are dark. Contrast *2 (Adjustment is not possible when "Color Mode" is set to "x.v.
Configuration Menu Functions Displayed for input sources other than computer image RGBCMY *1 This lets you adjust the hue, saturation, and brightness for each of the R/G/B/C/M/Y color components. p.20 Contrast Enhancement This automatically enhances the contrast by calculating based on its current contrast. Select one of the three levels to enhance the contrast. When a larger number is selected, the contrast becomes higher.
Configuration Menu Functions Displayed for input sources other than computer image Only displayed for Computer image input (does not appear when signals from the [HDMI1] /[HDMI2] input port are being input) Tracking *1 This adjusts the images if vertical stripes appear in the images. Sync. *1 This adjusts the images if flickering, fuzziness or interference appear in the images. • Flickering and fuzziness may also occur when the brightness, contrast and sharpness settings are adjusted.
Configuration Menu Functions Displayed for input sources other than computer image Mosquito NR This reduces the noise which can be generated around the edges of images when projecting MPEG images. Three modes are available. Select your preferred mode. Block NR Set to "ON" to reduce block noise which can occur when projecting MPEG images which have been compressed at a low bit rate.
Configuration Menu Functions "Settings" menu Direct Power On When the main power switch is turned on, you can set for projection to start (On) / not start (Off) without pressing or . When set to "On" with the main power switch left on, be aware that sudden surges of electricity that may occur when the power comes back on after a power outage may cause the projector to turn on.
Configuration Menu Functions Illumination If the light from or turn this setting to "Off". becomes bothersome while watching a movie or the like in a dark room, Display Menu Position Press , , and to specify the position for the menus to be displayed. Menu Color Selects the color for the main configuration menu. • Color 1:Black • Color 2:Blue Messages This sets whether the following message displays appear (On) or don't appear (Off).
Configuration Menu Functions "Memory" menu Load Memory This recalls the stored memory settings and your memory setting saved at "Save Memory". p.24 Save Memory This can be used to save "Image" menu settings. p.24 Erase Memory This is used to erase unwanted memory setting saved as "Memory9" and "Memory10". p.25 Rename Memory This can be used to change the names of the memories from "Memory9" to "Memory10". You can rename so that its settings are easy to recognize.
Problem Solving Reading the indicators The projector indicates its status using the indicators. (the icon and the around the button) and (the icon) light and flash, and lights and flashes in red according to the current status. The following tables show what the indicators mean and how to remedy the problems that they indicate. * If all indicators are switched off, check that the power cable is connected correctly and that the main power switch is on.
Problem Solving Lamp replacement warning It is time to replace the lamp. Replace the lamp with a new one as soon as possible. If you continue to use the projector without replacing the lamp, the lamp may blowout. p.50 Orange Indicator statuses in normal operation During normal operation, the indicator is off. : Lit : Flashing Standby condition If you press Warm-up in progress , projection will start after a brief interval. Warm-up time is approximately 30 seconds.
Problem Solving When the indicators provide no help If any of the following problems occur and the indicators do not offer a solution, refer to the pages given for each problem. Problems relating to images ● No images appear p.39 Projection does not start, the projection area is completely black, the projection area is completely blue, etc. ● Moving images are not displayed p.40 Moving images played on computer are not displayed. ● The message "Not Supported" is displayed p.
Problem Solving Are the image signal format settings correct? If a composite video or S-Video signal is being input. If projection does not occur when the "Video Signal" menu command is set to "Auto", select the signal format that matches the signal source. "Settings" - "Input Signal" - "Video Signal" p.
Problem Solving ■ The message "No Signal" is displayed Are the cables connected correctly? Check that all of the cables required for projection are securely connected. p.12 Has the correct video input port been selected? Press Is the power for the connected equipment turned on? Turn the power on for the devices. Are the image signals being output to the projector? If the image signals are only being output to the computer's LCD monitor, you need to change the output.
Problem Solving Is an extension cable being used? If an extension cable is used, interference may increase. Try connecting a signal amplifier. Have the "Sync. " and "Tracking " settings been adjusted correctly? The projector has an automatic adjustment function that causes the optimum images to be projected. However, for some types of signal, the correct adjustments may not be obtained even after automatic adjustment is carried out. In such cases, use the "Tracking" and "Sync.
Problem Solving Have the color intensity and tint been adjusted correctly? Only when projecting images from a video source Use the "Color Saturation" and "Tint" menu commands to adjust the color and tint. "Image" - "Color Saturation", "Tint" p.30 ■ Images appear dark Has the image brightness been adjusted correctly? Use the "Brightness" menu commands to make the adjustments. "Image" - "Brightness" p.30 Has the image contrast been adjusted correctly? Use the "Contrast" menu command to adjust the color.
Problem Solving Problems with the remote control ■ The remote control does not work 44 Is the remote control lightemitting area facing towards the remote control light-receiving area when it is operated? Face the remote control towards the remote control light-receiving area. Operating range p.13 Is the remote control too far from the projector? The operating range for the remote control is approximately 10m. p.
Maintenance This section describes maintenance tasks such as cleaning the projector and replacing consumable parts. Cleaning You should clean the projector if it becomes dirty or if the quality of projected images starts to deteriorate. Do not use sprays containing a flammable gas to remove dirt or dust which is adhering to parts such as the lens or filter of the projector. Because the lamp inside the projector becomes very hot during use, the gases may ignite and result in a fire.
Maintenance Use a vacuum cleaner to remove any remaining dust from the surface of the air filter. Install the air filter. Install with the groove faced to the right. Install the air filter cover. Cleaning the projector case Clean the projector case by wiping it gently with a soft cloth. If the projector is particularly dirty, moisten the cloth with water containing a small amount of neutral detergent, and then firmly wring the cloth dry before using it to wipe the projector case.
Maintenance Consumable replacement periods Air filter replacement period • If the air filter has been broken or the "Replace" message is displayed even though the air filter has been cleaned. Replace with an optional air filter. Replacing the air filter p.48 Lamp replacement period • The message "Replace the lamp." appears on the screen when projection starts. A message will be displayed.
Maintenance Replacing consumables Replacing the air filter TIP Dispose of used air filters properly in accordance with your local regulations. Frame material: PP Filter materials: PP, PET Press or to turn off the power, and then turn the main power switch OFF. Remove the air filter cover. Press the knobs to release the catches, and then pull the cover upward. Replacing the lamp If the lamp stops working and needs to be replaced, there is the danger that the lamp may already be broken.
Maintenance Remove the old air filter. Insert the new air filter. Install the air filter cover. Install with the groove faced to the right. Loosen the lamp fixing screws. Remove the old lamp. Insert the new lamp. Pull out straight. Make sure that it faces the correct way. Install the lamp and the lamp cover securely. The projector will not turn on if the lamp or the lamp cover is not installed correctly. Appendix This product includes a lamp component that contains mercury (Hg).
Optional Accessories/Consumables The following optional accessories/consumables are available for purchase if required. This list of optional accessories/consumables is current as of: 2009.9. Details of accessories are subject to change without notice. Varies depending on country of purchase. ■ Optional Accessories ■ Consumables 50" Portable Screen ELPSC06 A compact screen which can be carried easily. (Aspect 4:3) (1 spare lamp, 1 spare screwdriver) Use as a replacement for spent lamps.
List of Supported Monitor Displays The values may slightly vary depending on the Overscan setting.
List of Supported Monitor Displays Computer image (analog RGB) Units: Dots Signal Aspect Resolution mode Normal Full Zoom Wide VGA 60 640×480 640×360 *2 1440×1080 1920×1080 1920×1080 1920×1080 VESA72/75/85, iMac*1 640×480 640×360 *2 1440×1080 1920×1080 1920×1080 1920×1080 SVGA 56/60/72/ 75/85, iMac*1 800×600 800×450 *2 1440×1080 1920×1080 1920×1080 1920×1080 XGA 60/70/75/ 85, iMac*1 1024×768 1024×576 *2 1440×1080 1920×1080 1920×1080 1920×1080 WXGA60-1 1280×768 1800×1080 1
Specifications Product name EH-TW5500 450 (W) × 136 (H) × 360 (D) mm (not including feet) Dimensions 0.74 inch wide Panel size Polysilicon TFT active matrix Display method 2,073,600 pixels (1920 (W) × 1080 (H) dots) × 3 Resolution Pixel clock: 13.5 to 150 MHz Scanning frequencies (Analogue/Digital) Horizontal: 15 to 80 kHz Vertical: 24, 50 to 85 Hz Focus adjustment Manual Zoom adjustment Manual (Approx. 1 : 2.1) Manual (Maximums: Approx.
Specifications ■ Angle of tilt If you set the projector higher than 8 º, it could damage the projector and cause an accident.
Glossary Following is an explanation of some of the terms used in this guide which may be unfamiliar or which were not explained in the manual itself. Further information can be obtained by referring to other commercially-available publications. Aspect HDTV The ratio between an image's length and its height. HDTV images have an aspect of 16:9 and appear elongated. The aspect for standard images is 4:3. An abbreviation for High-Definition Television.
Glossary Security lock A device consisting of a protector case with a hole in it that a commercially-available theft-prevention cable can be passed through in order to secure the device to a table or pillar. This projector is compatible with the Microsaver Security System manufactured by Kensington. SVGA A type of image signal with a resolution of 800 (horizontal) x 600 (vertical) dots which is used by IBM PC/ AT-compatible computers.
Index Numeric Character G 4-4 Pull-down................................................................... 28,32 Gain .................................................................................. 22,28 Gamma ........................................................................ 20,28,30 B Battery replacement period (Remote control)....................... 13 Block NR............................................................................... 33 Brightness........................................
Index R W Refresh Rate.......................................................................... 29 Remote control................................................................... 7,13 Rename Memory.............................................................. 25,36 Replacing the air filter .......................................................... 48 Replacing the battery ............................................................ 13 Replacing the lamp ................................................
All rights reserved. No part of this publication may be reproduced, stored in a retrieval system, or transmitted in any form or by any means, electronic, mechanical, photocopying, recording, or otherwise, without the prior written permission of Seiko Epson Corporation. No patent liability is assumed with respect to the use of the information contained herein. Neither is any liability assumed for damages resulting from the use of the information contained herein.