User's Guide
Organization of the Guide and Notations in the Guide Using Each Guide The guides for this projector are organized as shown below. Safety Instructions/Support and Service Guide Contains information on using the projector safely, as well as a support and service guide, troubleshooting check lists, and so on. Make sure you read this guide before using the pro‐ jector.
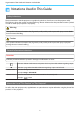
Organization of the Guide and Notations in the Guide Notations Used in This Guide Safety Indications The documentation and the projector use graphical symbols to show how to use the projector safely. The following shows the symbols and their meanings. Please understand and respect these caution symbols in order to avoid injury to persons or property. Warning This symbol indicates information that, if ignored, could possibly result in personal injury or even death due to incorrect handling.
Contents Removing the Terminal Cover . . . . . . . . . . . . . . 22 Organization of the Guide and Notations in the Guide Preparing the Remote Control . . . . . . . . 23 Installing the Remote Control Batteries . . . . . . . 23 Using Each Guide . . . . . . . . . . . . . . . . . . . . . 1 Remote Control Operating Range . . . . . . . . . . . 23 Notations Used in This Guide . . . . . . . . . . . 2 Operating range (left to right) . . . . . . . . . . . . 23 Safety Indications . . . . . . . . . . . . . . .
Contents Skin Tone . . . . . . . . . . . . . . . . . . . . . . . . . . . . 37 Operating the Remote Control . . . . . . . . . . . . . 62 Detailed Image Adjustments . . . . . . . . . . 38 Remote Control Operating Range . . . . . . . . . . . 63 Adjusting the Sharpness . . . . . . . . . . . . . . . . . . 38 Switching the Input and Output . . . . . . . . . . . . 63 Setting Auto Iris . . . . . . . . . . . . . . . . . . . . . . . . 39 Switching the target image . . . . . . . . . . . . . .
Contents Indicator status during normal operation . . . . 91 MHL Input Signal . . . . . . . . . . . . . . . . . . . . . . 111 When the Indicators Provide No Help . . . . . . . . 92 3D Input Signal HDMI . . . . . . . . . . . . . . . . . . . 111 Check the problem . . . . . . . . . . . . . . . . . . . . 92 WirelessHD Input Signal . . . . . . . . . . . . . . . . . 111 Problems relating to images . . . . . . . . . . . . . 93 3D Input Signal MHL (via a WirelessHD Transmitter*) . . . . . . . . . . . . . .
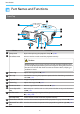
Introduction Part Names and Functions Front/Top Name a Lamp cover b Air exhaust vent Function Open when replacing the projector's lamp. s p.106 Exhaust vent for air used to cool the projector internally. Caution While projecting, do not put your face or hands near the air exhaust vent, and do not place objects that may become warped or damaged by heat near the vent. Hot air from the air exhaust vent could cause burns, warping, or accidents to occur. c Focus ring d Lens cap Adjusts the image focus.
Introduction Name l Control panel Function Control panel on the projector. s p.7 Control Panel Buttons/Indicators Function a Flashes orange when it is time to replace the lamp. Shows the projector's errors through a combination of other indicators lit and flashing. s p.89 b Flashes to indicate warm-up in progress or cool-down in progress. Shows the projector's status through a combination of other indicators lit and flashing. s p.89 Operation indicator c Turns the projector power on or off.
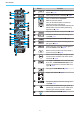
Introduction Remote Control Button Function a Turns the projector on. s p.24 b Allows you to simultaneously project two im‐ age sources, one in the main screen and the other in the sub screen. (Picture in Picture) s p.72 Press and hold the button to swap the main or sub screen image sources. c Changes to the image from each input port. s p.25 button is only available for EHTW6600W. d This button displays the settings menu for HDMI Link.
Introduction Button Function j Performs the function assigned to the user button. s p.79 k Saves, loads, or erases a memory. s p.43 l (Only available for EH-TW6600W) WiHD Transmitter control Turns on the WirelessHD Transmitter, or switches the input and output. Make sure you point the remote control at the WirelessHD Transmitter when performing operations. s p.62 m Displays and closes the test pattern. s p.27 n Temporarily hides or shows the image and audio. s p.31 o Changes between 2D and 3D.
Introduction Rear Name Function a Speaker The projector's built-in speaker. Outputs audio. Set Inverse Audio to On to use the built-in speaker when the projector is suspended from a ceiling. s Settings - Audio - Inverse Audio p.79 b Power inlet c Trigger Out port Connect the power cord. s p.24 d RS-232C port When controlling the projector, connect the projector to a computer with an RS-232C cable. This port is for control use and should not normally be used. s p.
Introduction Base Name Function a Front adjustable foot When setup on a surface such as a table, extend the foot to adjust the horizontal tilt. s p.28 b Ceiling mount fixing Attaches the optional ceiling mount here when suspending the projector from a points (four points) ceiling. s p.109 c Air intake vent When suspending from a ceiling, make sure it is setup so that dust does not collect in this section.
Introduction Appearance Units: mm a b Center of lens Distance from center of lens to suspension bracket fixing point 12
Preparing Installing Projected Image and Position of Projector Install the projector as follows. Installing in parallel with the screen If the projector is installed at an angle to the screen, keystone distortion occurs in the projected image. Adjust the projector’s position so that it is installed in parallel with the screen. c • If the projector cannot be installed in front of the screen, you can adjust the position of the image by using lens shift. s p.
Preparing Various Setting Methods Warning • A special method of installation is required when suspending the projector from a ceiling (ceiling mount). If it is not installed correctly, it could fall causing an accident and injury. • If you use adhesives, lubricants, or oil on the ceiling mount fixing points to prevent screws from loosening, or if you use things such as lubricants or oils on the projector, the projector case may crack causing it to fall from its ceiling mount.
Preparing Suspending from the ceiling and projecting You can suspend the projector from the ceiling with the optional ceiling mount to project images. c • When projecting from a ceiling, change Projection to a ceiling setting. s Settings - Projection p.79 • Set Inverse Audio to On to use the built-in speaker when the projector is suspended from a ceiling. s Settings - Audio - Inverse Audio p.
Preparing When adjusting the projection position horizontally in lens shift C D E F : : : : Lens center movement distance when the projector is moved (when lens shift is set to maximum left) Lens center movement distance when the projector is moved (when lens shift is set to maximum right) Projection distance from the projector to the screen Size of the projected image Unit: cm 16:9 Screen Size F WxH Lens Shift Maximum Values* Projection Distance (E) Minimum (Wide) Maximum (Tele) Distance (A) Di
Preparing Unit: cm 4:3 Screen Size F WxH Lens Shift Maximum Values* Projection Distance (E) Minimum (Wide) Maximum (Tele) Distance (A) Distance (B) Distance (C, D) 40" 81 x 61 143 233 6 67 26 60" 120 x 90 216 351 9 101 39 80" 160 x 120 288 468 12 134 52 100" 200 x 150 361 586 15 168 65 120" 240 x 180 434 704 18 201 78 150" 300 x 230 443 719 23 251 98 200" 410 x 300 591 1175 30 335 * Vertical and horizontal lens shift cannot both be set to their maximum valu
Preparing Connecting a Device Attention • Make cable connections before connecting to a power outlet. • When disconnecting, turn off the projector first, then remove the power cord, and then disconnect other cables. • Check the shape of the cable's connector and the shape of the port, and then connect. If you force a connector of a different shape into the port, it could cause damage and a malfunction to occur.
Preparing Connecting a Computer To project images from a computer, connect the computer using one of the following methods. When using a computer cable When using an HDMI cable Connecting External Devices Connecting to the Trigger Out port To connect external devices such as motorized screens, connect a mini-jack stereo cable (3.5 mm) to the Trigger Out port.
Preparing Connecting smartphones or tablets You can connect MHL compatible smartphones or tablets. Use an MHL compatible cable to connect the micro USB port of smartphones and tablets to the HDMI1 port on the projector. You can also view video and listen to music while charging a smartphone or tablet. Attention • Make sure the connection cable supports the MHL standards.
Preparing Connecting WirelessHD devices (EH-TW6600W only) The projector receives transmissions from the WirelessHD Transmitter, and projects the images. s p.54 Change the projected image by pressing the control panel. c button on the remote control or the button on the • When receiving WirelessHD images, make sure WirelessHD is set to On. s Settings - WirelessHD p.79 • You can change which device is displayed by selecting a device from Device Connections in HDMI Link. s HDMI Link-Device Connections p.
Preparing Attaching the Wireless LAN unit To use the wireless LAN function, attach an optional Wireless LAN unit (ELPAP07). Insert the Wireless LAN unit to the USB port (TypeA). To project images via a wireless LAN, you need to download the following applications. For more details, see the download page. • Projecting computer screens by wireless Use EasyMP Network Projection to project computer screens via a network. EasyMP Network Projection can be downloaded from the following Web site. http://www.
Preparing Preparing the Remote Control Installing the Remote Control Batteries Attention • Check the positions of the (+) and (-) marks inside the battery holder to ensure the batteries are inserted the correct way. • You cannot use other batteries except for the AA size manganese or alkaline. a Remove the battery cover. b Replace the old batteries with new batteries. c While pushing the battery compartment cover catch, lift the cover up. Reattach the battery cover.
Basic Operations Starting and Ending Projection Turning on the Projector and Projecting a Connect the equipment to the projector. b Connect the power cord. c Remove the lens cap. d Turn on the connected equipment. e Turn on the projector. Remote control Control panel Connect using the power cord supplied. c When Direct Power On is set to On, you can start projecting by simply connecting the power cord to the projector without having to press any buttons.
Basic Operations If the Target Image is not Projected If the image is not projected, you can change the source using one of the following methods. Remote control Press the button for the target port. c Control panel Press the Press the button and select the target port. button to confirm the selection. For video equipment, start playback first and then change the source. Turning Off a b c Turn off the connected equipment.
Basic Operations f Attach the lens cap.
Basic Operations Adjusting the Projected Screen Displaying the Test Pattern When adjusting the zoom/focus or the projection position just after setting up the projector, you can display a test pattern instead of connecting video equipment. Press the button on the remote control to display the test pattern. You can adjust the display position and so on by using this test pattern. Press the button to end this test pattern display. Adjusting the Focus Turn the focus ring to adjust the focus.
Basic Operations Adjusting the Projector's Tilt If the projection screen is tilted (the left and right sides of the projector are at different heights) when the projector is setup on a table, adjust the front foot so that both sides are level with each other. Adjusting the Position of the Projected Image (Lens Shift) If the projector cannot be installed directly in front of the screen, you can adjust the position of the image by using lens shift.
Basic Operations Attention • When using vertical lens shift for adjusting the position of the image, adjust the image by moving it upward and then finish the adjustment. If you move the image downward and finish the adjustment, its position may lower slightly. • Do not keep turning the lens shift dials without effect. Once the projection image is positioned all the way to one edge, turning the dial further may impair image quality.
Basic Operations Correcting Keystone Distortion (H/V-Keystone) You can use the c buttons on the control panel to correct keystone distortion. • You can maintain the quality of the projected image by adjusting the projection position using lens shift. Use keystone correction when you cannot make adjustments using lens shift. • When using keystone correction, turn the lens shift dials in the following positions.
Basic Operations Adjusting the Volume You can adjust the volume by using the the projector's control panel. buttons on the remote control or the Remote control c buttons on Control panel • You can also adjust the volume from the Configuration menu. s Settings - Audio p.79 • Under normal conditions, you can adjust the volume of the projector's built-in speaker.
Adjusting the Image Adjusting the Image Selecting the Projection Quality (Color Mode) You can obtain the optimum image quality to suit your surroundings when projecting. The brightness of the image varies depending on the mode selected. a Press the c b button. You can make settings from the Configuration menu. s Image - Color Mode p.75 Select Color Mode. Press the buttons from the displayed menu to select Color Mode, and then press the button to confirm the selection.
Adjusting the Image c Only when Projection is Front, Auto can be set. s p.79 Choices when projecting 3D images Mode Application 3D Dynamic For use when projecting 3D images. Images are bright and sharper than 3D Cinema. 3D Cinema For use when projecting 3D images. Produces crisper colors than 3D Dynamic. Switching the Screen Between Full and Zoom (Aspect) You can change the input signal's type, aspect ratio, and resolution to match the Aspect of the projection screen.
Adjusting the Image Input Image Setting Name (Aspect) Normal Full Zoom Letterbox Images* Retains the aspect ratio of the input signal, and matches the horizontal size of the projection pan‐ el. The top and bottom of the image may be trunca‐ ted. * The letterbox image used in this explanation is a 4:3 aspect ratio image displayed in 16:9 with black margins at the top and bottom for subtitle placement. The margins at the top and bottom of the screen image are used for subtitles.
Adjusting the Image Absolute Color Adjustments Adjusting Hue, Saturation, and Brightness You can adjust the hue, saturation, and brightness for each of the R (red), G (green), B (blue), C (cyan), M (magenta), and Y (yellow) colors. Hue Adjusts the overall color of the image to be blue, green, or red. Saturation Adjusts the overall vividness of the image. Brightness Adjusts the overall color brightness of the image. a Press the c b button.
Adjusting the Image Select and adjust the correction value Select the adjustment value, and then press the to confirm the selection. button The larger the value, the lighter the dark portions of the im‐ age become, but bright areas may appear discolored. The upper part of the gamma adjustment graph becomes roun‐ ded. The smaller the value, the darker the bright portions of the image become. The lower part of the gamma adjustment graph becomes rounded.
Adjusting the Image c Press the button to return the adjustments to their default values. Color Temp. You can adjust the overall tint of the image. Make adjustments if the image is a little too blue or too red and so on. The menu is displayed in the following order. Image - Color Temp. buttons to make adjustments. Use the Blue tints grow stronger as the value is increased, and red tints grow stronger as the value is reduced. c • The Color Temp. setting varies with the Color Mode setting.
Adjusting the Image Detailed Image Adjustments Adjusting the Sharpness You can make the image clearer. There are two types available, Standard and Advanced which allows you to make more detailed adjustments. Advanced cannot be adjusted in the following situations. • When a computer signal is being input • When Image Processing is set to Fast in the Signal menu • When projecting 3D images The following shows the setting items and procedures for Advanced.
Adjusting the Image Setting Auto Iris By automatically setting the luminance according to the brightness of the displayed image, it lets you enjoy deep and rich images. You can select the luminance adjustment tracking for changes in brightness in the displayed image from Normal to High Speed. (Depending on the image, you may hear the auto iris operating, but this is not a malfunction.) a Press the c button. Use the buttons to select the item, and then press the button to confirm the selection.
Adjusting the Image a Press the c b button. Use the buttons to select Super-resolution or Detail Enhancement, and then use the buttons to make the adjustments. For Super-resolution, the higher the value, the stronger the effect. For Detail Enhancement, the higher the value, the more emphatic the texture. • You can make settings from the Configuration menu. s Signal - Super-resolution p.77 • This cannot be set when a computer image signal is being input.
Adjusting the Image f i Select Start Adjustments, and then press the button to confirm the selection. First, adjust the whole LCD display. When a message appears prompting you to start adjustments, press the button to start them. g Adjustments are performed in four corners starting from the top-left corner. Use the buttons for adjustments, and then press the button. j c h Use the buttons to adjust, and then press the button to move to the next adjustment point.
Adjusting the Image c • You can make settings from the Configuration menu. s Signal - Advanced - Image Processing p.77 • This does not support 3D images. • If Image Processing is set to Fast, the following settings cannot be changed: -Noise Reduction and 2D-to-3D Conversion are fixed at Off. -Sharpness is fixed at Standard. -Picture in Picture cannot be used.
Adjusting the Image Viewing the Image at the Saved Image Quality (Memory Function) Saving Function You can save the adjustment values for some images and image quality settings in the Configuration menu for later use (Save Memory). Because these saved adjustment values can be loaded from the remote control, you can easily switch to your preferred image quality (Load Memory). The following Configuration menu functions can be saved. Image s p.
Adjusting the Image Loading a Memory a Press the b Select the target memory name. button, and then select Load Memory. The Load Memory screen is displayed. c • The color mode saved to the memory is displayed on the right. • Depending on the input signal, part of the loaded memory item may not be applied to the projected image. • Memories saved for 2D images can only be loaded when projecting 2D images. Memories saved for 3D images can only be loaded when projecting 3D images.
Adjusting the Image d Enter a name. Use the buttons to select a button to con‐ character, and then press the firm the selection. Enter up to 12 characters. When you have finished entering the name, se‐ lect Finish. The memory name is changed.
Useful Functions Enjoying 3D Images Setting 3D Images Set the source to HDMI1, HDMI2, or WirelessHD (EH-TW6600W only) to view 3D images. The projector supports following 3D formats. • Frame Packing • Side by Side • Top and Bottom When the projector detects a 3D format The projector automatically projects a 3D image when detecting a 3D format. When the projector cannot detect a 3D format Some 3D TV broadcasts may not contain 3D format signals. If this happens, set the 3D format manually.
Useful Functions Using 3D Glasses Use the supplied or optional 3D Glasses (ELPGS03) to view 3D images. Depending on the model, 3D Glasses may not be supplied. c The 3D Glasses come with protective stickers. Remove the protective stickers before use. Charging the 3D Glasses The following charging methods are available, depending on the model of 3D Glasses being used. If you have a WirelessHD Transmitter, you can use it to charge the glasses.
Useful Functions Press the [Pairing] button for a while on the 3D Glasses to start pairing. a b Turn on the 3D Glasses by sliding the [Power] switch to On. The indicator turns on for several seconds, and then turns off. c Press and hold the button for three seconds. The indictor flashes green and red in turn. If pairing has been performed correctly, the indicator turns on for ten seconds and then turns off.
Useful Functions Reading the indicator on the 3D Glasses You can check the status of the 3D Glasses by whether its indicator is lit or flashing. Indicators Status Flashes red two times ×5 Weak battery Lit red Charging Lit green Charging completed Flashes green and red in turn Pairing Lit green for ten seconds and then turns Power on or pairing succeeded off Range for Viewing 3D Images This projector allows you to view 3D images within the range shown in the figure below.
Useful Functions Warnings Regarding Viewing 3D Images Note the following important points when viewing 3D images. Warning Disassembling or remodeling • Do not disassemble or remodel the 3D Glasses. This could cause a fire to occur or the images to appear abnormal when viewing, causing you to feel unwell. Storage locations • Do not leave the 3D Glasses or the supplied parts within reach of children. They could be accidentally swallowed.
Useful Functions Caution Wearing 3D Glasses • Make sure you wear the 3D Glasses correctly. • • • • • Do not wear the 3D Glasses upside down. If the image is not displayed correctly into the right and left eyes, it could cause you to feel unwell. Do not wear the glasses unless you are viewing a 3D image. How a 3D image is perceived varies depending on the individual. Stop using the 3D function if you feel strange or cannot see in 3D. Continuing to view the 3D images could cause you to feel unwell.
Useful Functions Caution Health Risks • You should not use 3D Glasses if you are sensitive to light, have a heart condition, or are unwell. Doing so could aggravate your pre-existing conditions. Caution Recommended Age of Use • The minimum recommended age to view 3D images is six years old. • Children under the age of six are still developing and viewing 3D images may cause complications. Consult your doctor if you have any concerns.
Useful Functions c • When using 2D-to-3D Conversion, set 3D Format to Auto or 2D. s Signal - 3D Setup - 3D Format p.77 • If Image Processing is set to Fast, you cannot adjust 2D-to-3D Conversion. s Signal - Advanced - Image Processing p.
Useful Functions Connecting with WirelessHD (EH-TW6600W Only) Installing the WirelessHD Transmitter You can use the supplied WirelessHD Transmitter to wirelessly receive image and sound data. This is useful when the projector cannot be setup near your AV devices as you can connect the devices to the projector without using cables. You can use the WirelessHD Transmitter in the following ways. • You can connect up to five AV devices at the same time, and switch images using the remote control.
Useful Functions Name Function a t button Turns the transmitter on or off. button for WiHD Transmit‐ This performs the same function as the ter control on the lower section of the remote control. b Input button Changes to the image from each input port. button for WiHD Transmit‐ This performs the same function as the ter control on the lower section of the remote control. c Output button Switches the output image to the Wireless or Output port.
Useful Functions WirelessHD Transmitter connection example and signal flow Connection example 1: Viewing without an AV amplifier Connect a device to WirelessHD Transmitter without using an AV amplifier, and connect the sound bars and so on to the Optical Audio-Out port to output audio. When outputting audio from a connected device, you need an optical digital audio cable.
Useful Functions Connection example 2: Viewing with a connected AV amplifier The audio from the device connected to the AV amplifier is output from the amplifier's audio-out port without passing through the WirelessHD Transmitter. When outputting audio from a device connected with an MHL cable, you need an optical digital audio cable.
Useful Functions Setting the WirelessHD Transmitter a c b c Set up the WirelessHD Transmitter connected to the projector so that they are facing each other. s p.61 Using an HDMI cable, connect the AV device you want to use to the Input port on the WirelessHD Transmitter. You can connect up to five multi-media players. • The receiver is located at the front of the projector and therefore cannot receive any signals directly from the rear.
Useful Functions Projecting Images a Start playback on the AV device, and then turn on the projector and the WirelessHD Transmitter. The t indicator on the WirelessHD Transmitter turns on. b Check the status of the WiHD indicator on the WirelessHD Transmitter. If the WiHD indicator is on, go to the next step. If the indicator is off, press the button on the remote control or the WirelessHD Transmitter.
Useful Functions d If projection does not start, press the source. button on the remote control to change the Make sure you point the remote control at the projector when using the control. button on the remote Projection starts. e When connecting two or more AV devices to the WirelessHD Transmitter, press the button to switch images. s p.65 c • When receiving WirelessHD images, make sure WirelessHD is set to On from the Configuration menu. s Settings - WirelessHD - WirelessHD p.
Useful Functions Function Reset Explanation Resets WirelessHD settings to their default settings. Reception when no image signal is being input. Check the communication status using the c Video Link indicator. p.54 Even when the WirelessHD Transmitter and the projector are connected, 0% is displayed as the s WirelessHD Transmission Range The following shows the WirelessHD transmission range. Make sure you set up the WirelessHD Transmitter so that it faces the projector.
Useful Functions c • The wireless transmission range varies depending on the placement and material of the surrounding furniture and walls. The values given here are for your reference only. • The projector cannot communicate through walls. • The antennas are built-into the front of the projector and the WirelessHD Transmitter. Make sure the antennas face each other (face the front) when setting up the devices. • Do not place any object over the front side of the projector and WirelessHD Transmitter.
Useful Functions Remote Control Operating Range The following shows the operating range between the remote control and the WirelessHD Transmitter. Operating range (left to right) Operating range (top to bottom) Switching the Input and Output With the WirelessHD Transmitter, you can connect and switch between up to five multi-media players (input devices to be played back) and one monitor device (a monitor device displaying an image, such as a television).
Useful Functions a Turn on the projector or the monitor device, such as a television. b Turn on the WirelessHD Transmitter. c Point the remote control at the WirelessHD Transmitter, and then press the The t indicator on the WirelessHD Transmitter turns on. Remote control button. WirelessHD Transmit‐ ter Depending on the output target, the WiHD indicator on the WirelessHD Transmitter indicates the following status.
Useful Functions Switching the image source You can switch the image source for the AV device connected to the WirelessHD Transmitter. When switching, each input source is displayed on one screen as a preview. This allows you to switch easily between image sources even when two or more devices are connected using HDMI. The projector uses Insta Prevue Technology from Silicon Image, Inc.
Useful Functions a Point the remote control at the WirelessHD Transmitter, and then press the button. Remote control b The target screen changes each time you press the button. c After selecting the target screen, please wait for a moment. WirelessHD Trans‐ mitter Displays the sub-screen (small screen) for the connected device. Ex.) When projecting images for the device connected to the HDMI2 port The projected image is switched. c signal is displayed in blue or black.
Useful Functions Displaying as a Sub-Screen a c Point the remote control at the WirelessHD Transmitter, and then press the button. To close the sub-screen, press the button again. The projected image is switched. c Displays the sub-screen (small screen) for the connected device. b When switching between the subscreen and the main screen (large screen), press and hold down the button (for 3 seconds) until the screen changes.
Useful Functions Using the HDMI Link Function HDMI Link Function When an AV device that meets the HDMI CEC standards is connected to the projector's HDMI port, you can perform linked operations such as linked power on and volume adjustment for the AV system from one remote control. Also, when projecting images in WirelessHD, you can use the HDMI link function (EHTW6600W only).
Useful Functions c • To use the HDMI Link function, you must configure the connected device. See the documentation supplied with the connected device for more information. • Even when using the WirelessHD Transmitter with Power On Link set to Device -> PJ or Bidirectional, if WirelessHD is set to On, this projector also turns on when the AV device connected to the WirelessHD Transmitter is turned on (EH-TW6600W only). s Settings-HDMI Link-Power On Link p.
Useful Functions Playing Back Image Data (Slideshow) Compatible Data The following types of files stored on USB storage devices such as USB memories, digital cameras, and so on that are connected to the projector's USB port (TypeA) can be displayed as a slideshow. Slideshow compatible file types File Type (Extension) Notes • • • • .jpg Images using CMYK color mode are not compatible. Progressive format images are not compatible. Images with a resolution greater than 8192 x 8192 are not compatible.
Useful Functions c • To close the Slideshow, disconnect the USB storage device. • Select an image from the thumbnails and press the button to enlarge the selected image. buttons on the remote control when viewing an enlarged image to change between Press the images. You can also rotate the image using the buttons. Display Settings for Image Files and Slideshow Operation Settings You can set the file display order and slideshow operations on the option screen.
Useful Functions Projecting Two Different Images Using Picture in Picture Types of Screen that can be Displayed Simultaneously Two different image sources can be projected, one in the main screen (large screen) and the other in the sub screen (small screen). You can view the sub screen while viewing the main screen.
Useful Functions Changing the Picture in Picture settings Use the Picture in Picture menu to change the size or position of the sub screen. a Press the c b button. Make settings for each of the displayed functions. The Picture in Picture menu is displayed directly by pressing the button during Picture in Picture projection. Available functions on the Picture in Picture menu Function Explanation Subscreen Size Selects the sub screen size using Small and Large.
Configuration Menu Configuration Menu Functions Configuration Menu Operations On the Configuration menu, you can make adjustments and settings for Signal, Image, and so on. a Press the c button. Remote control Control panel Use the buttons to select the sub menu on the right, and then press the button to confirm the selection. The Configuration menu is displayed. b Use the buttons to select the top menu on the left, and button to confirm then press the the selection.
Configuration Menu c For items adjusted using an adjustment bar, such as the brightness level, you can press the button while the adjustment screen is displayed to return the adjustment value to its default value. Configuration Menu Table If there is no image signal being input, you cannot adjust items related to the image or signal in the Configuration menu. Note that the items displayed for the image, the signal, and other information vary depending on the image signal being projected.
Configuration Menu Function Advanced Menu/Settings Gamma Explanation 2, 1, 0, -1, -2 Customized*4 Display Confirmation Graph/Guide, Color Tone Adjustment Performs gamma adjustments. You can select a raw value or adjust the gamma while looking at the graph. s p.35 Reset RGB Adjusts the offset and gain for each R, G, and B color. s p.
Configuration Menu Signal menu Function 3D Setup*1 Menu/Settings Explanation 3D Display On, Off Enables or disables the 3D image display func‐ tion. s p.46 2D-to-3D Conver‐ sion Off, Weak, Medium, Sets the strength of the 3D effect when convert‐ Strong ing 2D images to 3D images. s p.52 3D Format Auto, Side by Side, Sets the 3D format for the input signal. When set Top and Bottom, 2D to Auto, the format is recognized automatically. 3D Depth -10 to 10 Sets the depth for the 3D image.
Configuration Menu Function Super-resolu‐ tion*5 Menu/Settings Explanation 0 to 5 Detail Enhance‐ ment Reduces blurring that occurs at the edge of im‐ ages when the resolution is increased. s p.39 0 to 100 This setting enhances the contrast in an image to create the image with more emphatic texture and material feel. The higher the number is, the stronger the enhancement effect is from the out‐ line area. s p.
Configuration Menu Function Reset Menu/Settings Explanation Yes, No Resets all Signal settings except for Diagonal Screen Size, 3D Viewing Notice, Aspect, and Image Processing settings to their default set‐ tings. *1 This is only displayed when an HDMI1, HDMI2, or WirelessHD image signal is being input. (WirelessHD is for EHTW6600W only.) *2 Settings are saved for each type of input source or signal. *3 This is only displayed when a PC image signal is being input.
Configuration Menu Function WirelessHD* Menu/Settings Device Connections - Displays a list of available Wire‐ lessHD devices that can be connec‐ ted. WirelessHD On, Off Enables or disables the WirelessHD function. Video Reception Lock Setting Explanation Video Reception indicates the con‐ nection status with the WirelessHD Transmitter. When the projector is connected to the WirelessHD Trans‐ mitter and receives an image signal, Transmitter detected appears.
Configuration Menu Function Projection Menu/Settings Front, Front/Ceiling, Rear, Rear/Ceiling Explanation Change this setting depending on how the projector is installed. • Front: Select if you are projecting in front of the screen. • Front/Ceiling: Select if you are projecting in front of the screen suspended from the ceiling. • Rear: Select if you are projecting to a rear screen from the back.
Configuration Menu Function Operation Menu/Settings Explanation Direct Power On On, Off You can set up the projector so that projection starts as soon as the pow‐ er cord is plugged in without any button operations. Note that when this is set to On, projection starts if power is restored after a blackout or other power out‐ age and the power cord is still plug‐ ged into the projector. Sleep Mode Off, 5min., 10min., 20min.
Configuration Menu Function Display Menu/Settings Messages On, Off Explanation Sets whether or not to display the following messages (On or Off). • Item names for image signals, color modes, aspect ratios, and loading memory. • If the internal temperature is rising when no image signal is being in‐ put or an unsupported signal is de‐ tected. Panel Align‐ ment Display Background Black, Blue, Logo Selects the screen status when no image signal is being input.
Configuration Menu Memory menu Function Explanation Load Memory Loads settings saved using the Save Memory function. s p.44 This cannot be selected if you have not saved any settings with the Save Mem‐ ory function. Save Memory Saves certain Image and Signal settings to memory. s p.43 Erase Memory Erases settings saved to memory that you no longer need. s p.44 Rename Memory Renames a saved memory. s p.44 Network menu Function Explanation Net. Info.
Configuration Menu Soft keyboard operations The Network menu displays a soft keyboard when input of alphanumerics is required during setup. Press the buttons on the remote control or the buttons on the control panel to button to input them. Selecting Finish confirms your input, and selecting select keys, and then press the Cancel cancels your input. CAPS key: SYM1/2 key: Sets and changes between upper case and lower case letters. Sets and changes the symbol keys.
Configuration Menu Function Menu/Settings Explanation DHCP Set whether or not (On/Off) to use DHCP. If specifying the following address, set it to Off. IP Address Enter the projector's IP address. The following IP addresses cannot be used. 0.0.0.0, 127.x.x.x, 224.0.0.0 to 255.255.255.255 (where x is a number from 0 to 255) Subnet Mask Enter the projector's subnet mask. The following subnet masks cannot be used. 0.0.0.0, 255.255.255.255 Gateway Address Enter the projector's gateway IP address.
Configuration Menu Info menu Function Projector Info Version Menu/Settings Explanation Lamp Hours Displays the cumulative lamp operating time. Source Displays the source name for the connected equipment cur‐ rently being projected. Input Signal Displays the input signal. Resolution Displays the resolution. Scan Mode Displays the scan mode. Refresh Rate Displays the refresh rate.
Configuration Menu Picture in Picture menu Displayed by pressing the button during Picture in Picture projection. Function Picture in Pic‐ ture Menu/Settings Explanation Subscreen Size Small, Large Changes the size of the sub screen. s p.73 Subscreen Position Top Right/Bottom Right/Top Left/Bottom Left Changes the position of the sub screen. Subscreen Source HDMI1, HDMI2, WirelessHD*, Component, Video, PC Selects which source is displayed as the sub screen. s p.
Troubleshooting Problem Solving Reading the Indicators You can check the status of the projector from the flashing and lit on the control panel. , (operation indicators), o and m Refer to the following table to check the projector's status and how to remedy problems shown by the indicators. Indicator status during an error/warning : Lit Indicators Status : Flashing : Status maintained : Off Remedy Replace Lamp It is time to replace your lamp.
Troubleshooting Indicators Status Internal Error Remedy The projector has malfunctioned. Remove the power plug from the electrical outlet, and contact your local dealer or the nearest Epson repair center. s Epson Projector Contact List (blue)/(orange) Fan Error Sensor Error (blue)/(orange) Auto Iris Error (blue)/(orange) Power Err. (Ballast) (blue)/(orange) Lamp Error There is a problem with the lamp, or it failed to turn on.
Troubleshooting Indicator status during normal operation : Lit Indicators Status Standby condition : Flashing : Off Remedy When you press the button on the remote control, or the button on the control panel, projection starts after a short wait. Warm-up in progress Warm-up time is about 30 seconds. The power-off operation is disabled while the projector is warm‐ ing-up. (blue) Cool-down in pro‐ gress All operations are disabled while the projector is cooling-down.
Troubleshooting When the Indicators Provide No Help Check the problem Check the following table to see if your problem is mentioned, and go to the appropriate page for information on handling the problem. Problem Problems relating to im‐ ages Page No images appear p.93 Projection does not start, the projection area is completely black, or the projection area is completely blue. Moving images being projected from a computer are not projected p.93 "Not supported" is displayed p.
Troubleshooting Problems relating to images No images appear Check Remedy Is the projector turned on? Press the button on the remote control or the on the control panel. Is the power cord connected? Connect the power cord. Are the indicators switched off? Disconnect and then reconnect the projector's power cord. Check that pressing the power button after connection supplies the projector with power. Is an image signal being input? Check that the connected device is turned on.
Troubleshooting "No Signal" is displayed. Check Remedy Are the cables connected correctly? Check that all the cables required for projection are securely connected. s p.18 Is the correct image input port selected? Change the image with the source buttons on the remote con‐ button on the control panel. s p.25 trol, or the Is the connected device turned on? Turn on the device.
Troubleshooting Check Is an extension cable being used? Remedy If an extension cable is used, electrical interference may affect the signals. (Only when projecting computer image sig‐ nals) The projector uses automatic adjustment functions to project at the optimum status. However, depending on the signal, some may not be adjusted correctly even after performing self correc‐ Are the Sync. and Tracking settings adjusted tions. If this happens, adjust the Tracking and Sync.
Troubleshooting Check Is it time to replace the lamp? Remedy When the lamp is nearly ready for replacement, the images be‐ come darker and the color quality becomes poorer. When this happens, replace the lamp with a new lamp. s p.106 Projection stops automatically Check Is Sleep Mode enabled? Remedy If the set time is exceeded and no signal is input, the lamp turns off automatically, and the projector enters standby status.
Troubleshooting Check Remedy Make sure you point the remote control at the WirelessHD Trans‐ Is the remote control pointed at the Wire‐ lessHD Transmitter when operating the WiHD mitter when using the WiHD Transmitter control button on the remote control. s p.
Troubleshooting The 3D image is enlarged and truncated Check Is the correct 3D video format set? Remedy Video may be truncated if an incorrect 3D format is set. Set the correct 3D format. s p.46 Problems with HDMI HDMI link does not function Check Remedy Are you using a cable that meets the HDMI standards? Operations are not possible with cables that do not meet the HDMI standards.
Troubleshooting Check Remedy Is WirelessHD set to Off? When WirelessHD is set to Off from the Configuration menu, projection is not possible for WirelessHD input signals. Set Wire‐ lessHD to On, and then press the button. s Settings WirelessHD p.79 Are signals being received within the Wire‐ lessHD transmission range? Check the range within which the WirelessHD's transceiver can communicate, and view within that range. s p.
Troubleshooting Check Remedy Are there any obstructions between the Wire‐ Because WirelessHD communicates using a tight beamed elec‐ lessHD Transmitter and the projector? tromagnetic wave, if there are any people or objects and so on obstructing the communication path, this could have an adverse affect on the image. Make sure that there are no obstacles be‐ tween the WirelessHD Transmitter and the projector within the WirelessHD transmission range. s p.
Troubleshooting Event ID Check the number, and try the remedy as follows. If the problem persists, contact your local dealer or the nearest Epson repair center. s Epson Projector Contact List Event ID Cause Remedy 0432 0435 The EasyMP Network Projection failed to be started. 0434 0481 0482 0485 The network communication status is unstable. Check the network communication status, and reconnect it after a while. 0433 Transferred images cannot be played.
Maintenance Maintenance Cleaning the Parts You should clean the projector if it becomes dirty or if the quality of projected images starts to deteriorate. Warning Do not use sprays that contain flammable gas to remove dirt and dust from the projector's lens, air filter, and so on. The projector may catch fire due to the high internal temperature of the lamp. Cleaning the air filter Clean the air filter if dust has accumulated on the air filter or when the following message is displayed.
Maintenance d Hold the air filter with the surface facing down and tap it 4 or 5 times to remove the dust. f Install the air filter. g Install the air filter cover. Grip the air filter by the knob in the center and insert it straight. Turn it over and tap the other side in the same way. Attention Fasten the upper catch and then the lower one. If the air filter is hit too hard, it may become unusable due to deformities and cracks.
Maintenance Cleaning the lens Use a commercially available cloth for cleaning glasses to gently wipe off dirt from the lens. Attention Do not rub the lens with harsh materials or handle the lens too roughly as it can easily become damaged. Cleaning the 3D Glasses Use the cloth to gently wipe off dirt from the lenses of the 3D Glasses. Attention • Do not rub the lenses of the glasses with harsh materials or handle the lenses too roughly as they can easily become damaged.
Maintenance Replacing Consumables Replacing the air filter c Dispose of used air filters properly in accordance with your local regulations. Material: Polypropylene a Press the button on the remote control or the control panel to turn off the power, and then disconnect the power cord. b Remove the air filter cover. c d Install the new air filter. e Install the air filter cover. Grip the air filter by the knob in the center and insert it straight.
Maintenance Replacing the lamp Warning When replacing the lamp because it has stopped illuminating, there is a possibility that the lamp may be broken. If replacing the lamp of a projector that has been suspended from the ceiling, you should always assume that the lamp is cracked, and remove the lamp cover with care. When you open the lamp cover, small shards of glass could fall out. If any shards of glass get into your eyes or mouth, contact a doctor immediately.
Maintenance f Install the new lamp. g Tighten the two lamp fixing screws. Make sure the lamp is facing the correct direction and press it in. h Replace the lamp cover. i Tighten the lamp cover fixing screw. Slide the cover back into place. Warning Do not disassemble or remodel the lamp. If a modified or disassembled lamp is installed in the projector and used, it could cause a fire, electric shock, or an accident. Caution • Make sure you install the lamp and lamp cover securely.
Maintenance Resetting lamp hours After replacing the lamp, make sure you reset the lamp hours. The projector records how long the lamp is turned on and a message and indicator notify you when it is time to replace the lamp. a Turn on the power. b Press the c Select Reset - Reset Lamp Hours. d button. Use the buttons to select Yes, and then press the button to execute. The lamp hours are reset. The Configuration menu is displayed. A reset confirmation message is displayed.
Appendix Optional Accessories and Consumables The following optional accessories and consumables are available for purchase if required. This list of optional accessories and consumables is current as of: 2014.7. Details of accessories are subject to change without notice. Availability may vary depending on the country of purchase. Optional Items Name Ceiling mount* Model No. ELPMB20 Explanation Use when installing the projector on a ceiling.
Appendix Supported Resolutions Component Video Signal Refresh Rate (Hz) Resolution (dots) SDTV (480i) 60 720 x 480 SDTV (576i) 50 720 x 576 SDTV (480p) 60 720 x 480 SDTV (576p) 50 720 x 576 HDTV (720p) 50/60 1280 x 720 HDTV (1080i) 50/60 1920 x 1080 HDTV (1080p) 50/60 1920 x 1080 Composite Video Signal Refresh Rate (Hz) Resolution (dots) TV (NTSC) 60 720 x 480 TV (SECAM) 50 720 x 576 TV (PAL) 50/60 720 x 576 Computer Signals (Analog RGB) Signal Refresh Rate (Hz) Resolu
Appendix Signal Refresh Rate (Hz) Resolution (dots) SDTV (480p) 60 720 x 480 SDTV (576p) 50 720 x 576 HDTV (720p) 50/60 1280 x 720 HDTV (1080i) 50/60 1920 x 1080 HDTV (1080p) 24/30/50/60 1920 x 1080 MHL Input Signal Signal Refresh Rate (Hz) Resolution (dots) VGA 60 640 x 480 SDTV (480i) 50 720 x 480 SDTV (576i) 60 720 x 576 SDTV (480p) 50 720 x 480 SDTV (576p) 60 720 x 576 HDTV (720p) 50/60 1280 x 720 HDTV (1080i) 50/60 1920 x 1080 HDTV (1080p) 24/30 1920 x 1080
Appendix * When projecting in WirelessHD, the following signals do not support Deep Color.
Appendix Specifications Product name EH-TW6600W EH-TW6600 Appearance (not including ad‐ 410 (W) x 157 (H) x 304 (D) mm justable foot) Panel Size 0.61" wide Display method Polysilicon TFT active matrix Resolution 1920 (W) x 1080 (H) x 3 Scanning Frequency Digital Pixel clock: 13.5 - 148.5 MHz Horizontal: 15.63 - 67.5 kHZ Vertical: 24, 30, 50 - 60 Hz Analog Pixel clock: 13.5 - 148.5 MHz Horizontal: 15.63 - 67.5 kHZ Vertical: 50 - 60 Hz Focus adjustment Manual Zoom adjustment Manual (approx.
Appendix *1 When using the WirelessHD Transmitter with EH-TW6600W, and the following conditions are satisfied Settings - WirelessHD - WirelessHD is set to On Settings - HDMI Link - Power On Link is set to Bidirectional or Device -> PJ s p.79 *2 For use at an altitude of 2286 m or higher, it is +5 to +30°C. This product is also designed for IT power distribution system with phase-to-phase voltage 230V.
Appendix • Communications protocol Default baud rate setting: 9600 bps Data length: 8 bit Parity: None Stop-bit: 1 bit Flow control: None Indication of the manufacturer and the importer in accordance with requirements of directive 2011/65/ EU (RoHS) Manufacturer: SEIKO EPSON CORPORATION Address: 3-5, Owa 3-chome, Suwa-shi, Nagano-ken 392-8502 Japan Telephone: 81-266-52-3131 Importer: SEIKO EUROPE B.V.
Appendix DECLARATION of CONFORMITY According to 47CFR, Part 2 and 15 Class B Personal Computers and Peripherals; and/or CPU Boards and Power Supplies used with Class B Personal Computers We: Located at: Tel: Epson America, Inc. 3840 Kilroy Airport Way MS: 3-13 Long Beach, CA 90806 562-981-3840 Declare under sole responsibility that the product identified herein, complies with 47CFR Part 2 and 15 of the FCC rules as a Class B digital device.
Appendix Glossary This section briefly explains the difficult terms that are not explained in context in the text of this guide. For details, refer to other commercially available publications. HDCP HDMI ™ HDCP is an abbreviation for High-bandwidth Digital Content Protection. It is used to pre‐ vent illegal copying and protect copyrights by encrypting digital signals sent over DVI and HDMI ports.
Appendix Interlace Transmits information needed to create one screen by sending every other line, starting from the top of the image and working down to the bottom. Images are more likely to flicker because one frame is displayed every other line. Pairing Register devices in advance when connecting with Bluetooth devices to ensure mutual communication.
Appendix General Notes All rights reserved. No part of this publication may be reproduced, stored in a retrieval system, or transmitted in any form or by any means, electronic, mechanical, photocopying, recording, or otherwise, without the prior written permission of Seiko Epson Corporation. No patent liability is assumed with respect to the use of the information contained herein. Neither is any liability assumed for damages resulting from the use of the infor‐ mation contained herein.
Index Connecting smartphones or tablets ......................................................................... 20, 21 Connecting USB devices ............................. 20 Connecting video equipment .................. 18 Connecting WirelessHD devices .............. 21 Connection Mode ......................................... 85 Contrast ............................................................ 75 Control panel ................................................ 6, 7 Control panel lock ................
Index H-Keystone ...................................................... 79 Hue .............................................................. 35, 76 P Pairing ............................................................... 47 Panel Alignment ............................................ 83 Passphrase ....................................................... 86 Pattern Color ................................................... 83 PC port ...............................................................
Index Slideshow ......................................................... 70 Soft keyboard ................................................. 85 Source ......................................................... 25, 87 Specifications ............................................... 113 SSID .................................................................... 85 SSID Display ..................................................... 86 Standby Confirmation ................................. 83 Start Adjustments .....