
User`s guide

Starting the Program
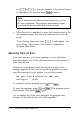
Follow these steps to start the System diagnostics program:
1.
2.
3.
4.
5.
6.
7.
8.
Insert the Reference 1 diskette in drive A and turn on or reset
the computer.
Note
Always boot the computer from the Reference 1 diskette
to start System diagnostics. This clears from memory
any protected mode terminate-and-stay-resident (TSR)
programs or other utilities and frees it for use by the
diagnostics program.
After a moment, you see the title screen for the System
Configuration program. Press any key to continue.
When you see the Welcome screen, press IEnter
From the Main Menu, select Access to other
utilities. Then select System diagnostics.
When prompted, remove the Reference 1 diskette, insert the
Reference 2 diskette, and then press [Enter.
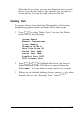
You see a menu bar at the top of the screen with Items
Detected highlighted. Press
IEnter
You see a list of all the testable devices the computer detects
in your system. Check to be sure the list is correct.
If the list is not correct, press I-] to select Quit and press
IEnter
Run the System Configuration program to make
sure any missing devices are configured properly. Then run
System diagnostics again.
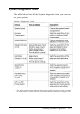
A-2
Running System Diagnostics