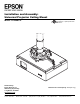
Installation and Assembly: Universal Projector Ceiling Mount Model: ELPMBPJF R Distributed by: Epson America, Inc. 3840 Kilroy Airport Way Long Beach, CA 90806 www.epson.com This product is UL Listed. It must be installed by a qualified professional installer. Maximum UL Load Capacity: 50 lb (22.7 kg) Manufactured by Peerless Industries, Inc. 3215 W. North Ave. • Melrose Park, IL 60160 • (800) 865-2112 or (708) 865-8870 • Fax: (708) 865-2941 • www.peerlessmounts.
NOTE: Read entire instruction sheet before you start installation and assembly. WARNING • Do not begin to install your product until you have read and understood the instructions and warnings contained in this Installation Sheet. If you have any questions regarding any of the instructions or warnings, call Peerless customer care at 1-800-729-0307.
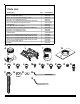
Before you start check the parts list to ensure all of the parts shown are included. Parts List A B C D E F G H I J K L M N O P Q R Description projector mount 4 mm security allen wrench M5 x .8 x 10 mm socket pin type F screw #10-32 x 3/8" spade thumb screw #10-32 x 3/8" serrated washer head socket pin screw #14 x 2.5" phillips hex head wood screw ceiling plate .25" ID x .56" OD x .
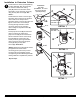
Installation to Extension Column 1 Screw extension column (sold separately) to ceiling plate (G). Align the notch with one of the four holes in the ceiling plate (G) and secure extension column with a M5 x 10 mm socket pin screw (C) using security allen wrench (B). See detail 1. EXTENSION COLUMN (ELPMBC01, UL Listed EXT or ADJ Series) (Sold Separately) Screw extension column connector (I) to extension column. Align slot in extension column with one of the top holes in extension column connector (I).
Installation To Wood Joist Ceilings 1 Drill two 5/32" (4 mm) dia. holes to a minimum depth of 2.5" (64 mm). Attach ceiling plate (G) with two #14 x 2.5" (6 mm x 65 mm) wood screws (F) as shown using 3/8" (10 mm) socket wrench. Skip to step 2. WOOD JOIST WARNING CEILING • Tighten wood screws (F) so that wall plate (G) is firmly attached, but do not overtighten. Overtightening can damage the screws, greatly reducing their holding power. G • Never tighten in excess of 80 in • lb (9 N.M.).
Installation to Concrete Ceilings WARNING • When installing Peerless mounts on concrete, verify that you have a minimum of 1 5/8" of actual concrete surface in the 1/4" diameter hole to be used for the concrete anchors. Do not drill into mortar joints! Concrete must meet ASTM C-90 specifications. • Concrete must be 2000 psi density minimum. Lighter density concrete may not hold concrete anchor.
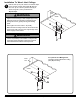
Flush Mount Application 1 Screw projector mount (A) into ceiling plate (G). Align the notch with one of the four holes of the ceiling plate (G) and secure projector mount (A) with a M5 x 10 mm socket pin screw (C) using security allen wrench (B) as shown in detail 1. NOTE: Slotted set screw (K) is used to jam against the threads of mount to prevent any excess movement of the projector mount (A).
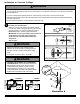
3 Attach adapter plate (L) to projector using one screw (M, N, O or P) for each channel as shown. Tighten all screws, while keeping the center of gravity. Be sure that adapter plate (L) is straight. Adjust the feet of the channels to keep the adapter plate level. Tighten all screws with 4 mm security allen wrench (B) or wrench provided with projector mount, while keeping the center of gravity. If M3 screws are used, tighten using 2 mm security allen wrench (Q).
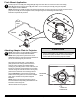
Projector Alignment 5 To adjust roll, pitch and yaw loosen the set screw (shown below) using allen wrench (B). You should be able to just slightly loosen the screw so that your adjustments can be set without having to hold the projector. Move projector to desired position and slowly tighten set screw. SET SCREW IMPORTANT: Allen wrench is your key for projector removal. Store it in a safe place. PROJECTOR Accessories NOTE: All accessories are available for purchase through Epson (www.epson.
LIMITED FIVE-YEAR WARRANTY 3HHUOHVV ,QGXVWULHV ,QF HVWDEOLVKHV D ZDUUDQW\ SHULRG RI ÀYH \HDUV IRU SURGXFWV PDQXIDFWXUHG RU VXSSOLHG E\ 3HHUOHVV 7KLV SHULRG FRPPHQFHV IURP WKH GDWH RI VDOH RI WKH SURGXFW WR WKH RULJLQDO FRQVXPHU EXW ZLOO LQ QR FDVH ODVW IRU PRUH WKDQ VL[ \HDUV DIWHU WKH GDWH RI WKH SURGXFWҋV PDQXIDFWXUH 'XULQJ WKH ZDUUDQW\ SHULRG VXFK SURGXFWV ZLOO EH IUHH IURP GHIHFWV LQ PDWHULDO DQG ZRUNPDQVKLS SURYLGHG WKH\ DUH LQVWDOOHG DQG XVHG LQ FRPSOLDQFH ZLWK WKH LQVWUXFWLRQV HVWDEOLVKHG E