
Projector User Manual
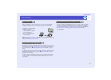

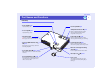
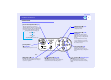
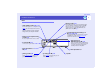
Table Of Contents
- Projector Features
- Contents
- Before Using the Projector
- Part Names and Functions
- Before Using the Remote Control
- Installation
- Inserting and Removing Cards (EMP-765/755 only)
- Connecting to a Computer
- Connecting to a Video Source
- Playing Sound from Video Equipment
- Playing Sound from External Speakers (EMP-765/755 only)
- Connecting USB Devices (Digital Camera, Hard Disk Drive or Memory Devices) (EMP-765/755 only)
- Preventing theft (Password Protect)
- Basic Operations
- Advanced Operations
- Troubleshooting
- Appendices

7
User’s Guide
Part Names and Functions
Front/Top
• Control panel sp.8
• Zoom ring sp.40
Adjusts the image size.
• Remote control light-receiving
area sp.13
Receives signals from the remote control.
• Power indicator sp.75
Flashes or lights in different colours to
indicate the operating status of the projector.
• Front adjustable foot sp.41
Extend and retract to adjust the projection
angle when the projector is placed on a
surface such as a shelf.
• Lens cover
Attach when not using the projector to
prevent the lens from becoming dirty or
damaged.
• Focus ring sp.40
Adjusts the image focus.
• Foot adjust lever sp.41
Pull out the foot lever to extend and retract the
front foot.
• Lamp indicator sp.75
Flashes or lights in different colours to
indicate problems with the projection lamp.
• Air exhaust vent
Do not touch during or immediately
after projection, as it can become hot.
• Temperature indicator sp.75
Flashes or lights in different colours to
indicate problems with the internal
temperature of the projector.
• Card slot (EMP-765/755 only)
sp.17
Insert a LAN card or memory card in here
when using EasyMP.
• Security lock ( ) sp.110