User’s Guide
User’s Guide Features of the Projector Direct Power On You can make the projector turn on and be ready to project images simply by connecting the power cable. You can also turn the power on for projectors in places such as meeting rooms where the power is centrally controlled, simply by turning the power on at the central control point. sp.84 Direct Power Off After turning the projector off, you can disconnect the power cable right away to move the projector.
User’s Guide Features of the Projector Network Support When something goes wrong with the projector, such as lamp blowing during projection, the projector can notify you of the error via e-mail. In addition, if you are using EMP-835, EasyMP allows you to; • Make easy network connection with a computer via a wireless LAN. • Project a computer's image over a network. sFor instructions on how to use EasyMP, refer to EasyMP Network Setup Guide and EasyMP Operation Guide.
User’s Guide Contents Features of the Projector .......................................... 1 Before Using the Projector Part Names and Functions ....................................... 6 Front/Top/Side ............................................................................. 6 Base .............................................................................................. 7 Rear .............................................................................................. 7 Remote Control .........
User’s Guide 4 Contents Advanced Operations Functions for Enhancing Projection ........................ 51 Selecting an Image Source While Viewing Projected Images (Preview Function) ........................................................ 51 Projecting Easy-to-see Images Without a Screen (Wall Shot)... 52 A/V Mute Function .................................................................... 54 Freeze Function .......................................................................... 55 E-Zoom Function ..
Before Using the Projector This chapter describes the procedures for setting up the projector before use. Part Names and Functions................................... 6 Connecting to a Computer ................................. 19 • Front/Top/Side.......................................................................6 • Base.........................................................................................7 • Rear ......................................................................................
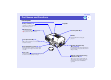
User’s Guide Part Names and Functions 6 Front/Top/Side • Lamp cover sp.119 • Speaker Open this cover when replacing the lamp inside the projector. • Air exhaust vent Do not touch during or immediately after projection, as it can become hot. • Control panel sp.9 • Handle Use this handle when carrying the projector. • Foot adjust lever sp.39 Pull out the foot adjust lever to extend and retract the front foot. • Front adjustable foot sp.
User’s Guide 7 Part Names and Functions Base Rear • Suspension bracket fixing points (4 points) sp.14, p.127 • Card slot (EMP-835 only) sp.16 Connect an optional ceiling mount here when suspending the projector from the ceiling. Insert a wireless LAN card or memory card in here when using EasyMP. • Input/output ports sp.10 Use to connect the projector to a variety of equipment such as a computer or video equipment. • Network port sp.24 Connect a network cable here.
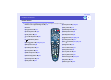
User’s Guide 8 Part Names and Functions Remote Control If you position the over the button icon or button name, a description of that button will appear. • Remote control light-emitting area sp.12 • [Power] button sp.34, p.43 • Indicator • [R/C] switch sp.12 • [Page] buttons sp.21 • [A/V Mute] button sp.54 • [E-Zoom] buttons sp.55 • [Resize] button sp.61 • [PinP] button sp.56 • [Freeze] button sp.55 • [Color Mode] button sp.76 •[ • [ ] (illumination) button • [Pointer] button sp.
User’s Guide 9 Part Names and Functions Control Panel Buttons with no description are the same as the remote control buttons. Refer to the remote control descriptions for details. • [Source Search] button sp.35 Operates in the same way as the [Search] button on the remote control. • [Quick Setup] button sp.40 • [Source] buttons sp.
User’s Guide 10 Part Names and Functions Input/Output Ports • [USB TypeA] port (EMP-835 only) sp.30 Connects a digital camera or USB support hard disc/ memory to project their image/movie files or scenarios. • [USB TypeB] port sp.21, p.132 For an USB cable connection to a computer in order to use the wireless mouse function when the computer and the projector are connected using a computer cable. • [Computer1/Component] port [Computer2/Component] port sp.20, p.26, p.
User’s Guide Before Using the Remote Control Inserting the Batteries 11 2 Insert the batteries. Check the positions of the (+) and (–) marks inside the battery holder to ensure that the batteries are inserted the correct way. 3 Replace the battery cover. Slide the battery cover in until the tab clicks into place. The batteries are not already inserted into the remote control at the time the projector is purchased.
User’s Guide 12 Before Using the Remote Control Using the Remote Control and Remote Operating Range PROCEDURE 1 Set the [R/C] switch to "ON". Operating angle (vertical) Operating distance approx. 10 m (30 ft.) Operating distance approx. 10 m (30 ft.) Approx. 15° Approx. 15° Approx. 15° Approx. 15° When suspended from the ceiling Approx. 15° Approx.
User’s Guide Before Using the Remote Control TIP • Do not allow sunlight or light from fluorescent lamps to shine directly onto the projector's remote control light-receiving areas, otherwise it may interfere with the reception of signals from the remote control. • When not using the remote control, set the [R/C] switch on the remote control to "OFF". If you leave the [R/C] switch at "ON", it will consume battery power.
User’s Guide Installation Setting Up the Projector 14 • Front/ceiling projection The projector supports the following four different projection methods, allowing you to choose the best method for displaying your images. Caution Before setting up the projector, be sure to first read the separate Safety Instructions/World-Wide Warranty Terms.
User’s Guide 15 Installation Screen Size and Projection Distance The distance from the lens to the screen determines the actual image size. Recommended distance 86–1473 cm (34–580 ft.) Screen While referring to the following table, position the projector so that the images are projected onto the screen at the optimum size. The values should be used as a guide for setting up the projector. The actual values will vary depending on projection conditions and the zoom setting. Units: cm (in.
User’s Guide Inserting and Removing Cards (EMP-835 only) You can use PC cards such as wireless LAN cards and memory cards with the EMP-835. Inserting and removing PC cards will be explained using the included wireless LAN card provided as an example. When using other cards, or inserting or removing a card in a PC card slot on a computer, refer to the documentation included with the card. TIP The following PC cards can be inserted into the projector's card slot.
User’s Guide 17 Inserting and Removing Cards (EMP-835 only) Removal Caution PROCEDURE 1 • Do not remove the wireless LAN card while the access lamp of the wireless LAN card is flashing green, otherwise it may damage the wireless LAN card. • Do not remove a memory card while the access lamp of the projector's card slot is flashing green, or while projecting a scenario. Doing so may damage the memory card itself or data in the card. • The PC card gets hot during and immediately after projector use.
User’s Guide 18 Inserting and Removing Cards (EMP-835 only) Access Lamp Statuses Wireless LAN Card Access Lamp Status The card slot access lamp does not light when a wireless LAN card has been inserted into the projector. You can check the network communication status by observing the status of the wireless LAN access lamps as described below.
User’s Guide Connecting to a Computer Caution When connecting the projector to a computer, be sure to check the following. • Turn the power off for both the projector and the computer before connecting them. If the power for either device is on at the time of connection, damage may result. • Check the shapes of the cable connectors and the device ports before making the connections.
User’s Guide 20 Connecting to a Computer Connecting to a Computer The shape and specifications of the computer's monitor port will determine what type of cable should be used. Select the port and cable in accordance with the computer being used. If the Monitor Port is a Mini D-Sub 15-pin Port (Example) Use the accessory computer cable to make the connections.
User’s Guide 21 Connecting to a Computer Using the Remote Control to Operate the Mouse Pointer (Wireless Mouse Function) You can use the remote control as a wireless mouse to control the mouse pointer on the screen by using the accessory USBg cable to connect the USB port of the computer to the [USB TypeB] port at the rear of the projector. Computer Mouse used Applicable cable Windows 98/2000/Me/ XP Home Edition/XP Professional USB mouse USB cable (accessory) Macintosh (OS 8.6–9.2/10.1–10.
User’s Guide 22 Connecting to a Computer Once the connection has been made, the mouse pointer can be operated as follows. Moving the mouse pointer Left click Tilt the [ ] button on the remote control to move the mouse pointer in the direction of tilt. Press the [Enter ( )] button. If you press the [Enter ( )] button twice in rapid succession, it has the effect of a double-click. Right click Drag and drop Press the [Esc ( )] button. When you hold down the [Enter ( )] button for approximately 1.
User’s Guide Connecting an External Monitor While projecting analogue RGB images from a computer connected by a computer cable or projecting RGB-video images from a video equipment, you can give a presentation viewing the images at an external monitor connected to the projector. Connect the external monitor using the cable that is provided with the monitor.
User’s Guide Network Cable Connections Connect using a commercially-available 100baseTX or 10baseT network cable. To network port To [Network] port Network cable (commercially-available) Caution To prevent the possibility of incorrect operation, you should use a category 5 shielded cable.
User’s Guide Connecting to a Video Source Caution When connecting the projector to other video sources, take the following precautions. • Turn the power off for both the projector and the video source before connecting them. If the power for either device is on at the time of connection, damage may result. • Check the shapes of the cable connectors and the device ports before making the connections.
User’s Guide 26 Connecting to a Video Source Projecting S-Video Images Projecting Component Video Images Use a commercially-available S-Videog cable to make the connections. To component video output ports To S-Video output port S-Video cable (commercially-available) Use the optional component videog cable to make the connections. s"Optional Accessories and Consumables" p.
User’s Guide 27 Connecting to a Video Source Projecting RGB Video Images An RGB video source is a video source other than a computer that outputs RGB signals. If the RGB Output Port is a Mini D-Sub 15-pin Port (Example) Use the accessory computer cable to make the connections.
User’s Guide Playing Sound from Connected Equipment The projector has a built-in speaker with a maximum output of 5 W. You can output sound from the connected equipment (such as a computer or VCR) through the projector's built-in speaker if the equipment has an audio output port. The [Audio] port to use is the port that is in the same box as the port being used to input the image signals, except when component video signals are being input.
User’s Guide Playing Sound from External Speakers The audio signals from the input source that is currently being projected can be output to external speakers. When the input source is changed, the audio signals change automatically too. You can connect speakers with built-in amplifiers to the projector's [Audio Out] port in order to enjoy a fuller quality of sound. Use a commercially-available audio cable with pin jack ⇔ stereo mini jack (3.5 mm) plugs or similar.
User’s Guide Connecting USB Devices (Digital Camera, Hard Disk Drive or Memory Devices) (EMP-835 Only) USB1.1-compatible digital cameras, hard disk drives and USB storage devices can be connected to the projector. Image files that are stored inside the digital camera and scenarios, images and movies that are stored inside USB storage devices can be played back by EasyMP CardPlayer.
User’s Guide Connecting USB Devices (Digital Camera, Hard Disk Drive or Memory Devices) (EMP-835 Only) Disconnecting a USB Device from the Projector After projection is finished, disconnect the USB device from the projector by the following procedure. PROCEDURE 1 Position the cursor with the "EJECT" button on the CardPlayer screen and press the [Enter] button on the remote control to close CardPlayer.
Basic Operations This chapter describes basic operations such as turning projection on and off and adjusting the projected images. Turning the Projector On.................................... 33 Preventing Theft (Password Protect) ................ 46 • Connecting the Power Cable ..............................................33 • Turning the Power On and Projecting Images .................34 • Adjusting the Position and Size of the Projection Area...38 • When Password Protect is Enabled .................
User’s Guide Turning the Projector On Turn the power on to start projecting images. 33 4 Connect the accessory power cable to the projector. Check that the power connector is facing the same way as the power inlet on the projector, and then insert the power cable connector securely into the projector. 5 Connect the other end of the power cable to an earthed electrical outlet. Caution Be sure to read the Safety Instructions/World-Wide Warranty Terms before projecting images.
User’s Guide 34 Turning the Projector On Turning the Power On and Projecting Images PROCEDURE 1 Check that the Power indicator is lit orange. 2 If using the remote control, set the [R/C] switch on the remote control to "ON". 3 Press the [Power] button on either the remote control or the projector's control panel to turn the power on for the projector. A beep will sound and the Power indicator will change to flashing green.
User’s Guide 35 Turning the Projector On 4 Turn the power on for all equipment connected to the projector. For a video source, press the [Play] button at the video source to start playback if necessary. 5 If no images are projected, press the [Search] button on the remote control or the [Source Search] button on the projector's control panel. The projector detects sources that currently being input and projects them.
User’s Guide 36 Turning the Projector On • If using the EMP-835, EasyMP will be detected as a source while CardPlayer is running with a memory card or a USB device, or while Network Screen is activated. While EasyMP standby screen or setting screen is displayed, the EasyMP screen will not be displayed by pressing the [Search] or [Source Search] button. Press the [EasyMP] button on the remote control or the [Computer/ Component] button on the projector's control panel to switch the source to EasyMP.
User’s Guide 37 Turning the Projector On Button to press Source EasyMP*1 Remote control [EasyMP] Computer1/Component [Comp1] Computer2/Component [Comp2] S-Video [S-Video] [Video] Video On-screen display Projector The source changes in the following order each time [Computer/Component] EasyMP Computer1 (Auto) is pressed.
User’s Guide 38 Turning the Projector On Adjusting the Position and Size of the Projection Area Adjusting the Vertical Position of the Projection Area (Foot Adjustment) If the images are being projected onto a screen that is higher than the position of the projector, extend the front adjustable foot to tilt the projector. The front adjustable foot and the rear adjustable feet can be extended and retracted to adjust the tilt of the projector to a maximum of 12° upwards and 4° downwards.
User’s Guide 39 Turning the Projector On Adjusting the Horizontal Position of the Projection Area PROCEDURE While pulling the foot adjust lever at the front of the projector, lift up the front of the projector to extend the front adjustable foot. Extend the front adjustable foot until the desired angle is obtained, and then release the foot adjust lever. If the projector cannot be positioned directly in front of the screen, this adjustment allows projection to be carried out from the side.
User’s Guide 40 Turning the Projector On Adjusting the Size of the Projection Area (Zoom Adjustment) The size of the projected images is basically determined by the distance from the projector to the screen. sp.15 The following procedures explain how to adjust the screen images once the projector itself has been set up. TIP The E-Zoom function can also be used to enlarge parts of the images. sp.55 PROCEDURE Press the [Zoom] buttons to adjust the size.
User’s Guide 41 Turning the Projector On TIP • You can use the "Quick Setup Options" in the configuration menu to set which functions are carried out when the [Quick Setup] button is pressed. Default setting: Auto Focus and Auto Quick Corner are carried out. Wall Shot is not carried out. s"Setting" - "Quick Setup" - "Quick Setup Options" p.80 • "Wall Shot" can also be carried out separately by pressing the [Wall Shot] button on either the remote control or the projector's control panel. sp.
User’s Guide 42 Turning the Projector On TIP • You can cancel Quick Setup operation at any time by pressing the [Esc] button on either the remote control or the projector's control panel. • When Auto Quick Corner detects a "frame" (detecting 3 or more sides, or top and bottom sides, or 2 adjacent sides) within the projection area, it automatically corrects the image so that it fits within the "frame" at an aspect ratio of 4:3. The "frame" means the borders of the screen, whiteboard or blackboard.
User’s Guide Turning the Projector Off 43 Follow the procedure below to turn the projector off. Caution PROCEDURE 1 2 Turn the power off for the signal sources that are connected to the projector. Check that the power for all connected components has been turned off. Press the [Power] button on either the remote control or the projector's control panel. The following confirmation message will appear. If the message "The projector is overheating.
User’s Guide 44 Turning the Projector Off Caution You should wait for at least 10 seconds after disconnecting the power cable before connecting it again. If you connect the power cable without waiting for 10 seconds, the projector may not start operating correctly. 4 5 Attach the lens cover. Attach the lens cover to the lens when not using the projector, in order to stop the lens from getting dusty or dirty. Push the lens cover on until it clicks into place. Set the [R/C] switch to "OFF".
User’s Guide Adjusting the Volume You can adjust the volume for the sound from the projector's built-in speaker or from the external speakers that are connected to the projector. PROCEDURE The volume can be adjusted using either the remote control, the projector's control panel or the configuration menus. This procedure explains how to use the remote control and the projector's control panel to adjust the volume. For adjustment using the configuration menus: s"Setting" - "Audio" - "Volume" p.
User’s Guide Preventing Theft (Password Protect) When the Password Protect function is enabled, people who do not know the password cannot project images even though they can turn on the projector's power. Furthermore, it will not be possible to change the company logo or other logo that is displayed when the power is turned on. This can help to increase anti-theft effectiveness.
User’s Guide 47 Preventing Theft (Password Protect) If the "Timer" Setting is for One Hour or More The password entry screen will not be displayed at all when the power is turned on until the length of time that has been set has elapsed. When the set length of time has elapsed, the password entry screen will be displayed each time the power is turned on. The length of time referred to here is the total illumination time for the projector's lamp from the point when the projector's menu is closed.
User’s Guide 48 Preventing Theft (Password Protect) Setting Password Protect 2 Enable "Power ON Protect". (1) Select When "Power ON Protect" and then press the [Enter] button on either the remote control or the projector's control panel. (2) Select "ON" and then press the [Enter] button on either the remote control or the projector's control panel. (3) Press the [Esc] button on either the remote control or the projector's control panel.
User’s Guide 49 Preventing Theft (Password Protect) 4 5 Enable "User's Logo Protect". (1) Select "User's Logo Protect" and then press the [Enter] button on either the remote control or the projector's control panel. (2) Select "ON" and then press the [Enter] button on either the remote control or the projector's control panel. (3) Press the [Esc] button on either the remote control or the projector's control panel. Enter the password.
Advanced Operations This chapter describes functions for enhancing the projection of images, and how to use the configuration menus. Functions for Enhancing Projection ................. 51 • Selecting an Image Source While Viewing Projected Images (Preview Function).................................................51 • Projecting Easy-to-see Images Without a Screen (Wall Shot) ...........................................................................52 • A/V Mute Function ..................................
User’s Guide Functions for Enhancing Projection 51 This section describes the various useful functions that can be used to enhance presentations. Active window Shows the images that are currently being projected. Computer (Analog-RGB) Selecting an Image Source While Viewing Projected Images (Preview Function) If using EMP-835, a image of EasyMP will appear You can momentarily project images from the currently-selected input source, and switch images while viewing them in a preview screen.
User’s Guide 52 Functions for Enhancing Projection 3 Press the [Enter] button. The selected images are then projected in the active window. If you press the [Enter] button once more, the preview function is cancelled and the images in the active window are projected. To return to the images that were being projected before the preview function was activated, press the [Esc] or [Preview] button.
User’s Guide 53 Functions for Enhancing Projection PROCEDURE The Wall Shot function can be operated using either the remote control or the projector's control panel. 1 Press the [Wall Shot] button on either the remote control or the projector's control panel while the images are being projected. When the button is pressed, the current status is displayed on the screen.
User’s Guide 54 Functions for Enhancing Projection A/V Mute Function This function momentarily pauses the images and sound. For example, it can be used when you do not wish to show details of operations such as selecting different files while computer images are being projected. However, if you use this function when projecting moving images, the images and sound will still continue to be played back by the source, and you cannot return to the point where the A/V Mute function was activated.
User’s Guide 55 Functions for Enhancing Projection Freeze Function This function pauses only the projected images. The sound keeps playing without pausing. The signal source will still be playing back the images even while projection is paused, and so it will not be possible to resume projection from the point where it was paused. PROCEDURE Press the [Freeze] button. The images will then be paused.
User’s Guide 56 Functions for Enhancing Projection 3 When the [ ] button is pressed, the image is enlarged with the cross at its centre. When the [ ] button is pressed, the enlarged image is then reduced. The enlargement ratio will appear at the bottom-right of the screen. You can scroll around the image by tilting the [ ] button.
User’s Guide 57 Functions for Enhancing Projection 2 Tilt the [ ] button on the remote control to change the position of the sub-screen. Pointer Function You can use this function to display a pointer icon on the images that are being projected, and use the remote control to control it. The pointer icon can be used to indicate parts of an image that is being projected to clarify which part is being described or to draw attention to it.
User’s Guide Functions for Enhancing Projection 2 Tilt the [ ] button to move the pointer. Press the [Pointer] button again to cancel the pointer. The pointer will then disappear.
User’s Guide 59 Functions for Enhancing Projection Preset Function 2 Once the settings are complete, select "Preset" from the "Signal" menu and then press the [Enter] button on either the remote control or the projector's control panel. 3 Select a preset number (1 to 5). While projecting analogue RGB images from a computer connected via a computer cable, you can store the following settings in the configuration menu.
User’s Guide 60 Functions for Enhancing Projection 4 Press the [Enter] button on either the remote control or the projector's control panel to store the setting values. When the settings have been saved, the input resolution will appear. TIP • To clear the memorised details, select "Reset" from the "Signal" menu. Note that this will clear all of the preset settings. • Preset recording is possible regardless of whether Wall Shot is ON or OFF. However, the Wall Shot settings are not memorised.
User’s Guide 61 Functions for Enhancing Projection If the input resolution is lower than the panel resolution (1024 × 768) Changing the Resize/Aspect Ratio You cannot switch to real display or change the aspect ratio while EasyMP is running (EMP-835 only).
User’s Guide 62 Functions for Enhancing Projection TIP • The type of display for projected images can be saved separately for each input source. • If the input resolution is the same as the panel resolution (1024×768 dots), the image size will not change. • In the case of SXGA (5:4) input signals, the image position changes as shown below each time you press the [Resize] button while holding down the [Shift] button on the projector's control panel.
User’s Guide 63 Functions for Enhancing Projection For HDTVg When 16:9 format images in squeeze mode are projected at 4:3 aspect ratio, the images are resized so that they fill the full vertical area of the screen, and the left and right edges are truncated and are not displayed.
User’s Guide 64 Functions for Enhancing Projection 2 Use the [ ] button on the remote control or the [ ] or [ ] button on the projector's control panel to select the desired ID number (1–9). Press the [Enter] button on either the remote control or the projector's control panel to accept the ID number setting. Registering an ID Number for a Remote Control PROCEDURE 1 Press the [ID] button. The [ID] button will light.
User’s Guide 65 Functions for Enhancing Projection TIP 2 If you would like to check the ID number that is currently set for a remote control, press the [ID] button on the remote control so that the button lights, and then press the [ID] button once more. After a brief period, the [ID] button will flash, and the number of flashes will equal the remote control's ID number. Set to "Full Lock" or "Partial Lock".
User’s Guide 66 Functions for Enhancing Projection Locking the Remote Control Buttons You can lock some of the remote control buttons to prevent mis-operations during presentations. PROCEDURE 1 Press the [Menu] button on either the remote control or the projector's control panel, and then select "Setting" - "Operation Lock" - "Remote Control" from the configuration menu. 2 Set to "Partial Lock". 3 When the confirmation message is displayed, select "Yes".
User’s Guide Adjusting Projected Images Manually Focusing the Screen Images (Focus Adjustment) PROCEDURE Press the [Focus] button to adjust the focus. The images may lose their focus when keystone correction and sharpness are adjusted. Remote control Projector TIP • If the surface of the lens is dirty or misted over as a result of condensation, it may not be possible to adjust the focus correctly. If this happens, clean or de-mist the lens. sp.102, p.
User’s Guide 68 Adjusting Projected Images Manually • Quick Corner: This correction function is used when both horizontal and vertical keystone distortion occurs in the projection area to adjust the projection area so that it fits the screen exactly. sp.71 The above correction method is selected automatically when automatic vertical keystone correction and Auto Quick Corner are carried out. The selection conditions are as follows.
User’s Guide 69 Adjusting Projected Images Manually Vertical and Horizontal Correction Vertical and horizontal correction can be carried out using either the projector's control panel or the configuration menus. This procedure explains how to use the projector's control panel to correct keystone distortion. For adjustment using the configuration menus: s"Setting" - "Keystone" "H/V-Keystone" p.81 "H-Keystone" and "Height" cannot be used at the same time.
User’s Guide 70 Adjusting Projected Images Manually Height Correction When vertical keystone correction is carried out automatically or manually, the height of the projected images will become shorter. Use the height correction function to adjust the height of the projection area. The height correction function is accessible from the configuration menu. This cannot be set when horizontal correction is carried out.
User’s Guide 71 Adjusting Projected Images Manually Correcting Keystone Distortion so that the Projection Area Fits the Screen Exactly (Quick Corner) Quick Corner correction can be carried out using either the projector's control panel or the configuration menus. This procedure explains how to use the projector's control panel to correct keystone distortion. If using the configuration menu: s"Setting" - "Keystone" - "Quick Corner" p.
User’s Guide 72 Adjusting Projected Images Manually 3 Press the [ ], [ ], [ ] and [ ] buttons on the remote control to correct the angle position. You can also tilt the [ ] button on the remote control to correct the angle position. Screen TIP • If the vertical or horizontal keystone correction gauge appears when [ ], [ ], [ ] or [ ], is pressed, it means that "H/V-Keystone" is selected. sp.69 When carrying out Quick Corner, select "Quick Corner" in the "Setting" - "Keystone" configuration menu first.
User’s Guide 73 Adjusting Projected Images Manually Adjusting Computer Images TIP Automatic Setup Automatic setup detects analogue RGB signals coming from a computer connected by a computer cable, and automatically adjusts these signals so that the optimum images can be obtained.
User’s Guide 74 Adjusting Projected Images Manually l Adjusting the Tracking If vertical stripes appear in the projected images, and this cannot be fixed using automatic setup, you will need to adjust the trackingg manually using the following procedure. (Only effective when RGB signals are being input) PROCEDURE Tracking adjustment can be carried out using either the projector's control panel or the configuration menus.
User’s Guide 75 Adjusting Projected Images Manually Projector Adjusting the Sync Projector If flickering, fuzziness or interference appear in images that are input from the computer, and this cannot be fixed using automatic setup, you will need to adjust the syncg manually using the following procedure. (Only effective when RGB signals are being input) PROCEDURE Sync adjustment can be carried out using either the projector's control panel or the configuration menus.
User’s Guide 76 Adjusting Projected Images Manually Selecting the Projection Quality (Colour Mode Selection) The following five preset colour modes are available for use depending on the characteristics of the images that are being projected. You can easily obtain the optimum image quality simply by selecting the colour mode that corresponds to the projected images. The brightness of the images will vary depending on which colour mode is selected.
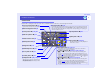
User’s Guide Configuration Menus 77 The configuration menus can be used to carry out a variety of settings and adjustments. The menus have a hierarchical structure, with a main menu that is divided into sub-menus, which are further divided into other sub-menus. Refer to "Using the Configuration Menus" ( sp.86) for details on using the menus. Caution If you use Direct Power Off while a configuration menu is being displayed, the settings from that configuration menu may not be saved.
User’s Guide List of Configuration Menu Commands 78 Following is a list of the functions that can be set using the configuration menus and the default setting values. The menu items displayed and the default values will vary depending on the type of image signals. If you click *1 to *7, you can check the setting conditions (*3 to *7) and default values for that menu (*1 and *2). The menu names are coloured according to the display conditions. .
User’s Guide 79 List of Configuration Menu Commands Default setting values Signal The items that can be set will vary depending on the input source that is currently being projected. Setting details are saved separately for each source. If using the EMP-835, you cannot change any of the "Signal" configuration menu settings while EasyMP is running.
User’s Guide 80 List of Configuration Menu Commands Video Signal *4 With the "Auto" function, image signals are recognized automatically. If interference appears in the projected images or no images appear when you select "Auto", select the appropriate signal manually. Reset Returns all adjustment values in the "Signal" menu except for the "Computer1 Input" and "Computer2 Input" settings to their default values. If you would like to return all menu items to their default, see "All Reset" sp.
User’s Guide 81 List of Configuration Menu Commands Default setting values Corrects keystone distortion in the projection area. sp.67 "Auto V-Keystone" can only be set when "Projection" is set to "Front". Keystone H/V-Keystone Auto V-Keystone ON , OFF Horz./Vert.
User’s Guide 82 List of Configuration Menu Commands Default setting values Lets you set the shape and movement speed for the pointer. sp.57 Pointer Pointer Shape , Pointer2, Pointer3 , Pointer2 , Pointer3 Pointer1 Pointer1 Pointer Zoom 100% , 200% The shape of the pointer can be selected. Selects the display size for the pointer. High Speed, Selects the movement speed for the pointer when the [ Medium Speed , Low Speed tilted.
User’s Guide 83 List of Configuration Menu Commands Default setting values Extended Display Message ON , OFF Display Background Black, Blue , Logo A/V Mute Black , Blue, Logo Startup Screen User's Logo Projector ID Projection ON , OFF EPSON Sets whether the input source name or colour mode name or a message is displayed on the screen ("ON") or not displayed ("OFF") at times such as when the input source or colour mode is changed or when no image signals are being input.
User’s Guide 84 List of Configuration Menu Commands Default setting values Operation Direct Power ON ON, OFF Sleep Mode ON , OFF Sets whether direct power on is enabled ("ON") or disabled ("OFF"). sp.33 When you set to "ON" and leave the power cable connecting to a wall socket, be aware of the sudden surges of electricity when the power comes back on after the power outage or something, that cause the projector turn on automatically.
User’s Guide 85 List of Configuration Menu Commands Default setting values Info Lets you check the statuses of the image signals being projected and the projector. (Display only) Lamp Hours (High Brightness) Shows the cumulative lamp operating time. (Low Brightness) When it reaches the lamp warning time, the characters are displayed in red. The cumulative operating time from 0 to 10 hours will be displayed as "0H". From "10H" onwards, the display will be in units of 1 hour.
User’s Guide 86 List of Configuration Menu Commands Using the Configuration Menus 3 Confirm the selection. Press the [Enter] button on either the remote control or the projector's control panel to confirm the item selection. The cursor will be displayed in the sub-menu and settings can then be made. 4 Select a sub-menu item. If using the remote control, tilt the [ ] button up or down to select a sub-menu item, and then press the [Enter] button to accept the selection.
User’s Guide 87 List of Configuration Menu Commands Example 2 TIP The items appearing in the "Signal" menu and the "Info" menu will vary depending on the type of input source being projected. 5 (1) Tilt the [ ] button on the remote control to the left or right or press the [ ] or [ ] button on the projector's control panel to change the setting. (2) Press the [Enter] button on either the remote control or the projector's control panel to accept the selection. Change the settings.
User’s Guide Monitoring and Controlling Projectors via a Network (for the EMP-830) You can monitor the status of the projector and control operations such as turning the power on and off from a computer via a network. TIP The network functions differ for the EMP-835 and the EMP-830. The following descriptions apply to the EMP-830. If using the EMP-835, refer to the EasyMP Network Setup Guide and the EasyMP Operation Guide. Available Network Functions for the EMP-830 The EMP-830 is compatible with SNMPg.
User’s Guide 89 Monitoring and Controlling Projectors via a Network (for the EMP-830) Using a Network for Monitoring and Control Follow the procedure below to monitor and control the projector over a network. Projector Network Connecting Settings (EMP-830) In order to connect a projector to a network, you will need to complete various configuration menu settings such as setting an IP addressg for the projector.
User’s Guide 90 Monitoring and Controlling Projectors via a Network (for the EMP-830) The table below gives details of the settings for each item. DHCPg IP addressg Subnet Maskg Gatewayg address SNMPg MAC addressg Sets whether DHCP is used or not. ON :DHCP is used OFF :DHCP is not used Settings can be entered when "DHCP" is set to "OFF". Enter the IP address that has been assigned to the projector. You can enter numbers from 0 to 255 in each field of the IP address.
User’s Guide 91 Monitoring and Controlling Projectors via a Network (for the EMP-830) Entering Numbers Use the following procedure to enter numbers. 1.Move the cursor to the item to be entered, and then press the [Enter] button on the remote control. The cursor will change to green and entry mode will be enabled. 2.Press the [Num] button on the remote control. The [Num] button will light and the buttons shown in the diagram below will switch to numeric keypad mode so that you can enter numerals.
Troubleshooting This chapter describes how to identify problems and what to do if a problem is found. Using the Help..................................................... 93 Problem Solving.................................................. 95 • Reading the Indicators........................................................95 • When the Power Indicator is Lit/Flashing Red ............................................95 • When the Lamp/Temp Indicator is Lit/Flashing Orange ..............................
User’s Guide Using the Help 93 When you have any problems, such as no image appears, or make no sound, press [Help] button on the remote control. The interactive help screen will be displayed. Most of your problems can be solved by answering the displayed questions. 2 Select a menu item. If using the remote control, tilt the [ ] button up or down to select a menu item. If using the projector's control panel, press the [ ] or [ ] button to select a menu item. 3 Confirm the selection.
User’s Guide Using the Help 4 Repeat steps 2 and 3 to proceed through the menu to more detailed items. Press the [Help] button to clear the help screen. TIP If the Help function does not provide a solution to the problem, refer to "Problem Solving". sp.
User’s Guide Problem Solving 95 If you are having a problem with the projector, first check the projector's indicators while referring to "Reading the Indicators" below. If the indicators do not show clearly what the problem might be, refer to "When the Indicators Provide No Help". sp.98 Reading the Indicators The projector is provided with the following three indicators. These indicators notify you of the operating status of the projector. Indicates the operating status of the projector.
User’s Guide 96 Problem Solving : lit Status Red Cause : flashing : off Remedy or Status Fan related error Sensor error Stop using the projector, disconnect the power cable from the electrical outlet, and contact your dealer or the nearest address provided in the "International Warranty Conditions" section of the Safety Instructions/World-Wide Warranty Terms booklet. Lamp error Lamp timer failure Lamp out Lamp cover is open Take out the lamp and check if it is broken. s"Replacing the Lamp" p.
User’s Guide 97 Problem Solving : lit When the Lamp/Temp Indicator is Lit/Flashing Orange Warning Status Red Cause : off Remedy or Status High-speed cooling in progress (This is not an abnormality. However, if the temperature rises too high again, projection will stop automatically.) •Check that the air filters and air exhaust vent are clear and that they are not up against a surface such as a wall. sp.15 •If the air filters are blocked, clean them. sp.
User’s Guide 98 Problem Solving When the Indicators Provide No Help First refer to the following problems to determine what type of problem it is that you are having, and then refer to the page containing details of the problem. Problems Relating to Images No images appear sp.100 Projection does not start, the projection area is completely black, the projection area is completely blue, etc. Projection stops automatically sp.100 The message "Not Supported." is displayed sp.101 The message "No Signal.
User’s Guide Problem Solving Problems Relating to Networks and EasyMP Mail notification messages are not being sent when a problem occurs with the projector sp.107 The projector cannot be monitored and controlled using the EMP Monitor function sp.108 An error message is displayed (error message when EMP Monitor is running) sp.116 For EMP-835 only You cannot connect from another computer when images are being projected during a network connection sp.
User’s Guide 100 Problem Solving Problems Relating to Images No images appear Check Remedy Was the [Power] button pressed? Press the [Power] button on either the remote control or the projector's control panel to turn the power on. The remote control cannot be used unless the [R/C] switch of the remote control is at "ON". sp.34 Is the A/V Mute function active? Press the [A/V Mute] button on either the remote control or the projector's control panel to cancel the A/V Mute function. sp.
User’s Guide 101 Problem Solving The message "Not Supported." is displayed Check Remedy Are the image signal format settings correct? If a composite videog or S-Videog source is connected to the projector, use the "Video Signal" menu command to select the signal format. s"Signal" - "Video Signal" p.80 Does the mode match the resolution of the image signals? Check the resolution of the computer. s"List of Supported Monitor Displays" p.
User’s Guide 102 Problem Solving Images are fuzzy or out of focus Check Remedy Has the focus been adjusted correctly? Press the [Focus] buttons on either the remote control or the projector's control panel to adjust the focus. sp.67 Is the lens cover still attached? Remove the lens cover. sp.6 Is the projector at the correct distance? The recommended projection distance range is 86–1473 cm (34–580 ft.). Set the projector up so that it is within this range. sp.
User’s Guide 103 Problem Solving Image is truncated (large) or small Check Remedy Is the image in real display? Is the aspect ratio setting correct? Press the [Resize] button on either the remote control or the projector's control panel. sp.61 Is the image still being enlarged by the E-Zoom function? Press the [Esc] button on the remote control to cancel the E-Zoom function. sp.
User’s Guide 104 Problem Solving Image colours are not right Check Remedy Do the input signal settings match the signals If a composite videog or S-Videog source is connected to the projector, use the "Video Signal" menu command to select the video signal format. s"Signal" - "Video Signal" p.80 from the connected device? Has the image brightness been adjusted correctly? Use the "Brightness" menu command to adjust the brightness. s"Image" - "Brightness" p.
User’s Guide 105 Problem Solving Images appear dark Check Remedy Have the image brightness and luminance been adjusted correctly? Use the "Brightness" and "Brightness Control" menu commands to adjust the brightness and luminance. s"Image" - "Brightness" p.78 s"Setting" - "Brightness Control" p.82 Has the image contrastg been adjusted correctly? Use the "Contrast" menu command to adjust the contrast. s"Image" - "Contrast" p.
User’s Guide 106 Problem Solving The remote control does not work Check Remedy Is the [R/C] switch at the "ON" position? Set the [R/C] switch to the "ON" position. sp.34 Is the remote control light-emitting area facing towards the remote control lightreceiving area when it is operated? Face the remote control towards the remote control light-receiving area. The operating angle for the remote control is approximately ±30° horizontally and approximately ±15° vertically. sp.
User’s Guide 107 Problem Solving Problems Relating to Monitoring and Controlling Projectors Using a Network Mail notification messages are not being sent when a problem occurs with the projector Check Remedy Is the network cable connected correctly? When using the EMP-835 connected to a wired LAN, or when using the EMP-830 Check that the network cable is connected correctly. If it is not connected or is connected incorrectly, reconnect it.
User’s Guide 108 Problem Solving The projector cannot be monitored and controlled using the EMP Monitor function Check Remedy Is the network cable connected correctly? When using the EMP-835 connected to a wired LAN, or when using the EMP-830 Check that the network cable is connected correctly. If it is not connected or is connected incorrectly, reconnect it.
User’s Guide 109 Problem Solving When Network Screen is running, the current image stays projected and connection from another computer is not possible (EMP-835 only) Check Has the person making the presentation left the meeting room without closing the connection? Remedy If you try to connect to a projector from a computer while Network Screen is running and the projector is already connected to another computer, the connection to the first computer will be terminated and the projector will then conne
User’s Guide 110 Problem Solving Check Remedy Is the wireless LAN setting for the computer set to ad hoc mode? When connected to a wireless LAN in easy connection mode Change the wireless LAN settings at the computer to ad hoc mode. s"Computer Wireless LAN Settings" in the EasyMP Network Setup Guide Depending on the manufacturer of the wireless LAN card, you may be able to use a communication setting utility (such as Client Manager) to set ad hoc mode.
User’s Guide 111 Problem Solving Check Are the connection refusal functions of the access point, such as the MAC address and port restrictions, set correctly? Remedy Set the projector connection permissions on the access point. Have the IP address, subnet mask and If not using DHCP, make all of the settings manually.
User’s Guide 112 Problem Solving PowerPoint slideshows will not play back in Network Screen (EMP-835 only) Check Are you trying to start Network Screen when PowerPoint is running? For Windows Remedy Close the PowerPoint application before connecting with Network Screen. If you connect when PowerPoint is already running, you will not be able to project any slideshows.
User’s Guide 113 Problem Solving Check Remedy Network settings are being made automatically. If the computer has been set to use DHCP, it may take some time for the IP address to be set. If the IP address has not been determined within about 70 seconds after the message is displayed, an error message will be displayed. If this happens, try closing EMP NS Connection and then restarting it. Projector detection error. No connectable projector exists, or the projector's power is not turned on.
User’s Guide 114 Problem Solving Check Remedy Failed to obtain network adaptor information. Check network settings and restart. Check the following: •Is a network adapter installed in the computer ? •Is the driver for the network adapter installed in the computer ? After checking, restart the computer and try to connect. If connection is still not possible, check the followings. Check the network settings at the computer and the EasyMP network settings at the projector.
User’s Guide 115 Problem Solving Check Image transfer slows if screen color is more than 24 bits. NS Connection converts it to 16 bits. Do you want to continue? For Windows Remedy The display colours of the computer being connected to the projector is set to 24 bits or higher. Clicking "Yes" connects the projector. However, the display will be in 16 bit colour. If an error message not described above is displayed, refer to the EMP NS Connection help.
User’s Guide 116 Problem Solving Check Remedy Cannot open the proposed file. The PowerPoint file to be added to the scenario is damaged or corrupted and cannot be used. Use a different PowerPoint file. Change name or directory A file or scenario folder of the same name already exists. Change the scenario name or the scenario folder name and try saving again. Error messages from EMP Monitor Check Remedy The password is incorrect. An incorrect password was entered. Enter the correct password.
Appendices This chapter provides information on maintenance procedures to ensure the best level of performance for the projector for a long time. Maintenance ...................................................... 118 List of ESC/VP21 Commands........................... 131 • Cleaning .............................................................................118 • Command List .................................................................. 131 • Communication Protocol ...............................
User’s Guide Maintenance This section describes maintenance tasks such as cleaning the projector and replacing consumable parts. Cleaning You should clean the projector if it becomes dirty or if the quality of projected images starts to deteriorate. Caution Be sure to read the separate Safety Instructions/World-Wide Warranty Terms before cleaning.
User’s Guide 119 Maintenance Replacing Consumables TIP This section describes how to replace the lamp and the air filters. Lamp Replacement Period It is time to replace the lamp when: • The message "Replace the lamp." appears on the screen when projection starts . A message will be displayed. • The replacement warning message is set to appear after the following periods of lamp use, in order to maintain the initial brightness and quality of the projected images. s"Brightness Control" p.
User’s Guide 120 Maintenance PROCEDURE 1 Turn the projector's power off, then disconnect the power cable. 2 Wait until the lamp has cooled down, and then remove the lamp cover from the base of the projector. It takes about one hour after the power has been turned off for the lamp to be cool enough. Use the screwdriver that is supplied with the spare lamp or your own cross head screwdriver to loosen the lamp cover fixing screw at the side of the projector.
User’s Guide 121 Maintenance 5 Install the new lamp. Hold the lamp so that it faces the correct way to fit into the projector, and then insert the lamp until it clicks into place and tighten the two lamp fixing screws. 6 Install the lamp cover. Slide the cover to replace it, and tighten the lamp cover fixing screw on the side of the projector. Caution • Install the lamp securely. If the lamp cover is removed, the lamp turns of automatically as a safety precaution.
User’s Guide 122 Maintenance Resetting the Lamp Operating Time Be sure to reset the lamp operating time after replacing the lamp. The projector has a built-in counter which keeps track of the lamp operating time, and this counter is use as the basis for displaying the replacement warning message. 2 Select "Lamp-Hours Reset" from the "Reset" menu and then press the [Enter] button on either the remote control or the projector's control panel.
User’s Guide 123 Maintenance Replacing the Air Filters The air filters can be replaced even if the projector is installed on a ceiling. 3 Install the new air filters. Insert the one tab of the air filter into the projector, and press the other tab until it clicks in the place. PROCEDURE 1 Turn the projector's power off, then disconnect the power cable. 2 Remove the air filters. Press the tabs to release the lock, and lift the air filters to remove them. The projector has two air filters.
User’s Guide Saving a User's Logo You can record the image that is currently being projected as a user's logo. Caution If you use Direct Power Off while a user's logo is being saved, the user's logo may not be saved correctly. If this happens, repeat the user's logo saving procedure from the start. 124 2 Select "Extended" - "User's Logo" in the configuration menu, and then press the [Enter] button on either the remote control or the projector's control panel.
User’s Guide 125 Saving a User's Logo 3 Select "Yes" in the sub-menu, and then press the [Enter] button on either the remote control or the projector's control panel. 4 The image to be recorded and a selection marquee box will be displayed, so move the marquee box to select the part of the image to use.
User’s Guide 126 Saving a User's Logo 5 6 Select "Yes" at the confirmation screen, and then press the [Enter] button on either the remote control or the projector's control panel. Select the zoom rate in the zoom rate setting screen, and then press the [Enter] button on either the remote control or the projector's control panel. 7 Select "Yes" at the confirmation screen, and then press the [Enter] button on either the remote control or the projector's control panel. The image will then be saved.
User’s Guide Optional Accessories and Consumables The following optional accessories and consumables are available for purchase if required. All items in this list is current as of July 2004. Details of accessories are subject to change without notice. Optional Accessories Soft carry case ELPKS52 Hard travel case ELPKS53 Use this case if you need to carry the projector by hand. 40" "Billboard Vision" screen ELPHS01 60" "Billboard Vision" screen ELPHS03 A translucent-type screen.
User’s Guide Glossary 128 Following is an explanation of some of the terms used in this guide which may be unfamiliar or which were not explained in the text of this guide itself. Further information can be obtained by referring to other commercially-available publications. 3-2 pull-down function This function directly converts image sources that have been recorded in the same 24-frame format used for movies into 60-frame progressive signals.
User’s Guide Glossary ESSID Film judgment function Gateway HDTV Interlaced IP address LEAP MAC address NDIS Progressive RADIUS server Refresh rate Resized display SDTV Security lock 129 ESS is an abbreviation of Extended Service Set. The ESSID is an identification number for connecting with a counterpart on a wireless LAN. Wireless communication is possible between devices with corresponding ESSID numbers. A function for judging whether an image source is a 24 Hz progressive film source or not.
User’s Guide Glossary SNMP 130 An abbreviation for Simple Network Management Protocol, which is the protocol for monitoring and controlling devices such as routers and computers connected to a TCP/IP network. To reduce the width of a 16:9 wide-screen video image, record the video image as 4:3 in the video software. Setting the aspect ratio to 16:9 on the Squeeze mode projector will restore the video image to 16:9 wide-screen format.
User’s Guide List of ESC/VP21 Commands Command List Cable Layouts When a power on command is sent to the projector, it goes into a warm- up state. When the power comes on, a colon ":" is returned. After executing a command, the projector returns a colon ":" and handles the next command. When there is a problem with shutting down, a colon ":" is sent after anerror message is output.
User’s Guide 132 List of ESC/VP21 Commands USB Connection Setup USB Connection • Connector shape : USB(type B) In order to control the projector using ESC/VP21 commands via a USB connection, the following preparations must be carried out. Type B PROCEDURE USB 1 Download the USB driver (USB-COM Driver2) from the EPSON website to your computer. The URL is as follows. http://www.epson.co.uk/support/download/index.
User’s Guide List of Supported Monitor Displays Computer/RGB Video Signal VGAEGA VGAg SVGAg XGAg SXGAg SXGA SXGA+ UXGAg MAC13" MAC16" MAC19" MAC21" SDTVg 525i (480i) 525p (480p) 625i (576i) 625p (576p) HDTVg 750p (720p) HDTV 1125i (1080i) 133 Component Video Resolutions for Refresh rateg Resolution (dots) resized displayg (Hz) (dots) 640×350 1024×560 60/72/75/85/100/ 640×480 1024×768 120, iMac*1 56/60/72/75/85/ 800×600 1024×768 100/120, iMac*1 60/70/75/85/100/ 1024×768 1024×768 120, iMac*1 70/75/85/100
User’s Guide Specifications Product name Dimensions Panel size Display method Resolution Focus adjustment Zoom adjustment Lamp (light source) Max.
User’s Guide 135 Specifications Monitor Out: Audio Out: Network: Card Slot Supported Memory Cards by Projector's Card Slot 1 Mini D-sub 15-pin (female) Black 1 Stereo mini jack RJ45 × 1 PCMCIA TypeII slot × 1 •CompactFlash cards (using a PC card adapter) •ATA Flash cards •Memory Sticks (using a PC card adapter) •Smart Media (using a PC card adapter) •SD/MMC cards (using a PC card adapter) *The USB connector is not guaranteed to operate correctly with all USB-compatible devices.
User’s Guide Appearance 136 57 72.9 187.1 62 Centre of lens 23 136 125.5 283 57.
User’s Guide 137 DECLARATION of CONFORMITY According to 47CFR, Part 2 and 15 Class B Personal Computers and Peripherals; and/or CPU Boards and Power Supplies used with Class B Personal Computers We Located at Tel :EPSON AMERICA, INC. :3840 Kilroy Airport Way MS: 3-13 Long Beach, CA 90806 :562-290-5254 Declare under sole responsibility that the product identified herein, complies with 47CFR Part 2 and 15 of the FCC rules as a Class B digital device.
User’s Guide 138 All rights reserved. No part of this publication may be reproduced, stored in a retrieval system, or transmitted in any form or by any means, electronic, mechanical, photocopying, recording, or otherwise, without the prior written permission of SEIKO EPSON CORPORATION. No patent liability is assumed with respect to the use of the information contained herein. Neither is any liability assumed for damages resulting from the use of the information contained herein.