About the Manuals and Notations Used Types of Manual The documentation for your EPSON projector is divided into the following two manuals. Refer to the manuals in the order given below. 1. Safety Instructions/World-Wide Warranty Terms This manual contains information on using the projector safely, and also includes safety instructions, world-wide warranty terms booklet and a troubleshooting check sheet. Be sure to read this manual thoroughly before using the projector. 2.
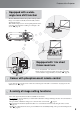
Checking the Components When you unpack the projector, make sure that you have all these components. If any of the components are missing or incorrect, please contact the place of purchase. Power cable (1.8 m) Connect to the projector and to a wall outlet. Projector (with lens cover) Remote control RGB SCART adapter. Use a commercially-available SCART cable to make the connections when projecting RGB-video and component video images. AA manganese batteries (2 pcs.) Insert into the remote control.
Table of Contents Features of the Projector ................................ 4 Part Names and Functions ............................. 6 Front / Top ............................................................... 6 Control panel ........................................................... 6 Remote control .........................................................7 Rear..........................................................................8 Base ..............................................................
Table of Contents Cleaning .................................................................40 Optional Accessories.....................................44 List of Supported Monitor Displays..............45 • Cleaning the air filter and air intake vent ........................... 40 • Cleaning the projector case ................................................ 40 • Component Videog ............................................................. 45 • Composite Video/S-Video .................................
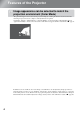
Features of the Projector Image appearance can be selected to match the projection environment (Color Mode) The optimum images for the location can be projected simply by selecting the desired colour mode from the following six preset modes. No complex colour adjustments are required. If "Natural", "Theatre", "Theatre Black 1" or "Theatre Black 2" is selected, the Epson Cinema Filter effect is applied automatically to increase the contrast and to make skin tones appear with more natural tints. s page 18.
Features of the Projector Equipped with a wideangle lens shift function The lens shift function allows the position of the projected images to be adjusted vertically and horizontally without distorting the images. This can allow the projector to be set up with greater freedom, even if it is suspended from a ceiling or at an angle to the screen. s page 16 Equipped with 1.5x short throw zoom lens For zoom adjustment, 1.5x short throw zoom lens is provided.
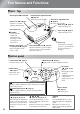
Part Names and Functions Front / Top • Control panel • Horizontal lens adjustment dial sSee below spage 16 Moves the lens horizontally. • Vertical lens adjustment dial spage 16 Moves the lens vertically. • Lamp cover s page 42 Open this cover when replacing the lamp inside. • Zoom ring s page 16 Adjusts the image size. • Air exhaust vent • Focus ring spage 16 Adjusts the image focus. c Caution: Do not touch the exhaust vent immediately after projecting, or while projecting, since it becomes hot.
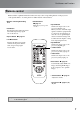
Part Names and Functions Remote control Buttons with no explanation function in the same way as the corresponding buttons on the projector's control panel. Refer to "Control panel" for further details on these buttons. • Remote control light-emitting area • On/Off buttons spage 14 Turns the projector power on / off. • Still button Pressing this button makes the picture stand still, and pressing it again restores the motion.
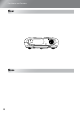
Part Names and Functions Rear Base 8
Appearance Centre of projector 127 Centre of lens 111 61*1 11 16 83.5*2 373 *1 Distance from centre of lens to suspension bracket fixing point (Lens shift amount: Max. 3.4 mm vertically) *2 Distance from centre of lens to centre of projector (Lens shift amount: Max. 3.0 mm horizontally) Centre of lens 115 127 96 98.
Setting up Adjusting the projection size The size of the projected image is basically determined by the distance from the projector's lens to the screen. c Caution: • Be sure to read the separate Safety 90 Instructions/World-Wide Warranty Terms booklet before installing the projector. • Do not stand this projector upright. This may damage your projector.
Setting up Installing the Projector Projection methods 11
Connecting Image Sources c Caution: •Turn the power off for both the projector and the signal source before connecting them. If the power for either device is on at the time of connection, damage may result. •Check the shapes of the cable connectors and the device ports before making the connections. If you try to force a connector to fit a device port with a different shape or number of terminals, a malfunction or damage to the connector or port may result.
Preparing the Remote Control The remote control is not supplied with batteries already inserted. Insert the accessory batteries before using the remote control. Installing the Projector Inserting batteries into the remote control Battery replacement period If delays in the responsiveness of the remote control occur or if it does not operate after it has been used for some time, it probably means that the batteries are becoming flat. If this happens, replace the batteries with two new batteries.
Turning the Power on and Projecting Images Turning the power on 14
Turning the Power on and Projecting Images Selectingthe the image source Selecting image source If more than one signal source has been connected, or if no images are projected, use the remote control or the projector's control panel buttons to select the signal source.
Adjusting the Projection Screen and the Audio Volume Focusadjustment adjustment Focus Turn the focus ring to adjust the focus. Fine adjustments to image size Fine adjustments to image size (Zoom adjustment) (Zoom adjustment) Turn the zoom ring to adjust the size of the projected image. Wide Tele Projection image position Projection image position adjustment (Lens shift)adjustment (Lens shift) Use the two lens shift dials to adjust the image position.
Adjusting the Projection Screen and the Audio Volume Correcting keystone distortion (Keystone) Correcting keystone distortion 30° Basic Operations (Keystone) When you wish to adjust the projection above or below the range of lens shift adjustment set the projector at an angle. When the projector is angled, the projected image may distort into a trapezoid. In such cases, press ( ) ( ) on the control panel, or on the remote control to adjust the images.
Basic Image Quality Adjustments Selecting the Color Mode Selecting the Image Aspect 18
Press and select the colour mode from the six available modes in the selection menu in accordance with the place where the projector is being used. Setting is also possible using the configuration menu. Dynamic : Ideal for using in bright rooms. Theatre Living Room : Ideal for using in rooms in which the curtains are closed. : Ideal for using in dark rooms. It is recNatural ommended that you start in this mode when making colour adjustments.
Advanced Colour Adjustments The projector allows you to select the optimum colour settings for the images being projected by selecting the appropriate colour mode. To render the picture even more to your own liking, adjust the "Color Temp." and "Skin Tone".
Image Quality Adjustments This can be used to adjust the skin tones for images of people. The Epson Cinema Filter effect that is automatically applied to images when a "Color Mode" setting is made creates natural-looking skin tones. If you would like to further enhance skin tones, use this "Skin Tone" setting to make the adjustment. If set to the + side, the colours become greenish, and if set to the – side, the colours become reddish. You can adjust the overall tint of images.
Viewing Images at a Preset Image Quality (Memory Function) After menu commands such as "Picture Quality" and "Screen" have been used to adjust the projected images, the adjustment values can then be saved. In addition, the saved data can be retrieved easily, so that you can enjoy viewing images with the adjusted settings at any time.
Viewing Images at a Preset Image Quality (Memory Function) The Cinema Color Editor program can also be used to store and retrieve memory settings from a computer. A computer canvalues be used detailed adjustments anditems theseon adjustments This can be used to save adjusted fortoallmake of the configuration menu the left. can be stored using the "Memory: Advance" menu command. The "Save Memory" command in the "Image" menu is used to save the settings. The following describes how to save settings. 2.
Configuration Menu Functions The configuration menus can be used to make a variety of adjustments and settings involving the screen, image quality and input signals. Top menu Sub-menu Navigation Bar Refer to "Using the configuration menus" ( Q Tip: page 32) for details on menu operations. The configuration menus can be used to change the colour pattern.
Configuration Menu Functions p "Setting" menu Screen Position page 29 Progressive g ON, OFF Aspect g Vertical Size Auto, Normal, Squeeze, Zoom Zoom Caption Zoom Position Output Scaling Normal, Larger This can only be set when component video signals or RGB video signals are being input. Keystone Front, Front/Ceiling Rear, Rear/Ceiling Projection Sleep Mode Operation page 29 Setup Level 0% ,7.
Configuration Menu Functions "Image" menu Only displayed for component video/composite video/S-Video input Only displayed for RGB-video/Computer input Picture Quality Brightness *1 The brightness of the images can be adjusted. If projecting in dark rooms or onto small screens and the images appear too bright, decrease the setting. Contrast *1 Adjusts the difference between bright and dark areas. When the contrast is increased, images with greater modulation are obtained.
Configuration Menu Functions Only displayed for RGB-video/Computer Save Memory This can be used to save the current configuration menu settings. s page 22 Load Memory *1 This retrieves settings stored in the memory. spage 22 Auto Setup *1 This sets automatic adjustment to on or off in order to set whether the projector automatically adjusts images to their optimum condition when the input signal is changed. The three automatically adjusted items are "Trackingg", "Position" and "Sync.
Configuration Menu Functions Zoom Caption *1 If "Aspectg" is set to "Zoom" when viewing images with subtitles, change the setting as follows so that the subtitles are visible. The vertical size and the display position can both be adjusted together. • Vertical Size Projection area Use "Vertical Size" to reduce the image size. Subtitle section Use "Zoom Position" to change the display position of the image. The vertical size of the image is reduced so that the subtitles are displayed.
Configuration Menu Functions Sleep Mode The projector is equipped with a power-saving function that causes the power to turn off automatically and the projector to switch to standby if no signal is input to the projector for a continuous length of time. The length of time before the power-saving function operates can be selected from four available settings. If "OFF" is selected, the power-saving function will not operate. If you press while the projector is in standby mode, projection will start again.
Configuration Menu Functions Message This sets whether the following message displays appear (ON) or don't appear (OFF). • Image signal, colour mode, aspectg and item name when memory settings are retrieved • Messages such as when no image signals are being input, when an incompatible signal is input, and when the internal temperature rises Background Color Displays a menu for selecting the screen status for when the A/V mute is set or when no image signal is input.
Configuration Menu Functions "Reset" menu Reset All This resets all configuration menu settings to their default settings. The "Child Lock", "InputA", "Language" and "Lamp Hours" settings will not be reset. Memory Reset This resets (erases) all settings that have been made using the "Save Memory". Lamp-Hours Reset Configuration Menu This initialises the lamp operating time. When this command is selected, the cumulative operating time for the lamp is cleared and returned to the default setting.
Configuration Menu Functions Using the configuration menus Displaying a menu Press . Selecting a menu item Use or to select a menu item, then press . Changing settings Example: Use or to adjust values. (green): Current setting value (orange): Currently-selected item Use press If you press when an item with will be displayed. To return to a previous display, press When setting is complete Press 32 . or to select an item, then . next to it is selected, the selection screen for that item .
Problem Solving Reading the indicators The projector is provided with the following two indicators which notify you of the operating status of the projector. The following tables show what the indicators mean and how to remedy the problems that they indicate. * If both indicators are switched off, check that the power cable is connected correctly and that power is being supplied.
Problem Solving When the indicators provide no help If any of the following problems occur and the indicators do not offer a solution, refer to the pages given for each problem. Problems relating to images No images appear s See below Projection does not start, the projection area is completely black, the projection area is completely blue, etc. The message "Not Supported." is displayed page 35 The message "No Signal.
Problem Solving Are the image signal format settings correct? If the signal source is connected to the [InputA] port Use the "Input Signal" menu command to set the signal format that matches the signal that is being projected from the connected equipment. s "Setting" - "Input Signal" - "Input A" page 30 You can also press on the remote control to select the format. s page 15 If the VCR or DVD equipment is connected using an RGB SCART adapter Press to set the signal format to "RGB-Video".
Problem Solving Is the power for the connected equipment turned on? Turn the power on for the devices. Are the image signals being output to the projector? If the image signals are only being output to the computer's LCD monitor or to the accessory monitor, you need to change the output. For some computer models, when the image signals are output externally, they no longer appear on the LCD monitor or accessory monitor.
Problem Solving Have the "Sync. " and "Tracking " settings been adjusted correctly? Computer and RGB video signals only Has the correct resolution been selected? Only when projecting computer images The projector has an automatic adjustment function that causes the optimum images to be projected. However, for some types of signal, the correct adjustments may not be obtained even after automatic adjustment is carried out. In such cases, use the "Tracking" and "Sync." menu commands to make the adjustments.
Problem Solving Have the colour intensity and tint been adjusted correctly? Only when projecting images from a video source Use the "Color Saturation" and "Tint" menu commands to adjust the colour and tint. s "Image"- "Picture Quality" - "Color Saturation", "Tint" page 26 Images appear dark Has the image brightness been Use the "Brightness" menu commands to make the adjustments.
Problem Solving Is the remote control lightemitting area facing towards the remote control light-receiving area when it is operated? Face the remote control towards the remote control light-receiving area. The operating angle for the remote control is approximately ±30° horizontally and approximately ±15° vertically. s page 13 Is the remote control too far from the projector? The operating range for the remote control is approximately 6m.
Maintenance This section describes maintenance tasks such as cleaning the projector and replacing consumable parts. Cleaning You should clean the projector if it becomes dirty or if the quality of projected images starts to deteriorate. Be sure to read the separate Safety Instructions/World-Wide Warranty Terms booklet for details on safe handling of the projector during cleaning.
Maintenance Consumable replacement periods Air filter replacement period If the air filter has been broken or the "Replace" message is displayed even though the air filter has been cleaned. Replace with an optional air filter. s "Replacing the air filter" page 42 Lamp replacement period • The message "Replace the lamp." appears on the screen when projection starts. A message will be displayed. • The projected images get darker or start to deteriorate.
Maintenance Replacing consumables Replacing the air filter Q Tip: Dispose of used air filters properly in accordance with your local regulations. Air Filter: Polypropylene off the power, wait 1 Turn until the projector cools 2 Remove the air filter cover. down and the "beep beep" tone sounds, then disconnect the power cable. Put your finger under the latch and pull it upward.
Maintenance 3 Remove the old air filter. 4 Insert the new air filter. 5 Install the air filter cover. 3 4 Remove the old lamp. 5 Insert the new lamp. Loosen the lamp fixing screws. Pull out straight. • • Install the lamp and the lamp cover securely. The lamp will not turn on if the lamp or the lamp cover is not installed correctly. The lamp contains mercury. Dispose of used lamps properly in accordance with your local regulations. “Lamp - Hours Reset“ 3 Select from the “Reset“ menu.
Optional Accessories The following optional accessories are available for purchase if required. This list of optional accessories is current as of June, 2005. Details of accessories are subject to change without notice. Varies depending on country of purchase. Lamp Unit ELPLP33 Soft Carry Case ELPKS54 Use this case if you need to carry the projector by hand. (1 spare lamp, 1 spare screwdriver) Use as a replacement for spent lamps.
List of Supported Monitor Displays Depending on the setting, the output screen resolution will change slightly.
Specifications Home Projector EMP-TW20 373 (W) × 111 (H) × 295 (D) mm (not including feet) Dimensions 0.55 inches Panel size Polysilicon TFT active matrix Display method 409,920 pixels (854 (W) × 480 (H) dots) × 3 Resolution Pixel clock :13.5 – 110 MHz Scanning frequencies Analogue Horizontal :15 – 92 kHz Vertical :50 – 85 Hz Manual Focus adjustment Manual (approx. 1 : 1.5) Zoom adjustment Manual (Maximums: Approx. 50% vertically, 25% horizontally) Lens shift UHE lamp, 135 W, Model No.
Specifications RS-232C cable layout Safety USA UL60950 Third Edition Canada CSA C22.2 No.
Glossary Following is an explanation of some of the terms used in this guide which may be unfamiliar or which were not explained in the manual itself. Further information can be obtained by referring to other commercially-available publications. Aspect HDTV The ratio between an image's length and its height. HDTV images have an aspect of 16:9 and appear elongated. The aspect for standard images is 4:3. An abbreviation for High-Definition Television.
Glossary SECAM An abbreviation for Sequential Couleur A Memoire, and a format for ground-based analogue colour television broadcasts. This format is used in France, Eastern Europe and the former Soviet Union, the Middle East and Africa. Security lock A device consisting of a protector case with a hole in it that a commercially-available theft-prevention cable can be passed through in order to secure the device to a table or pillar.
Index A Air filter ................................................. 8 Air intake vent........................................ 8 Aspect ................................ 7,18,25,27,45 [Audio] port ...................................... 8,12 Auto ..................................................... 18 Auto Setup ...................................... 24,27 A/V Mute ............................................... 7 B Background Color...........................
All rights reserved. No part of this publication may be reproduced, stored in a retrieval system, or transmitted in any form or by any means, electronic, mechanical, photocopying, recording, or otherwise, without the prior written permission of SEIKO EPSON CORPORATION. No patent liability is assumed with respect to the use of the information contained herein. Neither is any liability assumed for damages resulting from the use of the information contained herein.