E Printed in China 404662400 03.09-.
About The Manuals and Notations Used Types of Manual The documentation for your EPSON projector is divided into the following four manuals. Refer to the manuals in the order given below. Unpacking and Installation Guide Lists the accessories that are provided with the projector. Safety Instructions/World-Wide Warranty Terms This manual contains information on using the projector safely, and also includes safety instructions, world-wide warranty terms booklet and a troubleshooting check sheet.
TW200-E.book Page 1 Monday, September 1, 2003 5:19 PM Contents Basic Image Quality Adjustments....................8 RGB adjustment ......................................................10 Selecting the Color Mode .......................................... 8 Selecting the Image Aspect....................................... 8 Viewing images at a preset image quality (memory function)........................................... 12 Advanced Color Adjustments ........................
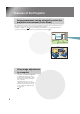
Features of the Projector Image appearance can be selected to match the projection environment (Color Mode) The optimum images for the location can be projected simply by selecting the desired colour mode from the following five preset modes. No complex colour adjustments are required. If "Theatre", "Natural" or "sRGB " is selected, the Epson Cinema Filter effect is applied automatically to increase the contrast and to make flesh tones appear with more natural tints. p.
Features of the Projector Equipped with a wide-angle lens shift function The lens shift function allows the position of the projected images to be adjusted vertically and horizontally without distorting the images. This can allow the projector to be set up with greater freedom, even if it is suspended from a ceiling or at an angle to the screen. Setup Guide Wide range of brightness adjustments The image brightness can be adjusted within a wide range.
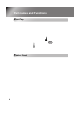
Part names and Functions Front/Top Control Panel 4
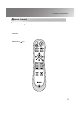
Part names and Functions Remote Control Buttons with no explanation function in the same way as the corresponding buttons on the projector's control panel. Refer to "Control Panel" for further details on these buttons. • Indicator Illuminates when remote control signals are being output. • Menu button p.
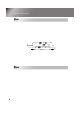
Part names and Functions Rear Base 6
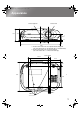
TW200-E.book Page 7 Monday, September 1, 2003 5:19 PM Appearance Centre of projector 134 Centre of lens 120 56.2*1 14 88*2 440 *1 Distance from centre of lens to suspension bracket fixing point (Lens shift amount: Max. 8.7 mm upwards, Max. 4.3 mm downwards) *2 Distance from centre of lens to centre of projector (Lens shift amount: Max. 7.7 mm to the left and right) Centre of lens 243.4 218.4 112.6 19.4 45 320 5 235 4-M4×8 10.
TW200-E.book Page 8 Monday, September 1, 2003 5:19 PM Basic Image Quality Adjustments Selecting the Color Mode Selecting the Color Mode *The colour mode selection menu cannot be activated when advanced memory settings have been retrieved. Default setting : Dynamic Selecting the Image Aspect Selecting the Image Aspect Selection menu operations Press or on the remote control or or on the projector's control panel to select an item. Press or to confirm the selection. * If you press disappears.
TW200-E.book Page 9 Monday, September 1, 2003 5:19 PM Basic Image Quality Adjustments Press and select the colour mode from the five available modes in the selection menu in accordance with the place where the projector is being used. Setting is also possible using the configuration menu. Dynamic : Ideal for using in bright rooms. Theatre Living Room : Ideal for using in rooms in which the curtains are closed. : Ideal for using in dark rooms.
TW200-E.book Page 10 Monday, September 1, 2003 5:19 PM Advanced Color Adjustments The projector allows you to select the optimum colour settings for the images being projected by selecting the appropriate colour mode. Furthermore, if you would like to create your own images with settings adjusted the way you want them, you can adjust "Color Temp. ", "Flesh Tone" and/or "RGB" in the "Color Adjustment" sub-menu of the "Image" menu.
Basic Image Quality Adjustments Advanced Color Adjustments 11
Viewing images at a preset image quality (memory function) After menu commands such as "Picture Quality" and "Color Adjustment" have been used to adjust the projected images, the adjustment values can then be saved. In addition, the saved data can be retrieved easily, so that you can enjoy viewing images with the adjusted settings at any time. Saving image quality adjustments Saving Image quality adjustments (Memory save) (Memory save) The save Settings that can be saved in memory Configuration menus p.
TW200-E.book Page 13 Monday, September 1, 2003 5:19 PM Viewing images at a preset image quality (memory function) s The adjustment results for all of the configuration menu items shown at left and the aspect setting can be saved. The "Memory: Standard" command in the "Image" menu is used to save the settings. The Cinema Color Editor program can also be used to store and retrieve memory settings from a The following describes how to save settings using the "Memory: Standard" command.
TW200-E.book Page 14 Monday, September 1, 2003 5:19 PM Configuration Menu Functions The configuration menus can be used to make a variety of adjustments and settings involving the screen, image quality and input signals. The following two types of menu are available. • Full menu • Line menu All items in a configuration menu can be This lets you adjust "Picture Quality" and "Color checked while the settings are being made. Adjustment" settings in the "Image" menu.
TW200-E.book Page 15 Monday, September 1, 2003 5:19 PM Configuration Menu Functions indicates default settings Progressive p.18 ON , OFF Noise Reduction OFF , NR1, NR2 Setting is only possible when composite video signals or S-Video signals are being input. Output Scaling When video images are input Normal , Larger When computer images are input: Normal , Smaller Setup Level 0% ,7.5% (Varies depending on country of purchase) Screen Sleep Mode p.
TW200-E.book Page 16 Monday, September 1, 2003 5:19 PM Configuration Menu Functions "Image" menu Only displayed for component video/composite video/S-Video input Only displayed for RGB-video/Computer input Picture Quality Default setting Input Adjustment *1 These settings can be adjusted if the output level from the connected equipment is weak and the images appear dark. The two settings cannot be made simultaneously. You can only select one of them to be adjusted.
TW200-E.book Page 17 Monday, September 1, 2003 5:19 PM Configuration Menu Functions Only displayed for RGB-video/Computer input Color Adjustment Default setting "Color Adjustment" cannot be selected when the colour mode is set to "sRGB". Color Temp. *2 • Color Temp. : The colour temperature can be selected from three settings in order to p.10 adjust the overall tint of the images that are being projected. • Flesh Tone : This adjusts the flesh tones of people who appear in the images. p.
TW200-E.book Page 18 Monday, September 1, 2003 5:19 PM Configuration Menu Functions "Setting" menu Advanced Default setting Progressive *1 (Setting is only possible when 525i or 625i component video signals are being input) • OFF :IP conversion is carried out for each field in the screen. This is ideal for using when viewing images with a large amount of movement. :Interlaced (i) signals are converted into progressive (p) signals. This is ideal for using when viewing still images.
TW200-E.book Page 19 Monday, September 1, 2003 5:19 PM Configuration Menu Functions Zoom Caption *1 If aspect is set to "Zoom" when viewing images with subtitles, change the setting as follows so that the subtitles are visible. The vertical size and the display position can both be adjusted together. • Vertical Size Projection area The vertical size of the image is reduced so that the subtitles are displayed. • Zoom Position The whole of the image is moved up so that the subtitles are displayed.
Configuration Menu Functions Trigger Out This turns the trigger function on and off to determine whether the projector's power on/ off status and problems with projector operation are communicated to an external device. If you change the setting, the new setting will take effect after the power has been turned off and the cool-down period is complete. OFF Lock Setting This sets whether the following lock functions are turned on or off.
TW200-E.book Page 21 Monday, September 1, 2003 5:19 PM Configuration Menu Functions Startup Screen This sets whether the start-up screen (the image that is projected when projection starts) is displayed (ON) or not displayed (OFF). If you change the setting, the new setting will take effect after the power has been turned off and the cool-down period is complete.
TW200-E.book Page 22 Monday, September 1, 2003 5:19 PM Configuration Menu Functions "Reset" menu Lamp-Hours Reset This initialises the lamp operating time. When this command is selected, the cumulative operating time for the lamp is cleared and returned to the default setting. Memory Reset This resets (erases) all settings that have been made using the "Memory: Standard" and "Memory: Advance" commands. "Memory: Advance" settings can be saved using the Cinema Color Editor.
TW200-E.book Page 23 Monday, September 1, 2003 5:19 PM Configuration Menu Functions Using the Configuration Menus Displaying a menu Full menu: Press . Line menu: Press . The line menu cannot be activated when advanced memory settings have been retrieved. Selecting a menu item Use and to select a menu item, then press . Use and Configuration Menu Changing settings to adjust values.
TW200-E.book Page 24 Monday, September 1, 2003 5:19 PM Preparation for Using Cinema Color Editor Installing Cinema Color Editor If any other applications are open, close them before installing Cinema Color Editor. Insert the accessory Cinema Color Editor CD-ROM into your CD-ROM drive. Windows: The installer will start automatically. Macintosh: Click the "Installer for Mac OS Classic" icon or the "Installer for Mac OS X" icon in the "EPSON" window, depending on the operating system you are using.
Preparation for Using Cinema Color Editor Uninstalling Cinema Color Editor If you no longer require Cinema Color Editor, uninstall it by following the procedure below. Windows From My Computer, open the Control Panel, double-click "Add or Remove Programs", select "Cinema Color Editor", and then click Add/Remove] (or [Change/Remove] for Windows XP). Macintosh Follow the instructions that are displayed on the screen until the following window is displayed. Select Uninstall. Click [Uninstall].
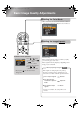
TW200-E.book Page 26 Monday, September 1, 2003 5:19 PM Using Cinema Color Editor The following information describes how to use the Windows edition of the program. The Macintosh edition works in basically the same way. Starting Cinema Color Editor Click to go to remote control window Click to go to picture quality window Starting Cinema Color Editor Operations using the Computer Picture quality window Operations using the Computer Drag the gauge button to the left or right to adjust.
TW200-E.book Page 27 Monday, September 1, 2003 5:19 PM Using Cinema Color Editor Check that the power for the projector to be adjusted is turned on, then start Cinema Color Editor. For Windows : Click "Start" "Programs" "EPSON Projector" "Cinema Color Editor" in that order. For Macintosh : Click "Finder" and then "Applications" from the "Dock (Macintosh HD)", and then (Names may vary double-click "CCEditor" and "Cinema Color Editor (V1.0)" in that order. depending on the version being used.
TW200-E.book Page 28 Monday, September 1, 2003 5:19 PM Using Cinema Color Editor Click Saving customised settings into memory Saving adjustment values into memory Loads settings from a memory area Saves adjustments into a memory area Saving customised settings into memory M Se Th av ca th "C St A Operates in the same way as the projector's Last Memory function. Memory list Indicates the projector memory status.
TW200-E.book Page 29 Monday, September 1, 2003 5:19 PM Using Cinema Color Editor ry Make the desired adjustments. Retrieving saved memory settings Select the memory area to be used. The following two types of memory area are available, and up to 6 sets of adjustment settings can be saved in each. The type of memory area that are available will vary depending on the "Color Adjustment" settings.
TW200-E.book Page 30 Monday, September 1, 2003 5:19 PM Problem Solving Reading the Indicators The projector is provided with the following two indicators which notify you of the operating status of the projector. The following tables show what the indicators mean and how to remedy the problems that they indicate. *If both indicators are switched off, check that the power cable is connected correctly and that power is being supplied.
TW200-E.book Page 31 Monday, September 1, 2003 5:19 PM Problem Solving When the Indicators Provide No Help If any of the following problems occur and the indicators do not offer a solution, refer to the pages given for each problem. Problems relating to images No images appear See below Projection does not start, the projection area is completely black, the projection area is completely blue, etc. The message "Not Supported." is displayed The message "No Signal.
TW200-E.book Page 32 Monday, September 1, 2003 5:19 PM Problem Solving Were the projector and computer connected while their power was already turned on? If the connection is made while the power is already turned on, the function (Fn) key that switches the computer's video signal to external output may not work. Turn the power for the computer that is connected to the projector off and then back on again.
TW200-E.book Page 33 Monday, September 1, 2003 5:19 PM Problem Solving Images are fuzzy or out of focus Has the focus been adjusted correctly? Adjust the focus. Setup Guide Is the lens cover still attached? Remove the lens cover. Is the projector at the correct distance? The recommended distance from the projector to the screen is within 87–1365 cm (2.9–44.8 ft.) for a screen size of 16:9, and 108–1672 cm (3.6–54.9 ft.) for a screen size of 4:3.
TW200-E.book Page 34 Monday, September 1, 2003 5:19 PM Problem Solving Has the "Position" setting been adjusted correctly? Use the "Position" menu command to make the adjustment. "Setting" - "Screen" - "Position" p.18 Has the computer been set for dual display? If dual display has been activated in the Display Properties of the computer's Control Panel, the projector will only project about half of the image on the computer screen.
TW200-E.book Page 35 Monday, September 1, 2003 5:19 PM Problem Solving Projection stops automatically Is sleep mode active? When "Sleep Mode" has been set to ON, the lamp turns off automatically if no signal is input for about 30 minutes, and the projector switches to standby mode. Press the button on the remote control or the button on the projector's control panel to turn the projector's power back on. To cancel the sleep mode setting, change "Sleep Mode" menu command to "OFF".
Maintenance This section describes maintenance tasks such as cleaning the projector and replacing consumable parts. Cleaning You should clean the projector if it becomes dirty or if the quality of projected images starts to deteriorate. Be sure to read the separate Safety Instructions/World-Wide Warranty Terms booklet for details on safe handling of the projector during cleaning. Cleaning the Air Filter If the airfilter becomes blocked with dust and the message "The projector is overheating.
TW200-E.book Page 37 Monday, September 1, 2003 5:19 PM Maintenance Consumable Replacement Periods Air Filter Replacement Period If the air filter becomes broken or too dirty to clean Replace with an optional air filter. "Appendix: Optional Accessories" p.40 Lamp Replacement Period • The message "Replace the lamp." appears on the screen when projection starts. A message will be displayed. • The projected images get darker or start to deteriorate.
Maintenance Replacing Consumables Replacing the Air Filter Turn off the power, wait for the cool-down period to finish (takes approximately 30 seconds), then disconnect the power cable. Replacing the Lamp Resetting the Lamp Operating Time 38 Remove the air filter cover. Put your finger under the latch. Lift up.
Maintenance Place your finger under one of the ribs and lift up. Insert the new air filter. Install the air filter cover. Make sure that it faces the correct way. Appendix Remove the old air filter.
TW200-E.book Page 40 Monday, September 1, 2003 5:19 PM Optional Accessories The following optional accessories are available for purchase if required. This list of optional accessories is current as of October 2003. Details of accessories are subject to change without notice. Spare lamp ELPLP28 ELPAF04 (1 air filter) Use as a replacement for old air filters. 50" portable screen A portable roll-type screen. (Aspect 4:3) VGA-HD15 PC cable (1.8 m (6 ft.)) ELPKC02 VGA-HD15 PC cable (3 m (9.8 ft.
TW200-E.book Page 41 Monday, September 1, 2003 5:19 PM List of Supported Monitor Displays Depending on the setting, the output screen resolution will change slightly.
TW200-E.book Page 42 Monday, September 1, 2003 5:19 PM Specifications Product name Dimensions Panel size Home Projector EMP-TW200 440 (W) × 114 (H) × 320 (D) mm (not including feet) 0.7 inches Polysilicon TFT active matrix 921,600 pixels (1280 (W) × 720 (H) dots) × 3 Resolution Pixel clock :14 – 110 MHz Scanning frequencies Analogue Horizontal :15 – 64 MHz Vertical :50 – 85 MHz Electronic Focus adjustment Electronic (approx. 1 : 1.
TW200-E.book Page 43 Monday, September 1, 2003 5:19 PM Specifications Compatible computers for using Cinema Color Editor Windows Macintosh OS Windows 98SE, NT4.0(SP6a), Me, 2000 Professional, XP Home Edition, XP Professional Edition * Internet Explorer Ver. 5 or later must be installed. Mac OS 8.6.x, 9.0.4, 9.1, 9.2.x MAC OS X 10.1.5, 10.2.x or later * Not compatible with the Classic environment of Mac OS X or higher.
TW200-E.book Page 44 Monday, September 1, 2003 5:19 PM Specifications DECLARATION of CONFORMITY According to 47CFR, Part 2 and 15 Class B Personal Computers and Peripherals; and/or CPU Boards and Power Supplies used with Class B Personal Computers We Located at Tel :EPSON AMERICA, INC. : 3840 Kilroy Airport Way MS: 313 Long Beach, CA 90806 : 562-290-5254 Declare under sole responsibility that the product identified herein, complies with 47CFR Part 2 and 15 of the FCC rules as a Class B digital device.
TW200-E.book Page 45 Monday, September 1, 2003 5:19 PM Glossary Following is an explanation of some of the terms used in this guide which may be unfamiliar or which were not explained in the manual itself. Further information can be obtained by referring to other commercially-available publications. Colour temperature The temperature of an object which is emitting light. If the colour temperature is high, the colors tend to take on a bluish tinge.
TW200-E.book Page 46 Monday, September 1, 2003 5:19 PM Glossary SECAM An abbreviation for Sequential Couleur A Memoire, and a format for ground-based analogue colour television broadcasts. This format is used in France, Eastern Europe and the former Soviet Union, the Middle East and Africa. Security lock A device consisting of a protector case with a hole in it that a commercially-available theft-prevention cable can be passed through in order to secure the device to a table or pillar.
TW200-E.book Page 47 Monday, September 1, 2003 5:19 PM Index "SG" stands for Setup Guide. Adjusting the color hue and saturation ..........................................26 Advanced.........................................15,18 Air filter..................................................6 Air inlet ..................................................6 All Reset..........................................15,22 Aspect...........................................8,12,41 Auto........................................
TW200-E.
TW200-E.book Page 49 Monday, September 1, 2003 5:19 PM All rights reserved. No part of this publication may be reproduced, stored in a retrieval system, or transmitted in any form or by any means, electronic, mechanical, photocopying, recording, or otherwise, without the prior written permission of SEIKO EPSON CORPORATION. No patent liability is assumed with respect to the use of the information contained herein.
E Printed in China 404662400 03.09-.