
User's Manual


0
When
you
upgrade
an
SX-based
processor
to
a DX-
or
Pentium-based
processor,
you
need
to
change
the
jumper
setting
of
Jl
to
position
A.
0
You
may
need
to
change
DIP
switch
settings
to
match
the
speed
of
your
new
processor.
See
page
4-7
for
more
information.
0
For
SX2, DX, DX2, DX4,
or
Pentium OverDrive
processors,
you
need
to
install
a
heat
sink
on
the
chip.
0
After
you
install
the
processor
and
replace
the
computer’s
cover,
run
the
SETUP
program
so
your
computer
can
update
its
configuration.
See
Chapter
2
for
instructions.
(You
need
only
run
the
program
and
save
the
configuration; you
do
not
need
to
change
any
settings.)
Replacing
the
Microprocessor
Follow
these
steps
to
replace
the
microprocessor
chip
in
your
computer:
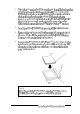
1.
Remove
any
video
card
or
other
option
cards
that
may
be
blocking
your
access
to
the
microprocessor
socket.
See
page
4-16.
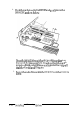
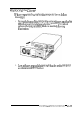
2.
Use
the
illustration
on
page
4-3
to
locate
the
microprocessor
on
the
system
board.
The
microprocessor
chip
is
inserted
in
a ZIF
(Zero
Insertion
Force)
socket.
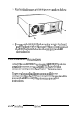
Caution
Make
sure
you
ground
yourself
by
touching
the
metal
surface
on
the
inside
of
the
computer’s
back
panel
before
you
touch
the
processor
chip.
Then
rem
ain as
stationary
as
possible
while
you
install
it. Do
not
touch
the
pins
on
the
processor
chip.
Handle
the
microprocessor
only
by
the
edges
of
its
case.
4-20 Installing and Removing Options