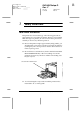
L R4C4450 Setup G. Rev. C A5 size 7/18/00 COVER.FM Pass 0 Proof Sign-off: ABE K.Tsuno H.Kimura_______ H.Kimura _______ ABE J.Holmes _______ Where to Find Information Unpacking Guide Provides you with information and instructions on how to unpack and place the printer. Before using the printer, you need to remove all protective materials as described in the instructions contained in this guide.
R4C4450 Setup G. Rev. C Proof Sign-off: ABE K.Tsuno H.Kimura_______ H.Kimura _______ ABE J.Holmes _______ A5 size 7/18/00 FRONT.FM Pass 0 ® Color Laser Printer All rights reserved. No part of this publication may be reproduced, stored in a retrieval system, or transmitted in any form or by any means, mechanical, photocopying, recording, or otherwise, without the prior written permission of SEIKO EPSON CORPORATION.
L R4C4450 Setup G. Rev. C A5 size 7/18/00 Proof Sign-off: ABE K.Tsuno H.Kimura_______ H.Kimura _______ ABE J.Holmes _______ FRONT.FM Pass 0 Declaration of Conformity According to ISO/IEC Guide 22 and EN 45014 Manufacturer: Address: SEIKO EPSON CORPORATION 3-5, Owa 3-chome, Suwa-shi, Nagano-ken 392 Japan Representative: Address: EPSON EUROPE B.V. Prof. J. H.
Proof Sign-off: ABE K.Tsuno H.Kimura_______ H.Kimura _______ ABE J.Holmes _______ R R4C4450 Setup G. Rev. C A5 size 7/18/00 4450SG.TOC Pass 0 Contents 1 Safety Instructions Laser Printer Precautions . . . . . . . . . . . . . . . . . . . . . . . . . . . . . . . . . 1 Important Safety Instructions . . . . . . . . . . . . . . . . . . . . . . . . . . . . . 4 Warnings, Cautions, and Notes. . . . . . . . . . . . . . . . . . . . . . . . . . . .
L R4C4450 Setup G. Rev. C A5 size 7/18/00 4450SG.TOC Pass 0 Proof Sign-off: ABE K.Tsuno H.Kimura_______ H.Kimura _______ ABE J.Holmes _______ Testing the Printer . . . . . . . . . . . . . . . . . . . . . . . . . . . . . . . . . . . . . . Loading paper . . . . . . . . . . . . . . . . . . . . . . . . . . . . . . . . . . . . . Printing a status sheet. . . . . . . . . . . . . . . . . . . . . . . . . . . . . . . Connecting to the Computer . . . . . . . . . . . . . . . . . . . . . . . . . . . . .
Proof Sign-off: ABE K.Tsuno H.Kimura_______ H.Kimura _______ ABE J.Holmes _______ R R4C4450 Setup G. Rev. C A5 size 7/18/00 4450SG.TOC Pass 0 ENERGY STAR Compliance . . . . . . . . . . . . . . . . . . . . . . . . . . . . . . 76 For United Kingdom Users . . . . . . . . . . . . . . . . . . . . . . . . . . . . . . .
L R4C4450 Setup G. Rev. C A5 size 7/18/00 4450SG.TOC Pass 0 vi Contents Proof Sign-off: ABE K.Tsuno H.Kimura_______ H.Kimura _______ ABE J.
Proof Sign-off: ABE K.Tsuno H.Kimura_______ H.Kimura _______ ABE J.Holmes _______ 1 R R4C4450 Setup G. Rev. C A5 size 7/18/00 SAFETY.FM Pass 0 Safety Instructions Laser Printer Precautions This printer uses laser technology. The following precautions apply whenever you use the laser printer. Even if you are familiar with other types of printers, be sure to follow these precautions carefully to ensure safe, efficient operation.
L R4C4450 Setup G. Rev. C A5 size 7/18/00 SAFETY.FM Pass 0 Proof Sign-off: ABE K.Tsuno H.Kimura_______ H.Kimura _______ ABE J.Holmes _______ ❏ Never force the printer’s components into place. Although the printer is designed to be sturdy, rough handling can damage it. ❏ When handling the toner cartridges, always place them on a clean, smooth surface. ❏ Do not attempt to modify or take apart the toner cartridge. It cannot be refilled. ❏ Try not to touch the toner and avoid all contact with your eyes.
Proof Sign-off: ABE K.Tsuno H.Kimura_______ H.Kimura _______ ABE J.Holmes _______ R R4C4450 Setup G. Rev. C A5 size 7/18/00 SAFETY.FM Pass 0 ❏ Be sure not to scratch the surface of the drum. When you remove the photoconductor unit from the printer, always set the unit on a clean, smooth surface. Also, avoid touching the drum, since oil from your skin can permanently damage its surface and may affect print quality.
L R4C4450 Setup G. Rev. C A5 size 7/18/00 SAFETY.FM Pass 0 Proof Sign-off: ABE K.Tsuno H.Kimura_______ H.Kimura _______ ABE J.Holmes _______ Important Safety Instructions Read all of these instructions before operating your printer. ❏ Follow all warnings and instructions marked on the printer. ❏ Unplug this printer from the electrical outlet before cleaning. Use a damp cloth for cleaning and do not use liquid or aerosol cleaners. ❏ Do not use this printer near water.
Proof Sign-off: ABE K.Tsuno H.Kimura_______ H.Kimura _______ ABE J.Holmes _______ R R4C4450 Setup G. Rev. C A5 size 7/18/00 SAFETY.FM Pass 0 ❏ Unless specifically instructed in this guide, do not attempt to service this product yourself. Opening or removing those covers that are marked “Do Not Remove” may expose you to dangerous voltage points or other risks. Refer all servicing in those compartments to service personnel.
L R4C4450 Setup G. Rev. C A5 size 7/18/00 Proof Sign-off: ABE K.Tsuno H.Kimura_______ H.Kimura _______ ABE J.Holmes _______ SAFETY.FM Pass 0 2 System Requirements To use your printer with a PC, you need MicrosoftWindows95, 98, Windows NT 4.0, Windows 3.1, or Windows NT 3.51 ; and a shielded, twisted-pair parallel interface cable.
Proof Sign-off: ABE K.Tsuno H.Kimura_______ H.Kimura _______ ABE J.Holmes _______ 3 R R4C4450 Setup G. Rev. C A5 size 7/18/00 SAFETY.FM Pass 0 Assembling the Printer Before assembling the printer, make sure that all protective materials packed around and inside your printer are removed. Follow the instructions in the Unpacking Guide to remove these materials. Installing the Expansion Tray The expansion tray is used for the wide-size paper setting.
L R4C4450 Setup G. Rev. C A5 size 7/18/00 SAFETY.FM Pass 0 Proof Sign-off: ABE K.Tsuno H.Kimura_______ H.Kimura _______ ABE J.Holmes _______ 2. While holding the expansion tray vertically, insert the left leg into the MP tray until the pin clicks into place in the hole on the MP tray. Installing the Face-Up Tray Install the face-up tray onto the left side of the printer as follows: 1. Locate the output slot on the left side of the printer. 2.
Proof Sign-off: ABE K.Tsuno H.Kimura_______ H.Kimura _______ ABE J.Holmes _______ R R4C4450 Setup G. Rev. C A5 size 7/18/00 SAFETY.FM Pass 0 3. Insert the plastic mounting pin on the right side of the face-up tray into the corresponding hole inside the output slot. 4. Insert the left mounting pin on the face-up tray into the hole on the left side of the output slot. 5. Release the spring so that the end rests against the outer case of the printer as shown below.
L R4C4450 Setup G. Rev. C A5 size 7/18/00 SAFETY.FM Pass 0 c Proof Sign-off: ABE K.Tsuno H.Kimura_______ H.Kimura _______ ABE J.Holmes _______ Caution: Do not insert the metal spring into the output slot or any holes in the printer case. Doing so may damage the face-up tray or your printer. Installing the Toner Cartridges You need to install four cartridges in the printer. Note: ❏ If toner gets on your skin or clothes, wash it off with soap and water immediately.
R R4C4450 Setup G. Rev. C Proof Sign-off: ABE K.Tsuno H.Kimura_______ H.Kimura _______ ABE J.Holmes _______ A5 size 7/18/00 SAFETY.FM Pass 0 1. Open the front cover. 2. Check which color appears in the cartridge installment window and prepare a cartridge with the same color.
L R4C4450 Setup G. Rev. C A5 size 7/18/00 SAFETY.FM Pass 0 Proof Sign-off: ABE K.Tsuno H.Kimura_______ H.Kimura _______ ABE J.Holmes _______ 3. Take the cartridge out of its package, and gently shake it back and forth and front to back as shown below to distribute the toner evenly. 4. Hold the cartridge with the arrow side facing up, and insert it all the way into the cartridge slot.
Proof Sign-off: ABE K.Tsuno H.Kimura_______ H.Kimura _______ ABE J.Holmes _______ R R4C4450 Setup G. Rev. C A5 size 7/18/00 SAFETY.FM Pass 0 5. Turn the cartridge knob clockwise 90 degrees so that the O symbol on the knob is in the position shown below. By turning the knob, the cartridge is pressed into the slot and installed completely. c Caution: Be sure to turn the knob all the way to the locked position. Otherwise, you may have toner problems or leakage. 6.
L R4C4450 Setup G. Rev. C A5 size 7/18/00 SAFETY.FM Pass 0 Proof Sign-off: ABE K.Tsuno H.Kimura_______ H.Kimura _______ ABE J.Holmes _______ 7. Turn the round knob located just above the cartridge installation window clockwise until it stops. The switch drops down to the lower position automatically and the next cartridge slot appears in the installation window. Note: If the knob cannot be moved, first check that the switch is in the upper position. Do not turn the knob by force. 8.
Proof Sign-off: ABE K.Tsuno H.Kimura_______ H.Kimura _______ ABE J.Holmes _______ R R4C4450 Setup G. Rev. C A5 size 7/18/00 SAFETY.FM Pass 0 Installing the Photoconductor Unit Before installing the photoconductor unit, read the following handling precautions: ❏ When installing the photoconductor unit, avoid exposing it to room light any longer than necessary. ❏ Be sure not to scratch the surface of the drum.
L R4C4450 Setup G. Rev. C A5 size 7/18/00 SAFETY.FM Pass 0 Proof Sign-off: ABE K.Tsuno H.Kimura_______ H.Kimura _______ ABE J.Holmes _______ 3. Take the photoconductor unit out of its package and unwrap the protective sheet while holding the handle as shown below. c Caution: ❏ Be sure not to touch or scratch the surface of the drum. ❏ When replacing the photoconductor unit, avoid exposing it to room light any longer than necessary. 4.
Proof Sign-off: ABE K.Tsuno H.Kimura_______ H.Kimura _______ ABE J.Holmes _______ R R4C4450 Setup G. Rev. C A5 size 7/18/00 SAFETY.FM Pass 0 5. Turn the small lever on the photoconductor unit to the left. 6. Turn the large lever clockwise 90 degrees.
L R4C4450 Setup G. Rev. C A5 size 7/18/00 SAFETY.FM Pass 0 Proof Sign-off: ABE K.Tsuno H.Kimura_______ H.Kimura _______ ABE J.Holmes _______ 7. Close the front cover. Installing the Fuser Oil Roll Before installing the fuser oil roll, read the following handling precautions: ❏ Do not touch the white roll surface. ❏ If oil gets on your skin or clothes, wash it off immediately. ❏ The roll should always be kept horizontal. Do not tilt or lean it against anything.
Proof Sign-off: ABE K.Tsuno H.Kimura_______ H.Kimura _______ ABE J.Holmes _______ R R4C4450 Setup G. Rev. C A5 size 7/18/00 SAFETY.FM Pass 0 To install the fuser oil roll: 1. Pull down the Face-up Tray. 2. Hold the handle of the fuser unit and pull it all the way out. .
L R4C4450 Setup G. Rev. C A5 size 7/18/00 SAFETY.FM Pass 0 Proof Sign-off: ABE K.Tsuno H.Kimura_______ H.Kimura _______ ABE J.Holmes _______ 3. Take the fuser oil roll out of its box, and remove the cover and two pins as shown below: Note: Do not touch the white roll surface. 4. Hold the roll handle and insert the new fuser oil roll into the fuser unit, matching the green marks on the roll and unit.
Proof Sign-off: ABE K.Tsuno H.Kimura_______ H.Kimura _______ ABE J.Holmes _______ R R4C4450 Setup G. Rev. C A5 size 7/18/00 SAFETY.FM Pass 0 5. Push the roll down firmly until it clicks into place. 6. Push the fuser unit into the printer until it clicks into place.
L R4C4450 Setup G. Rev. C A5 size 7/18/00 SAFETY.FM Pass 0 4 Proof Sign-off: ABE K.Tsuno H.Kimura_______ H.Kimura _______ ABE J.Holmes _______ Installing the Options If you purchased any options with the printer, install them before plugging in the printer. Installing the 250 Sheet Lower Cassette Unit (A3W) This cassette is designed for A3W size paper only. You can load up to 250 sheets in this cassette. 1. Remove the protective materials from the cassette.
Proof Sign-off: ABE K.Tsuno H.Kimura_______ H.Kimura _______ ABE J.Holmes _______ R R4C4450 Setup G. Rev. C A5 size 7/18/00 SAFETY.FM Pass 0 2. Pull the printer’s lower cassette unit all the way out and remove it by lifting up. 3. Put both legs of the optional lower cassette unit (A3W) on the printer’s slot guide, then insert it into the printer. Push the cassette unit all the way in. .
L R4C4450 Setup G. Rev. C A5 size 7/18/00 Proof Sign-off: ABE K.Tsuno H.Kimura_______ H.Kimura _______ ABE J.Holmes _______ SAFETY.FM Pass 0 Installing the Large Capacity Paper Unit The optional Large Capacity Paper Unit has three paper cassettes. c Caution: The optional 250 Sheet Lower Paper Cassette Unit (C81302✽) cannot be mounted on the Large Capacity Paper Unit or the 500Sheet Paper Cassette Unit. If you try to do this, the units may be damaged.
Proof Sign-off: ABE K.Tsuno H.Kimura_______ H.Kimura _______ ABE J.Holmes _______ w R R4C4450 Setup G. Rev. C A5 size 7/18/00 SAFETY.FM Pass 0 Warning: If you lift the printer improperly, it may fall and injure you. Unpacking and removing the protective materials 1. Open the box that contains the unit. Have two or more people lift the unit. Lift with these bars w Warning: Two or more people should lift the unit because it weighs approximately 24 kg (53 lb).
L R4C4450 Setup G. Rev. C A5 size 7/18/00 SAFETY.FM Pass 0 Proof Sign-off: ABE K.Tsuno H.Kimura_______ H.Kimura _______ ABE J.Holmes _______ 2. Pull out the top cassette and remove the protective materials in the following order: 1) cardboard, 2) foam material, 3) tape and plastic material. Then remove the cassette from the unit by gently lifting it up. 3. For the middle and lower cassettes, remove the protective materials in the same way as in step 2. Then remove the cassettes from the unit.
Proof Sign-off: ABE K.Tsuno H.Kimura_______ H.Kimura _______ ABE J.Holmes _______ R R4C4450 Setup G. Rev. C A5 size 7/18/00 SAFETY.FM Pass 0 4. Remove the two pieces of cardboard from the inside of the unit. 5. Return the cassettes to the unit. Lift the cassettes slightly to slide onto the guide rails, then push the cassettes all the way into the unit.
L R4C4450 Setup G. Rev. C A5 size 7/18/00 SAFETY.FM Pass 0 Proof Sign-off: ABE K.Tsuno H.Kimura_______ H.Kimura _______ ABE J.Holmes _______ Installing the unit on the printer 1. Lock the casters at the bottom of the unit. c Caution: You should lock all casters before installing the unit on the printer. Otherwise, the unit may move and cause an accident. 2. Remove the Face-up Tray located on the left side of the printer and fold up the expansion tray located on the right side of the printer.
R R4C4450 Setup G. Rev. C Proof Sign-off: ABE K.Tsuno H.Kimura_______ H.Kimura _______ ABE J.Holmes _______ A5 size 7/18/00 SAFETY.FM Pass 0 3. Lift the printer up. w Warning: Four people should lift the printer by the correct positions as shown below: 2 1 3 4 4. Keep the printer horizontal. Put it down gently on the unit so that the three pins on top of the unit fit into the holes on the bottom of the printer.
L R4C4450 Setup G. Rev. C A5 size 7/18/00 SAFETY.FM Pass 0 Proof Sign-off: ABE K.Tsuno H.Kimura_______ H.Kimura _______ ABE J.Holmes _______ Note: To fit the pins and holes easily, match the front and side of the printer and the unit cases. 5. Remove the top cassette from the unit. 6. Tighten the two screws on the upper side of the unit to secure the printer and unit.
Proof Sign-off: ABE K.Tsuno H.Kimura_______ H.Kimura _______ ABE J.Holmes _______ R R4C4450 Setup G. Rev. C A5 size 7/18/00 SAFETY.FM Pass 0 7. Return the top cassette to the unit. 8. Open the cover at the back of the unit, then remove the connector cover at the back of the printer by sliding it down. 9. There are two sets of cables and connectors. Be sure that the connector size is different between the two connectors. Check the connector size first and connect each cable to the samesize connector.
L R4C4450 Setup G. Rev. C A5 size 7/18/00 SAFETY.FM Pass 0 Proof Sign-off: ABE K.Tsuno H.Kimura_______ H.Kimura _______ ABE J.Holmes _______ 10. Attach the cables on the left side and close the cover of the unit to hold the cables down. Then attach the connector cover on the printer.
Proof Sign-off: ABE K.Tsuno H.Kimura_______ H.Kimura _______ ABE J.Holmes _______ R R4C4450 Setup G. Rev. C A5 size 7/18/00 SAFETY.FM Pass 0 Installing the Hard Disk Drive You can increase the printer capacity by installing the optional Hard Disk Drive (C82377✽). This option allows you to print complex and large print jobs at high speed. 1. Open the printer cover and pull out the paper path unit at least 10 cm (4 inches). 2. Remove the screws on the right side cover.
L R4C4450 Setup G. Rev. C A5 size 7/18/00 SAFETY.FM Pass 0 Proof Sign-off: ABE K.Tsuno H.Kimura_______ H.Kimura _______ ABE J.Holmes _______ 3. Open the front side of the right side cover until the pin on the cover comes out of the hole. Then remove the cover by sliding it back. 4. Press the Hard Disk Drive down until the socket and connector are firmly connected. And tighten the retaining screws with a cross-head screwdriver.
Proof Sign-off: ABE K.Tsuno H.Kimura_______ H.Kimura _______ ABE J.Holmes _______ c R R4C4450 Setup G. Rev. C A5 size 7/18/00 SAFETY.FM Pass 0 Caution: You should not remove any modules from the circuit board. If you remove them, the printer will not work. 5. To replace the right side cover, first insert the cover’s hook in the slot at the back of the printer, then close the front side making sure to fit the cover pin into the printer hole. 6. Secure the cover with the screws.
L R4C4450 Setup G. Rev. C A5 size 7/18/00 Proof Sign-off: ABE K.Tsuno H.Kimura_______ H.Kimura _______ ABE J.Holmes _______ SAFETY.FM Pass 0 Installing the Memory Module You can increase printer memory up to 256 MB (including standard printer memory of 64 MB) by installing the optional DIMM (Dual In-line memory module). This printer has two slots for optional DIMMs. You can purchase DIMMs from various vendors.
Proof Sign-off: ABE K.Tsuno H.Kimura_______ H.Kimura _______ ABE J.Holmes _______ R R4C4450 Setup G. Rev. C A5 size 7/18/00 SAFETY.FM Pass 0 1. Open the printer cover and pull out the paper path unit at least 10 cm (4 inches). 2. Remove the screws on the right side cover.
L R4C4450 Setup G. Rev. C A5 size 7/18/00 SAFETY.FM Pass 0 Proof Sign-off: ABE K.Tsuno H.Kimura_______ H.Kimura _______ ABE J.Holmes _______ 3. Open the front side of the right side cover until the pin on the cover comes out of the hole. Then remove the cover by sliding it back. 4. Check the position of the slots for optional DIMMs. c 38 Caution: You should not remove any modules from the circuit board. If you remove them, the printer will not work.
Proof Sign-off: ABE K.Tsuno H.Kimura_______ H.Kimura _______ ABE J.Holmes _______ R R4C4450 Setup G. Rev. C A5 size 7/18/00 SAFETY.FM Pass 0 5. Insert the memory module into the slot straight (either slot is OK) as shown below. The clips on the slot fasten the DIMM when it is inserted correctly. c Caution: ❏ Do not force the DIMM into the slot. ❏ Be sure to insert the DIMM facing the correct way.
L R4C4450 Setup G. Rev. C A5 size 7/18/00 SAFETY.FM Pass 0 Proof Sign-off: ABE K.Tsuno H.Kimura_______ H.Kimura _______ ABE J.Holmes _______ 6. To replace the right side cover, first insert the cover’s hook in the slot at the back of the printer, then close the front side making sure to fit the cover pin into the printer hole. 7. Secure the cover with the screws. Close the front cover and the paper path unit.
Proof Sign-off: ABE K.Tsuno H.Kimura_______ H.Kimura _______ ABE J.Holmes _______ R R4C4450 Setup G. Rev. C A5 size 7/18/00 SAFETY.FM Pass 0 Installing the ROM Module In some locations, there are optional ROM modules that can expand your printer’s features. c w Caution: Before you install the ROM module, be sure to discharge any static electricity by touching a grounded piece of metal. Otherwise, you may damage static-sensitive components.
L R4C4450 Setup G. Rev. C A5 size 7/18/00 SAFETY.FM Pass 0 Proof Sign-off: ABE K.Tsuno H.Kimura_______ H.Kimura _______ ABE J.Holmes _______ 2. Remove the screws on the right side cover. 3. Open the front side of the right side cover until the pin on the cover comes out of the hole. Then remove the cover by sliding it back.
Proof Sign-off: ABE K.Tsuno H.Kimura_______ H.Kimura _______ ABE J.Holmes _______ R R4C4450 Setup G. Rev. C A5 size 7/18/00 SAFETY.FM Pass 0 4. Check the position of the slots for a ROM module. c Caution: You should not remove any modules from the circuit board. If you remove them, the printer will not work. 5. Insert the module all the way into slot A, making sure that the gold contact side of the module is the lower side.
L R4C4450 Setup G. Rev. C A5 size 7/18/00 SAFETY.FM Pass 0 Proof Sign-off: ABE K.Tsuno H.Kimura_______ H.Kimura _______ ABE J.Holmes _______ 6. To replace the right side cover, first insert the cover’s hook in the slot at the back of the printer, then close the front side making sure to fit the cover pin into the printer hole. 7. Secure the cover with the screws. Close the front cover and the paper path unit.
Proof Sign-off: ABE K.Tsuno H.Kimura_______ H.Kimura _______ ABE J.Holmes _______ R R4C4450 Setup G. Rev. C A5 size 7/18/00 SAFETY.FM Pass 0 Installing an Interface Card Follow the steps below to install an optional interface card. c Caution: Before you install the interface card, be sure to discharge any static electricity by touching a grounded piece of metal. Otherwise, you may damage static-sensitive components. 1. Be sure to set any switches and jumpers on the card, as necessary.
L R4C4450 Setup G. Rev. C A5 size 7/18/00 SAFETY.FM Pass 0 Proof Sign-off: ABE K.Tsuno H.Kimura_______ H.Kimura _______ ABE J.Holmes _______ 3. Slide the interface card along the slots on both sides of the interface compartment. Push the card in firmly making sure that the connector at the back of the interface card is fully inserted into the printer’s internal socket. 4. Replace the two screws and tighten them.
Proof Sign-off: ABE K.Tsuno H.Kimura_______ H.Kimura _______ ABE J.Holmes _______ 5 R R4C4450 Setup G. Rev. C A5 size 7/18/00 SAFETY.FM Pass 0 Plugging in the Printer 1. Check the label on the left side of the printer to make sure that the voltage required by the printer matches that of the electrical outlet it will be plugged into. Also, make sure that you have the correct power cord for your power source. c Caution: It is not possible to change the printer’s voltage.
L R4C4450 Setup G. Rev. C A5 size 7/18/00 SAFETY.FM Pass 0 Proof Sign-off: ABE K.Tsuno H.Kimura_______ H.Kimura _______ ABE J.Holmes _______ Testing the Printer To test whether the printer is set up correctly, print a status sheet. The status sheet contains information about the printer, including the current settings. To print a status sheet, follow the steps below. Loading paper 1. Fan a stack of A4 or Letter size paper, then tap it on a flat surface to even the edges. 2.
Proof Sign-off: ABE K.Tsuno H.Kimura_______ H.Kimura _______ ABE J.Holmes _______ R R4C4450 Setup G. Rev. C A5 size 7/18/00 SAFETY.FM Pass 0 The display shows RAM check XXXMB, with the actual memory size of your printer, including the memory size of optional memory module if installed, displayed in place of XXX. The display shows SelfTest, and then shows Warming Up. The On Line light turns on. After about five minutes, the display shows Ready. 2. Press the Enter button. The display shows Status Sheet.
L R4C4450 Setup G. Rev. C A5 size 7/18/00 SAFETY.FM Pass 0 Proof Sign-off: ABE K.Tsuno H.Kimura_______ H.Kimura _______ ABE J.Holmes _______ Connecting to the Computer To connect your computer to your printer’s built-in parallel interface, you need a shielded, twisted-pair parallel interface cable that is IEEE-1284 compatible. Note: If you installed the optional interface card, you need a different type of cable. See the optional interface card’s manual. 1.
Proof Sign-off: ABE K.Tsuno H.Kimura_______ H.Kimura _______ ABE J.Holmes _______ 6 R R4C4450 Setup G. Rev. C A5 size 7/18/00 SAFETY.FM Pass 0 Installing the Printer Software After connecting the printer to your computer, install the printer software. It is included on the “Printer Software for EPSON EPL-C8200” CD-ROM shipped with your printer. Your printer software includes: ❏ Printer driver The printer driver gives you complete control over your printer with the Microsoft® Windows® 95, 98, NT® 4.
L R4C4450 Setup G. Rev. C A5 size 7/18/00 SAFETY.FM Pass 0 Proof Sign-off: ABE K.Tsuno H.Kimura_______ H.Kimura _______ ABE J.Holmes _______ ❏ If you are running DOS, you must use a driver other than the one included with the printer. see “For DOS Programs” on page 56. For All Windows Users Follow these steps to install the printer driver for Windows 95, 98, NT 4.0, Windows 3.1, or NT 3.51. Note: When you use your printer on a network, you need to have approval from the network administrator.
Proof Sign-off: ABE K.Tsuno H.Kimura_______ H.Kimura _______ ABE J.Holmes _______ R R4C4450 Setup G. Rev. C A5 size 7/18/00 SAFETY.FM Pass 0 5. In the dialog box that appears, double-click Install Printer Driver/Utility, or you can also install by selecting Install Printer Driver/Utility and then clicking the arrow on the top right. If this dialog box does not appear, double-click the My Computer icon, then double-click the CD-ROM drive icon.
L R4C4450 Setup G. Rev. C A5 size 7/18/00 SAFETY.FM Pass 0 Proof Sign-off: ABE K.Tsuno H.Kimura_______ H.Kimura _______ ABE J.Holmes _______ 6. In the dialog box that appears, select EPSON EPL-C8200 Advanced and click OK. This automatically installs the printer driver. 7. When installation is complete, click OK. Note: ❏ The EPSON Status Monitor 3 utility is also installed for Windows 95, 98, or NT 4.0. ❏ Installation time varies depending on your computer system.
Proof Sign-off: ABE K.Tsuno H.Kimura_______ H.Kimura _______ ABE J.Holmes _______ R R4C4450 Setup G. Rev. C A5 size 7/18/00 SAFETY.FM Pass 0 Installing EPSON Font Manager Follow these steps to install EPSON Font Manager: 1. Make sure that Windows is running and the printer is turned off. 2. Insert the CD-ROM that comes with your printer into your CD-ROM drive. Note: Step 3 and 4 are needed only for Windows 3.1 and NT 3.51. Windows 95, 98, NT 4.0 are executed automatically. 3.
L R4C4450 Setup G. Rev. C A5 size 7/18/00 SAFETY.FM Pass 0 Proof Sign-off: ABE K.Tsuno H.Kimura_______ H.Kimura _______ ABE J.Holmes _______ 5. In the dialog box that appears, double-click Install EPSON Font Manager; or you can install by selecting Install EPSON Font Manager and then clicking the arrow at the top right. 6. Follow the on-screen instructions. 7. When installation is complete, click OK. The EPSON Font Manager is now installed on your computer.
Proof Sign-off: ABE K.Tsuno H.Kimura_______ H.Kimura _______ ABE J.Holmes _______ R R4C4450 Setup G. Rev. C A5 size 7/18/00 SAFETY.FM Pass 0 When asked to select a printer, pick the first printer available in the list below.
L R4C4450 Setup G. Rev. C A5 size 7/18/00 SAFETY.FM Pass 0 Proof Sign-off: ABE K.Tsuno H.Kimura_______ H.Kimura _______ ABE J.Holmes _______ Note: When the EPSON Status Monitor 3 utility is running and the printer is turned on, the information on the installed options is automatically transmitted to the computer and its information appears in your driver’s screen. 1. Double-click the My Computer icon and double-click the Printers folder. 2. Right-click the icon of your printer, and click Properties. 3.
Proof Sign-off: ABE K.Tsuno H.Kimura_______ H.Kimura _______ ABE J.Holmes _______ R R4C4450 Setup G. Rev. C A5 size 7/18/00 SAFETY.FM Pass 0 4. If you select Update the Printer Option Info Automatically in the Printer window when EPSON Status Monitor 3 is running and the printer is turned on, the information on the installed options is automatically transmitted to the computer. If you select Update the Printer Option Info Manually, set this information manually as described in step 5.
L R4C4450 Setup G. Rev. C A5 size 7/18/00 SAFETY.FM Pass 0 Proof Sign-off: ABE K.Tsuno H.Kimura_______ H.Kimura _______ ABE J.Holmes _______ 5. Click the Settings button in the Printer window. The Optional Settings dialog box appears. Make settings depending on the option installation. Then click OK. For Windows NT 4.0/3.51 users If you have installed any options in the printer, you need to make optional settings in your printer driver before using the option.
Proof Sign-off: ABE K.Tsuno H.Kimura_______ H.Kimura _______ ABE J.Holmes _______ R R4C4450 Setup G. Rev. C A5 size 7/18/00 SAFETY.FM Pass 0 Note: When the EPSON Status Monitor 3 utility is running and the printer is turned on, the information on the installed option is automatically transmitted to the computer. In this case, you do not need to set anything (except for NT 3.51). 4. Click the Printer Setting tab. Select the paper size for each paper source.
L R4C4450 Setup G. Rev. C A5 size 7/18/00 SAFETY.FM Pass 0 Proof Sign-off: ABE K.Tsuno H.Kimura_______ H.Kimura _______ ABE J.Holmes _______ 7. Click OK to close the EPSON EPL-C8200 Advanced dialog box. Note: The EPSON Status Monitor 3 utility is not available for Windows 3.1.
Proof Sign-off: ABE K.Tsuno H.Kimura_______ H.Kimura _______ ABE J.Holmes _______ 7 R R4C4450 Setup G. Rev. C A5 size 7/18/00 SAFETY.FM Pass 0 Accessing Online Help Your Windows printer driver has an extensive online help feature that includes detailed information and instructions on the driver settings. Online help will answer most of your questions about the driver. Note: Online help is not available for DOS applications.
L R4C4450 Setup G. Rev. C A5 size 7/18/00 SAFETY.FM Pass 0 8 Proof Sign-off: ABE K.Tsuno H.Kimura_______ H.Kimura _______ ABE J.Holmes _______ Printing with Windows This section explains how to print your documents from your Windows application or how to cancel printing. Starting to Print To get started with printing right away, follow the printing procedure explained below, which is typical of many Windows applications. The actual way you print may vary depending on the application you use.
Proof Sign-off: ABE K.Tsuno H.Kimura_______ H.Kimura _______ ABE J.Holmes _______ R R4C4450 Setup G. Rev. C A5 size 7/18/00 SAFETY.FM Pass 0 3. Make sure that your printer is selected and then click Printer, Setup, Properties, or Options. You may need to click more than one of these buttons in different dialog boxes. The printer software window appears. 4. Make the settings in each menu depending on your document type.
L R4C4450 Setup G. Rev. C A5 size 7/18/00 Proof Sign-off: ABE K.Tsuno H.Kimura_______ H.Kimura _______ ABE J.Holmes _______ SAFETY.FM Pass 0 Canceling Printing To cancel printing, follow the instructions below: 1. Press the On Line button on the printer’s control panel. The On Line light turns off.
R R4C4450 Setup G. Rev. C Proof Sign-off: ABE K.Tsuno H.Kimura_______ H.Kimura _______ ABE J.Holmes _______ A5 size 7/18/00 SAFETY.FM Pass 0 3. Hold down the Alt and Reset buttons at the same time until Reset appears on the display. The received data is cleared. On Line Form Feed Continue Reset c Paper Source Page Size Manual Feed RITech Copies MP Tray Size Menu Item Value Orientation Enter ^ Alt Caution: Be careful not to hold the buttons down for more than five seconds.
L R4C4450 Setup G. Rev. C A5 size 7/18/00 SAFETY.FM Pass 0 9 Proof Sign-off: ABE K.Tsuno H.Kimura_______ H.Kimura _______ ABE J.Holmes _______ Using the Online Guide To learn more about your printer, see the online guide in the CDROM packaged with your printer. It contains detailed instructions on how to use the printer, and information on installing and using optional products. You can view this guide directly from the CD-ROM, or install it in your computer and view it from your hard disk.
R R4C4450 Setup G. Rev. C Proof Sign-off: ABE K.Tsuno H.Kimura_______ H.Kimura _______ ABE J.Holmes _______ A5 size 7/18/00 SAFETY.FM Pass 0 System Requirements For Windows System Windows 95, 98, Windows NT 4.0, Windows 3.1, or NT 3.51 CPU i486/25 MHz (for Windows 95 / NT 4.0) i486/66 MHz (for Windows 98) i486/25 MHz (for Windows 3.1 / NT 3.
L R4C4450 Setup G. Rev. C A5 size 7/18/00 SAFETY.FM Pass 0 Proof Sign-off: ABE K.Tsuno H.Kimura_______ H.Kimura _______ ABE J.Holmes _______ Installing Microsoft ® Internet Explorer A Web browser is required to use the online guide. You need Microsoft Internet Explorer version 4.01, or later, or Netscape® Navigator version 4.05, or later, already installed. If you do not have a Web browser, install Microsoft Internet Explorer 5.0 for Windows users, or Internet Explorer 4.5 for Macintosh users.
Proof Sign-off: ABE K.Tsuno H.Kimura_______ H.Kimura _______ ABE J.Holmes _______ R R4C4450 Setup G. Rev. C A5 size 7/18/00 SAFETY.FM Pass 0 For Macintosh 1. Insert the printer driver CD-ROM in your CD-ROM drive. 2. Double-click the Internet Explorer folder. 3. Find the Internet Explorer 4.5 icon and follow the instructions on the screen.
L R4C4450 Setup G. Rev. C A5 size 7/18/00 SAFETY.FM Pass 0 10 Proof Sign-off: ABE K.Tsuno H.Kimura_______ H.Kimura _______ ABE J.Holmes _______ Safety Information Laser safety This printer is certified as a Class 1 laser product under the U.S. Department of Health and Human Services (DHHS) Radiation Performance Standard according to the Radiation Control for Health and Safety Act of 1968. This means that the printer does not produce hazardous laser radiation.
Proof Sign-off: ABE K.Tsuno H.Kimura_______ H.Kimura _______ ABE J.Holmes _______ R R4C4450 Setup G. Rev. C A5 size 7/18/00 SAFETY.FM Pass 0 CDRH regulations The Center for Devices and Radiological Health (CDRH) of the U.S. Food and Drug Administration implemented regulations for laser products on August 2, 1976. Compliance is mandatory for products marketed in the United States.
L R4C4450 Setup G. Rev. C A5 size 7/18/00 SAFETY.FM Pass 0 Proof Sign-off: ABE K.Tsuno H.Kimura_______ H.Kimura _______ ABE J.Holmes _______ Your printer is a Class 1 laser product as defined in IEC 825 specifications. The label shown below is attached in countries where required. Internal laser radiation Max. Radiation Power 5.0 × 10-³ W Wave Length 785 + 10/-15 nm This is a Class IIIb Laser Diode Assembly that has an invisible laser beam. The printer head unit is NOT A FIELD SERVICE ITEM.
Proof Sign-off: ABE K.Tsuno H.Kimura_______ H.Kimura _______ ABE J.Holmes _______ R R4C4450 Setup G. Rev. C A5 size 7/18/00 SAFETY.FM Pass 0 Ozone exposure limit The print engine shall not exceed 0.02 ppm ozone concentration TWA (Time Weighted Average).
L R4C4450 Setup G. Rev. C A5 size 7/18/00 Proof Sign-off: ABE K.Tsuno H.Kimura_______ H.Kimura _______ ABE J.Holmes _______ SAFETY.FM Pass 0 ENERGY STAR Compliance As an International ENERGY STAR Partner, EPSON has determined that this product meets the International ENERGY STAR Program guidelines for energy efficiency.
Proof Sign-off: ABE K.Tsuno H.Kimura_______ H.Kimura _______ ABE J.Holmes _______ R R4C4450 Setup G. Rev. C A5 size 7/18/00 SAFETY.FM Pass 0 If you need to fit a plug: As the colours of the mains lead of this appliance may not match any coloured markings used to identify the terminals in a plug, please proceed as follows: ❏ The green and yellow wire must be connected to the terminal in the plug which is marked with the letter E or the Earth symbol (G).
L R4C4450 Setup G. Rev. C A5 size 7/18/00 SAFETY.FM Pass 0 78 Safety Information Proof Sign-off: ABE K.Tsuno H.Kimura_______ H.Kimura _______ ABE J.
R R4C4450 Setup G. Rev. C Proof Sign-off: ABE K.Tsuno H.Kimura_______ H.Kimura _______ ABE J.Holmes _______ A5 size 7/18/00 4450SG.
L R4C4450 Setup G. Rev. C A5 size 7/18/00 4450SG.
EPSON OVERSEAS MARKETING LOCATIONS EPSON AMERICA, INC. EPSON UK LTD. 20770 Madrona Ave. Campus 100, Maylands Avenue, P.O. Box 2842 Hemel Hempstead, Herts, Torrance, CA 90509-2842 HP2 7TJ, U.K. Phone: (800) 922-8911 Phone: (+44) 01442 261144 Fax: (310) 782-5220 Fax: (+44) 01442 227227 EPSON DEUTSCHLAND GmbH EPSON FRANCE S.A. Zülpicher Straße 6, 68 bis, rue Marjolin 40549 Düsseldorf Germany 92300, Levallois-Perret, France Phone: (0211) 56030 Phone: 33.1.40.87.37.