What You should Know About Scanning
WHAT You SHOULD KNOW ABOUT SCANNING If you’re thinking about purchasing a scanner, you may already know some of the ways they can add visual interest and variety to all of your projects. You don’t have to be a graphic artist to inject extra punch in a special presentation, newsletter, or brochure. You’ve probably also heard that by using OCR (optical character recognition) software, the scanner can create an editable text file from any hard copy, such as a journal article, fax, or legal document.
SCANNER TECHNOLOGIES Several types of scanners are available; the list below summarizes some popular choices. FLATBED SCANNER Best suited for most business applications, this scanner looks similar to a desktop photocopier. You place a document on glass and close the cover, and the scan head moves underneath it along the “bed” of the scanner. Originally a gray scale technology, color models are now just as affordable, offering the widest range of uses in a desktop system.
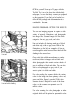
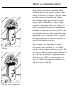
How SCANNERS WORK All scanners convert areas of light and dark into digital data for your computer. One of the most versatile scanners for general office use is the flatbed scanner. Scanning an image on a flatbed scanner is a lot like using a photocopier. Here’s how it works: ) 1 You place your document (a photo, book, or any image that you want to scan) face-down on the glass and close the cover.
A WORD ABOUT SOFTWARE Your scanner hardware works hand in hand with your software to produce data files. In fact, the most important aspect of getting great results with your scanner is understanding a little bit about the software that creates these files. The rest of this booklet presents software topics that will help you to understand the scanning process.
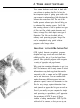
OCR for yourself. Scan up to 25 pages with the Try-Pak. Try it on a fax, have fun with the daily newspaper, or even that dusty resume you prepared on the typewriter. If you find you’re hooked, we offer the full package and documentation at a considerable discount. IMAGING PROGRAMS: PICTURE THE RESULTS You can use imaging programs to capture a wide variety of artwork, illustrations, and photographs into image files. Scanned images fall into three categories: line art, gray scale, and color.
RESOLUTION Resolution determines how many pixels, or dots, are used for scanning and reproducing an image. As the resolution value increases, the scanner reads and reproduces the image in finer detail. You might hear resolution described in terms of dots per inch (dpi), or pixels per inch (ppi). The best resolution setting really depends on the type of image you are scanning and the printing method. The table below shows optimum scanning resolutions for most needs.
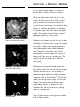
You’ll also notice that if you scan a color image at 600 dpi, the printed result is not much different from what it is if you scan the same image at 200 dpi, because all printers and printing presses reproduce the image as a series of dots and have their own maximum resolution. Here are two images, one scanned at 200 dpi, one at 600 dpi, output on the same device.
SELECTING A PRINTING METHOD You can print scanned images on a variety of devices. Here are three of the most common: Black and white printers (laser, ink jet, or dot matrix) like those used in most offices produce good to excellent text and line art but are not as good for gray-scale images. You might use these printers to reproduce photographs in newsletters or informal reports that don’t require the highest quality. The example to the left shows a typical photograph printed by a laser printer.
WHAT IS INTERPOLATION? Each flatbed scanner has a maximum optical resolution based on the physical number of light sensors in the bed. For example, a 400 dpi scanner has 400 sensors per horizontal inch. Despite this maximum value, many scanners can use a process called interpolation to achieve higher resolutions. Interpolation allows the software to make an educated guess based on mathematical probability to determine the value of pixels it can’t see and then insert these values in the final image.
ADJUSTING THE IMAGE Most scanning software offers a common group of scanning settings to help you get the results you want. Many also provide a preview function that lets you see a sample of what the finished scan will look like and check the settings. You may have to experiment a few times to get the results you want, but you’ll soon be adept at making minor adjustments to fine-tune your scanned image.
EDITING IMAGES TO MAKE YOUR MARK Gray scale image Dropout background Image editing software lets you manipulate a scanned image to fit your intended output device, or to change or repair an image. They work along the same principle as word processing programs, letting you delete things, move things around, or “clean up” a scanned image.
l l l Is computer performance slower than you’d like? Larger files take longer to process. See if there is an accelerator board or CPU or RAM upgrade available for your system. Do your video card and monitor support the resolutions you need to display high quality scanned images? Check the resolutions supported by your current video card to make sure it supports at least 256 colors. Consider changing the existing video card or adding a high resolution video or graphics card to boost performance.
ADDING OPTIONS TO YOUR SCANNER For the Epson dealer nearest you, call the Epson Connection at 1-800-922-8911.
EPSON