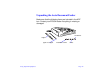
Using the Auto Document Feeder The auto document feeder (part number B813112) automatically loads multi-page documents into your scanner. It is particularly useful for OCR (optical character recognition) scanning or for creating an image database. To use the ADF with your OCR software, you must install EPSON TWAIN Pro.
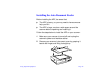
Unpacking the Auto Document Feeder Make sure that the following items are included in the ADF box. Contact your EPSON dealer if anything is missing or damaged.
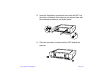
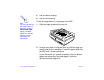
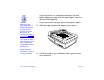
Installing the Auto Document Feeder Before installing the ADF, be aware that: ◗ The ADF is heavy, so you may need to have someone help you lift it. ◗ The ADF is large, so clear a wide space around the scanner before unpacking and installing it. Follow the steps below to install the ADF on your scanner: Using Optional Equipment 1 Make sure your scanner is turned off and unplug the scanner’s power and interface cables.
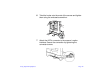
Using Optional Equipment 3 Insert the installation screws that came with the ADF into the holes in the back of the scanner and secure them with the enclosed screwdriver, as shown below. 4 Place the two knobs included with the ADF beside the scanner.
Place the ADF on the scanner, lining up the screws with the holes as shown. Warning: The ADF is heavy, so you may need to have someone help you lift it.
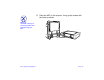
Using Optional Equipment 6 Twist the knobs onto the ends of the screws and tighten them using the enclosed screwdriver. 7 Attach the ADF’s connector to the scanner’s option interface. Secure the connection by tightening the connector screws.
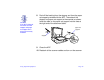
8 Caution: If the ADF misfeeds, first make sure the stopper and paper out support are in place and correctly installed. Peel off the backing from the stopper and from the paper out support provided with the ADF. Then attach the stopper and paper out support to the scanner as shown. Insert the tabs on the paper out support into the slots at the right end of the document table. paper out support stopper 9 Close the ADF. 10 Reattach all the scanner cables and turn on the scanner.
Loading Paper in the Auto Document Feeder Caution: Do not feed photographic sheets or valuable original artwork into the ADF; misfeeding may result in accidental wrinkling or damage to your original. The ADF can hold up to 30 sheets of the following paper sizes, based on a paper weight of 17 lb and a thickness of 0.2 inch (6.0 mm) or less: Paper size Direction A3, Ledger, B4, Legal, A4, Letter, B5, A5, Portrait 5.5 × 5.
◗ Has no carbon coating. ◗ Has no cut-out areas. Follow the steps below to load paper in the ADF: Note: You can automatically scan both sides of a document using the ADF-double sided setting in EPSON TWAIN Pro. See the software’s online user’s guide for instructions. 1 Slide the edge guides all the way out. 2 Arrange your stack of originals face up, with the page you want to scan first on the bottom. Insert the paper stack into the ADF until it meets resistance.
If your document is in landscape orientation (top and bottom edges are longer than the side edges), insert the document left edge first. Caution: When scanning high-quality color or halftone documents, it is best to open the ADF and scan documents as described in Loading documents manually. If your documents are large, pull out the paper support. 3 Slide the edge guides to the edges of your paper. 4 Follow the steps in your software’s user’s guide to scan your document.
Loading documents manually You can load documents manually while the ADF is installed. Open the ADF and place the document on the document table. Then close the ADF and scan the document as described in Scanner Basics.
Fixing Paper Jams in the Auto Document Feeder If a paper jam occurs, first open the ADF’s cover to determine where the paper jam occurred.
If paper jams in the feeder, open the cover on the left and slowly pull out the jammed paper as shown. (Be careful not to pull too hard or the paper may tear, making it more difficult to remove.
If paper jams in the paper eject position, open the cover on the right and slowly pull out the jammed paper as shown. (Be careful not to pull too hard or the paper may tear, making it more difficult to remove.) open cover pull paper out this way or this way After removing the jammed paper, close the ADF cover and reset the scanner by turning it off and on again or pressing the RESET button.
Adjusting the Scanning Position of the Auto Document Feeder If your document feeds into the ADF too far or not far enough, adjust the scanning position using the adjustment dials. This problem may occur if the stopper is not installed or not positioned properly on the document table, so first make sure the stopper is installed as described in Installing the Auto Document Feeder. To access the dials, slide open the dial cover on the rear of the ADF.
3 4 5 6 4 -5 - -3 -2 -1 0 1 2 mm 7 -7 6 -1 0 1 2 3 4 5 6 7 mm 4 -5 - -3 -2 The right dial controls where paper stops when it is first loaded from the feeder. The left dial controls where double-sided originals stop during scanning of the second side. -7 6 If the upper portion of the scanned image is missing, turn the dial clockwise. The position changes in 1 mm (0.04 inch) increments. If the lower portion of the scanned image is missing, turn the dial counterclockwise.