EPSON DYO™ 211 & 212 Dual Drive User’s Guide Printed on recycled paper with at least 10% post-consumer content.
IMPORTANT NOTICE DISCLAIMER OF WARRANTY Epson America makes no representations or warranties, either express or implied, by or with respect to anything in this manual, and shall not be liable for any implied warranties of merchantability and fitness for a particular purpose or for any indirect, special, or consequential damages. Some states do not allow the exclusion of incidental or consequential damages, so this exclusion may not apply to you. COPYRIGHT NOTICE All rights reserved.
Contents Introduction . . . . . . . . . . . . . . . . . . . . . . . . . . System Requirements . . . . . . . . . . . . . . . . . . . Where to Get Help . . . . . . . . . . . . . . . . . . . . . Unpacking the Drive . . . . . . . . . . . . . . . . . . . . . Installing the DYO Dual Drive . . . . . . . . . . . . . . . Installing the Controller Card . . . . . . . . . . . . . . . Installing the Drive . . . . . . . . . . . . . . . . . . . . . Connecting the Diskette Drive and Power Cables . . .
Introduction Your EPSON® DYO™ 211 or 212 dual drive combines a 1.44MB, 3.5-inch diskette drive and a full-function Type III PCMCIA (Personal Computer Memory Card International Association) drive socket. The dual drive fits into any standard half-height 5.25-inch drive bay. The diskette drive is power-saving and supports 3.5-inch double-sided, high- or double-density diskettes. The PCMCIA drive socket supports Type I, II, and III PC cards and is fully compatible with the PCMCIA Specifications Release 2.x.
Single-chip LSI design that integrates the control and read/write circuits, minimizes the number of components required, and ensures reliability. This manual explains how to install and configure your DYO dual drive. It does not cover MS-DOS,® Windows™ ‘95, OS/2® Warp, or the operation of PCMCIA card and socket services software; see the manuals that came with these programs for instructions.
Where to Get Help EPSON provides support and service through the EPSON ConnectionSM at (800) 922-8911. Call the EPSON Connection for the following: Technical assistance with the installation, configuration, and operation of EPSON products Assistance in locating your nearest Authorized EPSON Reseller or Customer Care Center Customer relations EPSON technical information library fax service Product literature on current and new products.
Unpacking the Drive When you unpack the drive, make sure you have these items: When you unpack the option card, try not to touch its components or the gold-edged connectors. If you need to set it down before you install it, place it gently on top of its original packing material with the component side facing up.
Installing the DYO Dual Drive This section explains how to install your DYO 211 or 212 dual drive into your computer. You will use the following procedures for installing the DYO dual drive. These procedures are described in detail in the sections that follow.
Depending on the drive configuration in your computer, you may need to remove an existing drive or option card before you install the DYO drive and PCMCIA controller card. For instructions on how to remove an option card or a drive, see the manual that came with your computer.
3. Locate the option slots on the computer’s system board, and remove the slot cover from one of the available 16-bit slots, as shown below. 4. Install the M-bit controller card by holding it at the top edge and carefully pushing the edge connector into the option slot, as shown below.
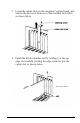
5. Secure the controller card to the computer using the screw you removed in step 3. Once the controller card is secure, you can install the dual drive. Installing the Drive before you can install the DYO dual drive, you must first remove the faceplate or existing drive from the half-height drive bay of the computer. See the documentation that came with your computer for information on how to remove a faceplate or a drive.
3. Position each PCMCIA ribbon cable connector so that the small tab in the middle of the connector aligns with the middle notch of each connector socket. 4. Make sure the holes in the ribbon cable connector fit over all the pins in the drive connector socket; then push in each cable connector. Caution Make sure you correctly align the holes with the pins, or you could severely damage the socket pins on the drive. 5.
Connecting the Diskette Drive and Power Cables Once the drive is installed, you need to connect the computer’s power supply cable and diskette drive ribbon cable to the drive. Follow the steps below along with the ones in your computer manual to connect a drive with these cables. 1. Identify pin 1 on the DYO diskette drive connector and align the diskette drive ribbon cable connector with it so that the red wire is at pin 1, as shown below. Push in the connector.
3. Position the power supply cable connector so that its red wire aligns with pin 1 of the power supply connector on the dual drive. Note If the computer’s power cable connector is too big for the power supply connector on the dual drive, connect the power cable connector to the adapter for the power supply connector (included with the dual drive), then connect the adapter to the power supply connector on the dual drive. 4. Make sure the connector holes fit over all the pins; then push in the connector.
Connecting the PCMCIA Controller Card Follow these steps to connect the PCMCIA ribbon cable to the PCMCIA controller card. 1. Locate the twin connector sockets on the DYO 211 or 212 PCMCIA controller card, as shown below. 12 2. Position the PCMCIA ribbon cable connectors so that the small tab in the middle of each connector aligns with the middle notch in each connector socket, as shown above. Then push in the cable connectors.
Post-installation Procedures Restart your computer to check that the DYO dual drive is correctly installed. You should see its lights turn on (continuous or flashing yellow). Then run the SETUP program to verify that the new 3.5-inch diskette drive is configured properly. See the manual that came with your computer for instructions on running the SETUP program.
If Windows ‘95 was already installed on your system when you installed the dual drive, you can use the Windows ‘95 Control Panel to configure your PCMCIA drive. Refer to the Windows ‘95 software documentation for instructions. Note As you configure your PCMCIA drive through the Control Panel, you will need to supply the name of the PCMCIA controller chip manufacturer. (The PCMCIA controller chip is mounted on the PCMCIA controller card.
You don’t hear any beeps when you insert a PC card The PC card is probably not inserted correctly. Remove it from the socket and inspect it for anything that could obstruct a connection. If you find an obstruction, remove it and reinsert the PC card firmly in the socket. If there is no obstruction, there may be a conflict with your computer’s memory manager. See your card and socket services documentation for instructions on how to handle memory manager conflicts.
You are not able to restart the computer from a PC card Your computer’s current BIOS ROM configuration does not support the option of starting a computer from a PC card. Restart the computer without the PC card installed.
3.5-inch drive Item Specification Storage capacity 1.44MB formatted Transfer rate 500 KB/sec Rotation speed 300 rpm Average seek time 95 ms Average latency 100 ms Power supply 5V Operating temperature 39°F to 113°F ( 4°C to 45°C ) Storage temperature -4° F to 149° F ( -20° C to 65° C ) Physical dual drive Item Specification Height 1.6 inches (41.5 mm) Width 5.75 inches (146.0 mm) Depth 7.56 inches (192.0 mm) Weight l.
Epson America (USA) Epson America, Inc. 20770 Madrona Avenue Torrance, CA 90509-2842 Tel: (310) 782-0770 Fax: (310) 782-5051 EPSON Connection Tel: (800) 922-8911 (in U.S.) (800) GO-EPSON (in Canada) EPSON DirectSM P.O. Box 2858 20770 Madrona Avenue Torrance, CA 90509-1111 Tel: (800) 374-7300 (310) 782-5478 Fax: (310) 782-4455 Epson America (International) 18 Epson Latin America Miami, FL, USA Tel: (305) 265-0092 Fax: (305) 265-0097 Epson Mexico, S.A. De C.V. Mexico, D.F.