PowerLite Home Cinema 1080.
PowerLite Home Cinema 1080.book Page 2 Tuesday, February 5, 2008 4:46 PM Copyright Notice All rights reserved. No part of this publication may be reproduced, stored in a retrieval system, or transmitted in any form or by any means, electronic, mechanical, photocopying, recording, or otherwise, without the prior written permission of Seiko Epson Corporation. The information contained herein is designed only for use with this Epson product.
PowerLite Home Cinema 1080.
PowerLite Home Cinema 1080.
PowerLite Home Cinema 1080.book Page 5 Tuesday, February 5, 2008 4:46 PM Problem Solving What To Do When the Lights Come On or Flash Solving Picture Problems Solving Remote Control Problems Where To Get Help Specifications General Lamp Remote Control Dimensions Electrical Environmental Safety Compatible Video Formats ESC/VP21 Command Codes Notices 55 55 56 59 60 61 61 61 61 62 62 62 62 63 65 Important Safety Information FCC Compliance Statement Declaration of Conformity Epson America, Inc.
PowerLite Home Cinema 1080.
PowerLite Home Cinema 1080.book Page 7 Tuesday, February 5, 2008 4:46 PM Introduction The PowerLite® Home Cinema 1080 projector lets you enjoy theater-quality images in the relaxing environment of your own home.
PowerLite Home Cinema 1080.
PowerLite Home Cinema 1080.
PowerLite Home Cinema 1080.
PowerLite Home Cinema 1080.book Page 11 Tuesday, February 5, 2008 4:46 PM Optional Accessories Epson provides the following optional accessories for the projector: Product Part number Replacement lamp V13H010L39 (ELPLP39) Air filter replacement V13H134A09 (ELPAF09) Projector mount ELPHB550 Kensington security lock (anti-theft device) ELPSL01 You can purchase accessories from an authorized Epson reseller. To find the nearest reseller, please call 800-GO-EPSON (800-463-7766).
PowerLite Home Cinema 1080.book Page 12 Tuesday, February 5, 2008 4:46 PM Using This Manual This book contains all the information you need to use the projector, in addition to basic setup and maintenance instructions, troubleshooting tips, important safety instructions, specifications, and warranty information. Please follow these guidelines as you read through the manual: Warning: Must be followed carefully to avoid bodily injury. Caution: Must be observed to avoid damage to your equipment.
PowerLite Home Cinema 1080.book Page 13 Tuesday, February 5, 2008 4:46 PM Setting Up the Projector Follow the instructions in this section to choose a location for the projector, connect the cables, and display an image. Choosing a Location You can install the projector for various viewing setups, as shown below.
PowerLite Home Cinema 1080.book Page 14 Tuesday, February 5, 2008 4:46 PM Ideally, place the projector at a height where its lens is between the top and bottom of the screen. That way, you can keep the projector level and use the vertical lens shift dial to position the image. This produces the best-looking picture. Try to be as close as possible to the calculated projector position when installing the projector. Too much lens shift can cause minor reduction in image dimensions.
PowerLite Home Cinema 1080.book Page 15 Tuesday, February 5, 2008 4:46 PM The maximum size of the image is determined by the distance from the projector’s lens to the screen. Depending on your display settings and how you use the Zoom ring, the actual size may be smaller. Use this table as a rough guide for projector placement: 16:9 aspect ratio Maximum diagonal image Projection distance size (width × height) Offset A to Offset B Horizontal Offset 2.8 to 6.2 feet 30 in. (26 × 15 in.) 6.8 to –6.8 in.
PowerLite Home Cinema 1080.book Page 16 Tuesday, February 5, 2008 4:46 PM Also keep these considerations in mind: ■ Make sure there is plenty of space for ventilation around and under the projector. Do not set the projector on top of loose materials that could block the vents underneath. ■ Make sure the projector is within 9.8 feet of a grounded electrical outlet or extension cord.
PowerLite Home Cinema 1080.book Page 17 Tuesday, February 5, 2008 4:46 PM The following illustrations show the dimensions of the projector: 5.18 in. 4.88 in. 5.63 in. 2.60 in. 0.75 in. 4.33 in. 15.98 in. 11.81 in. 2.08 in. 3.04 in. 12.20 in. 6.30 in. To install, you will need the optional projector mount designed for the projector. See page 11 for ordering information.
PowerLite Home Cinema 1080.book Page 18 Tuesday, February 5, 2008 4:46 PM In addition to the tools supplied with the projector mount, you will need a Phillips head screwdriver and a drill to use on the wall or ceiling. If you install the projector on the ceiling, you will need to invert the picture so that it appears right side up. Follow these steps: Menu button 1. Press the Menu button on the remote control. 2. Press the menu navigation buttons to open the Settings menu, then select Projection. 3.
PowerLite Home Cinema 1080.book Page 19 Tuesday, February 5, 2008 4:46 PM You can connect up to five pieces of video equipment at the same time, using any of the commercially available cables shown below: Port name Video equipment connection* HDMI Use an HDMI cable: Component Use a component video cable (with RCA-style connectors): Component video ports PC Computer connection* — Connect the cable to the three component video ports. Match corresponding colors between the cable and the ports.
PowerLite Home Cinema 1080.book Page 20 Tuesday, February 5, 2008 4:46 PM For best results, connect your video equipment to the HDMI (High-Definition Multimedia Interface) port, if possible. If your equipment doesn’t support HDMI, connect it to one of the following ports (highest quality listed first): Component (for component video), S-Video, or Video (for composite video).
PowerLite Home Cinema 1080.book Page 21 Tuesday, February 5, 2008 4:46 PM ■ The Trigger out port outputs a 12-volt DC signal when the projector is turned on. This lets a central control system monitor whether the projector is on or off, and can be used to raise or lower your projection screen automatically when the projector is in use. Connect a 3.5-mm mini jack to the port, as shown. Installing Batteries in the Remote Control The remote control uses two AA batteries.
PowerLite Home Cinema 1080.book Page 22 Tuesday, February 5, 2008 4:46 PM Turning the Projector On and Off Turning On the Projector 1. Remove the lens cap. 2. Turn on any connected equipment you plan to use. 3. Turn on the main power switch on the back of the projector. Power switch 4. Press the On button on the remote control or the P Power button on the projector. Turn on the projector Note: To prevent children from turning on the projector, you can use the Child Lock. See page 32 for details.
PowerLite Home Cinema 1080.book Page 23 Tuesday, February 5, 2008 4:46 PM Turning Off the Projector 1. Turn off any equipment connected to the projector. 2. Press the Off button on the remote control, or press the P Power button on the projector twice. 3. When the P Power light stops flashing orange and stays on, turn off the projector’s main power switch on the back. It is now safe to unplug the projector, if necessary. Caution: Turn off this product when not in use to prolong the life of the projector.
PowerLite Home Cinema 1080.book Page 24 Tuesday, February 5, 2008 4:46 PM If you press the Source button on the projector, you see a menu of available sources. Source button Press the u or d button to go up or down the menu, then press the Select button. Note: If an image does not appear, see “Problem Solving” on page 55. To temporarily turn off the image and darken the screen, press the Blank button on the remote control. Press the Blank button again to return to normal viewing.
PowerLite Home Cinema 1080.book Page 25 Tuesday, February 5, 2008 4:46 PM Positioning the Image If the image is not centered on the screen, use the horizontal and vertical lens shift dials to adjust its position. Caution: Do not try to move the lens by hand, or you may damage the projector. Always use the lens shift dials to change the lens position.
PowerLite Home Cinema 1080.book Page 26 Tuesday, February 5, 2008 4:46 PM The image display position cannot be moved to the maximum distance in both the vertical and horizontal directions. For example, the image cannot be shifted vertically when it has been shifted horizontally by the full amount. When the image has been shifted vertically by the full amount, it can be shifted up to 9 percent of the horizontal width of the screen.
PowerLite Home Cinema 1080.book Page 27 Tuesday, February 5, 2008 4:46 PM Making Basic Adjustments Follow the instructions in this chapter to make basic adjustments to the image shape, size, color, and quality. For further refinements, see “Making Detailed Adjustments” on page 33. Focusing and Zooming Sharpen or reduce the focus using the focus ring. Zoom into or out of the picture using the zoom ring.
PowerLite Home Cinema 1080.book Page 28 Tuesday, February 5, 2008 4:46 PM Choosing the Aspect Ratio In many cases, video signals are automatically resized to fit on your screen when Auto is selected as the Aspect setting. You may need to change the size of the image (or aspect ratio) for certain image types by pressing the Aspect button on the remote control.
PowerLite Home Cinema 1080.book Page 29 Tuesday, February 5, 2008 4:46 PM Choosing the Color Mode You can change the Color Mode to automatically adjust brightness, contrast, and color, letting you quickly optimize the projected image for various lighting environments. You can also select a different color mode for each input source—which is useful if you view different types of images from different sources.
PowerLite Home Cinema 1080.book Page 30 Tuesday, February 5, 2008 4:46 PM Adjusting Color Temperature, Skin Tone, and Gamma To further customize the color and image quality, you can adjust the Gamma, abstract Color Temperature, and Skin Tone settings using buttons on the remote control. (Not available when you’re projecting sRGB images.) Gamma button S. Tone button ColorTemp. button Note: You can fine-tune these and other color and image quality settings using the projector’s menu system (see page 33).
PowerLite Home Cinema 1080.book Page 31 Tuesday, February 5, 2008 4:46 PM Adjusting the Gamma Setting You can select from five gamma settings (2.0 to 2.4) or customize your own setting from your image or a displayed graph. Lower values will increase the contrast of dark areas, but tend to blur the bright areas. Higher values will darken the light areas. Gamma presets make minor adjustments to mid-tone values. The larger the gamma preset, the lower the midtone values.
PowerLite Home Cinema 1080.book Page 32 Tuesday, February 5, 2008 4:46 PM Locking the Projector The projector includes two lock settings to prevent the image from being accidentally changed once it’s adjusted, and to keep children from turning on the projector without adult supervision. To access the lock settings, follow these steps: 1. Press the Menu button on the remote control. 2. Use the menu navigation buttons to open the Settings menu. Menu button 3.
PowerLite Home Cinema 1080.book Page 33 Tuesday, February 5, 2008 4:46 PM Making Detailed Adjustments You can use the projector’s on-screen menus to make detailed adjustments to the image quality—such as the brightness, contrast, sharpness, and color. You can also change the menu display, sleep mode settings, and other projector features. Using the Menu System You can access the menu system either from the remote control or the buttons on the projector’s control panel.
PowerLite Home Cinema 1080.book Page 34 Tuesday, February 5, 2008 4:46 PM 5. When you’re finished, press the Esc button to return to the previous menu or press the Menu button to exit the menu system. To display one of the line menus of the Image menu, press the display like this at the bottom of the image: Select button. You see a Press the u or d button to highlight an option (if necessary), then press the l or r button to adjust it.
PowerLite Home Cinema 1080.book Page 35 Tuesday, February 5, 2008 4:46 PM Changing How the Menus Display Use these options to control how the menus display. ■ Language Settings > Language Select from 20 languages to use in the menu system. ■ Menu Position Settings > Display > Menu Position Use the arrow buttons to choose a position on the screen for displaying the menu. ■ Menu Color Settings > Display > Menu Color Select a color scheme for displaying the menus.
PowerLite Home Cinema 1080.book Page 36 Tuesday, February 5, 2008 4:46 PM ■ Brightness Image > Brightness Adjust the brightness so it’s suitable for your viewing conditions. For example, if you’re projecting in a brightly lit room or onto an especially large screen, you may need to increase the brightness. Decrease the brightness for dark rooms or small screens; this also reduces power consumption and fan noise, and helps to prolong the life of the lamp.
PowerLite Home Cinema 1080.book Page 37 Tuesday, February 5, 2008 4:46 PM ■ Brightness Control Image > Brightness Control This setting controls the light output from the projector. On high, the lamp uses 170 W of power. On low, the lamp uses 135 W. Sharpness and Picture Quality Settings If the image looks fuzzy, or if it contains noise or flickering, you can use these settings to correct it. ■ Sharpness Image > Sharpness Use this function to make lines and edges appear more distinct in the image.
PowerLite Home Cinema 1080.book Page 38 Tuesday, February 5, 2008 4:46 PM ■ Motion Detection Signal > Motion Detection This setting specifies how signals are converted to progressive signals. Select a lower setting for slow-moving or still images (S) or select a higher number for video images (M). Note: This setting applies only when viewing composite video, S-video, component video, or 480i or 575i RGB video. ■ Noise Reduction Signal > Noise Reduction This setting reduces flickering of analog images.
PowerLite Home Cinema 1080.book Page 39 Tuesday, February 5, 2008 4:46 PM ■ Skin Tone Image > Skin Tone Makes fine adjustments to the tint and controls the amount of magenta or green in the image. Also useful for correcting black-and-white images, if they look tinted. You can access this setting by pressing the S. Tone button on the remote control. See page 30 for more information. ■ RGB Image > Advanced > RGB Use the RGB settings to fine-tune the color of the image.
PowerLite Home Cinema 1080.book Page 40 Tuesday, February 5, 2008 4:46 PM Adjustments for Computer Images In addition to the settings described above, you can adjust the Tracking and Sync settings for analog RGB computer images. Normally, these settings are adjusted automatically by the projector. If you notice that the image is blurry or contains dark vertical bands, you may need to adjust the settings yourself.
PowerLite Home Cinema 1080.book Page 41 Tuesday, February 5, 2008 4:46 PM Selecting Memory Settings and Resetting the Projector Your projector comes with 10 memory locations for installers to save customized settings, designed to provide the best color quality for each of your video inputs. Selecting Memory Settings You can easily recall the memory settings by using the memory button on the remote control. 1. Press the Memory button on the remote control. 2. Select Load Memory. Memory button 3.
PowerLite Home Cinema 1080.book Page 42 Tuesday, February 5, 2008 4:46 PM Deleting Saved Memory Settings You can clear all your memory settings at once. 1. Press the Menu button on the remote control. 2. Open the Reset menu, then select Reset Memory. 3. Press the Select button to delete the memory settings. Note: You can delete memory settings one at a time with the Erase Memory setting under the Memory menu.
PowerLite Home Cinema 1080.book Page 43 Tuesday, February 5, 2008 4:46 PM 3. Do one of the following: ■ Select Reset Lamp Hours to clear the lamp usage timer and reset it to zero. You should reset the lamp timer only when you install a new projector lamp. See page 52 for more information. ■ Select Reset Memory to clear all memory settings. ■ Select Reset All to return all projector settings to their original defaults (except Component, Save Memory, Language, and Lamp).
PowerLite Home Cinema 1080.book Page 44 Tuesday, February 5, 2008 4:46 PM Screen Options ■ Messages Settings > Display > Messages Turn this setting off if you want to prevent on-screen messages from appearing (such as the no-signal message, or the identifying text that appears when you switch between image sources or color modes). ■ Startup Screen Settings > Display > Startup Screen Turn this setting off if you want to prevent the startup screen from appearing while the projector is warming up.
PowerLite Home Cinema 1080.book Page 45 Tuesday, February 5, 2008 4:46 PM ■ Component Settings > Input Signal > Component Change this setting to match the type of equipment connected to the Component port. For component video, select Auto to let the projector automatically interpret the signal; or select YCbCr or YPbPr to manually select your video equipment’s signal.
PowerLite Home Cinema 1080.
PowerLite Home Cinema 1080.book Page 47 Tuesday, February 5, 2008 4:46 PM Maintenance Your projector needs little maintenance. All you need to do on a regular basis is keep the lens clean. You also may need to clean the air filter to prevent overheating. Warning: Before you clean any part of the projector, turn it off and unplug the power cord. Never open any cover on the projector, except the lamp and filter covers. Dangerous electrical voltages in the projector can injure you severely.
PowerLite Home Cinema 1080.book Page 48 Tuesday, February 5, 2008 4:46 PM Cleaning the Projector Case Before you clean the case, turn off the projector and unplug the power cord. ■ To remove dirt or dust, wipe the case with a soft, dry, lint-free cloth. ■ To remove stubborn dirt or stains, moisten a soft cloth with water and a neutral detergent. Then wipe the case and dry it with a dry cloth. Caution: Never use wax, alcohol, benzene, thinner, or other chemical detergents. These can damage the case.
PowerLite Home Cinema 1080.book Page 49 Tuesday, February 5, 2008 4:46 PM 5. If you need to replace the filter, release the tab and lift up the cover. 6. Remove the old filter and replace it with a new one. 7. To replace the cover, insert the tabs and press down until the cover clicks into place.
PowerLite Home Cinema 1080.book Page 50 Tuesday, February 5, 2008 4:46 PM Replacing the Lamp The projection lamp lasts for up to 3000 hours. You can use the Info menu to check how long it’s been in use (see page 53). It’s time to replace the lamp when: ■ The projected image gets darker or starts to deteriorate. ■ The projector’s warning light flashes red at half-second intervals. ■ The message Replace the lamp appears on the screen when you start projecting.
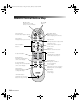
PowerLite Home Cinema 1080.book Page 51 Tuesday, February 5, 2008 4:46 PM 5. Press in the latches securing the lamp cover and lift off the cover. 6. Loosen the two screws securing the lamp (they don’t come all the way out). 7. Grasp the bottom of the lamp as shown and pull it straight out. Warning: The lamp(s) in this product contain mercury. Please consult your state and local regulations regarding disposal or recycling. Do not put in the trash.
PowerLite Home Cinema 1080.book Page 52 Tuesday, February 5, 2008 4:46 PM 8. Gently insert the new lamp and tighten its screws. Caution: Don’t touch the glass portion of the lamp assembly. Touching the glass could result in premature lamp failure. 9. Replace the lamp cover. (The projector won’t work if the lamp cover is open or loose.) 10. Reset the lamp usage timer, as described on page 52.
PowerLite Home Cinema 1080.book Page 53 Tuesday, February 5, 2008 4:46 PM Checking the Projector Status You can use the Info menu to view information about the current display settings and how long the projection lamp has been in use. To access the Info menu: 1. Press the Menu button on the projector or remote control. 2. Use the menu navigation buttons to open the Info menu.
PowerLite Home Cinema 1080.book Page 54 Tuesday, February 5, 2008 4:46 PM Transporting the Projector Note: Epson shall not be liable for any damages incurred during transportation. The projector contains many glass and precision parts. When shipping the projector for repairs, use the original packaging material if possible. If you do not have the original packaging, use equivalent materials. Be sure the carrier is capable of transporting fragile equipment and is aware that the projector is fragile.
PowerLite Home Cinema 1080.book Page 55 Tuesday, February 5, 2008 4:46 PM Problem Solving This section explains how to interpret the projector’s status lights, solve problems with the picture and remote control, and contact technical support. What To Do When the Lights Come On or Flash The lights on top of the projector indicate the projector’s status and let you know when a problem occurs.
PowerLite Home Cinema 1080.book Page 56 Tuesday, February 5, 2008 4:46 PM Light state Warning light is red Cause and solution The projector is too hot, which turns off the lamp automatically. Let it cool for five minutes, then turn it back on. Make sure there is plenty of space around and under the projector for ventilation. Also, clean or replace the filter if necessary (see page 48).
PowerLite Home Cinema 1080.book Page 57 Tuesday, February 5, 2008 4:46 PM You’re using a computer and no picture appears on the screen. If you’re using a Windows laptop: ■ Press the function key that lets you display on an external monitor. It’s often labeled with an icon such as , but it may also be labeled CRT/LCD. You may have to hold down the Fn key while pressing it. Check your laptop’s manual or online help.
PowerLite Home Cinema 1080.book Page 58 Tuesday, February 5, 2008 4:46 PM The picture is upside-down or reversed. Change the Projection setting in the Settings menu (see page 44). Only part of the picture is displayed, or the picture is distorted. ■ Press the Aspect button to select a different aspect ratio (see page 28). ■ If the Aspect is set to Zoom, you may need to use the Zoom Caption Pos. option to see the top or bottom section of the screen so that subtitles are visible (see page 43).
PowerLite Home Cinema 1080.book Page 59 Tuesday, February 5, 2008 4:46 PM ■ Make sure the lens is not fogged by condensation. If you’ve just moved the projector from a cold environment, wait a couple of minutes before using it. ■ Adjust the Sharpness setting (see page 37). ■ If you’re projecting from a computer, you may need to adjust the Tracking and Sync settings (see page 40). The colors on the screen don’t look right.
PowerLite Home Cinema 1080.book Page 60 Tuesday, February 5, 2008 4:46 PM Where To Get Help Internet Support Epson provides technical assistance 24 hours a day at epson.com/support. Here you can access troubleshooting information, download product documentation, and receive technical advice through e-mail. Speak to a Support Representative To use the Epson PrivateLine Support service, call (800) 637-7661 and enter the PIN on the Epson PrivateLine Support card that came with your projector.
PowerLite Home Cinema 1080.book Page 61 Tuesday, February 5, 2008 4:46 PM Specifications General Type of display Poly-silicon TFT active matrix Size of LCD panels 0.74 inch (18 mm) wide Lens F=2.0 to 3.17 Resolution (native format) 1920 × 1080 pixels, 1080p Brightness 1200 ANSI lumens maximum Dynamic contrast ratio 12000:1 Image size 30 to 300 inches Projection distance 2.8 to 62.8 feet (0.87 to 19.15 m) at 16:9 3.5 to 76.9 feet (1.06 to 23.44 m) at 4:3 Zoom ratio 1-2.
PowerLite Home Cinema 1080.book Page 62 Tuesday, February 5, 2008 4:46 PM Dimensions Height 4.9 inches (124 mm); not including adjustable feet Width 16 inches (406 mm) Depth 12.2 inches (310 mm); not including lens protrusion Weight 12.3 lb (5.6 kg) Electrical Rated frequency 50/60 Hz AC Power supply 100 to 120 VAC, 2.7 A 200 to 240 VAC, 1.
PowerLite Home Cinema 1080.book Page 63 Tuesday, February 5, 2008 4:46 PM Compatible Video Formats The projector supports analog video in NTSC, PAL, and SECAM formats, and it automatically adjusts to the incoming signal. It can receive these formats as composite video, S-video, or component video— which it accepts through the Video, S-Video, and Component ports, respectively. The projector also supports digital video (SDTV, HDTV) and various monitor display formats.
PowerLite Home Cinema 1080.
PowerLite Home Cinema 1080.book Page 65 Tuesday, February 5, 2008 4:46 PM ESC/VP21 Command Codes You can use an AV controller with a 9-pin null modem serial cable to control the projector. You can download the complete ESC/VP 21 Communication Manual for home theater projectors from the Epson website at epson.com/support.
PowerLite Home Cinema 1080.
PowerLite Home Cinema 1080.book Page 67 Tuesday, February 5, 2008 4:46 PM Notices Important Safety Information Follow these safety instructions when setting up and using the projector: ■ Never look into the projector lens when the lamp is turned on; the bright light can damage your eyes. Never let children look into the lens when it is on. ■ Never open any cover on the projector, except the lamp and filter covers. Dangerous electrical voltages inside the projector can severely injure you.
PowerLite Home Cinema 1080.book Page 68 Tuesday, February 5, 2008 4:46 PM ■ The lamp(s) in this product contain mercury. Please consult your state and local regulations regarding disposal or recycling. Do not put in the trash. ■ Allow the lamp to cool for one hour before replacing it. ■ Unplug the projector during lightning storms or when not in use for extended periods. ■ Don’t place the projector or remote control on top of heat-producing equipment.
PowerLite Home Cinema 1080.book Page 69 Tuesday, February 5, 2008 4:46 PM FCC Compliance Statement For United States Users This equipment has been tested and found to comply with the limits for a Class B digital device, pursuant to Part 15 of the FCC Rules. These limits are designed to provide reasonable protection against harmful interference in a residential installation.
PowerLite Home Cinema 1080.book Page 70 Tuesday, February 5, 2008 4:46 PM Declaration of Conformity According to 47CFR, Part 2 and 15 for Class B Personal Computers and Peripherals; and/or CPU Boards and Power Supplies used with Class B Personal Computers: We: Located at: Epson America, Inc.
PowerLite Home Cinema 1080.book Page 71 Tuesday, February 5, 2008 4:46 PM Epson America, Inc. Limited Warranty Basic Two-Year Warranty and 90-Day Lamp Warranty What Is Covered: Epson America, Inc.
PowerLite Home Cinema 1080.book Page 72 Tuesday, February 5, 2008 4:46 PM COVERED BY THIS LIMITED WARRANTY. EXCEPT AS PROVIDED IN THIS WRITTEN WARRANTY, NEITHER EPSON AMERICA, INC. NOR ITS AFFILIATES SHALL BE LIABLE FOR ANY LOSS, INCONVENIENCE, OR DAMAGE, INCLUDING DIRECT, SPECIAL, INCIDENTAL, OR CONSEQUENTIAL DAMAGES, RESULTING FROM THE USE OR INABILITY TO USE THE EPSON PRODUCT, WHETHER RESULTING FROM BREACH OF WARRANTY OR ANY OTHER LEGAL THEORY.
PowerLite Home Cinema 1080.book Page 73 Tuesday, February 5, 2008 4:46 PM Index A Abs. Color Temp.
PowerLite Home Cinema 1080.
PowerLite Home Cinema 1080.
PowerLite Home Cinema 1080.