
User's Manual


The monitor automatically selects which display mode to use. Its
microcontroller analyzes the signal input (horizontal and vertical sync
pulses) from the computer, checks the seven factory-set modes and
any user-defined modes (up to seven), and uses the most appropriate
mode in its memory. The signal input depends on your computer and
application software.
This section explains how to modify and recall factory-set display
modes and create user-defined display modes.
Note
The monitor accepts interlaced timing rates. However, interlaced modes are
not recommended because they may cause the image to flicker.
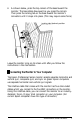
u
Modifying a Factory-set Display Mode
For each factory-set display mode, you can
change
any of six display
settings. The table below describes these settings and shows the
corresponding icon for each one. Refer to this table as you follow the
steps below.
Icon
Display
Function
setting name
[I
Operate
The selector switch should be in the operate position
when you are using your monitor as usual and not
modifying or creating a display mode.
i:(
Width
Wf
Adjusts the overall width of the image. Use the
increment button to increase the width and the
decrement button to decrease the width.
0
j%=J,
Horizontal
Centers the image horizontally. Use the increment
position
button to move the image right and the decrement
button to move the image left.
EJ
Height
Adjusts the overall height of the image. Use the
i
increment button to increase the height and the
decrement button to decrease the height.
Vertical
position
Centers the image vertically. Use the increment button
to move the image up and the decrement button to
move the image down.
12
Professional Series Monitor