EPSON ® EPSON P-1000 Quick Reference Guide Quick Reference Guide CPD-17374 Printed in USA Printed in USA CPD-17374
P-1000 Parts P-1000 Control Panel ACCESS light PRINT button Flashes orange briefly when you turn on the P-1000 or access data Displays the Print menu Eject button MENU button Displays the Pop-up menu Memory card slot Arrow button Power switch Press , , , or to select a photo or an option in a menu Activity light Flashes during power on and off, printing, and certain other operations CANCEL button CHARGE light Flashes green when the battery is being charged Cancels the current operation and retu
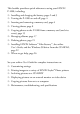
This booklet provides a quick reference to using your EPSON P-1000, including: ❍ Installing and charging the battery, pages 2 and 3 ❍ Turning the P-1000 on and off, page 4 ❍ Inserting and removing a memory card, page 6 ❍ Viewing photos, page 8 ❍ Copying photos to the P-1000 from a memory card (and vice versa), page 13 ❍ Managing albums, page 17 ❍ Deleting photos, page 21 ❍ Installing EPSON Software™ Film Factory™, the online User’s Guide, and the Windows 98 driver from the CD-ROM, page 22 ❍
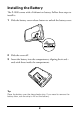
Installing the Battery The P-1000 comes with a Lithium-ion battery. Follow these steps to install it: 1 Slide the battery cover release button to unlock the battery cover. 2 Slide the cover off. 3 Insert the battery into the compartment, aligning the + and – ends with those inside the compartment. Tip: Place the battery over the clear plastic strip. If you need to remove the battery later, use the strip to lift out the battery.
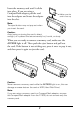
4 Replace the battery cover. 5 Slide the battery cover release button as shown below to lock the cover. Charging the Battery After installing the battery, you need to charge it using the AC adapter. Connect the AC adapter to the P-1000 as shown. Connect the other end to an electrical outlet. Caution: Do not connect the AC adapter when the battery is not installed; this can damage the P-1000.
A fully charged battery lasts about 1 hour, depending on how you use the P-1000. The CHARGE light flashes while the battery is being charged. When the battery is fully charged, the CHARGE light turns off. It takes about 3.5 hours to fully charge the battery. Note: Although the full battery icon (see the next page) may appear before 3.5 hours, leave the AC adapter connected for the entire 3.5 hours to ensure the battery is fully charged.
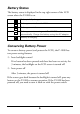
Battery Status The battery status is displayed in the top right corner of the LCD screen when the P-1000 is on. Battery is fully charged. Battery power is about half full. Battery power is low. Battery power is running out. The P-1000 is shut down automatically. Charge the battery using the AC adapter. Battery is charging.
To change the number of minutes for these settings, follow these steps: 1 From the Main Menu, select Settings and press the OK button. 2 Then press u or d on the arrow button to select Power Save. You see this menu: Power Save Settings Auto backlight control duration: 1 min 5 min Auto power off duration: 1 min 10 min The LCD screen goes dark when Photo Viewer is idle for this period of time. Press OK to apply the setting and return to the previous screen.
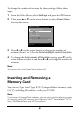
Insert the memory card until it clicks into place. If you are using a CompactFlash adapter, put the card into the adapter and insert the adapter into the slot. Make sure the card is face up Note: The eject button may not pop out when you insert the card. Caution: Avoid using or storing the card in direct sunlight, or in places that are extremely hot, humid, or dusty. When you are ready to remove a memory card, make sure the ACCESS light is off. Then push the eject button and pull out the card.
Viewing Photos The P-1000 can display JPEG images of up to 6 megapixels, with an aspect ratio of 6:1. Note: Progressive JPEG format files, non-JPEG images, some black and white or CMYK images, video files, or sound files cannot be displayed or played on the P-1000. However, it is possible to copy these files to the P-1000’s HDD (for temporary storage). RAW images from some digital cameras may be supported by the P-1000.
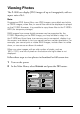
You see the Browse menu: Shows albums in the P-1000’s Album Case Shows memory card folders in the P-1000’s Card Case Browse Album Case Card Case Memory Card Shows images on a memory card installed in the P-1000 CD-R/RW Press OK to browse the Album Case. Shows images, albums, or folders on the CD-R/RW attached to the P-1000 The Album Case contains albums you have created to organize your photos. (See page 17 for more information about albums.) The Card Case contains memory card folders.
4 If necessary, select a folder or album and press OK. Storage location Folder or album Device or storage icon 1 2 3 20021218.001 20021218.003 20021218.004 Thumbnail of first photo Press OK to browse this card folder. Press Cancel to return to the previous screen. When you open an album or folder, you see thumbnail versions of all the photos. Note: Any unsupported file types are displayed with this icon: .
Accessing the Pop-up Menu While you are looking at your photos, you can press the MENU button to display a Pop-up menu which lets you access a variety of functions.
Running a Slide Show To run a slide show of photos stored in an album, follow these steps: 1 In the Main Menu, select Slide Show and press the OK button. 2 Select the album you want and press the OK button to start the slide show. It continues until you press the CANCEL button. Main Menu Browse Copy to the HDD Slide Show Settings Copy to CD-R/RW Start album slide show. Press OK to continue.
Press u or d on the arrow button to select one of the options and then l or r to change the setting. ❍ Slide show effect Select ON for this option to fade from one photo to the next. Select OFF if you do not want this effect. Note: When this setting is ON, the slide show duration setting is invalid. ❍ Slide show duration If Slide Show Effect is turned off, you can set the length of time you want each image to remain on the screen before switching to the next.
Copying Photos From a Memory Card to the P-1000 You can copy all the photos from a memory card to a folder in the P-1000’s Card Case or to an album in the Album Case. This is an easy way to make a backup of the photos on your card. Then you can delete the photos on the card so you have room for more. Note: If the battery is low when you try to copy files, they may not be copied correctly. Use the AC adapter if this happens. Some screens may not appear if you’ve changed the Copy Mode settings.
4 If you see this screen, select the album in which you want to store the copied photos. Then press the OK button. Copying starts and you see this message: Note: The screen may go blank, but the ACCESS light will continue to flash while the photos are being copied. Copy to the HDD Copying all files in the memory card to the 20030214.001 in the Card Case. ... Press the Cancel button to cancel copying. The copied images are stored in a card folder in the Card Case (and in an album if you selected one).
Copying Photos From the P-1000 to a Memory Card You can copy individual photos or complete Card Case folders from your P-1000 to a memory card. Although you cannot copy an album this way, you can copy individual photos from an album. If you will be copying individual photos, it’s okay if the memory card already contains photos—as long as there is enough space to hold the new ones you will copy. If you are copying a Card Case folder, the memory card must be empty.
Managing Photos in Albums You can group your favorite images in an album which is stored in the P-1000’s Album Case. An album named Favorites already exists as a default. You can add photos to this album and other albums as you like. You can also create up to three album shortcuts on the Main Menu to access your favorite albums quickly. For details, see page 20. Follow the steps in this section to copy individual photos or complete folders to an album.
If you want to create a new album select New from the list, and press the OK button. You see this screen: Copy to Album Select one of the following: Favorites 4 Select an album name from the list (you can scroll down to see more), and press the OK button. After you press OK, the photo is copied. Family Travel Hobbies Christmas Press OK to select the option. Press Cancel to return to the previous screen.
Changing an Album’s Name If you want to change the name of an album, follow these steps: 1 Select the album in the Album Case. 2 Press the MENU button to display the Pop-up menu: 3 Select Change Album Name and press the OK button. Delete Copy All Christmas Images to Album Travels Slide Show Lock Return to Main Menu Hide Unsupported Files Change Album Name Select to Delete Copy to Album Select one of the following: 4 Select the new name from the list, and press the OK button.
Adding an Album Shortcut You can create shortcuts that let you go straight to your three favorite albums. 1 First select the photo you want to use as the album thumbnail picture. To do this, open the album you want the shortcut for and select a photo to be the thumbnail. Note: You can’t create a shortcut to an album that was copied from your computer or a CD-ROM. 2 Press the MENU button to display the Pop-up menu. 3 Select Set as the Album Thumbnail and press the OK button.
Deleting Photos There are several ways to delete a photo, folder, or album. The easiest way is to select the item and then hold down the MENU button for several seconds. When you see the message “Are you sure you want to delete the files?”, select Yes to delete or No to cancel. You can also delete an individual photo, folder, or album as follows: 1 Select an image, folder, or album to delete.
3 Use the arrow button to choose Select to Delete and press the OK button. A trash can icon appears in the thumbnail for the folder or album. 4 Repeat step 3 for any other items you want to delete. 5 When you finish marking the items you want to delete, press the MENU button to display the Pop-up menu and select Delete. You see the message Are you sure you want to delete the files? 6 Select Yes to delete them or No to cancel and press the OK button.
Installing Film Factory 1 Insert the P-1000 CD-ROM into your CD or DVD drive. The CD automatically opens. If it doesn’t open, double-click the EPSON CD-ROM icon. If you’re using a Macintosh, double-click the EPSON Installer icon. 2 Select Install EPSON Software Film Factory, then click . 3 Follow the instructions on the screen to complete the installation. 4 Click to close the P-1000 installer.
Viewing and Installing the P-1000 User’s Guide The CD includes an online User’s Guide with detailed instructions on using the P-1000. You can view the P-1000 User’s Guide from the CD-ROM or you can install it on your computer and view or print it from there. The User’s Guide is a PDF manual, which requires Adobe® Acrobat® Reader or Preview (on Macintosh OS X) to view it. 1 Insert the P-1000 CD-ROM into your CD or DVD drive. The CD automatically opens. If not, double-click the EPSON CD-ROM icon.
Installing the USB Driver for Windows 98 Before you connect the P-1000 to a computer running Windows 98, you need to install a USB driver. If you connect your P-1000 to your computer and see this screen, click the CANCEL button. Click Cancel Follow these steps to install the driver. 1 Insert the P-1000 CD-ROM into your CD or DVD drive. The CD automatically opens. If not, double-click the EPSON CD-ROM icon. 2 Select EPSON P-1000 USB Driver, then click .
Resetting the P-1000 If the P-1000 locks up (stops working) or you want to restore the default values, you can reset it. Press the RESET button with a thin object. RESET button The P-1000 shuts off, resets its default values and comes back on. Cleaning the P-1000 Follow these guidelines when cleaning the P-1000: ❍ Turn the P-1000 off before cleaning. ❍ Use a clean, dry cloth to wipe it clean. ❍ Do not use harsh or abrasive cleaners. ❍ If necessary, clean the battery contacts with a dry cloth.
Contacting EPSON EPSON provides technical assistance 24 hours a day through the electronic support services and automated telephone services listed below: ❍ World Wide Web From the Internet, you can reach EPSON Support at http://support.epson.com. At this site, you can download drivers and other files, look at product documentation, access troubleshooting information, and receive technical advice through e-mail.
All rights reserved. No part of this publication may be reproduced, stored in a retrieval system, or transmitted in any form or by any means, electronic, mechanical, photocopying, recording, or otherwise, without the prior written permission of SEIKO EPSON CORPORATION. The information contained herein is designed only for use with this EPSON product. EPSON is not responsible for any use of this information as applied to other products.
P-1000 Parts P-1000 Control Panel ACCESS light PRINT button Flashes orange briefly when you turn on the P-1000 or access data Displays the Print menu Eject button MENU button Displays the Pop-up menu Memory card slot Arrow button Power switch Press , , , or to select a photo or an option in a menu Activity light Flashes during power on and off, printing, and certain other operations CANCEL button CHARGE light Flashes green when the battery is being charged Cancels the current operation and retu
EPSON ® EPSON P-1000 Quick Reference Guide Quick Reference Guide CPD-17374 Printed in USA Printed in USA CPD-17374