Perfection 2450.
Perfection 2450.book Page ii Tuesday, September 18, 2001 3:16 PM Copyright Notice All rights reserved. No part of this publication may be reproduced, stored in a retrieval system, or transmitted in any form or by any means, electronic, mechanical, photocopying, recording, or otherwise, without the prior written permission of SEIKO EPSON CORPORATION. The information contained herein is designed only for use with this EPSON scanner.
Perfection 2450.
Perfection 2450.
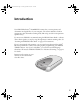
Perfection 2450.book Page 1 Tuesday, September 18, 2001 3:16 PM Introduction Your EPSON Perfection® 2450 PHOTO scanner lets you turn pictures and documents into digital files on your computer. The scanner includes a built-in transparency unit that makes scanning slides, film strips, and other transparencies quick and easy. For most scans, EPSON® recommends using the EPSON Smart Panel™ software. This software guides you step-by-step through many common scanning tasks.
Perfection 2450.
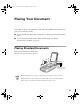
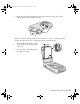
Perfection 2450.book Page 3 Tuesday, September 18, 2001 3:16 PM Placing Your Document Depending on what you’re planning to scan, follow the guidelines in this chapter to place your document correctly: ■ To scan standard (opaque paper) documents, see “Placing Standard Documents” below. ■ To scan transparent media such as slides and film strips, see “Placing Transparencies and Film” on page 4. Placing Standard Documents Place your document face down on the scanner, as shown, then close the cover.
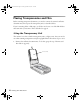
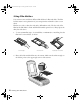
Perfection 2450.book Page 4 Tuesday, September 18, 2001 3:16 PM Placing Transparencies and Film Before scanning transparent documents, you need to remove the scanner’s reflective document mat; this exposes the transparency unit, as described below. If you’re scanning slides or film strips, you’ll also need to use one of the film holders that came with your scanner. This is described on page 6.
Perfection 2450.book Page 5 Tuesday, September 18, 2001 3:16 PM 2. Make sure the cable is plugged into the round connector. If not, turn off the scanner and connect the cable, as shown. When you’re done scanning transparencies and want to return to scanning standard (opaque) documents, be sure to replace the reflective document mat: 1. With the white side facing toward you, partially insert the lower tabs as shown. 2. Insert the upper tabs fully until the mat clicks into place.
Perfection 2450.book Page 6 Tuesday, September 18, 2001 3:16 PM Using Film Holders Your scanner comes with three different film holders for film and slides. The film holders ensure correct placement of your transparencies and make it easier to scan them. Film has two sides, a shiny base side and a dull emulsion side. The base side of the film has the film maker’s name and film ID numbers printed on it. Always place the shiny base side down. 1.
Perfection 2450.book Page 7 Tuesday, September 18, 2001 3:16 PM If you’re scanning 35-mm slides, set the holder on the scanner first, then place the slides in the holder.
Perfection 2450.
Perfection 2450.book Page 9 Tuesday, September 18, 2001 3:16 PM Scanning with EPSON Smart Panel You can use EPSON Smart Panel’s easy, step-by-step applications to help you with your most common scanning needs: ■ Use the Copy function like a copy machine to scan and print copies of newspapers, magazine articles, or handwritten letters. (For photos, use Photo Print.) ■ Use Scan to E-mail to scan a photo or letter and include it in your e-mail.
Perfection 2450.book Page 10 Tuesday, September 18, 2001 3:16 PM Smart Panel Basics Follow these steps to scan with EPSON Smart Panel: 1. Turn on the scanner by pressing the P Power button. 2. Place your photo(s) face down on the scanner, then close the cover. (If you place multiple photos, make sure that their edges do not touch.) 3.
Perfection 2450.book Page 11 Tuesday, September 18, 2001 3:16 PM See the following sections in this chapter to learn more about specific Smart Panel features. You can also find more information in the EPSON Smart Panel online help. An update to the Copy application is available on the Scanner Software CD-ROM (Windows users only). For installation instructions, see the Read Me file in the Copy Utility 2.0 folder on the CD-ROM. You can also check the NewSoft web site at www.newsoftinc.
Perfection 2450.book Page 12 Tuesday, September 18, 2001 3:16 PM Follow these steps to assign a new function to the ] Start button: 1. Open EPSON Smart Panel as described on page 10. 2. Select the application you want to assign to the ] Start button, as shown below. select the application you want the ] Start button to open The ] icon appears next to the selected application on screen. The next time you press the ] Start button, that application automatically opens.
Perfection 2450.book Page 13 Tuesday, September 18, 2001 3:16 PM Scanning to E-mail Scan to E-mail automatically scans your document and includes it in an e-mail. Your e-mail program must be MAPI-compliant—for example Microsoft Exchange or Outlook. See your e-mail documentation for details. AOL® is not a MAPI-compliant e-mail program. To send a photo using AOL, scan it and save it as a file as described on page 24, then attach it to an e-mail and send it. Follow these steps to use Scan to E-mail: 1.
Perfection 2450.book Page 14 Tuesday, September 18, 2001 3:16 PM 5. EPSON Smart Panel opens. Click Scan to E-mail. Scan to E-mail The application automatically scans your image. If you’d rather scan in Manual mode so you can adjust your scan settings, click Cancel. (See page 30 for instructions on selecting TWAIN settings.) After adjusting your settings, close EPSON TWAIN and continue with step 6. 6. When the scan completes, the Scan to E-mail dialog box opens.
Perfection 2450.book Page 15 Tuesday, September 18, 2001 3:16 PM 7. Select your e-mail program and then click Launch. (You only need to select your e-mail program the first time you use EPSON Smart Panel. For subsequent scans, it is automatically selected.) select your e-mail program click Launch 8. An e-mail dialog box opens with your photo(s) attached. Enter the recipient’s e-mail address, type in a message, and then click Send.
Perfection 2450.book Page 16 Tuesday, September 18, 2001 3:16 PM Some e-mail programs, such as Outlook Express, do not immediately send the e-mail, but instead place it in an “outbox.” To send the e-mail, you must launch the e-mail program and then click Send/Recv. See your e-mail program’s documentation for more information. Send and Receive Outbox Scanning and Printing with Photo Print Photo Print lets you scan and make high-quality printouts of your photographs.
Perfection 2450.book Page 17 Tuesday, September 18, 2001 3:16 PM 4. EPSON Smart Panel opens. Click Photo Print. Photo Print 5. The application confirms you have a printer installed on your system. Then EPSON TWAIN automatically scans your image. 6. When the scan completes, the EPSON Photo Print screen appears and your scanned image automatically prints. If you want to verify or change the paper and print size settings, cancel the scan; then select your paper and print size.
Perfection 2450.book Page 18 Tuesday, September 18, 2001 3:16 PM Scanning to the EPSON PhotoCenter With Scan to Web, you can scan photos and upload them to the EPSON PhotoCenter at http://photo.epson.com. The EPSON PhotoCenter is a free photo-sharing site that allows you to: ■ store, organize, and share your photos ■ print high-resolution photos straight from the Web ■ order prints and custom photo gifts.
Perfection 2450.book Page 19 Tuesday, September 18, 2001 3:16 PM 6. EPSON Smart Panel opens. Click Scan to Web. Scan to Web 7. The application opens, then EPSON TWAIN automatically scans your image. If you’d rather scan in Manual mode so you can adjust your scan settings, click Cancel. (See page 30 for instructions on selecting TWAIN settings.) After adjusting your settings, close EPSON TWAIN and continue with step 8.
Perfection 2450.book Page 20 Tuesday, September 18, 2001 3:16 PM 8. When the scan completes, the Scan to Web dialog box opens. ■ Select USA under Site Name, and enter the same User ID (e-mail address) and Connection Password you used when you registered at the EPSON PhotoCenter. (You only need to do this once. For subsequent scans, these are automatically selected.) ■ Click Upload. The photos upload to the EPSON PhotoCenter.
Perfection 2450.book Page 21 Tuesday, September 18, 2001 3:16 PM 9. When the upload completes, a message prompts you to confirm your upload. Click OK to connect to the EPSON PhotoCenter. Under Member Sign In, enter your e-mail address and password, and then click go. Member Sign In box 10. You are automatically logged into the EPSON PhotoCenter and receive a message stating that you have new photos in your Photo Inbox. Click Photo Inbox to view your photos.
Perfection 2450.book Page 22 Tuesday, September 18, 2001 3:16 PM 11. If you want others to see your photos, you must move them to an album. Select the photos you want to share. Either select them individually by clicking Select photo for each picture or click Select All to select them all. select an album or create a new one select all photos or select them individually 12. Select the album you want to move your photos to. Then click Move or Copy to move the photos to the album.
Perfection 2450.book Page 23 Tuesday, September 18, 2001 3:16 PM Sharing Your Photos Now your friends and family can view the photos you’ve uploaded to the EPSON PhotoCenter. Have them visit http://photo.epson.com, enter your e-mail address under Visit Albums, then click go. your friends and family enter your e-mail address here Your friends and family can view the photos in the shared albums you’ve created.
Perfection 2450.book Page 24 Tuesday, September 18, 2001 3:16 PM Scanning a Photo to a File You can scan a photo directly to a file. This is useful for: ■ creating files to attach to an e-mail ■ archiving your photos as digital files ■ distributing your photos to friends and family. Follow these steps to scan a photo to a file: 1. Turn on the scanner by pressing the P Power button. 2. Place your photo(s) face down on the scanner, then close the cover.
Perfection 2450.book Page 25 Tuesday, September 18, 2001 3:16 PM EPSON TWAIN automatically scans your image. If you’d rather scan in Manual mode so you can adjust your scan settings, click Cancel. (See page 30 for instructions on selecting TWAIN settings.) After adjusting your settings, close EPSON TWAIN and continue with step 5. 5. When the scan completes, the Scan to File dialog box opens. If you want to scan more photos, place them on the scanner, close the cover, and then click Scan More.
Perfection 2450.book Page 26 Tuesday, September 18, 2001 3:16 PM 6. At the next dialog box, you may specify a file path and file format. When you’re finished, click Save. The photo is saved in your selected folder. The file path is the location where the file is saved. If you are not going to use the default path (My Documents), be sure to use a path that is easy to remember. Bitmap is the default file format in Windows. JPEG is the default file format on Macintosh.
Perfection 2450.book Page 27 Tuesday, September 18, 2001 3:16 PM Advanced Scanning If you’re experienced with scanning, you can scan from Adobe Photoshop Elements (which comes with your scanner) or nearly any other graphics program. Once you’ve opened your graphics program, you have to choose the scanner software you want to scan with. The standard software that comes with your scanner is EPSON TWAIN. If you’ve installed LaserSoft Imaging SilverFast SE, you can use it instead of EPSON TWAIN.
Perfection 2450.book Page 28 Tuesday, September 18, 2001 3:16 PM Scanning from an Application Follow the instructions below to scan from an image-processing application. Selecting the Scanner Source (Windows only) The first time you open your application in Windows, you have to select the scanner “source” you want to scan with. This is normally EPSON TWAIN (the standard software that comes with your scanner), but if you’ve installed SilverFast SE, you can select it instead.
Perfection 2450.book Page 29 Tuesday, September 18, 2001 3:16 PM Scanning Your Image To start you scan, follow these steps: 1. Turn on the scanner by pressing the P Power button. 2. Place your photo(s) face down on the scanner, then close the cover. (If you place multiple photos, make sure that their edges do not touch.) 3. In your image-processing software, open the File menu and choose Import, then TWAIN_32 (Windows) or EPSON TWAIN 5 (Macintosh).
Perfection 2450.book Page 30 Tuesday, September 18, 2001 3:16 PM Using EPSON TWAIN When you scan with EPSON TWAIN, the default mode is Full Auto and the software automatically selects the settings for your image type. EPSON TWAIN also has a Manual mode that lets you select the settings yourself, as described below.
Perfection 2450.book Page 31 Tuesday, September 18, 2001 3:16 PM 4. Manually adjust settings in the EPSON TWAIN window in the following order: 1 Select the basic settings: Document Source Image Type Destination Resolution 3 Automatically set the scan area for your image using Auto Locate 4 Size or scale the image 2 Preview your image 5 Customize your exposure and use color management 6 Scan the image into your application 5.
Perfection 2450.book Page 32 Tuesday, September 18, 2001 3:16 PM Using SilverFast SE You can use SilverFast SE as an alternative to the standard EPSON TWAIN software that comes with your scanner. The easiest way of scanning with SilverFast SE is to use ScanPilot.® This utility guides you through the best sequence of steps for achieving a professional-looking image. The first time you open SilverFast, you have to enter the serial number printed on the label on your Scanner Software CD-ROM sleeve.
Perfection 2450.book Page 33 Tuesday, September 18, 2001 3:16 PM 3. Click to prescan your image. 4. Follow the remaining steps as indicated by ScanPilot. When you’re done, SilverFast closes and your completed image appears in your image-processing application. You can select or de-select which tools are offered by ScanPilot. Click the Prefs button to customize your selections. For more information on using SilverFast SE, click help.
Perfection 2450.book Page 34 Tuesday, September 18, 2001 3:16 PM Recommended Settings Getting the best scan depends on several factors, including the quality of your original and the resolution you select. The better your original is, the better your scan will be. You can make many corrections in your scanning software (EPSON TWAIN or SilverFast SE). For additional photo retouching, use an image editing program such as Adobe Photoshop Elements.
Perfection 2450.book Page 35 Tuesday, September 18, 2001 3:16 PM Problem Solving This chapter gives you the basics for diagnosing and solving scanner problems. For more troubleshooting tips, see the “Troubleshooting” section of your electronic Reference Guide. Scanner Light The scanner’s indicator light (next to the ] Start button) indicates the status of the scanner, as described below. Light Color Status Flashing Green The scanner is initializing (warming up) or is busy scanning.
Perfection 2450.book Page 36 Tuesday, September 18, 2001 3:16 PM Problems and Solutions If you’re having problems, this section answers some of the most common questions. Setup Problems You are unable to install EPSON TWAIN in Windows 2000. Your system doesn’t recognize the scanner or the indicator light doesn’t come on. ■ In Windows 2000, don’t select Block under Control Panel, System, Hardware, Driver Signing; select Ignore or Warn instead.
Perfection 2450.book Page 37 Tuesday, September 18, 2001 3:16 PM For Windows 2000 users: Scanner Problems 1. Make sure your scanner is plugged in and connected to your computer. The fluorescent lamp isn’t on. ■ The scanner has a power saving function (sleep mode); press the ] Start button to “wake” the scanner. ■ Make sure the power cord is plugged into an electrical outlet and you’ve turn on the scanner using the P Power button. 2.
Perfection 2450.book Page 38 Tuesday, September 18, 2001 3:16 PM You’re having trouble scanning while using the transparency unit. ■ Make sure the transparency unit cable is connected to the round port on the back of the scanner. ■ If you’re scanning in Manual Mode on a Macintosh, the “stopwatch” icon may not change back to a cursor after scanning is complete. The cursor returns to normal after you close EPSON TWAIN.
Perfection 2450.book Page 39 Tuesday, September 18, 2001 3:16 PM of the image is blurred, part of your document may be wrinkled or warped. ■ Try scanning at a higher resolution. See page 34 for recommended settings. ■ Make sure the document table glass is clean. See your electronic Reference Guide for details. ■ Make sure the scanner is not tilted or placed on an unstable or uneven surface. darker. Adjust the marquee (frame border) in the preview window so none of the film holder is selected.
Perfection 2450.book Page 40 Tuesday, September 18, 2001 3:16 PM ■ The document table has non-readable areas around the edges. If your document extends beyond the limits marked on the document table edge guides, reposition your document so it is within the readable area. The scanner doesn’t recognize your image type when scanning in Full Auto mode. Try scanning the image again. If that doesn’t work, scan in Manual mode (see page 30 for instructions). The image does not look the same as the original.
Perfection 2450.book Page 41 Tuesday, September 18, 2001 3:16 PM Where To Get Help For More Information There are several sources of information for your scanner, including printed materials, help utilities, and electronic manuals. Here’s where to look for help: ■ Scanner Basics This manual contains scanning instructions, troubleshooting information, system requirements, safety instructions, and your warranty.
Perfection 2450.book Page 42 Tuesday, September 18, 2001 3:16 PM EPSON Technical Support EPSON provides technical assistance 24 hours a day through the electronic support services and automated telephone services listed in the following table: Service Access World Wide Web From the Internet, you can reach EPSON Support at http://support.epson.com.
Perfection 2450.book Page 43 Tuesday, September 18, 2001 3:16 PM Software Support Software Telephone Fax Online and E-mail EPSON TWAIN driver U.S. (562) 276-4382 (800) 922-8911 fax-on-demand system http://support.epson.com Canada (905) 709-3839 EPSON Smart Panel (510) 445-8616 (510) 445-8601 tech@newsoftinc.com LaserSoft Imaging SilverFast SE (941) 383-7496 9:00 AM to 5:30 PM, EST, Monday through Friday (941) 387-7574 support@SilverFast.
Perfection 2450.
Perfection 2450.book Page 45 Tuesday, September 18, 2001 3:16 PM Requirements and Notices This chapter includes system requirements, safety instructions, and other important information about your EPSON Perfection scanner. System Requirements The minimum system requirements for Windows and Macintosh are listed below. For optimum performance, a faster processor and more memory are recommended.
Perfection 2450.book Page 46 Tuesday, September 18, 2001 3:16 PM Macintosh You cannot use a serial interface to connect the scanner. ■ For USB: Apple Macintosh computer (G3, G4, or iMac™) with built-in USB port, running Mac® OS 8.5 to 9.X For IEEE 1394 (FireWire): Power PC-equipped Macintosh with Mac OS 8.6 to 9.X If using FireWire, make sure Apple’s FireWire 2.1 (or later) software is installed on your system. Check the Apple web site for any updates to your operating system.
Perfection 2450.book Page 47 Tuesday, September 18, 2001 3:16 PM Important Safety Instructions Read all of these instructions and save them for later reference. Follow all warnings and instructions marked on the scanner. ■ Place the scanner close enough to the computer for the interface cable to reach it easily. ■ Place the scanner near an electrical outlet where the power cord can be easily unplugged.
Perfection 2450.book Page 48 Tuesday, September 18, 2001 3:16 PM ■ Unplug the scanner and refer servicing to qualified service personnel under the following conditions: If the power cord or plug is damaged; if liquid has entered the scanner; if the scanner has been dropped or the case damaged; if the scanner does not operate normally or exhibits a distinct change in performance. (Do not adjust controls that are not covered by the operating instructions.
Perfection 2450.book Page 49 Tuesday, September 18, 2001 3:16 PM WARNING: The connection of a non-shielded equipment interface cable to this equipment will invalidate the FCC Certification of this device and may cause interference levels which exceed the limits established by the FCC for this equipment. It is the responsibility of the user to obtain and use a shielded equipment interface cable with this device.
Perfection 2450.book Page 50 Tuesday, September 18, 2001 3:16 PM Declaration of Conformity According to 47CFR, Part 2 and 15 for Class B Personal Computers and Peripherals; and/or CPU Boards and Power Supplies used with Class B Personal Computers: We: EPSON America, Inc.
Perfection 2450.book Page 51 Tuesday, September 18, 2001 3:16 PM kind and quality. Epson’s liability for replacement of the covered product will not exceed the original retail selling price of the covered product. Exchange or replacement products or parts assume the remaining warranty period of the product covered by this limited warranty. What This Warranty Does Not Cover: This warranty covers only normal use in the United States and Canada.
Perfection 2450.
Perfection 2450.
Perfection 2450.