Printed on recycled paper with at least 10% post-consumer content.
A Note Concerning Responsible Use of Copyrighted Materials Like photocopiers, scanners can be misused by improper copying of copyrighted material. Although Section 107 of the U.S. Copyright Act of 1976 (Title 17, United States Code), the “fair use” doctrine, permits limited copying in certain circumstances, those circumstances may not be as broad as some people assume.
Introduction This package contains everything you need for professional quality document scanning and processing: ❑ EPSON® Personal Document Station (ES-300GS) scanner, which scans in 8-bit monochrome grayscale at up to 400 dpi and includes a built-in document feeder and an attachable business card guide ❑ SCSI system cable ❑ e•Paper Document Management & Archival Suite for the Apple® Macintosh,® an integrated software package providing file creation and management, optical character recognition (OCR)
This booklet tells you how to set up your scanner, install the software, and scan a document. For additional instructions, see the manual for the ES-300GS scanner, Balloon Help, and the manual and on-line help utilities for the e•Paper Document Management & Archival Suite.
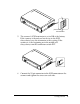
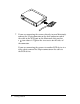
Setting Up the Scanner Follow the steps below to set up the scanner and connect it to the SCSI port on your Macintosh or to another SCSI device. The SCSI cable included with the scanner has a 25-pin connector on one end and a dual 25-/50-pin connector on the other. 50-pin connector for an additional device 25-pin connector to the scanner 1. Take the scanner out of its box and place it on a flat, stable surface with the rear panel facing you. 2.
plus button minus button 5. The scanner’s SCSI terminator is set to ON at the factory. If the scanner is the only or last device in the SCSI daisy-chain, leave the terminator at this setting. If the scanner is at the beginning or in the middle of a daisy-chain, turn the terminator switch OFF. 6. Connect the 25-pin connector to the SCSI connector on the scanner and tighten the screws on each side.
. If you are connecting the scanner directly to your Macintosh, connect the 25-pin connector on the dual-connector end of the cable to the SCSI port on the Macintosh; this port has a icon above it. Tighten the two screws on the sides of the connector. If you are connecting the scanner to another SCSI device in a daisy-chain, connect the 50-pin connector on the cable to the SCSI device.
. Connect the scanner’s power cable to the power inlet on the rear of the scanner and plug the other end into a grounded electrical outlet. 9. Raise the scanner cover. 10. Turn on the scanner by pressing the | side of the power switch, which is on the back of the scanner. The green Power light on the top right side of the scanner comes on. The Ready light flashes while the scanner warms up.
11. Turn on any other external devices you will use before you turn on the Macintosh. (Always turn on the scanner before turning on the computer.) The scanner’s Ready light goes out when you turn on the computer, flashes for a moment, and then comes on again once the computer boots. Installing the e•Paper Software Suite Before you install the e•Paper software suite, it’s a good idea to make backup copies of your disks.
8. Click Install into Hard disk. Follow the prompts on the screen to complete the installation and restart your Macintosh. (Once installed, e•Paper will reside in a folder on the desktop.) After installation, a small floating window will appear on your screen. This window resides in the background awaiting document tasks. The ‘e’ icon on the window shows you the current status of your scanner at a glance. See your software guide for more information.
3. Flip down the two paper guides to the operating position, as shown below. 4. Fan the edges of your document if you are scanning multiple pages; then level the stack by tapping it on a flat surface. 5. Hold the document with the side to be scanned facing down and guide it into the scanner’s document feeder, as shown.
6. Adjust the paper guides to fit the width of the paper. The scanner automatically feeds the first page of your document to the scanning position. Note: If e•Paper is not currently running, first make sure that the scanner’s Ready light is on. Then open the e•Paper folder and double-click the e•Paper program icon. The following floating window appears. e•Find: Click here to search for an archived e•Paper document. Control/Status Icon: Shows the condition of your scanner. 7.
Note: After cropping an image, the new settings are used to scan the remaining pages of your document. You may need to reset the cropping area before scanning additional pages of your document. See your e•Paper user’s guide for more information. 9. To stop a scan in progress, hold down the command key and type a period (.). You can also cancel the scan in progress by clicking the cancel button. 10. After scanning a document, you can save it by selecting Save from the File menu.
Where to Get Help EPSON provides customer support and service through a network of Authorized EPSON Customer Care Centers and provides the following services when you dial (800) 922-8911: ❑ EPSON Fax-On-Demand technical information library ❑ Product literature on current and new products ❑ Assistance in locating your nearest Authorized EPSON Reseller or Customer Care Center ❑ Technical information on the installation, configuration, and operation of EPSON products ❑ Customer relations.
World Wide Web If you are connected to the Internet and have a Web browser, you can access EPSON’s World Wide Web site at http://www.epson.com. EPSON’s home page links users to What’s New, EPSON Products, EPSON Connection,SM Corporate Info, and EPSON Contacts. Link to the EPSON Connection for the latest drivers and FAQs (Frequently Asked Questions) and the EPSON Chat area. To get in touch with EPSON around the world, EPSON Contacts includes contact information for local EPSON subsidiaries.
EPSON Forum on CompuServe® CompuServe members can access the Epson America Forum on CompuServe. If you are already a member, simply type GO EPSON at the menu prompt to reach the forum.If you are not currently a member, you are elibible for a free introductiory membership as an owner of an EPSON product. This membership entitles you to: ❑ An introductory credit on CompuServe ❑ Your own user ID and password ❑ A complimentary subscription to CompuServe Magazine, CompuServe’s monthly publication.