Snap. Print. Enjoy. Using PictureMate Without a Computer CPD-19367R1 Printed in XXXXXX XX.
Contents Welcome! . . . . . . . . . . . . . . . . . . . . . . . . . . . . . . . . . . . . . . . . . . . . . . . . . . . . . . . . . . . . . . . . . . . . . . . . . 2 Prepare to Print . . . . . . . . . . . . . . . . . . . . . . . . . . . . . . . . . . . . . . . . . . . . . . . . . . . . . . . . . . . . . . . . . . . . 5 Choose Photos to Print . . . . . . . . . . . . . . . . . . . . . . . . . . . . . . . . . . . . . . . . . . . . . . . . . . . . . . . . . . . . . . 8 Do More With Your Photos . . . . . . . . .
Welcome! PictureMate® Deluxe Viewer Edition is your easy-touse, personal photo lab. Just insert a digital camera memory card and you’re ready to print brilliant, longlasting photos. Because PictureMate is light and portable, you can print whenever and wherever you take pictures. Plus, your PictureMate photos are archival; generations from now your PictureMate prints will be as vibrant as they are today.
Special Features Printing with your PictureMate becomes even easier with these special features: From the PictureMate photo selection menu, you can print all your photos by simply pressing the Print button. Or you can select just the ones you want. Photo selection menu (See page 10.) You can crop photos right from PictureMate—no computer required. (See page 17.
Supported Photo Formats JPEG TIFF Make sure your photos meet these requirements for printing with your PictureMate (without a computer): ● JPEG files or uncompressed TIFF files only ● Resolutions ranging from 80 × 80 to 4600 × 4600 pixels PictureMate recognizes and prints the first 999 photos on your memory card. To use PictureMate with your Macintosh® or Windows® PC, see Using PictureMate With a Computer. It explains how to install the software and connect to your computer.
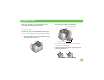
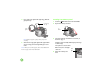
Prepare to Print Before you can print, you need to load paper and insert your memory card in PictureMate. 2 Open the paper support and output tray. Open paper support Loading Paper Follow these steps to load PictureMate Photo Paper: Caution: Don’t load plain paper; this may damage PictureMate. 1 Move the handle to the back and down. Then tilt up the photo viewer screen. Open output tray Note: Keep the handle all the way down when printing, to allow paper to feed through.
4 Place your paper against the right edge, with the glossy side up. Load glossy side up Inserting Your Memory Card 1 Press the 2 Open the memory card door. On button Edge guide Note: Make sure paper is glossy side up to prevent smearing. 5 3 Insert the memory card into the correct slot, as shown on page 7. Push the card in carefully until it stops (it won’t go in all the way). Slide the left edge guide against the paper. Make sure it is snug, but not so tight that paper can’t move.
Now you are ready to choose your photos and start printing (see page 9). Top: Removing Your Memory Card SmartMediaTM xD Picture CardTM xD Picture Card Type M When you are ready to remove a memory card, make sure the card light is not flashing, then pull the card straight out of the slot. Caution: Do not remove a card while the card light is flashing; you may lose photos on your card.
Choose Photos to Print PictureMate’s photo viewer screen makes it easy to select the photos you want to print.
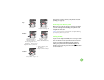
Printing All Photos When you turn on PictureMate, you see the photo selection menu on the photo viewer screen. The red or orange bar at the top of the screen indicates the currently selected option. 1 2 If you want more than 1 copy of each picture, press the or button to select the number of copies. You can also press the Menu button to adjust settings if necessary. See page 17 for more information. 3 Press the Print button.
You see the first photo on your memory card: Note: If your card has more than 20 photos, you will need to reload paper while printing. Load a maximum of 20 sheets at a time. When you see a message that paper is out, load more paper and press OK to continue printing. If you need to cancel printing, press Cancel. Printing Individual Photos You can easily view the photos on your memory card and select just the ones you want to print.
The blue box indicates the area that will print. If you want to adjust this area, press the button. Then press or to move the box. Press OK, then press OK again. You can press or to review the photo or photos you have selected. If you change your mind, press Back. 7 If you want to adjust the brightness, saturation, or sharpness of the photo, press the Menu button. See page 23 for more information. 5 6 Printing a Range of Photos Repeat steps 3 and 4 for all the photos you want to print.
2 Press the OK button. You see small thumbnail images of your photos: 5 Make sure the photos you want to print are outlined in blue, then press OK. 3 Press or to choose the first photo you want to print. Then press OK. The photo outline changes from orange to blue. 6 Press or to select the number of copies you want for each photo. 4 Press or to choose the last photo you want to print. All your selected photos have blue outlines.
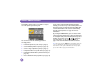
Printing Photos by Date You can print photos taken on specific dates. If you have a lot of photos on your memory card, this makes it easier to find the ones you want. 1 At the photo selection menu, press the button to highlight Print by Date. 2 Press the OK button. You see a list of dates: You see one of the photos taken on each date next to the date. 3 Press press or to highlight the date you want, then to select the date. A checkmark appears in the box for the date you selected.
2 number of copies). See page 17 for more information. 7 Press the Print button. You see the Print Confirmation. 8 Make sure you have enough paper loaded, then press Print again to start printing. Press the OK button. You see the first photo on your memory card. Note: All frames are designed to work with horizontal or “landscape” oriented photos. 3 Press or to select the photo you want to print in a frame. Then press OK.
You see your photo in the frame you selected. Viewing a Slideshow of Your Photos You can have PictureMate display all the photos on your card one by one. 6 ● If you want to select a different frame, press Back and repeat step 3. ● If your photo doesn’t quite fit in the frame, you can crop it and adjust the picture area. Press Back twice, then press the button and follow the instructions on page 18. Press or 1 At the photo selection menu, press the button to highlight Play Slideshow.
Printing Camera-Selected DPOF Photos If your camera supports DPOF (Digital Print Order Format), you can use it to pre-select which photos and how many copies you want to print. See your camera’s manual to choose photos for printing with DPOF, then insert your memory card in PictureMate. PictureMate automatically reads your preselected photos and displays this message: Storing and Displaying Your PictureMate Prints Photos printed on PictureMate Photo Paper are beautiful, long-lasting images.
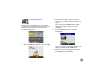
Do More With Your Photos By pressing the Menu button, you can choose from a variety of layouts, add the time or date, print in black and white or sepia, and fix photos that are too light or dark. You can use the button to crop your photos or zoom in for a closer look. You can use the button to zoom out. Note: The features described in this section do not change or replace the original digital photo file; they customize only the print(s) you make at that time.
Note: You can use the arrow buttons to move the box up or down and select the exact portion of your image that will be printed. 3 4 18 5 If you are ready to print, press OK. You see your photo with the zoom setting you selected. Set the area you want to print (or view) as follows: ● Press the button to zoom in and crop out more of the photo. ● Press the button to zoom out and crop less of the photo. ● Press , , , or to move the orange box to a different part of your photo.
8 Make sure you have enough paper loaded, then press Print again to start printing. 3 Press or to highlight the layout setting you want for your photo(s), then press OK. Choosing a Layout By default, your photos are printed at the full 4 x 6 size, without borders. If you want to print pictures with white borders or place several small photos on one sheet of paper, you can use the Layout menu. Note: When you print without borders, your images are automatically expanded and cropped around the edges.
For example, if you want 3 mini wallet photos of one image and 4 of another, select 3 copies for photo A and 4 copies for photo B. Then choose Mini Wallets as the layout setting. Your photos will be printed on 2 sheets of paper as shown: 4 5 Make sure you have enough paper loaded, then press Print again to start printing. Printing Photos in Black and White or Sepia Press OK again. You see your photo (or one of your photos) labeled with the setting you chose.
3 Press or to select Black & White or Sepia, then press OK. The color effect you select will be applied to all photos in the current print job. When you no longer want to use it, you need to go back to the Color Effects menu and select a different setting. 4 Press OK again to close the menu. You see your photo with the color effect you selected: 6 Make sure you have enough paper loaded, then press Print again to start printing.
3 Press or settings: to choose one of the following ● mmm.dd.yyyy (Sep.01.2005) ● dd.mmm.yyyy (01.Sep.2005) ● yyyy.mm.dd (2005.09.01) 4 Press OK. 5 To print the time, press to highlight Time Stamp, then press to open the menu. 6 Press or settings: Press the Print button. You see the Print Confirmation showing the settings you selected: to choose one of the following ● 12-hour system (03:00 for 3 pm) ● 24-hour system (15:00 for 3 pm) 7 Press OK.
Fixing Photos PictureMate lets you correct the color and improve the image quality of your photos without using a computer. Two types of adjustments are available: ● Note: These settings affect only your printed pictures. They do not change your original image files. Automatically Fixing Your Photos 1 After selecting the photo(s) and number of copies you want, press the Menu button. 2 Press the or then press the 3 Make sure Auto Correct is highlighted, then press .
4 Press or to choose one of the options: Manually Fixing Your Photos ● P.I.M./Exif: This information helps ensure an accurate image reproduction for files that include P.I.M. or Exif Print data. Manual corrections apply only to individual photos. You can select different settings for each photo in a print job. ● Enhance: This setting improves your photos’ colors and increases contrast and sharpness. It may correct images that are too dark, too bright, or backlit.
6 Repeat steps 3 and 4 for the other settings if necessary. Press OK again to close the menu. You see your photo with your chosen settings applied. 7 Press the Print button. You see the Print Confirmation: 8 Make sure you have enough paper loaded, then press Print again to start printing.
Save Your Photos to a Computer or an External Device You can save photo files on your memory card to a computer when you connect it to PictureMate with a USB cable. You can also save photos to an external device that you connect directly to PictureMate. Note: Even if you have the optional battery, you still need to connect the AC adapter when transferring files.
3 If you are using a CD-R/RW drive or Zip drive, plug it into an electrical outlet if required. 4 Connect the drive to PictureMate: ● ● For a flash memory drive, plug it into the EXT/IF port on the back of PictureMate. For a CD-R/RW or Zip drive, connect its USB cable to the EXT/IF port on the back of PictureMate. Then insert a CD-R or Zip disk in the drive. Note: If you insert a blank CD-R in the drive before inserting a memory card in PictureMate, you may see an error message.
7 Select Back Up. You see this message: You can save photos multiple times to the same disk or drive until it is full. Each time you save photos on the same disk or drive, they are saved in a new folder. The first folder is named 001, the second folder is named 002, and so on. If you save on a CD-R, PictureMate names the CD-R Photo. 8 Press OK to start saving your photos. Note: PictureMate checks to make sure there is enough free space for your photos.
Print From a Computer or an External Device PictureMate can print photos stored on a computer or on another device such as an external hard drive, a Bluetooth-enabled device, or a digital camera. Printing From a Computer You can connect PictureMate directly to your computer with a USB cable, then print photos that are stored on your computer. See Using PictureMate With a Computer and the on-screen User’s Guide for details.
You can also print photos from a CD that you get from a photo processing lab. (Images should be in JPEG or uncompressed Tiff file format. Some CDs may not work.) 1 Make sure PictureMate is on. 2 Make sure there are no memory cards in PictureMate’s memory card slots. The memory card light should be off. Note: If a memory card is inserted, the printer will read photos from the card, not from an external drive. 3 If PictureMate is connected to a computer, disconnect it or turn off the computer.
You see this message: Printing From a PictBridge-Enabled Camera You can connect your PictBridge- or USB DP-enabled digital camera to the back of PictureMate and use the camera to control printing. (Check your camera manual to see if it supports the PictBridge standard or USB DP.) 1 Make sure PictureMate is on. 2 Make sure there are no memory cards in PictureMate’s slots. The card light should be off. Press or to choose the folder where your photos are stored, then press OK.
8 Connect your camera’s USB cable to your camera and the EXT/IF port on the back of PictureMate. Note: While PictureMate complies with the Bluetooth specification, it is not guaranteed to work with all devices enabled with Bluetooth wireless technology. Also, make sure your photos meet the requirements listed on page 4. 1 Make sure PictureMate is on but not printing. Caution: Do not connect the Bluetooth Photo Print Adapter while PictureMate is printing; this may cause PictureMate to malfunction.
4 Make sure you are within about 30 feet of PictureMate, then select the photo you want to print from your Bluetooth PDA, cell phone, computer, or other device and send it to PictureMate as follows: ● For Windows, send photos directly to PictureMate with your Bluetooth file sharing program. See the documentation included with your computer’s Bluetooth adapter for details on setting up Bluetooth file sharing and sending files. ● For a Macintosh with Mac OS® X 10.
Replace Ink and Paper When PictureMate is low on ink or you are out of paper, it’s time to buy a PictureMate Print Pack, which contains a new photo cartridge and photo paper. This section tells where to buy one and how to replace the used photo cartridge. When PictureMate needs a new photo cartridge, you see a message on the photo viewer screen. Tip: If you see a message while printing, you can still replace the photo cartridge and continue the current print job.
Removing the Used Photo Cartridge 4 Open the cartridge door on the back of PictureMate. 5 Move the photo cartridge lever to the Release position by sliding it in the direction shown. This releases the cartridge. Make sure you have a new PictureMate photo cartridge before you begin. Once you start replacing a cartridge, you must complete all the steps in one session. Caution: Before you replace the cartridge, read the “Photo Cartridge Safety Instructions” on page 61.
6 Carefully pull out the cartridge and dispose of it properly. (For appropriate disposal, check local resources for recycling guidelines.) Inserting the New Photo Cartridge 1 Caution: Don’t touch the small green circuit board. Install the photo cartridge immediately after you remove it from its package. If you leave a cartridge unpacked for a long time before using it, normal printing may not be possible. Warning: Keep ink cartridges out of the reach of children and do not drink the ink.
3 Slide the cartridge straight into the slot, label side up, until it is fully inserted. Push in both sides evenly to make sure it is not crooked. 4 Note: The cartridge won’t go in all the way. You need to use the photo cartridge lever to lock it in place. If either side is sticking out, remove the cartridge and reinsert it so it is straight. Right Move the lever right to the Lock position. If it does not lock in place, the cartridge is crooked; remove it and try again. (See step 3.
If the door does not close completely, the cartridge is not installed correctly. Remove it and try again. 6 Lower the handle. Checking the Photo Cartridge Status (Ink Level) You can check the approximate amount of ink in your photo cartridge at any time. 1 Press the Menu button. 2 Press the or button to select Maintenance, then press to open the menu. 3 Press the or button to select Cartridge Status, then press . You can see the approximate ink level displayed on the photo viewer screen.
Take Your PictureMate With You PictureMate’s handle makes it easy to carry short distances. If you have the optional battery, you can use PictureMate just about anywhere, even if an electrical outlet is not available. 4 Push down the top of the paper support and close it against PictureMate. Then close the output tray and lower the screen. 5 Disconnect the power cord and any connected USB cable from the back of PictureMate.
6 Pack PictureMate along with its power cable and adapter in the box that PictureMate came in, or in the optional carrying case. Caution: Make sure the photo cartridge is installed. Do not remove the photo cartridge before transporting. Don’t place PictureMate on its side or upside down, or ink may leak. Installing the Battery 1 Make sure PictureMate is turned off. 2 Unplug the AC adapter from PictureMate. 3 Open the battery cover on the back of the printer.
5 6 Make sure the battery is pushed in all the way so that it locks into place as shown: Charging the Battery After you install the battery, you need to charge it by connecting the AC adapter and plugging in the printer. Close the battery cover. The power light flashes during charging when PictureMate is off. It takes about 2 hours to fully charge the battery when PictureMate is off. It takes longer when you use PictureMate while it is charging.
The following battery status icons appear in the upper right corner of the photo viewer screen: Charging 1/3 full Full Low 2/3 full Almost out Removing the Battery If there is a problem with your battery, or you want to replace it with one that is already charged, you may need to remove the battery. 1 Make sure PictureMate is turned off. 2 Open the battery cover. 3 Flip down the gray tab on the battery and pull it straight out. 4 Close the battery cover.
Set PictureMate Preferences You can change the way PictureMate works by using the Setup menu.
3 Press press or to select Display Preference, then . Adjusting Borderless Expansion and Cropping When you print borderless pictures, your images are automatically expanded and cropped. If your pictures are cut off around the edges, you can adjust the amount of expansion and cropping. 4 Choose the setting you prefer, then press OK. 5 Continue pressing OK to exit the menu. 1 At the photo selection menu, press the Menu button. 2 Press or to highlight Setup, then press open the menu.
5 Continue pressing OK to exit the menu. If you see white lines on the edges of your photos after printing with the MIN setting, repeat steps 1 to 3 and select MID or MAX. Turning Print Confirmation Off or On When Print Confirmation is On and you press the Print button, you see a screen that lets you confirm your selected photos, the number of copies, layout, and other settings. Then you press Print again to start printing.
The Print Confirmation setting remains in effect until you change it again or reset the default preferences (see page 48). 4 Press or to choose from the following settings, then press OK: ● Ask each time: Lets you choose whether to save your selections after each print job. Determining Whether to Keep Selections After Printing ● Always Keep: Save your selections each time you print.
You see the Photo Viewer Adjustment screen: 4 Press or to adjust the contrast of the screen, then press OK. 5 Continue pressing OK to exit the menu. 1 At the photo selection menu, press the Menu button. 2 Press or to highlight Setup, then press open the menu. 3 Press or then press to to select Personal Settings Wizard, . Selecting Your Personal Settings You can reset the PictureMate settings to the ones you prefer.
The Top screen setting determines which selection mode (such as Print All or Print Some) is highlighted when you first turn on PictureMate. You can return your personal settings to the PictureMate original default settings. At the photo selection menu, press the Menu button. 2 Press or to highlight Setup, then press open the menu. 3 Press or then press 48 Press OK to restore the original settings, or press Back to go back to the menu without restoring the settings.
Printer Care and Troubleshooting If you have problems with your PictureMate, or you want to improve print quality, read these sections: ● Cleaning the print head (on the right) ● Aligning the print head (on page 51) ● Error messages and warnings (on page 52) ● Printing and operation problems (on page 54) ● Photo quality problems (on page 55) ● Problems with paper feeding (on page 56) ● Miscellaneous printout problems (on page 57) ● Where to get help (on page 58) Cleaning the Print Head If yo
4 Make sure Clean Print Head is selected, then press . You see this message: 6 To make sure the nozzles are clean, load a sheet of photo paper, then press OK. 7 When you see the message, press Print to print the nozzle check. 8 Check the pattern to see if there are any gaps in the lines. OK 5 Press the OK button to begin cleaning the print head. Cleaning takes about 40 seconds.
Aligning the Print Head 4 Press the Print button. The following alignment patterns are printed: 5 Look at the printed squares to determine which one in each set is the most even, with no streaks or lines. (You may need to use a magnifying glass.) 6 Press or to highlight the number for the best square (1 to 9) in set #1. Then press to move to #2. 7 Press or to highlight the number for the best pattern (1 to 9) in set #2.
8 After you have entered the number for the best square in each set, press OK. PictureMate aligns the print head and displays a message when alignment is done. Note: The numbers that you enter become the default settings (#5) the next time you align the print head. 9 Press Back or OK to return to the Maintenance menu. Message Load or remove and reload paper in the paper support, and press the OK button to clear this message. The printer resumes printing. See page 5 for loading instructions.
Message What to Do Message What to Do The inserted card cannot be used with this printer. See your printer manual for help. Use a compatible memory card. Format the card with your camera, not a computer. See the card types you can use on page 6. The file types on the card might not be supported. See page 4. The battery temperature is abnormal. Turn the power off, then wait until the battery temperature decreases.
Insufficient space on the backup device. Backup cannot be performed. Insert a new CD or Zip disk or delete files to make more space. No memory card in slot. Stopping backup. Insert the memory card that contains the photos you want to back up. Printing and Operation Problems The Power light is off. ● If you’re using the optional battery, PictureMate will automatically turn off after 15 minutes if it is not being used. Press the On button to turn it back on.
PictureMate sounds as though it is printing, but nothing prints. ● PictureMate may be preparing to print. ● Make sure the print head nozzles are not clogged. To clean the print head, see page 49. ● PictureMate won’t work properly if it’s tilted or at an angle. Place it on a flat, stable surface that extends beyond the printer base in all directions. ● Make sure paper is not jammed and is loaded correctly so it can feed into PictureMate. Make sure the handle is not resting on the paper.
● The print head may need aligning; see page 51. Your printout is blurry or smeared. Colors in your photo are wrong or missing. ● Make sure the Color Effects setting is set to Color for color photos. See page 20. ● The print head may need cleaning; see page 49. ● Use PictureMate Photo Paper to ensure proper saturation, absorption of ink, and quality. ● Make sure you load paper with the glossy side face up. ● The photo cartridge may be old or low on ink. To replace the cartridge, see page 34.
● If paper doesn’t feed, remove it from the paper support, reload it against the right edge, then slide the left edge guide against the paper (but not too tightly). ● If multiple pages feed at once, remove the paper from the paper support, separate the sheets, and carefully reload it. ● Load paper glossy side up. Load a maximum of 20 sheets. ● Don’t load plain paper; this may damage PictureMate. ● Make sure you are using only PictureMate Photo Paper or Epson Premium photo paper (see page 34).
Where to Get Help Toll or long distance charges may apply. Epson provides technical assistance 24 hours a day through the electronic support services and automated telephone services listed below. Before you call, please have the following information ready: Service World Wide Web Automated Telephone Services ● Product name (PictureMate Deluxe Viewer Edition) From the Internet, you can reach Epson Support at www.MyPictureMate.com/ support.
Notices Important Safety Instructions Before using your PictureMate, read the following safety instructions to make sure you use it safely and effectively: ● Be sure to follow all warnings and instructions marked on the printer. ● If you use the printer in places where the use of printers is restricted, such as in airplanes or hospitals, follow all instructions in those places. ● Do not insert objects through the slots in the printer. ● Take care not to spill liquid on the printer and the AC adapter.
● Avoid places subject to dust, shock, or vibration. ● ● Leave enough room around the printer to allow for sufficient ventilation. Avoid using electrical outlets controlled by wall switches or automatic timers. ● ● Place the AC adapter near a wall outlet where the plug can be easily unplugged. Keep the entire computer system away from potential sources of electromagnetic interference, such as loudspeakers or the base units of cordless telephones.
WARNING: The cords included with this product contain chemicals, including lead, known to the State of California to cause birth defects or other reproductive harm. Wash hands after handling. (Provided in accordance with Proposition 65 in Cal. Health & Safety Code §25249.5 et seq.) Photo Cartridge Safety Instructions ● Do not use a photo cartridge beyond the date printed on the cartridge carton; otherwise, it may result in reduced print quality.
Photo Viewer Screen Safety Instructions ● The screen contains a few small bright or dark spots. These are normal and do not mean that the screen is damaged in any way. ● ● ● ● To protect against short circuits, do not remove the outside case of the battery. Only use a dry, soft cloth to clean the screen. Do not use liquid or chemical cleansers. ● Do not handle the battery with wet hands or use it near water. If the screen is damaged, contact your dealer.
● Charge the battery before using it if it has not been used for a long period. ● When not using the printer for a long period of time, remove the battery from the printer and store it separately to avoid over-discharging the battery. ● Do not store the battery where the temperature or humidity is very high. ● Store the battery out of children’s reach. ● Before disposing of the battery, make sure you discharge it completely. Warning: Do not dispose of batteries as ordinary refuse.
printer will not exceed the original retail selling price of the covered printer. Exchange products and parts assume the remaining warranty period of your original product covered by this limited warranty. What This Warranty Does Not Cover: This warranty does not apply to refurbished or reconditioned products. This warranty covers only normal use in the United States and Canada. This warranty is not transferable.
How many photos will I get from a PictureMate Print Pack? Epson has conveniently packaged the PictureMate Photo Cartridge with PictureMate Photo Paper, so that purchasing supplies for PictureMate is simple and saves time. The PictureMate Print Pack provides both supplies together, so replacing both the PictureMate Photo Cartridge and paper with a new PictureMate Print Pack is convenient and affordable. Actual yields will vary based on types of photos printed, images and frequency of use.
FCC Compliance Statement For United States Users This equipment has been tested and found to comply with the limits for a Class B digital device, pursuant to Part 15 of the FCC Rules. These limits are designed to provide reasonable protection against harmful interference in a residential installation. This equipment generates, uses, and can radiate radio frequency energy and, if not installed and used in accordance with the instructions, may cause harmful interference to radio or television reception.
not cause harmful interference, and (2) this device must accept any interference received, including interference that may cause undesired operation. Trade Name: Epson Type of Product: Ink Jet Printer Model: B351A ENERGY STAR Compliance As an ENERGY STAR® Partner, Epson has determined that this product meets the ENERGY STAR guidelines for energy efficiency.
Trademarks Epson and PictureMate are registered trademarks and PRINT Image Matching and the PRINT Image Matching logo are trademarks of Seiko Epson Corporation. Epson Store, SoundAdvice, and Epson Connection are service marks of Epson America, Inc. Disney scenes and characters © Disney. Winnie the Pooh is based on the “Winnie the Pooh” works by A. A. Milne and E. H. Shepard. SD is a trademark. Memory Stick, Memory Stick Duo, Memory Stick PRO, and Memory Stick PRO Duo are trademarks of Sony Corporation.
Index A Accessories, 32, 34, 40, 58 Add Frame, 14 to 15 Adjustment, photo, 23 to 25 Aligning print head, 51 to 52 All photos, printing, 9 Auto Correct, 23 to 25 Auto shutoff, 7, 42 B Backing up photos, 26 to 28, 53 to 54 Banding, fixing, 55 Battery, 3, 40 to 42, 62 to 63 Black and white printing, 20 to 21 Blank pages, 57 Blank screen, 54 Bluetooth Photo Print adapter, 3, 29, 32 to 33 printing, 29, 32 to 33 Blurry prints, 56 Borderless expansion, 44 to 45 Borderless photos, 19 to 20 Borders, 19 to 20, 57 B
CD printing from, 29 to 31 saving files to, 26 to 28 software, 4, 26, 29 Cell phone, printing from, 32 to 33 Charging battery, 41 to 42 Charging ink, 38, 54 Choosing photos, 8 to 16 Cleaning print head, 49 to 50 Clogged nozzles, 49 to 50 Closeup, viewing, 18 Color effects, 20 to 21 fixing, 23 to 25 problems, 56 CompactFlash card, 7 Computer Bluetooth printing, 32 to 33 printing from, 29 saving photo files to, 26 using with PictureMate, 4 Confirmation, turning off, 45 Contrast on screen, 46 to 47 Copies, 9,
Epson accessories, 32, 34, 40, 58 Store, 32, 34, 40, 58 technical support, 58 Error messages, 52 to 54 Exif Print, 24 EXT/IF port, 26 to 33 External device, 26 to 33 F Factory settings, restoring, 48 Faint images, 56 FCC compliance, 66 File formats, 4 Fixing photos, 23 to 25 Flash memory drive printing from, 29 to 31 saving files to, 26 to 28 Frames, adding to photos, 14 to 15 G Gaps in image, 56 H Half-page photos, 19 to 20 Handle, 5 Help, 17, 58 I Image formats, 4 quality, 23 to 25, 55 to 56 Incorrect
M N Macintosh Bluetooth printing, 33 using with PictureMate, 4 MagicGate Memory Stick, 7 Maintenance, 34 to 38, 49 to 52 Manuals, 4 Margins eliminating, 45 incorrect, 57 selecting, 19 to 20 Memory card adapter, 7 compatibility, 7, 53 inserting, 6 problems, 55 removing, 7 Memory Stick, 7 Menu button, 17 to 25 Microdrive, 7 Mini wallet photos, 19 to 20 MiniSD card, 7 Missing colors, 56 MMC (MultiMediaCard), 7 Nine photos, displaying, 10, 43 to 44 Noise, PictureMate, 54 Nozzle check, 50 Nozzles, cleaning, 4
Photo choosing, 8 to 16 copying, 26 to 28 displaying, 16 formats, 4 paper, see Paper quality, 23 to 25, 55 to 56 saving, 26 to 28 slideshow, 15 storing, 16 Photo cartridge buying, 34 ink level, 38 inserting, 36 to 38 release lever, 35 to 37 removing, 35 to 36 replacing, 34 to 38 safety instructions, 61 Photo selection menu, 9 Photo viewer screen contrast, 46 to 47 instructions on, 17 problems, 54 safety instructions, 62 using, 8 to 25 PictBridge, 3, 29, 31 PictureMate customizing, 43 to 48 instructions, 17
PRINT Image Matching, 3, 24 Print Pack, 34 to 38, 58, 65 Print quality problems, 55 to 56 Print Range, 11 to 12 Print Some, 10 to 11 Print speed, increasing, 55 Problems memory card, 55 missing colors, 56 paper feeding, 56 to 57 paper jam, 52, 56 to 57 photo quality, 55 to 56 power off, 54 print quality, 55 to 56 slow printing, 55 Proofsheet, 19 to 20 Q Quality, 23 to 25, 55 to 56 R Range of photos, 11 to 12 Release lever, 35 to 37 74 Removing battery, 42 memory card, 7 photo cartridge, 35 to 36 Replaci
Sharpness, adjusting, 24 Slideshow, 15 SmartMedia card, 7 Smears, 56 Sony Memory Stick, 7 SoundAdvice, 58 Speed, increasing, 55 Stamp, date and time, 21 to 22 Stopping printing, 10 Storing paper and prints, 16 Support, technical, 58 T Technical support, 58 Thumb drive printing from, 29 to 31 saving files to, 26 to 28 TIFF, 4 Time stamp, 21 to 22 Transporting PictureMate, 39 Traveling, 39 Troubleshooting, 49 to 57 Turning on printer, 6 U USB cable, 30 to 32, 39 USB DP (USB Direct Print), 3, 29, 31 User’s G
76
Get to know your PictureMate Need a new photo cartridge and paper? You can get the PictureMate Print Pack (part# T5570) with everything you need to print in one box: PictureMate Photo Paper and a PictureMate Photo Cartridge.
Get to know your PictureMate Need a new photo cartridge and paper? You can get the PictureMate Print Pack (part# T5570) with everything you need to print in one box: PictureMate Photo Paper and a PictureMate Photo Cartridge.