User’s Guide
Contents Welcome! . . . . . . . . . . . . . . . . . . . . . . . . . . . . . . . . . . . . . . . . . . . . . . . . . . . . . . . . . . . . . . . . . . . . . . . . . 4 Prepare to View and Print . . . . . . . . . . . . . . . . . . . . . . . . . . . . . . . . . . . . . . . . . . . . . . . . . . . . . . . . . . . . 8 View Photos and Print . . . . . . . . . . . . . . . . . . . . . . . . . . . . . . . . . . . . . . . . . . . . . . . . . . . . . . . . . . . . . . 12 Do More With Your Photos . . . . . . . . . . . .
Specifications . . . . . . . . . . . . . . . . . . . . . . . . . . . . . . . . . . . . . . . . . . . . . . . . . . . . . . . . . . . . . . . . . . . . . 82 Notices . . . . . . . . . . . . . . . . . . . . . . . . . . . . . . . . . . . . . . . . . . . . . . . . . . . . . . . . . . . . . . . . . . . . . . . . . . 87 Index . . . . . . . . . . . . . . . . . . . . . . . . . . . . . . . . . . . . . . . . . . . . . . . . . . . . . . . . . . . . . . . . . . . . . . . . . . . .
Welcome! PictureMate ShowTM is your easy-to-use, personal photo lab that’s also a digital photo frame. Just insert a digital camera memory card and you’re ready to view your pictures in a variety of entertaining slideshows or print brilliant, long-lasting photos. Because PictureMate® is light and portable, you can print whenever and wherever you take pictures. Plus, your PictureMate prints will be as brilliant and vibrant generations from now as they are today.
Special Features Printing with your PictureMate becomes even easier with these special features: From PictureMate’s screen, you can view your photos and press the Print button on the remote control to print the ones you want. Or you can select to print all photos. (See page 12.) You can select from 12 entertaining slideshows including clock and calendar functions. You can even edit and print your photos on the spot. (See page 15.) You can crop photos right from PictureMate—no computer required.
Supported Photo Formats Make sure your photos meet these requirements for viewing and printing with your PictureMate (without a computer): ● JPEG files only ● Resolutions ranging from 80 × 80 to 9200 × 9200 pixels PictureMate recognizes and prints up to 9,999 photos on your memory card. Where to Find Information See your Start Here sheet to unpack, set up, and use your PictureMate.
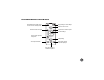
PictureMate Remote Control Buttons Set PictureMate to standby mode or turn it on from standby mode Stop printing or cancel settings Return to home menu Set/increase number of copies Decrease number of copies Confirm settings Cancel current operation and go back Start printing Change the number of photos displayed View help information View print settings or maintenance options 7
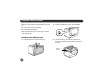
Prepare to View and Print Before you view and print with PictureMate, you need to: ● Insert your memory card (below) ● Load paper (see page 10) 2 Press the P On button to turn on PictureMate. 3 Insert the memory card into the correct slot, as shown on the following page. Insert just one card at a time. When you’re finished, you can remove your memory card (see page 10). Inserting Your Memory Card 1 Press the top of the screen to slide it up.
Note: PictureMate can’t read multiple cards at once. 4 Top slot: Push the card in carefully until it stops (it won’t go in all the way). When the card is in, the memory card light comes on and begins to flash. Caution: Do not remove a card while the memory card light is flashing; you may lose photos on your card.
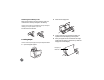
Removing Your Memory Card 2 Slide out the edge guides. 3 Create a stack of up to 20 sheets of paper and separate the sheets slightly by fanning them. 4 Place your paper into the slot between the edge guides with the glossy or whiter side up. Slide the edge guides inward slightly. When you are ready to remove a memory card, first make sure the memory card light is not flashing. Caution: Do not remove a card while the memory card light is flashing; you may lose photos on your card.
Note: Load a maximum of 20 sheets at a time. Load your paper glossy or whiter side up to prevent smearing. 5 6 Using the P On Button You can use the P On button on the remote control Store any unused paper in the original package and keep it flat in a dry area to prevent curling. to place PictureMate in standby mode and save energy. Note: When you need more paper, order a PictureMate Print Pack. See page 56 for more information. 1 Attach the output tray.
View Photos and Print After you insert your camera’s memory card, you can print your photos or view them in a variety of entertaining slide shows. information, or select Contents for a list of topics. See page 64 for details about the help system. Make sure you adjust the angle of the screen for comfortable viewing.
2 Select View and Print Photos and press OK. Your photos are displayed by date: You see the number 1 on the photo, indicating that one copy will be printed. Note: If you want to crop or edit your photo, press OK. See page 18 for instructions. 5 To print more than one copy, press to increase the number of copies or to decrease it. 6 After you have selected all the photos you want, press Print.
8 Press l or r to review your selected photos. Printing All Photos 9 If you want to print with a white border or include the date, select Borderless/Date Stamp: Off and press OK. Then select the option you want and press OK again. You can print photos at full size or on a proof sheet of small thumbnail images. Note: The date comes from your camera, not from the printer. If this information is incorrect, adjust the date setting on your camera.
4 Select 1 Per Page or Proof Sheet (20 per page) and press OK. If you selected 1 Per Page, you can press l or r to review your photos. 5 If you selected 1 Per Page and you want to print with a white border or include the date, select Borderless/Date Stamp: Off and press OK. Then select the option you want and press OK again. Printing From a Slideshow You can select from 12 slideshows with 3D animation, and choose photos for printing right from the show.
3 Press OK to select the photo(s) you want to print. Those you select are “reserved” for printing. Printing Camera-Selected DPOF Photos When the slideshow is finished, you see the print confirmation screen. If your camera supports DPOF (Digital Print Order Format), you can use it to pre-select which photos and how many copies you want to print. 4 Press l or r to review your reserved photos.
Storing and Displaying Your PictureMate Photos Photos printed on PictureMate photo paper are beautiful and long-lasting. Follow these guidelines to make sure they will look great for generations. Storing Unused Paper Return unused paper to the original package. Store paper flat to prevent curling, and keep it away from extreme temperatures, high humidity, and bright light. Caring for Your Photos ● To avoid scratches or smudging, do not rub the printed side of the photo.
Do More With Your Photos You can select a variety of layouts and crop your photos for printing individually or in multi-photo formats. You can also do the following: Zooming and Cropping You can print just part of a photo, cropping out the area that you don’t want. The part you keep is automatically enlarged to fit the layout. ● Remove red eyes from your photos (see page 21) ● Fix color and photo quality (see page 22) Cropping affects only your printed photo, not your original image.
2 Choosing a Layout Select Crop and press OK. By default, your photos are printed at the full 4 × 6 size. If you want to place several small photos on one page, you can use the Layout menu. 1 From the Home menu, select LAYOUT and press OK on the remote control. 2 Select Layout Options and press OK. Note: If you want multiple copies of the same photo, select Crop/Trim Photo(s). See page 20 for details. 3 3 Choose one of the methods for selecting the photos, then press OK.
7 Press OK to preview your layout. Note the large number, which tells you how many sheets of paper are required. 8 If you want to adjust any settings, press Menu. See page 22 for more information. 9 Press OK or Print to start printing. You see a screen that allows you to adjust the printed size of your photo. The size you select determines the number of copies that will fit on a page—from one to 12 copies. Custom Sizing and Cropping You can set custom sizes and crop your photos.
After you finish cropping and press OK, you see a screen like the following, showing your cropped photo and the layout: Fixing Red-Eye PictureMate can fix red eyes in your photos when you print. Note: PictureMate may not be able to correct red eyes in all photos, and printing will be slower when you use this feature. 6 Adjust the number of copies if necessary, then press OK. 7 Select any of the enhancement settings shown on the screen, or press Menu for additional settings.
Adjusting Photo Settings You see this screen: PictureMate lets you adjust the color and improve the quality of your photos without using a computer. You can do the following: ● Enhance your photos based on the following types of scene detection: standard, people, landscape, or night scene ● Print at the highest resolution ● Adjust the sharpness ● Print your pictures in black and white or sepia Note: These settings affect only your printed pictures. They do not change your original image files.
● None: Prints photos as is or bypasses P.I.M. or Exif Print data. Select this setting for the fastest printing. Scene Detection—If Fix Photo is selected as the Enhance setting, you can choose from the following: Standard, People, Landscape, Night Scene. If you are printing a variety of photos, select Standard. Quality—Select Standard or Best. Printing is slower at Best quality. Sharpness—Increase or decrease the sharpness until you are happy with the effect (as shown on the sample photo).
Selecting the Source for Photos Note: If you choose an external device that has more than one folder, you can also select an individual folder or All folders. When you have photos saved in print history, you can choose between those and the photos on your memory card. If you insert a thumb drive or other device, you can also select it as a source, and select from multiple folders. Adding Camera Text 1 Press the Menu button on the remote control.
Rotating You can rotate a photo on PictureMate’s screen. This does not affect how the photo prints, only how it displays. 1 Select the photo you want to rotate and press OK. 2 Select Rotate and press OK. 3 Select 90 degrees, 180 degrees, or 270 degrees (or select Do Not Rotate). Your photo is rotated on the screen. 4 Press OK.
Print From an External Device PictureMate can print photos stored on a: ● PictBridge-enabled digital camera (this page) ● USB-connected external drive, such as a thumb drive (see page 28) ● Bluetooth-enabled device (requires an optional Bluetooth Photo Print adapter; see page 28) Tip: Once you’ve connected PictureMate to an external drive, you can back up photos from your camera’s memory card to the drive for safekeeping. See page 32 for instructions.
4 5 Connect your camera’s USB cable to your camera and the port on the side of PictureMate. Use your camera’s controls to select and print photos on PictureMate. (See your camera manual for instructions.) 3 Select PictBridge Settings and press OK. 4 Select one of the following settings, then press OK.
Printing From an External Drive If you have saved photos on a thumb drive, you can connect the drive to the side of PictureMate and print just like you do when you insert a memory card. You can also connect and print from an external CD drive or hard drive. Note: Epson cannot guarantee the compatibility of any drives. 1 Make sure PictureMate is on. 2 If PictureMate is connected to a computer, disconnect it or turn off the computer. 3 Connect your drive to the PictureMate.
1 Make sure PictureMate is on but not printing. Caution: Do not connect or remove the Bluetooth Photo Print Adapter while it is communicating with a device or while PictureMate is printing; this may cause PictureMate to malfunction. 2 Plug the adapter into the PictureMate. port on the side of ● Macintosh®: Double-click Bluetooth File Exchange in your Utilities folder. Follow the on-screen instructions.
Caution: Do not connect or disconnect the Bluetooth Photo Print Adapter while it is communicating with your device or while PictureMate is printing; this may cause PictureMate to malfunction. 4 Select Bluetooth Settings and press OK. 5 Select Bluetooth Setup and press OK. Choosing Bluetooth Settings If necessary, use the PictureMate remote control to choose settings for Bluetooth wireless communication.
You see a screen like the following: Press OK to save the option and move to the next setting. ● Printer ID If multiple Bluetooth-enabled printers are in the same communication range, you can distinguish them by assigning each a unique number (from 0 through 9). Turn PictureMate off and then back on when you’re finished. ● Communication Mode Select Discoverable to allow Bluetoothenabled devices to freely discover PictureMate and send print jobs.
Save Photos After you print, PictureMate asks if you want to save the photos on your camera’s memory card to the print history. If you select Yes, the photos are saved on PictureMate’s internal hard drive. If you want to change the way photos are saved, see page 61. Backing up Photos Before you start, make sure PictureMate is not connected to your computer. 1 Insert your memory card into PictureMate. 2 Insert a USB storage device or thumb drive into the port on the side of PictureMate.
4 Press OK. Deleting Photos from Print History 5 Select Save All Photos. You can select photos to delete from PictureMate’s print history, or delete all the photos. Note: You can delete photos from the print history only, not from a memory card. 6 Press OK, then read the message and press OK again. 7 Follow the instructions on the screen to complete the backup. If you need to cancel the backup, press Clear. 1 From the Home menu, select Photo Storage.
3 Press u or d to select different dates. Press l or r to move through your photos. Note: If you want to see your photos one at a time press the Display button. Continue pressing the button to switch between 20 photos, one photo, and display by month. 4 When you see a photo you want to delete, press to select it. You see a red check mark on the photo, indicating that it will be deleted. 5 After you have selected all the photos you want to delete, press OK.
Print From a Computer To use PictureMate with your computer, you must first: ● Install the PictureMate software on your computer from the PictureMate CD as described here. ● Connect PictureMate to your computer with a USB cable. If you don’t have a USB cable, you can buy one from your local computer dealer or from Epson. Note: Periodically, it’s a good idea to check Epson’s support website at epson.com/support for free updates to your PictureMate printer software.
Installing Software for Windows 3 When you see this screen, click Install. 4 Read the license agreement and click Accept. The software starts installing. Before you start, make sure PictureMate is NOT connected to your computer and does NOT have a memory card inserted in it. 1 Press the P On button to turn on PictureMate. Note: If you see a Found New Hardware screen, click Cancel and disconnect PictureMate from your computer. 2 Insert the PictureMate CD.
After a moment, you see this screen: Your PictureMate software is installed. Note: If you see a screen like this one, remove your memory card and click the X in the corner to close it. 5 Connect the USB cable to any open USB port on your computer. Then connect the other end to the USB port on the back of PictureMate. Note: PictureMate is automatically set as your default printer. If you have another printer, you can change this setting in the Windows Control Panel.
8 Follow the on-screen instructions to register your PictureMate. 9 When you’re done, remove the CD. Now you can print photos from your computer on PictureMate (see page 40). Installing Software for Macintosh Before you start, make sure PictureMate is NOT connected to your Macintosh and does NOT have a memory card inserted in it. 1 Press the P On button to turn on PictureMate. 2 Insert the PictureMate CD. 3 Double-click the Epson icon. 38 4 When you see this screen, click Install.
5 Read the license agreement and click Accept. 6 Follow the on-screen instructions to install the software. 7 Connect the USB cable to any open USB port on your Macintosh. Then connect the other end to the USB port on the back of PictureMate. After a few minutes, you see this screen: If you’re using Mac OS X 10.5.x or later, skip to step 10. If you’re using Mac OS X 10.3.9 or 10.4.11, continue with the next step.
8 When you see this screen, click Add Printer. Printing From a Computer Follow these basic printing instructions for your computer: ● Windows (below) ● Macintosh (see page 47) Printing From a Windows Computer You can print photos from an imaging application, the Windows Photo Gallery or Photo Viewer (page 41), or the Picture and Fax Viewer in Windows XP (page 43). 9 Follow the steps on the right side of the screen to add PictureMate.
Printing from the Windows Photo Gallery/Photo Viewer 3 Note: Screens may vary depending on your operating system. 1 Locate the photo you want to print on your computer. 2 Right-click the photo, highlight Open With, and select Windows Photo Gallery (Windows Vista) or Windows Photo Viewer (Windows 7 and Windows 8). Click the Print icon at the top of the screen, then select Print from the drop-down menu that appears.
set the Expansion slider to Min. If you see a white edge on your photo, select Mid or Max. You see the printer settings window: ● You can change the Color Option and see the effects on the sample photo (the changes don’t affect your original). Auto Correction improves the quality of photos that are too dark or have a color cast. Sample photo Scene Correction lets you choose the subject of your photo so that PictureMate can correct it appropriately. You can select People, Landscapes, or Night scene.
● Select Print Preview to see what your photo will look like before you print. Printing with the Windows XP Picture and Fax Viewer ● Select the number of copies you want to print. 1 Locate the photo you want to print on your computer. 2 Right-click the photo, highlight Open With, and select Windows Picture and Fax Viewer. Tip: For more information about printer settings, click Help. 7 Click OK. 8 When you return to the Windows Photo Gallery/ Photo Viewer, click Print to start printing.
5 When you see this screen, select the photo(s) you want to print and click Next. 6 When you see this screen, select your EPSON PictureMate model and click Printing Preferences.
● You see the printer settings screen: You can change the Color Option and see the effects on the sample photo (the changes don’t affect your original). Auto Correction improves the quality of photos that are too dark or have a color cast. Scene Correction lets you choose the subject of your photo so that PictureMate can correct it appropriately. You can select People, Landscapes, or Night scene.
Tip: For more information about printer settings, click Help. 8 Click OK. 9 At the Photo Printing Wizard screen, click Next. During printing, this window appears on your computer screen showing the progress of your print job. You can cancel printing if necessary and see your photo cartridge status. 10 When you see this screen, select Full page photo print and click Next.
Printing From a Macintosh In Preview, you see the settings shown below: See the section below for your Mac OS operating system. Mac OS X 10.5 and later Note: Screens may vary depending on your operating system. 1 Start your print program and open the photo you want to print. 2 Open the File menu and select Print. 5 3 Select EPSON PictureMate PM300 as the Printer setting. 4 Click d to expand the Print window, if necessary. Open the Paper Size menu and place your cursor on the 4 × 6 in option.
6 Select the direction you want your photo to print ( for portrait, for landscape facing right, or for landscape facing left) as the Orientation. 7 Select Print Settings from the pop-up menu. ● 9 Borderless prints are automatically expanded. If too much of your photo edges are cut off, set the Expansion slider to Min. If you see a white edge on your photo, select Mid or Max. To reduce or remove red-eye effects, select Extension Settings from the pop-up menu and choose Fix Red-Eye. 10 Click Print.
From this window, you can do the following: Mac OS X 10.3 and 10.4 ● To cancel printing, click the print job and click Delete. 1 Start your print program and open the photo you want to print. ● To pause printing, click the print job and click Hold. 2 Open the File menu and select Page Setup. ● To resume printing, click a print job marked “Hold” and click Resume. ● To pause printing for all jobs, click Pause Printer.
● Select 4 × 6 in (Borderless) to print without any borders. ● Select 4 × 6 in (Borders) to print with white borders all around. 8 Select Print Settings from the pop-up menu. Note: iPhoto® expands two sides of an image to the maximum print area, so you may see small borders in iPhoto prints. 5 Select the direction you want your photo to print ( for portrait, for landscape facing right, or for landscape facing left) as the Orientation. 6 Click OK. 7 Select Print from the File menu.
● You can change the Color Option and see the effects on the sample photo (the changes don’t affect your original). If you clicked the Print Center icon, double-click your PictureMate model. Sepia changes the colors to brown for an oldfashioned look. Black & White changes a color photo to black-and-white. ● Borderless prints are automatically expanded. If too much of your photo edges are cut off, set the Expansion slider to Min. If you see a white edge on your photo, select Mid or Max.
12 From this window, you can do the following: ● To cancel printing, click the print job and click Delete. ● To pause printing, click the print job and click Hold. ● To resume printing, click a print job marked “Hold” and click Resume. ● If multiple print jobs are listed and you want one to print before the other(s), select the job and click the Status arrow to move it up. ● To check photo cartridge status, click Utility, then select EPSON Status Monitor.
Copy Photos to and From Your Computer You can insert a memory card into PictureMate and copy the photos from the card to your computer. You can also copy photos from your computer to the memory card. Make sure your PictureMate software is installed and PictureMate is connected to your computer as described in “Installing Software and Connecting PictureMate” on page 35. Note: When you copy photos to a memory card, you need to remove and reinsert the card to have PictureMate recognize the photos you copied.
What happens when your computer detects your photos depends on the type of system you have. See below for Windows XP or later. For Windows 2000 and Macintosh, see page 55. ● To copy photos to your computer, select Import pictures (Windows Vista or later) or Copy pictures to a folder on my computer and click OK (Windows XP). Follow the on-screen instructions. Windows XP or later ● To copy photos from your computer to the card, select Open folder to view files and click OK.
Windows 2000 Preparing to Remove a Memory Card Access your card just as you would access a drive on your computer. Once you’re finished copying photos to or from your memory card, follow the steps below to remove it. Be sure to remove any cards before turning off PictureMate or unplugging its USB cable. To copy photos to and from your computer and card, drag and drop the photos to the card or folder. Make sure the photo files meet the requirements described in “Supported Photo Formats” on page 6.
Replace Print Pack When PictureMate needs a new Print Pack, you will see a message on the screen. The Print Pack contains a new photo cartridge and photo paper. When you need a new Print Pack, see these sections: ● Buy a PictureMate Print Pack (to the right) ● Replace the photo cartridge (see page 57) If you want to check the status of your photo cartridge, see page 59. Tip: If you see a replacement message while printing, you can replace the photo cartridge and continue the current print job.
Replacing the Photo Cartridge Make sure you have a new PictureMate Print Pack before you remove the old photo cartridge. Once you remove the cartridge, you must install the new one right away. 3 Slide the cartridge lever left, to the Release position. Caution: Before you replace the cartridge, read the “Photo Cartridge Safety Instructions” on page 89. 1 Make sure PictureMate is on but not printing. 2 Open the cartridge door on the back of PictureMate.
4 Pull out the cartridge and dispose of it properly. (For appropriate disposal, check local resources for recycling guidelines.) 5 Remove the new photo cartridge from its package. Don’t touch the green chip on the side Caution: Don’t touch the small green circuit board. Install the photo cartridge immediately. If you leave a cartridge unpacked for a long time before using it, normal printing may not be possible. 6 Slide the cartridge straight into the slot, label side up, until it clicks into place.
7 Slide the lever right, to the Lock position. Checking Photo Cartridge Status You can check the status of your photo cartridge at any time. 1 Press the Menu button on the remote control. 2 Select Maintenance and press OK. 3 Select Check Cartridge Status and press OK. You see the status displayed on the screen: The gray square represents the ink level Caution: If the cartridge is not inserted correctly, PictureMate will not be able to print. 8 Close the cartridge door all the way.
Take PictureMate With You PictureMate’s handle makes it easy to carry short distances. 5 Close the paper support and remove the output tray. Then lower the screen. 6 Place the remote control in the storage area on top of PictureMate. 7 Pack PictureMate in the box that it came in or the optional carrying case. Note: You can’t raise the handle all the way up; it’s designed to balance the printer’s weight.
Set PictureMate Preferences You can change the way PictureMate works by using the Setup menu.
Setting the Date and Time Setting Automatic Power On/Off 1 Press the Menu button on the remote control. 2 Select Setup and press OK. You can set times for PictureMate to turn on and off automatically. 3 Select Date/Time and press OK. 4 Press u or d to change the year, then press r to move to the month. 5 Repeat step 4 for the month and day, then press OK. 6 Repeat the process to set the time format and time, then press OK. 62 1 Press the Menu button on the remote control.
Changing PictureMate’s Language Adjusting the Screen Brightness You can change the language on PictureMate’s screen to French. You can make the screen brighter or dimmer. 1 Press the Menu button on the remote control. 1 Press the Menu button on the remote control. 2 Select Setup and press OK. 2 Select Setup and press OK. 3 Select LCD Brightness Adjustment and press OK. 3 Select Language and press OK. 4 4 Select the language you want, then press OK.
Printer Care and Troubleshooting If you have problems or questions about how to use PictureMate, check the built-in help system: 1 Press the 2 Select Troubleshooting or Contents, then press OK. 3 Press u or d to select from the following:. button on the remote control. Press d to display additional information.
Checking and Cleaning the Print Head 5 Press Print. The nozzle check pattern is printed. If your print quality is not as good as it used to be—if photos are too light, are missing colors, or have lines running through them—PictureMate’s print head nozzles may need cleaning. 6 Check the pattern to see if there are any gaps or missing lines. OK You can check the nozzles and clean the print head if necessary. 1 Load paper in PictureMate. 2 Press the Menu button on the remote control.
Note: You can also clean the print head by selecting Auto Cleaning from the Maintenance menu. If you see the photo cartridge low warning, you may not be able to clean the print head until you replace the photo cartridge. 4 Check the pattern to see if there are any gaps or missing lines. OK Checking and Cleaning the Print Head Using the Computer You can check the nozzles and clean the print head using your computer. 1 Make sure PictureMate is connected to your computer and paper is loaded.
Aligning the Print Head You see the Print Head Alignment screen: If you have moved PictureMate and print quality is not as good as it used to be—if your prints look fuzzy or have light or dark lines running through them—you may need to align the print head. 1 Load paper in PictureMate so you can print the head alignment pattern. 2 Press the Menu button on the remote control. 3 Select Maintenance and press OK. 4 Select Print Head Alignment and press OK.
Note: The square you select becomes the middle square (#5) the next time you align the print head. 4 You see a window like this: 5 Look at the printed squares to determine which one is the most even, with no streaks or white lines. (You may need to use a magnifying glass.) 6 Enter the number of the best square in each pattern (1 to 9) in the boxes on the screen. Then click Finish. Aligning the Print Head Using the Computer You can align the print head using your computer.
Realignment to print another alignment pattern and repeat this step. Note: The square you select becomes the middle square (#5) the next time you align the print head. Cleaning PictureMate Replacing the Remote Control Battery If the remote control stops working, you need to change the battery. Use a CR2025 lithium button battery only. 1 Turn the remote control upside down. 2 Push in the latch and slide out the battery holder. You may need to use a small screw driver or other tool.
4 Push in the battery holder until it clicks into place. The screen goes blank or the printer shuts off automatically. If Auto Power Settings are in effect, PictureMate will shut off automatically at the selected time. Press the P On button on the printer’s side to turn it back on. The power light is orange. Printing and Operation Problems If you have problems with PictureMate, check the suggestions on the following pages. You can also press the button on the remote control for troubleshooting help.
PictureMate makes an unexpected noise after you install a photo cartridge. ● Make sure you are using a compatible memory card. See page 8. The first time you install the photo cartridge, PictureMate charges its print head for about three and a half minutes. Wait until charging finishes before you turn it off, or it may charge improperly and use more ink the next time you turn it on. ● PictureMate recognizes and can print the first 9,999 photos on a memory card.
Printing is too slow. The remote control doesn’t work. ● It takes a few moments for PictureMate to process your images before printing them. ● ● If PictureMate is in a hot or sunny location, move it to a cooler place and try printing again. ● If you print continuously for 30 minutes, PictureMate may slow down to prevent overheating. Leave the printer powered on, but allow it to cool off by not printing for at least 30 minutes. For faster printing, try these tips: Make sure the power light is on.
Software Installation Problems ● Follow the instructions beginning on page 35 to install your software. Don’t connect PictureMate to your computer until you are instructed to. ● Close other programs, including screen savers and virus protection software, and try installing again. ● Make sure your system meets the requirements listed in “System Requirements” on page 82. ● To print over a network, see “Set Up Network Printing” on page 78 for instructions. Print Quality Problems Your print is grainy.
● Make sure your paper isn’t damaged, old, dirty, or loaded face down. If it is, load new paper with the glossy or whiter side up. Problems With Paper Feeding Paper doesn’t eject fully or is wrinkled. Colors in your photo are wrong or missing. The paper may be damp. Load new paper. ● Make sure the Color Effect setting is not set to Black & White or Sepia. See page 18. Paper doesn’t feed correctly or jams.
● Don’t load plain paper; this may damage PictureMate. ● Use only PictureMate photo paper or Epson Premium Photo Paper Glossy or Semigloss. (See page 6.) ● adjust the amount of expansion. See page 23 page 23 (if printing directly from PictureMate) or page 40 (if printing from a computer). ● Store paper flat to help prevent curling. Miscellaneous Printout Problems PictureMate prints blank pages. ● The print head may need cleaning. See page 65. ● The photo cartridge may be old or low.
Tip: Periodically, it’s a good idea to check Epson’s support website for free updates to your PictureMate printer software. Visit Epson’s driver download site (U.S. downloads or Canadian downloads). With Windows, you can also click or Start, open Programs or All Programs, select EPSON, and click the PictureMate Driver Update option for printer driver updates. Uninstalling From a Windows Computer 1 Click or Start and select Programs or All Programs.
When you are ready to reinstall the PictureMate software, follow the instructions in “Installing Software for Macintosh” on page 38. ● Computer configuration ● Description of the problem Then call: Where to Get Help Epson Technical Support Epson provides these technical support services: Internet Support Visit Epson’s support website for PictureMate Show (U.S. or Canada) for solutions to common problems.
Set Up Network Printing These sections tell you how to set up PictureMate so that other computers on a network can print to it. Then, you must install the PictureMate software on each computer that will access it through the network. Note: These instructions are for small network users only. If you are on a large network and would like to share PictureMate, consult your network administrator. Setting Up a Shared Printer See the instructions below for Windows, or on page 80 for Macintosh.
2 Right-click your Epson PictureMate, then click Sharing. 3 Do one of the following: 1 Windows Vista or later: Click , click Control Panel, and click Printer under Hardware and Sound. Windows Vista or later: Click the Change sharing options button and click Continue. Windows XP: Click Start, click Control Panel, and click Printers and Other Hardware or Printers and Faxes. Windows XP: Select Share this printer. Windows 2000: Select Shared as.
6 7 Double-click the icon of the computer that is directly connected to PictureMate, then click your EPSON PictureMate model. Click Next and follow the on-screen instructions. Note: Depending on the operating system and the configuration of the computer to which PictureMate is connected, the Add Printer Wizard may prompt you to install the printer driver from the PictureMate software CD. In this case, click the Have Disk button and follow the on-screen instructions. Mac OS X 10.
4 Click the checkbox next to Printer Sharing, then close System Preferences. Accessing a Shared Printer Follow the steps in this section to print to PictureMate from other Macintosh computers on your network. 1 Turn on the shared PictureMate. 2 Print normally, but do one of the following to select your printer: Mac OS X 10.5 or later: Select the printer from the Format for menu (in the Page Setup window) or Printer menu (in the Print window). Mac OS X 10.3 or 10.
Specifications System Requirements Macintosh System Requirements To use PictureMate with your computer, your system must meet the requirements below. ● Mac OS® X 10.3.9, 10.4.11, or 10.5.x, 10.6.x, 10.7.x, or 10.8.x. Note: Visit Epson’s support website (U.S. or Canada) for more compatibility information and the latest drivers for PictureMate. ● USB 1.1 port (minimum) or USB 2.0 port (recommended) ● Shielded USB “AB” cable up to 6.5 feet (2 meters) long.
Technical Specifications Photo Cartridge (Included in each PictureMate Print Pack) Printing Colors Black, Cyan, Magenta, and Yellow Printing method On-demand ink jet Cartridge life Nozzle configuration 90 nozzles × 4 Colors: yellow, magenta, cyan, black 6 months at 77 °F (25 °C) after opening the package Storage temperature –22 to 104 °F (–30 to 40 °C)* 1 month at 104 °F (40 °C) Print direction Bidirectional with logic seeking Control code EPSON ESC/P® raster Paper Note: Since the quality o
Mechanical Electrical Paper path Sheet feeder, top entry Input voltage range Sheet feeder capacity 20 sheets Power consumption (approximate): Dimensions Storage: Width: 9.0 inches (228 mm) Depth: 7.6 inches (192 mm) Height: 6.2 inches (158 mm) Printing 15.0 W 13.5 W Ready mode 7.0 W 7.0 W Sleep mode (Standby mode) 6.5 W 5.0 W Powered off 0.2 W 0.3 W Printing: Width: 9.0 inches (228 mm) Depth: 12.5 inches (318 mm) Height: 7.9 inches (200 mm) Remote control: Width: 1.
Environmental Requirements Temperature Operation: 50 to 95 °F (10 to 35 °C) Storage: –4 to 140 °F (–20 to 40 °C) 1 month at 104 °F (40 °C) Humidity Operation: 20 to 80% RH (without condensation) CompactFlash Microdrive Memory Stick* Memory Stick PRO Memory Stick Duo** Memory Stick PRO Duo** Memory Stick PRO-HG Duo** Memory Stick Micro** Voltage requirements 3.3 V 3.
Interface USB 2.0 Hi-Speed (for PictBridge compliant devices)/Mass storage class for external storage Recommended cable length: less than 6.5 feet (2 meters) Bluetooth (optional) Ver. 2.0 + EDR compliant Standards and Approvals Safety UL 60950-1 CAN/CSA-C22.2 No.
Notices Important Safety Instructions Before using your PictureMate, read the following safety instructions to make sure you use it safely and effectively: ● Be sure to follow all warnings and instructions marked on the printer. ● If you use the printer in places where the use of electronic devices is limited, such as in airplanes or hospitals, follow all instructions in those places. ● Do not insert objects through the slots in the printer. ● Take care not to spill liquid on the printer and the AC adapter.
● Avoid places subject to dust, shock, or vibration. ● Leave enough room around the printer to allow for sufficient ventilation. ● Place the AC adapter near a wall outlet where the plug can be easily unplugged. ● Do not place or store the printer, the AC adapter, or the optional battery outdoors. ● Do not block or cover the vents and openings in the printer. ● Power supply cords should be placed to avoid abrasions, cuts, fraying, crimping, and kinking.
WARNING: The cords included with this product contain chemicals, including lead, known to the State of California to cause birth defects or other reproductive harm. Wash hands after handling. (This notice is provided in accordance with Proposition 65 in Cal. Health & Safety Code §25249.5 and following.) Photo Cartridge Safety Instructions ● Keep photo cartridges out of the reach of children and do not drink the ink. ● Do not shake the photo cartridge after removing it from the bag; this can cause leakage.
Screen Safety Instructions ● Do not place the battery near or into fire or water. ● The screen contains a few small bright or dark spots. These are normal and do not mean that the screen is damaged in any way. ● Do not use a battery that is leaking or damaged in any way. ● Only use a dry, soft cloth to clean the screen. Do not use liquid or chemical cleansers. ● Do not leave the battery in a vehicle to prevent the battery from overheating. ● Do not charge the battery.
What Is Covered: Epson America, Inc. (“Epson”) warrants to the original retail purchaser that the Epson printer covered by this limited warranty statement, if purchased and operated only in the United States or Canada, will be free from defects in workmanship and materials for a period of one (1) year from the date of original purchase. For warranty service, you must provide proof of the date of original purchase.
maintained or fail to function properly as a result of misuse, abuse, improper installation, neglect, improper shipping, damage caused by disasters such as fire, flood, and lightning, improper electrical current, software problems, interaction with non-Epson products, or service other than by an Epson Authorized Servicer. If a claimed defect cannot be identified or reproduced, you will be held responsible for the costs incurred.
months. For print quality, a variable amount of ink remains in the cartridge after the “Replace Print Pack” indicator comes on. You may be able to print more photos with a PictureMate Photo Cartridge than the number of sheets of photo paper in your PictureMate Print Pack. In this case the cartridge monitor indicates the cartridge can still be used.
a) Fully completed PictureMate Print Pack Satisfaction Guarantee Form b) Original UPC code of PictureMate Print Pack c) Copy of PictureMate Print Pack receipt d) Remaining PictureMate Print Pack paper from the original PictureMate Print Pack.
turning the equipment off and on, the user is encouraged to try to correct the interference by one or more of the following measures: ● Reorient or relocate the receiving antenna. ● Increase the separation between the equipment and receiver. ● Connect the equipment into an outlet on a circuit different from that to which the receiver is connected. ● Consult the dealer or an experienced radio/TV technician for help.
A Note Concerning the Responsible Use of Copyrighted Materials Epson encourages each user to be responsible and respectful of the copyright laws when using any Epson product. While some countries’ laws permit limited copying or reuse of copyrighted material in certain circumstances, those circumstances may not be as broad as some people assume. Contact your legal advisor for any questions regarding copyright law.
Index A Accessories, 6, 28, 77 Adapter Bluetooth, 28 to 29 memory card, 9 Adjust Photo settings menu, 22 Aligning print head, 67 to 69 All photos, printing, 14 to 15 Auto Cleaning, 65, 73 Auto Correction, 42, 45 Auto Power Settings, 62 Auto shutoff, 70 B Backing up photos, 32 to 33 Banding, fixing, 65, 73 Basic printing Macintosh, 47 to 52 Windows, 40 to 46 Battery replacing, 69 to 70 safety instructions, 90 Black and white prints, 23, 42 to 51 Blank pages, 75 Blank screen, 70 Bluetooth printing, 28 to 29
C Cable power, 60 USB, 27, 35, 37 to 39, 60 Camera printing from, 26 to 27 printing text from, 24 selected photos (DPOF), 16 Cancelling printing Macintosh, 49, 52 remote control, 15 Windows, 43, 46 Care of PictureMate, 64 to 70 Cartridge, photo see Photo cartridge CD, installing software from, 35 to 40 Change units setting, 63 Checking nozzles, 65, 66 Choosing photos, 12 to 16 Cleaning PictureMate, 69 print head, 65, 73 98 Color effects, 23 fixing, 22 to 23, 42, 45 problems, 74 Computer Bluetooth printing
DOC (Declaration of Conformity), 94 DPOF (Digital Print Order Format), 16 Drive, external, see External device G E H Enhance Fine Details setting, 45, 48, 50 Enhancing photos, 22 to 23 Epson accessories, 6, 28, 77 technical support, 77 Exif Print, 22 Expansion, borderless, 23, 45, 48, 51 External device port, 27 to 28 printing from, 26 to 28 selecting as source, 24, 28 F Faint prints, 73 FCC compliance, 94 to 95 File formats, 6, 53 Fixing photos, 22 to 23, 42, 45 Flash memory drive, printing from, 28
JPEG, 6, 53 L Landscape orientation, 48, 50 Language, changing, 63 Layout Macintosh, 47, 49 problems, 75 settings, 19 to 21 Windows, 45 Lights memory card, 9 to 10, 53 power, 11, 70 Lines in photos, fixing, 65, 73 Loading paper, 10 to 11, 74 100 M Macintosh basic printing, 47 to 52 Bluetooth printing, 29 cancelling printing, 49, 52 installing software for, 38 to 40, 73 network printing, 80 to 81 system requirements, 82 uninstalling software for, 76 Maintenance, 64 to 70 Manuals, 6 Margins incorrect, 23,
N Network printing, 78 to 81 Noise, PictureMate, 71 Nozzles, checking and cleaning, 65 O On button, 8, 11 Orientation setting, Macintosh, 50 Output tray, 10, 60 P Packing PictureMate, 60 Paper buying, 6, 77 feeding problems, 74 to 75 jam, 74 to 75 loading, 10 to 11, 74 output tray, 11, 60 specifications, 83 storing, 17 support, 10 to 11, 60 PDA, printing from, 28 to 29 Phone, printing from, 28 to 29 Photo backing up, 32 to 33 choosing, 12 to 16 copying to/from computer, 53 to 55 correction, 22 to 23, 42,
Photo cartridge buying, 6, 77 information, 92 to 94 replacing, 56 to 59 safety instructions, 89 specifications, 83 status, 59 Photo Gallery, Windows, 41 Photo Storage menu, 32 to 34 PictBridge camera, 26 to 27 Picture and Fax Viewer, Windows, 40 to 46 PIM (PRINT Image Matching), 22 Portrait orientation, 48, 50 Power light, 70 problems, 70 saving, 11 turning on, 8, 11, 70 Power cable, 60 Preferences, setting, 61 to 63 Previewing printing, 13 to 16, 45 Print preview, 13 to 16, 45 speed, increasing, 72 102 P
Printing all photos, 14 to 15 black-and-white, 42 to 51 Bluetooth, 28 to 29 cancelling, 15, 46, 49, 52 from camera, 26 to 27 from computer, 40 to 52 from external device, 26 to 28 from slideshow, 15 to 16 individual photos, 12 to 14 Macintosh, 47 to 52 network, 78 to 81 preview, 13 to 16, 45 problems, 70 to 72 Windows, 40 to 46 wireless, 28 to 29 Problems border or layout, 75 color, 74 memory card, 71 paper feeding, 74 to 75 paper jam, 74 to 75 power, 70 print quality, 73 to 74 printing, 70 to 72 remote co
Remote control buttons, 7 problems, 72 replacing battery, 69 to 70 Replacing photo cartridge, 56 to 59 Requirements environmental, 85 system, 82 Reserved photos, 16 Resetting preferences, 61 to 63 Resolution, 6, 53 Rotating photos, 25 S Safety instructions, 87 to 90 Saving photos, 61 Scene Detection, 23 Screen adjusting angle, 12 adjusting brightness, 63 problems, 70 safety instructions, 90 Sepia, 23, 42, 45, 48, 51 Service, 77 104 Settings, default, 63 Sharpness, fixing, 23 Sizing photos, 20 to 21 Slide
Support, paper, 10, 60 System requirements, 82 T Technical support, 77 Thumb drive, printing from, 24, 28 Time, setting, 62 Transporting PictureMate, 60 Troubleshooting, 64 to 75 Turning printer on or off, 8, 11, 70 U Windows basic printing, 40 to 46 Bluetooth printing, 29 cancelling printing, 46 installing software for, 36 to 38, 73 network printing, 78 to 80 system requirements, 82 uninstalling software for, 76 Wireless printing, 28 to 29 Z Zooming in and out, 18 to 21 USB cable, 27, 35, 37 to 39, 60