EMP Monitor Operation Guide V4.
Meanings of symbols used The following table shows the symbols used in this manual, along with descriptions of what they mean. s [ (name) ] Indicates a page where a related topic or a more detailed explanation is provided. Indicates the name of the buttons on the remote control or the control panel. Example: Esc button "(name)" Timer Indicates the name of the buttons or items on EMP Monitor. Example: Select "Timer" - "Timer Settings". Select Timer - Timer Settings.
Contents Meanings of symbols used EMP Monitor Features EMP Monitor Functions . . . . . . . . . . . . . . . . . . . . . . . . . . . . . . . . . . . . . . . 6 Operating environment . . . . . . . . . . . . . . . . . . . . . . . . . . . . . . . . . . . . . . . 7 Compatible computers . . . . . . . . . . . . . . . . . . . . . . . . . . . . . . . . . . . . . . . . . . . . . . . . . . 7 Installing EMP Monitor . . . . . . . . . . . . . . . . . . . . . . . . . . . . . . . . . . . . . . . . . . . . . . . . . .
Application lock function . . . . . . . . . . . . . . . . . . . . . . . . . . . . . . . . . . . . . 39 Switching application lock between enabled and disabled . . . . . . . . . . . . . . 39 Enabling the application lock. . . . . . . . . . . . . . . . . . . . . . . . . . . . . . . . . . . . . . . . . 39 Disabling the application lock . . . . . . . . . . . . . . . . . . . . . . . . . . . . . . . . . . . . . . . . 39 Setting a password for cancelling application lock . . . . . . . . . . . . . . . . . . . .
EMP Monitor Features
EMP Monitor Functions EMP Monitor Functions EMP Monitor lets you carry out operations such as checking the statuses of multiple EPSON projectors that are connected to a network at a computer monitor, and controlling the projectors from the computer. Following are brief descriptions of the monitoring and control functions that can be carried out using EMP Monitor.
Operating environment Operating environment Compatible computers Only Windows is supported. OS 7 • EMP Monitor cannot be used in environments which do not allow pings to be transmitted. • Windows NT4.0 does not support Arabic and Hebrew versions of EMP Monitor. • You must update Windows Vista to Windows Vista SP1 to use the Ukrainian version of EMP Monitor. Windows 98 Second Edition SP1 Windows Me Windows NT4.
Operating environment Limitations imposed by a Windows Vista environment. When using EMP Monitor under Windows Vista, note the following limitations. • You must have administrator authority in order to use Register at startup on the Environment setup screen of EMP Monitor. • Even after EMP Monitor has been uninstalled, the settings and log information will remain on the hard disk. If this information is no longer required, you may delete the EMP Monitor V4.30 folder.
Using EMP Monitor
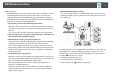
Registering and deleting projectors for monitoring Registering and deleting projectors for monitoring This operation is carried out when starting EMP Monitor for the first time after it has been installed and when you would like to add projectors. Once a projector has been registered, the status for the projector will be displayed automatically each time EMP Monitor is started from that point onwards. B 10 The main window will be displayed. The area described in red box is referred to as Grouping view.
Registering and deleting projectors for monitoring Registering projectors using automatic search (Searching for and registering projectors that are located in the same segment) B 11 Click "Search". Automatic searching will be carried out, and the names of the projectors that have been detected will be displayed. If a projector does not appear in the list, use "Registration by specifying an IP address (Manual registration)". s p.
Registering and deleting projectors for monitoring Procedures for registration 12 Display name Procedure A Select the projector(s) to be registered from the displayed list, and then click "Edit". The following window will be displayed. Enter the name of the projector(s) to be displayed in Grouping view or Detail list view. Up to a maximum of 32 bytes can be entered. A space cannot be used as the first character. Display icon Select the icon(s) to be displayed in Grouping view or Detail list view.
Registering and deleting projectors for monitoring B After entering the details, click "Register" to start the registration. When the message is displayed, click "OK". To continue registering other projector(s), repeat Steps 1 and 2. Projectors that have been registered using automatic search are searched for again by projector name each time EMP Monitor is started. C To end the registration operation, click in the top-right corner of the window or click "Cancel".
Registering and deleting projectors for monitoring C Click "Search". Automatic searching will be carried out, and the names of the projectors that have been detected will be displayed.
Registering and deleting projectors for monitoring Procedures for registration 15 Display name Procedure A Select the projector(s) to be registerd from the displayed list, and then click "Edit". The following window will be displayed. Enter the name of the projector(s) to be displayed in Grouping view or Detail list view. Up to a maximum of 32 bytes can be entered. A space cannot be used as the first character. Display icon Select the icon(s) to be displayed in Grouping view or Detail list view.
Registering and deleting projectors for monitoring B After entering the details, click "Register" to start the registration. When the message is displayed, click "OK". To continue registering other projector(s), repeat Steps 1 and 2. C To end the registration operation, click in the top-right corner of the window or click "Cancel". The icon(s) of the projector(s) you registered will be displayed in Grouping view or Detail list view. Refer to s "Monitoring window layout" p.
Registering and deleting projectors for monitoring Registration by specifying an IP address (Manual registration) Procedure You can also carry out this operation by selecting New - Projector (manual registration) from the Edit menu. B A Right-click in Grouping view and select "New" - "Projector (manual registration)". The following window will be displayed. If Detail list view is displayed, select "New" - "Projector (manual registration)" from the Edit menu.
Registering and deleting projectors for monitoring Port Number If using a serial TCP/IP conversion adapter to connect the projector, enter the port number. Monitor Password If a Monitor Password has been set for the projector, be sure to enter the Monitor Password that has been set. If the correct password is not entered at this time, it will not be possible to monitor and control the projector even though it is registered.
Registering and deleting projectors for monitoring from the Edit menu. Procedure A Right-click in Grouping view and select "New" - "Group". The following window will be displayed. Make the necessary settings while referring to the table below. If Detail list view is displayed, select New - Group from the Edit menu. B C D Group name 19 Enter the name of the group to be displayed in Grouping view or Detail list view. Up to a maximum of 32 bytes can be entered.
Registering and deleting projectors for monitoring If the projector name or IP address changes after registration For projectors that have been registered manually B 20 Carry out automatic search to re-register the projector(s). s p.11 Cancelling (deleting) projector registrations Procedure The registrations for projectors can be deleted if they are no longer required for monitoring or control using EMP Monitor.
Monitoring window layout Monitoring window layout You can monitor using either of the window layouts below. • Grouping view This view lets you check the status of group registrations in a hierarchical diagram. 21 • How to switch views Grouping view and Detail list view are switched as follows. Procedure Click the View menu, and select "Grouping view" or "Detail list view".
Monitoring window layout The icon patterns and their meanings are explained below. 22 Projector Network error (monitor password authentication error) Group No warnings or problems All projectors in the group are normal. Warning or problem No Monitor Password was entered when the projector was registered, or an incorrect Monitor Password was entered.s p.12, p.15, p.17 Network error (TCP connection error)*2 A projector in the group has a warning or problem status. Notification Network error (ESC/VP.
Monitoring window layout • Expanding and collapsing icons Each time you double-click a group icon, the icons for the projector that have been registered in that group are displayed or hidden. • Moving icons To change the position of an icon within Grouping view, simply drag and drop the icon to be moved. Monitoring using Detail list view Meanings of Detail list view icons The status of registered projectors is displayed as a list in Detail list view regardless of which groups the projectors belong to.
Monitoring window layout 24 The icon patterns and their meanings are explained below. Type: Displays the projector status. No warnings or problems*1 Warning or problem An error has occurred on the projector. Notification The projector requires immediate attention. Internal temperature normal High-temperature warning Internal temperature normal Internal temperature error High-temperature warning Error information: Shows a notification or warning/problem status using the following icons.
Monitoring window layout *1 When Temperature level display group view is set to On at Environment setup in the Tool menu, an icon indicating the internal temperature of the projector will be displayed on top of the projector icon. The default setting is Off. 25 Procedure A *2 Check the following items. - Check that the projector's power is turned on. - Check that the LAN cable is connected.
Monitoring window layout Sorting lists You can sort detailed lists by using a specific row as a sort key, such as projector name order or IP address order. Procedure Click the item name of the row you want to use as the sort key. Searching for desired icons (Projector list) The Projector list feature is useful for searching in lists when many groups and projectors are registered and the icon you are looking for is not displayed on screen.
Monitoring window layout B Select "Resident in the task tray". 27 Displaying projectors with problem or warning statuses in a list You can display a list of only the projectors which have a problem or warning status. Procedure C Click "OK". • Right-click the icon in the system tray to open a pop-up menu to select the Open the main screen or Exit. • If Register at start up in the Environment set up is selected, EMP Monitor starts automatically when the computer's power is turned on.
Monitoring window layout 28 The icon patterns and their meanings are explained below. Type: Shows the group or projector status. Error information: Shows the warning or problem status using the following icons. Display name: Shows the display name. Power: Shows the power on status for the projector. Power on and normal status Power on and abnormal status Power off and normal status Power off and abnormal status Lamp Hours: Shows the lamp operating time for the projector.
Monitoring window layout • Displaying properties for specified groups Right-click an icon in Grouping view and then select Property. 29 Displaying projector properties Right-click on a projector icon in Grouping view or Detail list view and select Property. A B If you double-click in a line, the properties for that group or projector will be displayed. 1 Shows the projector's serial number. If hyphens are displayed, confirm the serial number on the label of the projector.
Monitoring window layout When Log output is set to On at Environment setup in the Tool menu, transmission logs are stored. The default setting is Off. Displaying logs Procedure Select "Log" - "View" from the View menu. The web browser will open and the communication logs up until that time will be displayed. Deleting logs Procedure Select "Log" - "Delete" from the View menu. When the confirmation message is displayed, click "OK".
Using the control functions Using the control functions Carrying out control using control buttons Click the icon of a projector to be controlled in Grouping view or Detail list view, and click a control button to enable control of only that selected projector. You can also enable control of all selected projectors by selecting more than one projector in Grouping view or Detail list view and clicking a control button. The methods of selecting more than one projector at the same time are as follow.
Using the control functions The following table shows the meanings of the control buttons. 32 * If the button does not function, you can switch the input source using the EasyMP control button. Power On Turns the projector power on. Power Off Turns the projector power off. Switch source Computer1 Switches the video input source to the Computer1 port or Computer port. Switch source Computer 2 Switches the video input source to the Computer2 port.
Using the control functions You can select projectors and right-click on them to select Web control even when the following are being displayed. Group properties s p.28 Warning and Error Projector list (Control operations can only be carried out for projectors with a warning status.) s p.
Using the control functions Procedures for new timer settings Procedure A Click "Add" on the timer setting window. The following window is displayed and the new timer settings are applied. At Operation, you can carry out the operations of turning the power on and off and switching the input sources, similarly for the control buttons on the main window. If you set the input source switching, the projector's power will turn on at the timer start time even if it is not on at the time.
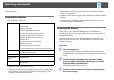
E-mail notification function settings E-mail notification function settings The mail notification function can be used to send corresponding notification messages to a preset e-mail address when a projector that is connected to the network assumes a certain status, or if it experiences a problem or warning. By using this function, the operator can be notified of a projector’s status or problems even when the operator is in a different location from the projectors.
E-mail notification function settings C Click "Notification event" and check the items for mail notification in the window that appears. D Click "OK". The Set mail notification function window appears again. Repeat Steps 3 and 4 to set the notification events to be notified. E When the setup is complete, click "OK".
E-mail notification of problem/warning/status The details contained in the e-mail message can consist of the following. E-mail notification of problem/warning/status If the projector experiences a problem or enters a status requiring attention, an e-mail like that shown below is sent to the address specified for Recipient mail address. If there is more than one problem, warning, or status, the corresponding messages are output to separate lines.
E-mail notification of problem/warning/status Message Other error Supply System Error (Ballast) Remedy Stop using the projector, disconnect the power cable from the electrical outlet, and contact Epson.s Projector's User's Guide Auto Iris Error Network error (TCP connection error) Check that the projector's power is turned on and the LAN cable is connected, and also check that Network Monitoring is set to ON and Standby Mode is set to Network ON.
Application lock function Application lock function You can use the application lock to prevent third parties from operating the projectors using EMP Monitor and from changing settings without authority. Opening and closing EMP Monitor and status monitoring can still be carried out even when the application lock is applied. In addition, when a password has been set, the password must be entered in order to cancel the application lock.
Appendix
Troubleshooting 41 Troubleshooting An e-mail message is not sent when a problem occurs with a projector Projectors cannot be monitored or controlled Cause Cause Remedy Is the projector connected Check that the network cable has been to the network correctly? connected correctly. If the cable is not connected correctly, reconnect it. Has the projector been set Check the settings for the Network up correctly for configuration menu command.
General Notices General Notices Copyright Notice All rights reserved. No part of this publication may be reproduced, stored in a retrieval system, or transmitted in any form or by any means, electronic, mechanical, photocopying, recording, or otherwise, without the prior written permission of Seiko Epson Corporation. No patent liability is assumed with respect to the use of the information contained herein.