User’s Manual M00053900
All rights reserved. No part of this publication may be reproduced, stored in a retrieval system, or transmitted in any form or by any means, electronic, mechanical, photocopying, recording, or otherwise, without the prior written permission of Seiko Epson Corporation. No patent liability is assumed with respect to the use of the information contained herein. While every precaution has been taken in the preparation of this book, Seiko Epson Corporation assumes no responsibility for errors or omissions.
Standards and Approvals The following standards are applied only to the printers that are so labeled. (EMC is tested using the Epson power supplies.) North America: FCC/ICES-003 Class B FCC Compliance Statement For American Users This equipment has been tested and found to comply with the limits for a Class B digital device, pursuant to Part 15 of the FCC Rules. These limits are designed to provide reasonable protection against harmful interference in a residential installation.
Safety Precautions This section presents important information intended to ensure safe and effective use of this product. Please read this section carefully and store it in an accessible location. WARNING: Shut down your equipment immediately if it produces smoke, a strange odor, or unusual noise. Continued use may lead to fire. Immediately unplug the equipment and contact your dealer or a Seiko Epson service center for advice. Never attempt to repair this product yourself.
Caution Label The caution label on the product indicates the following precaution. CAUTION: Take care not to injure your fingers on the fixed blade of the autocutter. Restriction of Use When this product is used for applications requiring high reliability/ safety, such as transportation devices related to aviation, rail, marine, automotive, etc.; disaster prevention devices; various safety devices, etc.; or functional/precision devices, etc.
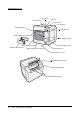
Part Names Error LED Power LED Ink LED Paper LED Cut button Release lever Feed button Paper ejection guide Roll paper cover Paper ejection table Paper ejection tray Paper ejection guide lock Ink cartridge cover Power switch Power switch cover Fanfold paper cover Paper feed guide Fanfold paper guide 4 TM-C3400 User’s Manual
Power switch Turns on/off the printer. Power switch cover Installing the power switch cover onto the power switch prevents inadvertent changing of the power switch. WARNING: If an accident occurs with the power switch cover attached, unplug the AC cable immediately. Continued used may cause fire. Power LED Lights when the power is on, and is off when the power is off. Flashes when the printer is operating (initializing, head cleaning, or printing) or in an error state.
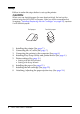
Setup Follow in order the steps below to set up the printer. CAUTION: When you use fanfold paper (for rear feed printing), first set up the printer using the INCLUDED roll paper. After you have completed ink charging (“Installing/Replacing the Ink Cartridge” on page 22), replace it with fanfold paper. Roll paper 1. 2. 3. 4. 5. Fanfold paper Installing the printer (See page 7.) Connecting the AC cable (See page 7.) Connecting the printer to the computer (See page 8.
Installing the Printer CAUTION: Install the printer horizontally on a flat, stable, and vibration-free surface. Otherwise, the roll paper cover may not operate correctly, and your fingers may be caught. Do not tilt the printer with the roll paper cover open. The roll paper cover may close unexpectedly, and your fingers may be caught. ❏ ❏ ❏ ❏ ❏ Be sure to open the roll paper cover and remove the cushion materials in the printer.
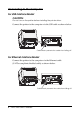
Connecting to the Computer For USB Interface Model CAUTION: Do not turn on the printer before installing the printer driver. Connect the printer to the computer via the USB cable as shown below. Cable hook: prevents the cable from falling off. For Ethernet Interface Model Connect the printer to the computer via the Ethernet cable (CAT5e-compliant shielded cable) as shown below. Cable hook: prevents the cable from falling off.
Installing Easy Setup Utility and Printer Driver Follow the steps below to install Easy Setup Utility and the printer driver. CAUTION: Be sure to confirm the operating environment (page 28) before installing. You are required to login as a user with administrative rights. Installing Easy Setup Utility 1. Load the TM-C3400 Setup and Utilities CD on your computer. 2. Click TM-C3400EasySetup. Follow the instructions displayed to install Easy Setup Utility.
3. Click [Install Driver], and then click [Local]. 4. Complete the installation by following the instructions displayed. If the screen confirming the connection to the computer is displayed during the installation, turn on the printer. For Ethernet Interface Model 1. 2. Turn on the printer. Click the TM-C3400 Easy Setup icon on your desktop. Easy Setup Utility starts. 3. Click [Install Driver], and then click [Network]. Complete the installation by following the instructions displayed.
Printer Settings Perform printer settings with DIP switches, and then with Setup Wizard in TM-C3400 Easy Setup Utility. Settings with DIP Switches CAUTION: DIP switch settings are enabled only when the power is turned on or the printer is reset via the interface. If the settings are changed after that, the functions will not change. 1. 2. 3. Turn off the printer. Open the ink cartridge cover and remove the DIP switch cover. Set the DIP switches, using the tip of a tool, such as a small screwdriver. .
Settings with Setup Wizard 1. 2. Turn on the printer. Click the TM-C3400 Easy Setup icon on your desktop. Easy Setup Utility starts. 3. Click [Setup Wizard]. Complete the printer settings by following the instructions displayed.
Installing/Replacing Paper CAUTION: Do not tilt the printer with the roll paper cover open. The roll paper cover may close unexpectedly, and your fingers may be caught. CAUTION: When you use fanfold paper (for rear feed printing), first set up the printer using the INCLUDED roll paper. After you have completed ink charging (See “Installing/Replacing the Ink Cartridge” on page 22), replace it with fanfold paper. Confirm that printer settings (See page 11.
When Installing Roll Paper ❏ ❏ ❏ When you install the roll paper for the first time (when you install the ink cartridge for the first time): Perform ➂ and ➃. When you have used up the roll paper (when you install same type of roll paper): Perform ➀ and ➃. When you change the paper type: Perform ➀ ➃. ➀ Removing roll paper (page 14) ➁ Removing the paper feed guide (page 15) ➂ Adjusting the guides (page 15) ➃ Loading the paper and turning on the printer (page 17) ➀ Removing roll paper 1.
➁ Removing the paper feed guide CAUTION: The paper feed guide should be attached to the printer only when you use fanfold paper. Be sure to remove the paper feed guide when you use roll paper. 1. 2. Pull the release lever to open the roll paper cover. If the paper feed guide is attached into the grooves inside of the roll paper cover, slide it in the direction of the arrow to remove it. 3. Close the roll paper cover.
3. Push the roll paper guide on the left in the direction of the arrow, and load the roll paper with the printable side up completely inside the printer. 4. 5. Lock the roll paper guide. Unlock the paper ejection guide, using the tip of a tool, such as a pen. 6. Slide the paper ejection guide to align it with the roll paper width. 7. Lock the paper ejection guide, and then close the roll paper cover.
➃ Loading the paper and turning on the printer 1. 2. Pull the release lever to open the roll paper cover. Load the roll paper with the printable side up completely inside the printer. 3. While aligning the roll paper with the paper ejection guide, close the roll paper cover. 4. Turn on the printer, and then the paper is fed automatically.
When Installing Fanfold Paper ❏ ❏ When you have used up the fanfold paper (when you install same type of fanfold paper): Perform ➀ and ➃. When you change the paper type: Perform ➀ ➃. ➀ Removing fanfold paper (page 18) ➁ Attaching the paper feed guide (page 19) ➂ Adjusting the guides (page 19) ➃ Turning on the printer and loading the paper (page 21) ➀ Removing fanfold paper 1. Remove the paper left on the paper ejection table. 2.
➁ Attaching the paper feed guide CAUTION: Be sure to attach the paper feed guide when you use fanfold paper. 1. Open the fanfold paper cover and take out the paper feed guide. 2. 3. Pull the release lever to open the roll paper cover. Insert the paper feed guide into the grooves inside of the roll paper cover to attach it. 4. Close the roll paper cover. ➂ Adjusting the guides 1. Unlock the paper ejection guide, using the tip of a tool, such as a pen.
2. Slide the paper ejection guide as wide as possible, and lock it. When you install fanfold paper for the first time, or when the paper width needs to be changed, continue to steps 3 and 4. 3. Open the fanfold paper cover and unlock the fanfold paper guide. 4. Slide the fanfold paper guide to align it with the fanfold paper width, and lock it.
➃ Turning on the printer and loading the paper 1. 2. Turn on the printer. When the Power LED stays on after flashing, insert the paper with the printable side up until it is automatically drawn in (approximately 100 mm), and then the paper is fed automatically. 3. Place the paper straight at least 40 mm from the printer. 40mm 4. Close the fanfold paper cover.
Installing/Replacing the Ink Cartridge CAUTION: When the ink cartridge is installed for the first time: ❏ Be sure to install the roll paper before installing the ink cartridge. For details on how to install the roll paper, see “Installing/Replacing Paper” on page 13. ❏ When you install continuous paper, about 40 inches of paper is fed and the printer enters the error state right after the printer is turned on. In that case, turn off the printer, and then turn it back on.
Note: When the ink cartridge is installed for the first time, the printer uses ink to prepare for printing (ink charging). Cartridge yields vary based on such factors as type of item printed, print settings, paper type, frequency of use, and temperature. To insure print quality, some ink remains in the cartridge after the Ink LED comes on. The ink cartridge contains 3 colors of ink.
Attaching/Adjusting the Paper Ejection Tray When you attach the paper ejection tray, you can temporarily store the printed paper in the tray. CAUTION: Paper may not stay in the paper ejection tray, depending on the paper curl and length. 1. Attach the paper ejection tray to the hooks under the paper ejection table. 2. Pull the lever at the bottom-right of the paper ejection tray to unlock it. 3. Slide the bottom tray to align it with the paper length, and lock it.
Displaying the Printer Driver Follow the steps below to display the printer driver. For details on how to use the printer driver, see the printer driver help. 1. 2. Open [Printers and Faxes] (or [Printers]). Right-click on [EPSON TM-C3400] and click [Printing Preferences] to display the printer driver. Cleaning the Autocutter Adhesive from labels may stick to the fixed blade of the autocutter, which may prevent the autocutter from cutting paper cleanly.
Head Cleaning This printer has an automatic nozzle check function, and automatically performs head cleaning under normal conditions. However, depending on the printer settings, the printout may be faint or incorrect colors may be printed, due to a clogged print head. If this happens, perform head cleaning by using the printer driver. 1. 2. 3. 4. Turn on the printer. Display the [Printing Preferences] screen of the printer driver. Click [Manual Head Cleaning] on the [Maintenance And Utilities] tab.
Specification Printing method Serial ink jet, dot matrix Three-color printing Paper feed Forward and reverse friction feed Autocutter Cutting method By separated-blade scissors Cutting type Full cut (cuts paper completely) Minimum cut length 15 mm {0.
Temperature and humidity Printing 10 to 35°C {50 to 95°F} 20 to 80% RH (No condensation) Storage When packed: -20 to 60°C {-4 to 140°F}, 5 to 85%RH (No condensation, ink not loaded) (At -20°C or 60°C {-4 or 140°F}: up to 120 hours) When ink loaded: -20 to 40°C {-4 to 104°F} (At -20°C {-4°F}: up to 120 hours) (At 0 to 30°C {32 to 86°F}: up to 6 months) (At 40°C {104°F}: up to 1 month) Overall dimensions (H W D) 261 255 275 {10.28 10.04 10.