User’s Guide 3 4001786 G01-04
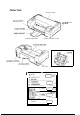
Printer Parts printer cover ontrol panel paper feeder cover paper separator ink cartridge AC inlet I ” 0 DATA 0 PAPER OUT 000 IF 000 Courier 000 Roman T fPS\ I 0 0 0 0 0 PAUSE O N T y-1 n ” a I i ?=--I
EPSON ® 48-NOZZLE INK JET PRINTER All rights reserved. No part of this publication may be reproduced, stored in a retrieval system, or transmitted in any form or by any means, mechanical, photocopying, recording, or otherwise, without the prior written permission of Seiko Epson Corporation. No patent liability is assumed with respect to the use of the information contained herein. Neither is any liability assumed for damages resulting from the use of the information contained herein.
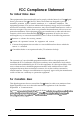
FCC Compliance Statement For United States Users This equipment has been tested and found to comply with the limits for a Class B digital device, pursuant to Part 15 of the FCC Rules. These limits are designed to provide reasonable protection against harmful interference in a residential installation. This equipment generates, uses, and can radiate radio frequency energy and, if not installed and used in accordance with the instructions, may cause harmful interference to radio or television reception.
Important Safety Instructions Read all of these instructions before you set up your printer. Follow all warnings and instructions marked on the printer. Unplug the printer from the wall outlet before you clean it, and use a damp cloth for cleaning, not liquid or aerosol cleaners. Do not use your printer near water or spill any liquid on it. Do not place the printer on an unstable cart, stand, table, or other surface that may allow the printer to fall. Do not block any slots or openings in the cabinet.
LI Unplug the printer from the wall outlet and have it repaired by a qualified service person under the following conditions: When the power cord or plug is damaged or frayed If liquid has been spilled into it If it has been exposed to rain or water If it does not operate normally when the operating instructions are followed.
Tips for Printing on Single Sheets There are a few things you should know about printing on single sheets as opposed to continuous paper. When you print on single sheets, you may notice that your printer prints the first page of your file correctly but then prints too low on the next page, or that it prints the last few lines from one page onto the next.
Contents lntroduction Features ........................................................................................... 1 How to Use This Manual .............................................................. 2 Warnings, Cautions, and Notes ................................................... 2 Chapter 1 Setting Up Your Printer About Your Ink Jet Printer ..................................................................l-2 A few precautions.. ...............................................................
Controlling the Page with Micro Feed.. .............................................2-8 Adjusting the loading position ..................................................2-9 Adjusting the print position .......................................................2-10 Selecting Character Fonts ....................................................................2-11 Scalable Fonts ...............................................................................2-12 Condensed printing.. ...............................
Bit image ......................................................................................A-20 Graphics .......................................................................................A-21 Character Tables ..................................................................................A-21 Glossary Index .
Your new Epson@ printer is a 48-nozzle ink jet printer, ideal for quiet, high-speed printing. Features Your printer offers the following features: High print quality. Epson’s new ink jet technology delivers crisp 360 x 360 dots per inch (dpi) text and graphics. Flexible paper handling. Use the built-in paper feeder to load up to 100 sheets automatically. You can also insert envelopes or single pages manually without removing the paper supply. Fast printing speed.
How to Use This Manual Here’s what you’ll find in this book: CI Chapter 1 describes how to unpack and set up the printer. It also describes how to load the paper feeder and print a self test. Be sure to read and follow these instructions. Cl Chapter 2 contains information that you will need to use special printer functions. It explains how to load paper manually and change printer settings from the control panel. LI Chapter 3 contains maintenance and troubleshooting information.
Chapter 1 Setting Up Your Printer About Your Ink Jet Printer .................................................................. 1-2 A few precautions ....................................................................... 1-2 Choosing the right paper ........................................................... 1-3 Unpacking the Printer ......................................................................... 1-4 Attaching the paper support ......................................................
About Your Ink Jet Printer If you’re new to ink jet printers, you may wonder how they differ from dot matrix or laser printers. Two noticeable benefits of this technology are high print quality and quiet printing. An ink jet printer produces cost-effective, quality print results. When you use the right paper, you get crisp, laser-sharp printouts usually associated with laser printers. And the ink cartridge inside your printer is easier to replace and more affordable than the toner cartridges used by lasers.
0 Install the ink cartridge immediately after you remove it from its package. Leaving the cartridge unpacked for a long time before use may result in poor print quality. 0 Do not use an ink cartridge beyond its rated life expectancy. Ink cartridges are good up to the date printed on the cartridge carton. 0 When moving the ink cartridge from a cold place to a warm one, let it sit for about one hour until the ink warms to the new temperature.
To test a supply of paper, take a single sheet from the package and load it in the printer. Perform the self test and check the results. You should test both sides of the paper to determine which gives you the best quality printing. If the ink does not bleed or smear, the paper should be suitable for use with your printer.
In some locations, the power cord comes attached to the printer. The shape of the AC plug varies by country; be sure the plug included is the right shape for your location. You must remove all packing and protective materials packed with your printer before you can set it up and turn on the power. Follow the directions on the Notice Sheet (inserted in your printer) to remove these materials. Save all of the packaging and the protective materials in case you ever need to transport the printer.
Choosing a Place for the Printer When selecting a location for your printer, follow these guidelines: Place the printer on a flat, horizontal, stable surface. If the printer is tilted or at an angle, it cannot operate properly. Place the printer close enough to the computer for the interface cable to reach it easily. Leave adequate room for easy operation and maintenance. Avoid using or storing the printer in places subject to rapid changes in temperature and humidity.
Plugging in the Printer 1. Make sure that the power switch is turned off. It is off when the 0 side of the switch is pressed down. 2. Check the label on the back of the printer to make sure the voltage required by the printer matches that of your electrical outlet. Also, make sure that you have the correct power cable for your power source. Caution: It is not possible to adjust the printerfor use at another voltage.
Installing the Ink Cartridge Each ink cartridge contains enough ink to print about 700 pages. The exact number of pages a single cartridge can print varies according to the amount of text and graphics on each page. Cautiow El The iuk cartridge is a self-contained unit. Under ordinary use, ink will not leak from the cartridge. If ink does get on Tour hands, wash them thoroughly with soap and water. lf mk gets iuto l/our et/es, flush them immediately with water.
1. Make sure the printer is turned off. 2. Hold down both the ALT and PAUSE buttons while you turn on the printer. Release the buttons after the printer starts initializing. The print head moves to the ink cartridge replace position automatically.
1-10 3. Open the printer cover. 4. Pull the top of the ink cartridge clamp towards you to open it.
5. Open the foil package containing the ink cartridge and remove it from the protective cardboad. Make sure to remove the tape seal from the ink cartridge. 6. Lower the cartridge into the holder with the label face up and the arrow mark on the cartridge towards the arrow mark on the printer case.
7. Push the ink cartridge clamp towards the back of the printer to secure the cartridge. 8. Press the ALT button again to charge the ink delivery system. It takes about one minute. The PAUSE light flashes throughout the cycle and turns off when the ink charging has finished. Caution: Do not tur~z off or reset the printer until the ink-charging cycle is complete. 9. I-12 Close the printer cover.
Testing the Printer After you charge the ink delivery system, you can use the builtin self test to make sure the printer is working properly. You can run the self test with paper from the built-in paper feeder or by feeding a sheet manually. This section describes loading paper in the paper feeder. Loading paper in the paper feeder 1. Open the paper feeder cover and lift the paper separator. 2. Fan a stack of letter-size or A4 paper; then tap it on a flat surface to even the edges.
3. Insert a stack of paper all the way into the paper feeder with the printable surface face-down. Align the right edge of the stack with the right edge of the paper feeder. Then move the left edge guide to match the width of your paper, as shown below. 4. Close the paper feeder cover and lower the paper separator to secure the paper stack. Now you are ready to run the self test. For more about printing with the paper feeder, be sure to read “Tips for Using the Paper Feeder” at the end of this chapter.
2. While holding down the FONT button, turn on the printer. (Hold down the button until the printer starts working; it takes a few seconds,) It loads a sheet of paper automatically from the paper feeder and begins the self test. The printer prints characters in each font, in the order the fonts appear on the control panel. Here is part of a typical self test: Courier !“#$%&I()*+,-./0123456789:; <=>?@ABCDEFGHIJKLMNOPQR !"#$%&'()*+,-./0123456789:; <=>'?@ABCDEFGHIJKLMNOPQRS "#$%&'()*+,-.
Follow these steps: 1-16 1. Make sure both the printer and computer are turned off. 2. Plug the cable connector securely into the printer’s interface connector. 3. Squeeze the wire clips together until they lock in place on both sides. If your cable has a ground wire, connect it to the ground connector above the interface connector. 4. Plug the other end of the cable into the computer’s parallel interface.
Setting Up Your Software Programs Most application programs let you specify the type of printer you use so that the program can take full advantage of the printer’s features. Many of these programs provide an installation or setup menu that presents a list of printers. To take full advantage of your printer’s features, including ESC/P 2, choose one of the first five printers on the list below. If none of these is listed, contact your software manufacturer for an update that includes one of these.
Tips for Using the Paper Feeder Following the tips below will give you the best performance when printing with the paper feeder. Load paper into the paper feeder before you turn on the printer and send data. When the printer receives data from the computer, it loads a single sheet automatically and begins to print. If the printer runs out of paper during a print job, reload the paper feeder and then press the LOAD/EJECT button to continue printing.
Chapter 2 Using Other Printer Functions Loading Paper Manually.. ................................................................... 2-2 Paper sizes .................................................................................... 2-2 Printing on single sheets ............................................................ 2-2 Printing on envelopes ................................................................. 2-4 Operating the Control Panel.. .............................................................
Loading Paper Manually You can load single sheets of paper or envelopes from the manual feed slot without removing the paper supply from the paper feeder. Paper sizes You can use the manual feed slot to load single sheets of paper from 182 mm (7.1 inches) to 216 mm (8.5 inches) wide and from 257 mm (10.1 inches) to 297 mm (11.7 inches) long. You can also load the following envelope sizes from the manual feed slot: Ll Envelope No. 6,166 mm (6.5 inches) wide x 92 mm (3.6 inches) Ll Envelope No. 10,240 mm (9.
2. Insert a single sheet of paper into the slot until it meets resistance, aligning the right edge of the paper with the arrow mark on the printer. The printer automatically loads the sheet. 3. Send data from the computer to the printer. When the printer receives the data, it begins printing. When the printer finishes printing, it ejects the sheet automatically. If the sheet does not come all the way out, press the LOAD/EJECT button. 4. You can print as many sheets as you like from the manual slot.
Printing on envelopes You can also use the manual feed slot to print on individual envelopes. 1. Turn on the printer and open the printer cover. 2. Turn the paper-thickness lever clockwise as far as it will go. 3. Close the printer cover.
4. Insert an envelope into the manual feed slot with the wide end at the top entering the printer first, and the printable side face-up, until it meets resistance. The printer loads the envelope to the print position automatically. 5. Send data from your computer. The printer ejects the envelope automatically when it is finished printing. Note: U Make sure your application program keeps the printing entirely zuithin the printable area of the envelope.
Operating the Control Panel The printer control panel gives you easy control over most common printer operations. It consists of indicator lights and buttons. Indicator lights PAUSE On when printing is paused FONT Indicate the current font setting. These three lights go on and off when you press the FONT button. The font menu on the control panel helps you determine which font is selected. For instructions on selecting fonts, see page 2-11. CONDENSED On when the condensed printing mode is selected.
ECONOMY On when the economy printing mode is selected. When this mode is selected, the printer uses fewer dots per character. The print speed is the same in both economy and LQ mode, but the economy mode uses less ink. This mode is ideal for rough drafts and editing work. INK OUT On when the ink cartridge runs out of ink. Rapid flashing indicates the ink is low. For instructions on replacing the ink cartridge, see page 3-2. PAPER OUT On when the printer runs out of paper.
ALT Hold down this button for several seconds to move the print head to the ink cartridge replace position when the printer is paused. The ALT button also alters the functions of the other buttons. Hold down the ALT button and press another button to change the functions as follows: PRINT HEAD CLEANING (ALT + PAUSE) Starts print head cleaning cycle. See “Cleaning the Print Head” on page 3-3 for details.
Adjusting the loading position The loading position is the position of the paper when the printer loads it from the paper feeder or the manual feed slot. If printing is too high or low on the page, you can change the loading position with the micro-feed feature as follows: 1. Make sure the printer is turned on. 2. Load a sheet of paper from the paper feeder by pressing the LOAD/EJECT button, or from the manual feed slot by inserting it into the slot. 3. Open the paper feeder cover. 4.
Note: U The printer has a minimum and maximum loading position. If you try to move the loading position beyond these limits, the printer beeps and the paper stops moving. 3 When the paper reaches the factory-set loading position, the printer beeps. Use the factory setting as a reference point when adjusting the loading position. Adjusting the print position The print position is the position on the page where the print head actually prints during a print job.
Selecting Character Fonts Your printer has seven built-in character fonts including two new Epson fonts: the Epson Roman T and Epson Sans Serif H. (The Roman T is similar to the TimesTM font; Sans Serif H is similar to HelveticaTM.) Press the FONT button to select from the seven fonts listed on the control panel. The three FONT lights come on (0) or go off (a) to indicate the active font. 003 FONT 000 Courier m RomanT (PS) 00.
Scalable Fonts The size of the Roman, Sans Serif, Roman T, and Sans Serif H fonts can be selected from 8 to 32 points in 2-point increments by using your application program or by sending an ESC/P 2 command. See the documentation that came with your application program for information on selecting the size of scalable fonts. See the Appendix of this manual for a list of ESC/P 2 commands.
Using the Default-Settings Mode Your printer comes with a series of internal settings that control a variety of printer functions, such as print direction and auto line feed. Because these settings take effect each time you turn on the printer, they are called default settings. The factory default settings are designed to meet the needs of most users, so you may not need to change them. The table below lists all the features you can select in the default-settings mode.
Default settings descriptions Character table Character tables contain the characters and symbols used by different languages. The printer prints text with the selected character table. When you select this feature, the font lights on the control panel go on or off to indicate the current selection. Auto print direction The printer ordinarily prints text bidirectionally for speed and prints graphics characters unidirectionally for precise vertical alignment.
Auto line feed When the auto line feed feature is on, each carriage return (CR) code is accompanied by a line feed (LF) code. If your printed text is unexpectedly double-spaced, set this feature to off. If text lines print on top of each other, set it to on. Changing the default settings To change the printer’s default settings, you press the control panel buttons; the control panel lights show your selections. Follow the steps below to make your changes: 1.
After you press the ALT button, the printer prints the current default settings, and the next instruction in the language you selected. Wait until printing is finished, then go to the next step. 4. To move to the feature you want to change, press the ALT button until the DATA, PAPER OUT, and INK OUT lights indicate the appropriate selection.
Network mode Off 0.0 on 0.
6. Repeat steps 4 and 5 to make all of your changes. 7. To exit the default-settings mode, turn the printer off. Note: LI You may exit the default-settings mode any time by turning off the printer. Any changes you have made remain in effect until you change them again. Q lf you want to check the new default settings, enter the defaultsettings mode again and print the current settings. After you check them, turn the printer ofi to exit without making changes.
Chapter 3 Maintenance and Troubleshooting Replacing the Ink Cartridge ................................................................ 3-2 Cleaning the Print Head ...................................................................... 3-3 Cleaning the Printer ............................................................................. 3-4 Transporting the Printer ...................................................................... 3-4 Troubleshooting .......................................................
Replacing the Ink Cartridge When the INK OUT light on the control panel flashes, the ink in the ink cartridge is low. The printer will continue printing until the cartridge is completely empty. When it is out of ink, the printer stops and the INK OUT light stays on. Printing will not resume until you insert a new cartridge. It’s a good idea to keep a spare ink cartridge on hand. Use Epson ink cartridge SO20025 to ensure proper operation and preserve the life of the print head.
4. Lift the cartridge out of the printer and dispose of it properly. Do not take the used cartridge apart or try to refill it. Caution: lf ink does get on your hands, wash them thoroughly with soap and water. If ink gets into your eyes, flush them immediately with water. 5. Turn to page l-11 and follow the steps there to install the new cartridge. Note: When you replace the cartridge, the printer will not recharge the ink delivery system again.
Cleaning the Printer To keep your printer operating at its best, you should clean it thoroughly several times a year. 1. Make sure the printer is turned off. 2. Remove any paper from the paper feeder. 3. Use a soft brush to carefully brush away all dust and dirt. 4. If the outer case or the inside of the paper feeder is dirty, clean it with a soft, clean cloth dampened with mild detergent. Keep the printer cover closed to prevent water from getting inside the printer. 5.
Note: Do not remove the ink cartridge when transporting. 2. Unplug the power cord from the electrical outlet; then disconnect the interface cable from the printer. 3. Remove the paper from the paper feeder. 4. Attach the protective material to the printer. 5. Repack the printer and power cord and place them in the original box. 6. Keep the printer flat in the box during transport. 7. If the print quality is poor after transport, clean the print head. See “Cleaning the Print Head.
Plug another electrical device into the outlet to determine whether it is working. The lights come on briefly but then go off and stay off. Check that the printer’s voltage rating matches the voltage of your electrical outlet. If the voltages do not match, unplug the printer and contact your dealer immediately. Do not reconnect the power cord to an electrical outlet. Printing All lights on the control panel are on but nothing prints. Contact your dealer, Printing stops and the printer beeps five times.
The PAUSE light is off but nothing prints. The interface cable may not be plugged in securely. Check both ends of the cable between the printer and the computer. Make sure your interface cable meets both the printer and computer specifications. Make sure that your software is properly set up for your printer. Printed output is not as expected. If the printer does not print correctly, try the self test described in Chapter 1.
Dots are missing in printed characters or graphics. The print head nozzles may be clogged. Hold down the ALT button and press the PAUSE button for two seconds to clean the print head. See “Cleaning the Print Head” earlier in this chapter. Set the Mixed text/graphics mode to on in the default-settings mode. See “Using the Default-Settings Mode” in Chapter 2. Set the Network interface mode to on in the default-settings mode. See “Using the Default-Settings Mode” in Chapter 2.
You may not be printing on the correct side of the paper. Test both sides to determine which side gives you the best print quality. Your paper may be moist or damp. Do not store your paper in a damp or humid environment. The typestyles or characters set with your software do not print. Check that the program is correctly configured for your printer. The font selected on the control panel does not print. Your software settings may be overriding the control panel setting.
The text prints an extra blank line between each text line. Set auto line feed to off in the default-settings mode so that two line-feed signals are not sent. See “Using the Default-Settings Mode” in Chapter 2. Line spacing is incorrect. Adjust the line-space setting with your software. Printed page length is not as expected. The page length setting may not match the length of the paper loaded in the printer. Change the page length setting within your software to match to the paper you are using.
The ejected paper is wrinkled. The paper is too thin or is damp. Make sure that the paper you are using meets the specifications. See “Technical Specifications” in the Appendix. Do not store your paper in a damp or humid environment. The paper does not fully eject. Use the LOAD/EJECT button to eject the page. The paper may be too long to be loaded from the manual feed slot. Use paper that is within the specified size. See “Technical Specifications” in the Appendix.
3. Pull the paper out gently. If the paper tears, make sure you remove any remaining pieces. 4. If the paper is caught in the paper ejection area, gently pull it out of the printer. 5. Push the access panel back onto the rear of the printer and close the printer cover and the paper feeder cover. Preventing paper feed and paper jam problems If you have frequent paper feed or paper jam problems, refer to this checklist of corrective measures: Ll Use a higher-quality paper, one that is not too thin or rough.
Technical Specifications ..................................................................... A-2 Printer specifications ................................................................. A-2 Interface specifications .............................................................. A-7 Initialization ................................................................................ A-11 Command Summary .......................................................................... A-13 Sending printer commands ......
Technical Specifications Printer specifications Printing method: Drop on demand 48-nozzle ink jet matrix Printable columns and printing speed: Character pitch Printable columns Printing speed 10 cpi 80 150 cps 12 cpi 96 180~~~ 15 cpi 120 225 cps 17 cpi (10 cpi condensed) 137 257 cps 20 cpi (12 cpi condensed) 160 300 cps cpi: characters per inch cps: characters per second Maximum Resolution: 360 x 360 dpi text, graphics Printing direction: Bidirectional with logic-seeking for text an
Bitmap fonts: Select other font/pitch combinations using ESC/P 2 commands. See the command summary later in this chapter for a list of commands.
Single sheets (Manual insertion): 182 to 216 mm (7.1 to 8.5 inches) Width 257 to 297 mm (10.1 to 11.7 inches) Length 0.065 to 0.11 mm (0.0026 to 0.0043 inches) Thickness 52 to 90 g/m2 (14 to 24 lb) Weight Bond Paper, plain paper Quality Note: Use recycled paper under normal temperature and humidity conditions only. Poor quality paper may reduce print quality, as well as cause paper jams and other problems. lf you encounter problems, switch to a higher grade of paper.
Envelopes: A Ei C A The minimum top margin is 3.0 mm (0.12 inches). B The minimum left and right margins is 3.0 mm (0.12 inches). C The minimum bottom margin is 13.0 mm (0.51 inches). Mechanical Paper-feed method: Ink cartridge (S020025): Color: Print capacity: Friction MTBF: Black Approximately 0.7 million characters in letter quality mode 2 years from production date (The cartridge life may vary, depending on how often you use the print head cleaning function.
Print head life: 1,000 million dots per nozzle Dimensions and weight: Height Width Depth Weight 720 V model: Rated voltage: Input voltage range: Rated frequency range: Input frequency range: Rated current: Power consumption: 220-240 V model: Rated voltage: Input voltage range: Rated frequency range: Input frequency range: Rated current: Power consumption: 154 mm (6.0 inches) 435 mm (17.1 inches) 264 mm (10.4 inches) (no paper) 4.8 kg (10.6 lb) AC 120 V AC 103.5 to 132 V 50 to 60 Hz 49.5 to 60.5 Hz 0.
Humidity (without condensation): Operation: Storage: 20 to 80% RH 5 to 85% RH Print assured area 10°C (50°F) I I 27°C (80°F) 35°C (95°F) Safety approval Safety standards: US model: European model: UL1950 with D3, CSA22.2 #220 EN 60950 (TUV) IEC 950 (SEMKO, DEMKO, NEMKO, SETI) R.F.I.: US model: European model: FCC Part 15 Subpart B class B Vfg. 243 (VDE 0878 part 3, part 30) EN 55022 (CISPR Pub 22) class B Interface specifications Your printer is equipped with an g-bit parallel interface.
The table below provides the connector pin assignments and describes their respective interface signals. Signal Pin Return Pin Signal Direction Description 1 19 STROBE IN STROBE pulse to read data. Pulse width must be more than 0.5 microseconds at the receiving terminal. 2 3 4 5 6 7 8 9 20 21 22 23 24 25 26 27 DATA 1 DATA2 DATA3 DATA4 DATA5 DATA6 DATA7 DATA8 IN IN IN IN IN IN IN IN These signals represent information of bits 1 to to 8 of parallel data, respectively.
cleared. This level is normally HIGH; its pulse width must be more than 50 microseconds at the receiving terminal. l- 32 - ERROR OUT This level becomes LOW when the printer is: 1) out of paper 2) in an error state 33 - GND - Same as for pins 19-30 34 - NC - Not used 35 - OUT Pulled up to 5 V through 1 .O k.Q resistance ^ - NC Not used Note: 0 The column heading ‘Direction” refers to the direction of signal flow as viewed from the printer.
0 Data transfer must be carried out by observing the ACKNLG or BUSY signal. Data transfer to this printer can be carried outonly after receipl of the ACKNLG signal or when the BUSY signal is LOW. Interface timing The figure below shows the timing for the parallel interface. BUSY ACKNLG DATA STROBE Approx. 5~s Approx.
Initialization The printer can be initialized (returned to a fixed set of conditions) in three ways: Hardware initialization The power is turned on. The printer receives an INIT signal from the parallel interface (pin 31 goes LOW). The following condition then results: 1) The printer mechanism is initialized. 2) The input data buffer is cleared. 3) The download character set is cleared. 4) The print buffer is cleared. 5) The default values are set.
Default settings The table below shows the default settings that take effect when the printer is initialized. F Item Default setting Top-of-form position Current paper position Page length Single sheets: 65 lines for A4-size paper 61 lines for letter-size paper 22 inches for manual insertion Left and right margins Cancelled Line spacing l/6-inch line spacing Character size 10.
Command Summary Sending printer commands Most actions your printer performs are handled by your software. Software commands instruct the printer to print in a particular typeface, feed the paper a certain amount after printing each line, start printing a particular place on the page, and so on. Some software programs let you send these commands yourself. This allows you to enhance your printing in ways that may not normally be available through the software.
ASCII Dec. Hex. Description ESC U l/O 85 25 55 19 Turn Unidirectional Mode On/Off ASCII Dec. Hex. Description CR FF 13 OD Carriage Return 12 oc Form Feed LF 10 OA ESC 0 30 32 Line Feed Select l/&inch Line Spacing ESC 2 48 50 ESC 3 n 51 33 Set n/l 80-inch Line Spacing ESC + n 43 28 Set n/360-inch Line Spacing ASCII Dec. Hex.
Print position motion ASCII Dec. Hex. Description ESC $ nl n2 36 24 Set Absolute Horizontal Print Position n=nl +n2x256 n: Specifies print position from left margin in defined units * Before you define the unit, the default is l/60 inch for this command. ESC \ nl n2 92 5C Set Relative Horizontal Print Position n=nl +n2x256 n: Moves current print position in defined units Before you define the unit, the default is 1 /120 inch in draft and l/180 inch in LQ for this command.
ASCII Dec. Hex. Description ESC X nn 88 58 Select Font by Pitch and Point ESCXmnl n2 m: Set pitch to 360/m cpi m = 0: No change in pitch m = 1: Select proportional m=O,1,18,21.24,30,36,42,48. 60, or 72 n=nl +n2x256 n: Set point size in 0.5 points Total points = (nl + n2 x 256) x 0.5 n = 0: No change in point n = 0, 16,21,24,20,32,36.40,44. 48,52,56,60, or 64 (for Roman. Sans Serif Roman T, and Sans Serif H.
font enhancement ASCII Dec. Hex.
ASCII Dec. Hex. Description ESC ( U nn 40 85 28 55 Define Unit ESC(U 1 On Define positioning unit as n/3600 inch n = 10,20.30.40.50, or 60 n = 10: default ESC c nl n2 99 63 Set Horizontal Motion Index (HMI) Select Pitch in n/360-inch units Total units = nl + n2 x 256 Character handling ASCII Dec. Hex.
ASCII Dec. Hex.
Bit image ASCII ESC l nn DeC. Hex.
Graphics ASCII Dec. Hex.
PC437 (USA, standard Europe) ~~DEo123456769ABCDEF Llaa MJL spOBP’p~B6 0 1 !lAQaqUefzlTpf 2 ocz ” 5 6 7 6 9 A B §%5EUeuBbR &6FVfvdO& f 7GWgwqtiQl (8HXhxgyi hlw)9IYiyEar LF *:JZjz&iiy VfESC+ ; Klk{ic+ XL\11 PC850 (Multilingual) ,COOE 0 1 2 3 4 5 6 7 6 9 A B C D E F A-22 Appendix PC860 (Portuguese) CODE 0 1 2 3 4 5 6 7 6 9 A B C D E F 69ABCDEF LA a E c B 4 I I
PC863 (Canadian-French) CODE 0 1 2 3 4 5 6 7 6 9 A B C D E F CODE 69ABCDEF LIaz CEI 0 1 2 3 4 5 6 7 8 9 A B C D E F u&‘$-Lrp* PC853 (Turkish) amE 0 1 2 3 4 5 6 7 6 9 A B C D E F PC865 (Norwegian) l 69ABCDEF CB4.
PC85 7 (Greek) PC437 Greek” l tCCDl89ABCDEF 0 1 2 3 4 5 6 7 8 9 A B C D E F 1AP PC855 (Cyril/k) CaE 0 1 2 3 4 5 6 7 8 9 A B C D E F Llfdt2 L PC866 (Russian) l BSABCDEF LJI m n a bJbAc*Jlpbl tts6: Y P Ill b f & lb h 6 q M c 3 -Hc3 i?‘bIJxtHTlU effnXuoTIU Cffa~iKOys sgeHLnY3 A-24 Appendix CODE 0 1 2 3 4 5 6 7 6 9 A B C D E F l 89ABCDEF A P a L* p I.
PC852 (East Europe) BRASCII (Brazilian Portuguese) l acE 1 0 1 : 6 7 8 9 A B C D E F l 0 1 2 3 4 5 6 7 8 9 A B C D E F 2 3 1 l - Abicomp (Brazilian Portuguese) * l CCDj89ABCDEF 0 1.u SP b i E, A 6 iI 6 1 2 WA 6 4 6 3 A 6 6 6 4 5 6 7 oc4x u ti a x(-Eiice c 0c h E 6 B 6 A B C D KTEMBU6t.l LF B Y e y VTESCI ” 1 f3 FF ! E i a i P CR f .
69ABCDEF u SP 0 8 P ’ p !IAQaq oc2 ” 2BRbr A3CSCS OC454DTdt XSEUeu 616FVfv ‘7GWRw (8HXhx HrEMJ9IYiY LF *: JZjz VT E6C + ; K I k i CL \ I ’ FF CR l, =Mlm; ~0 .zN^nSI /70-o A-26 Appendix No characters are available for hex code 15 in the italic character table.
International character sets You can select one of the following international character sets with the default-settings mode or the ESC R command. For example, when you select “Italic France,” the characters in the “France” row on the table below are used in the italic character table. The following eight international character sets can be selected with the default-settings mode or with the ESC R command.
Characters available with the ESC ( A command To print the characters in the table below, first send the ESC ( * command.
Glossary The following definitions apply specifically to printers. If a word is italicized, see that topic for more information. ASCII American Standard Code for Information Interchange. A standardized coding system for assigning numerical codes to letters and symbols. auto line feed When this feature is selected in the default-setting mode, each carriagereturn code (CR) is automatically followed by a line-feed (LF) code. bidirectional printing Printing in which the print head prints in both directions.
control code Special codes used to control printer functions such as performing a carriage return or line feed. cpi See characters per inch. default A value or setting that takes effect when the equipment is turned on, reset, or initialized. A method of printing in which each letter or symbol is formed by a pattern (matrix) of individual dots. double-height printing Printing in which each character is twice as tall as normal. double-strike printing Printing in which each character is printed twice.
font A font is a style of type designated by a family name. hex dump A troubleshooting feature that helps advanced users find the cause of communication problems between the printer and the computer. When the printer is in hex dump mode, it prints each code it receives in hexadecimal notation and ASCII characters. Also called data dump. initialization Returns the printer to its defaults (fixed set of conditions).
proportional printing Printing in which the width of the character varies from character to character. For example, a capital W receives much more space than a lowercase i. The result looks more like a typeset book than a typewritten draft. R A M Random Access Memory. The portion of the printer’s memory used as a buffer and for storing user-defined characters. All data stored in RAM is lost when the printer is turned off.
Index Individual command d descriptions are not indexed here. For information on a specific command, see the Appendix.
E ECONOMY button, 2-7,2-12,2-15 ECONOMY light, 2-6 Economy printing, 2-6,2-12 EJECT button, l-15,1-18,2-3,2-5, 2-7 Ejecting paper, l-15,1-18 Envelopes loading, 2-4-5 specifications, 2-2, A-4-5 Environment for printer, l-6 specifications, A-6-7 Epson Courier, 2-11, A-3 Epson Prestige, 2-11, A-3 Epson Roman, 2-11-12, A-3 Epson Roman T, 2-11-12, A-3 Epson Sans Serif, 2-11-12, A-3 Epson Sans Serif H, 2-l l-12, A-3 Epson Script, 2-11, A-3 ESC/P, Intro-l, 1-17 ESC/P 2, Intro-l, l-17,2-12 F FCC regulations, ii Fe
J Jam, paper clearing, 3-11-12 preventing, 3-12 L Language, setting, 2-15 Lever, paper-thickness, 2-4 Lights, indicator, 2-6-7 Lines per page, v LOAD/EJECT button, l-15,1-18, 2-3,2-5,2-7 Loading paper envelopes, 2-4-5 manually, 2-2-3 paper feeder, l-13-14 single sheets, l-13-14,2-2-3 Loading position, adjusting, 2-9-10 M Maintenance, printer, 3-2-4 Manual feed slot, 2-2-5 Manual insertion, 2-2-5 Micro feed buttons, 2-8 using, 2-8-l 0 Mixed text/graphics mode, 2-13-14,2- 16-l 7 Moving printer, 3-4--5 N N
Printing envelopes, 2-4-5 loading paper, l-13-14 manual, 2-2-5 self test, l-14-15 single sheets, v, 2-2-3 tips, 1-18 Printing position, adjusting, 2-10 Problems, see Troubleshooting Software controlling printer with, 1-17 printer menu, 1-17 setting up, l-17 Specifications, A-2-7 Speed, printing, A-2 Status lights, see Indicator lights Q Temperature, printer environment, A-6 Testing paper, l-4 Testing the printer, l-14-15 Toll-free number, USA, iv Transporting the printer, 3-4-5 Troubleshooting, 3-3,3-5-1
Epson America, Inc.