EPSON Stylus® C84 Printer Basics
Copyright Notice All rights reserved. No part of this publication may be reproduced, stored in a retrieval system, or transmitted in any form or by any means, electronic, mechanical, photocopying, recording, or otherwise, without the prior written permission of SEIKO EPSON CORPORATION. The information contained herein is designed only for use with this EPSON product. EPSON is not responsible for any use of this information as applied to other equipment.
Contents WELCOME! . . . . . . . . . . . . . . . . . . . . . . . . . . . . . . . . . . . . . . . . . . . 7 About Your Software . . . . . . . . . . . . . . . . . . . . . . . . . . . . . . . . . . . . . . . . . . . . . . . . . . . . . 8 About Your Documentation. . . . . . . . . . . . . . . . . . . . . . . . . . . . . . . . . . . . . . . . . . . . . . . . 8 Using the EPSON Printer Information Center. . . . . . . . . . . . . . . . . . . . . . . . . . . . . . . . . . 9 Launching the Animations. . . . . . . . . .
Customizing Macintosh Print Settings . . . . . . . . . . . . . . . . . . . . . . . . . . . . . . . . . . . . . . . Macintosh OS X . . . . . . . . . . . . . . . . . . . . . . . . . . . . . . . . . . . . . . . . . . . . . . . . . . . . Macintosh OS 8.6 to 9.x . . . . . . . . . . . . . . . . . . . . . . . . . . . . . . . . . . . . . . . . . . . . . . Selecting the Correct Paper Type . . . . . . . . . . . . . . . . . . . . . . . . . . . . . . . . . . . . . . . . . . . Printing Borderless Photos . . . . . . . .
Uninstalling Printer Software . . . . . . . . . . . . . . . . . . . . . . . . . . . . . . . . . . . . . . . . . . . . . . Windows . . . . . . . . . . . . . . . . . . . . . . . . . . . . . . . . . . . . . . . . . . . . . . . . . . . . . . . . . . Macintosh OS X . . . . . . . . . . . . . . . . . . . . . . . . . . . . . . . . . . . . . . . . . . . . . . . . . . . . Macintosh OS 8.6 to 9.x . . . . . . . . . . . . . . . . . . . . . . . . . . . . . . . . . . . . . . . . . . . . . . Where To Get Help . . . . . . .
Welcome! The EPSON Stylus® C84 printer is the ideal desktop printer for business and home use. With its exceptional speed and print resolutions, it is practical for everyday use, yet capable of delivering superior photo printing. It provides you with these advanced features: ■ EPSON’s exclusive DuraBrite® inks. These quick-drying inks are resistant to water and fading, so prints stand the test of time.
About Your Software Your printer CD-ROM includes all the software you need for printing. See the Start Here sheet for installation instructions. ■ Your printer driver runs your printer and lets you control how your documents look. You can’t print without it. Tip: It’s a good idea to check EPSON’s support website periodically for free updates to your printer driver. Visit http://support.epson.com. ■ Your EPSON Printer Information Center gives you quick, on-screen access to information about your printer.
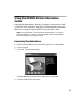
Using the EPSON Printer Information Center Need help loading special paper, replacing ink cartridges, or cleaning the print head? The EPSON Printer Information Center (EPIC) has animations that quickly show you how. EPIC also includes an on-screen User’s Guide with additional printer details. See the Start Here sheet to install the EPSON Printer Information Center. Note: You need a browser—such as Microsoft Internet Explorer 4.0 or later or Netscape® Navigator® 4.0 or later—to view the manual.
Launching the Manual 1. Double-click the EPSON Printer Information Center icon on your desktop. 2. Click User’s Guide. 3. Click on the topic you want to view. Installing Printer Software for Windows NT 4.x Before you begin, complete the instructions on the Start Here sheet for setting up your printer. For instructions on installing printer software in Windows XP, Me, 2000, 98, or on a Macintosh, see your Start Here sheet. Note: Use a parallel cable to connect the printer to your computer. Windows NT® 4.
Loading Paper Follow the steps in these sections to load paper in your printer: ■ “Loading Single Sheets” below ■ “Loading Envelopes” on page 12 ■ “Loading Special Papers” on page 13 Loading Single Sheets 1. Open the output tray and its extension. 2. Fan the stack of paper and place it against the right edge guide. Don’t push the paper in. 3. Press in the side of the left edge guide and slide it against the paper, but not too tightly.
Follow these guidelines when loading paper: ■ Don’t load paper above the arrow on the left edge guide. Also make sure the paper is under the tabs on the left and right edge guides. ■ Load the printable side face up. It’s usually whiter or brighter than the other side. ■ Always load the short edge first, even when printing in landscape mode. ■ Load letterhead or preprinted paper into the printer top edge first. ■ If you experience paper feeding problems, try loading fewer sheets.
Loading Special Papers EPSON offers the following special ink jet papers for the EPSON Stylus C84: Paper name* Size Part number EPSON Premium Bright White Paper Letter (8.5 x 11 inches) S041586 EPSON DuraBrite Ink Glossy Photo Paper Letter (8.5 x 11 inches) S041731 4 x 6 inches S041734 EPSON Photo Quality Ink Jet Paper Letter (8.5 x 11 inches) S041062 A4 (8.3 x 11.7 inches) S041061 Legal (8.5 x 14 inches) S041067 Letter (8.5 x 11 inches) S041141/S041649/ S041271/S041272 A4 (8.3 x 11.
To load EPSON ink jet papers, follow these guidelines: 14 Paper type Loading capacity Premium Bright White Paper 120 Sheets Photo Quality Ink Jet Paper 80 sheets EPSON DuraBrite Ink Glossy Photo Paper 20 sheets Glossy Photo Paper or Photo Paper 20 sheets Matte Paper Heavyweight 20 sheets with a support sheet beneath the stack Double-Sided Matte Paper 1 sheet Enhanced Matte Paper (Archival Matte Paper) 20 sheets Premium Semigloss Photo Paper 20 sheets Ink Jet Transparencies 20 sheets wit
Printing With Windows Before you start, make sure your printer is set up and its software is installed as described on the Start Here sheet. (For Windows NT 4.x, see page 10 to install your printer software.) Whenever you print, make sure you do the following: ■ Use the right paper. For the best-looking photos, most vivid colors, and greatest detail, always use genuine EPSON papers and EPSON inks. ■ Choose the right printer settings. Your printer automatically adjusts itself for each type of paper.
Printing From an Application After you create a document in a software program, follow these steps to print it using the basic printer settings: 1. From the file menu, click Print. You see a Print window like this one: Select your printer name here Click here to open your printer software 2. Make sure EPSON Stylus C84 Series is selected. 3. Click the Preferences or Properties button. (If you see a Setup, Printer, or Options button, click it. Then click Preferences or Properties on the next screen.
4. Select the following in the preferences window: Select the type of document you’re printing Select your paper Type Select your paper Size Select your document or image orientation 5.
8. Click OK. 9. At the Print window, click OK or Print to start printing. During printing, this window appears and shows the progress of your print job. You can use the buttons to cancel, pause, or resume printing. You can also see how much ink you have left. Click to cancel printing Click to pause or resume printing Tip: You can also cancel printing by pressing the paper button on your printer. Selecting Default Settings Your printer settings only apply to the program you’re currently using.
Customizing Windows Print Settings You can use advanced settings for color matching, printing at a higher resolution, or selecting a variety of special effects and layouts. 1. On the Main tab, click the Advanced button in the bottom right corner of the window. 2. If you see a warning note, click Continue. 3.
4. Once you’ve finished selecting advanced settings, you can: ■ Click OK to save your settings, return to the Print dialog box, and print. ■ Click the Basic button to return to the Basic settings. ■ Click the Page Layout tab and continue with step 5 to select layout options. 5.
Selecting the Correct Paper Type Select the correct paper Type setting so your printer knows what kind of paper you’re using and adjusts the ink coverage accordingly.
Printing Borderless Photos You can print your photos with no margins, extending the image all the way to the edges of the page. BorderFree Paper Although borderless printing is a bit slower, you get beautiful snapshots and enlargements, without trimming, on these papers and sizes: Paper name Sizes Paper Type setting EPSON Matte Paper Heavyweight Letter (8.5 × 11 inches) Matte Paper - Heavyweight EPSON Photo Paper 4×6 A4 (8.3 × 11.7 inches) Letter (8.
To order EPSON paper, contact your dealer or call the EPSON Store at (800) 873-7766 or visit our web site at www.epsonstore.com (U.S. sales only). In Canada please call (800) 463-7766 for dealer referral. Loading Paper Load paper as shown, then see the following section to print. Insert paper against the right edge Slide the left edge guide against the paper ■ Always load the short edge first, even for printing landscape-oriented photos. ■ Load the printable side face up.
Printing Your Photos 1. Start your photo program and open your photo. 2. Open the File menu and click Print. Then click Properties or Preferences. You see the following: 3. Select Photo or Best Photo as the Quality Option setting. 4. Select one of the following paper types: ■ Matte Paper - Heavyweight ■ Glossy Photo Paper ■ DURABrite Ink Glossy Photo Paper 5. Click the Borderless checkbox. Read the message and click OK. 6. Select your paper Size setting. 7.
8. Click the Page Layout tab. 9. Adjust the Expansion slider to choose Min, Max, or the in-between setting. Min retains the entire image in your print, but there may be a small white edge on the borders of the print. Max expands the image to ensure that there are no unprinted edges, but the edges of the image may not appear in the print. 10. Click OK, then click OK or Print.
Printing With a Macintosh Before you start, make sure your printer is set up and its software is installed as described on the Start Here sheet. Whenever you print, make sure you do the following: ■ Use the right paper. For the best-looking photos, most vivid colors, and greatest detail, always use genuine EPSON papers and EPSON inks. ■ Choose the right printer settings. Your printer automatically adjusts itself for each type of paper. That’s why printer settings are important.
Printing With Macintosh OS X If you’re using a Mac OS® X compatible printing application, follow the steps below to print a document. (If you’re using an application that’s compatible only with Classic mode, follow the steps in “Macintosh OS 8.6 to 9.x” on page 34 instead.) 1. From the File menu, select Page Setup. Select the following settings: Select your printer name from the list Select your paper size Select your document or image orientation 2. Select your printer from the Format for drop-down list.
6. Select Print Settings from the list. 7. Select the following Print Settings as necessary: Select the type of paper you’re using Select Automatic mode Select Color or Black Ink Select higher quality or faster printing (if available) Note: For more information about printer settings, click the Help button. The Quality setting on this screen gives you the best combination of quality and print speed for most prints.
9. Click Print. 10. To monitor the progress of your print job, click the appears in the dock on the bottom of your desktop. Print Center icon when it In OS X 10.2.x, double-click Stylus C84 in the Printer List window. You see a screen like this: 11.
Printing With Macintosh OS 8.6 to 9.x Before you begin, make sure you selected your printer in the Chooser as described on your Start Here sheet. 1. From the File menu, select Page Setup. Select the following settings: Make sure you see C84 Series Select your paper size Select your paper source Select your document or image orientation 2. Click OK to close the Page Setup window. 3. From the File menu, select Print.
■ Set the slider to Quality to select high-quality printing, Speed for faster printing, or an in-between setting. (The slider is not available for all paper types.) Note: The Quality setting on this screen gives you the best combination of quality and print speed for most prints. For the highest print quality (Photo RPM) on selected papers, click Custom then click the Advanced button and see “Customizing Macintosh Print Settings” on page 33 for instructions on selecting Photo RPM. 5.
Customizing Macintosh Print Settings You can use advanced settings for color matching, printing at a higher resolution, or selecting a variety of special effects and layouts. Macintosh OS X 1. To access advanced settings, click Advanced. 2.
Macintosh OS 8.6 to 9.x 1. On the printer settings window, click Custom, then click Advanced. Click Custom, then choose Advanced 2. Select these advanced settings as necessary: Select color management settings here Click here to select Photo RPM for the best print quality on photo and glossy papers Select various print options here Note: For the highest print quality, select Photo RPM. Please note that printing will take longer in this mode.
Selecting the Correct Paper Type Select the correct Media Type setting so your printer knows what kind of paper you’re using and adjusts the ink coverage accordingly.
Printing Borderless Photos You can print your photos with no margins, extending the image all the way to the edges of the page. Although borderless printing is a bit slower, you get beautiful snapshots and enlargements, without trimming, on these papers and sizes: Paper name Sizes Media Type setting EPSON Matte Paper Heavyweight Letter (8.5 × 11 inches) Matte Paper - Heavyweight EPSON Photo Paper 4×6 Letter (8.5 × 11 inches) Glossy Photo Paper EPSON Glossy Photo Paper 4×6 Letter (8.
Loading Paper Load paper as shown below, then follow the instructions for your operating system. Insert paper against the right edge Slide the left edge guide against the paper ■ Always load the short edge first, even for printing landscape-oriented photos. ■ Load the printable side face up. It’s usually whiter or brighter than the other side. ■ Make sure the paper is under the tabs on the left and right edge guides. ■ Check the paper package for additional loading instructions. Macintosh OS X 1.
4. Select your Paper Size. Caution: When printing borderless photos, select one of the supported paper sizes listed on page 36; never select a custom or unsupported paper size or ink may spray inside your printer. 5. Select your document or image orientation. 6. Click OK. 7. Open the File menu and click Print. You see the following: Select Stylus C84(Sheet Feeder - Borderless) 8. Select Stylus C84(Sheet Feeder - Borderless) in the Printer drop-down list.
12. Select Expansion from the pop-up list. 13. Adjust the slider to choose Min, Max, or the in-between setting. Min retains the entire image in your print, but there may be a small white edge on the borders of the print. Max expands the image to ensure that there are no unprinted edges, but the edges of the image may not appear in the print. 14. Click Print. Macintosh OS 8.6 to 9.x 1. Start your photo program and open your photo. 2. Open the File menu and click Page Setup. You see the following: 3.
5. Click the Expansion button. 6. Adjust the slider to choose Min, Max, or the in-between setting. Min retains the entire image in your print, but there may be a small white edge on the borders of the print. Max expands the image to ensure that there are no unprinted edges, but the edges of the image may not appear in the print. 7. Select Portrait or Landscape as the orientation setting. 8. Click OK to close the Page Setup window. 9. Open the File menu and click Print. 10.
Maintaining Your Printer This section describes maintenance procedures to keep your printer working at its best and preparation steps for moving your printer.
Running the Head Cleaning Utility 1. Make sure the printer is turned on but not printing, and the red ink light is off. (If the ink light is flashing or on, you need to replace a cartridge; see “Replacing an Ink Cartridge” on page 45 for details.) 2. Windows: Right-click the printer icon on your taskbar (in the lower right corner of your screen). Select Head Cleaning. Macintosh OS X: Open the Applications folder and double-click EPSON Printer Utility.
4. When the green power light stops flashing, make sure paper is loaded in the printer, then do the following: Windows: Click Print nozzle check pattern. Then click Print. Macintosh: Click Confirmation, then click Next. The nozzle check pattern prints (see “Examining the Nozzle Check Pattern” below for details). 5. If the nozzle check pattern has no gaps or white lines, click Finish. If the pattern has white lines, click Clean to clean the print head again.
Purchasing Ink Cartridges Use these EPSON ink cartridges within six months of installing them and before the expiration date on the package: Ink cartridge Part number Capacity* Black (high capacity)** T043120 1350 pages ISO/IEC 10561 letter pattern 950 pages at 5% coverage Black (standard capacity)** T044120 600 pages ISO/IEC 10561 letter pattern 420 pages of graphics at 5% coverage Cyan T044220 450 pages at 5% coverage Magenta T044320 450 pages at 5% coverage Yellow T044420 450 pages at 5%
Replacing an Ink Cartridge ■ When the red ink light flashes, one or more ink cartridges are low on ink. ■ When the red ink light stays on, you need to replace the cartridge(s). When you print, you’ll also see a message on your screen telling you which cartridge is low or empty. When a cartridge is more than six months old, you may need to replace it if printouts don’t look their best.
■ Macintosh OS X: Double-click the EPSON Printer Utility icon in the Applications folder. Choose C84 Series and click OK. Then click EPSON Status Monitor. You see a window like this: Click a cartridge image to display information about the cartridge. ■ Macintosh OS 8.6 to 9.x: From the File menu, select Print, then click the icon. Ink Cartridge Precautions Warning: Keep ink cartridges out of the reach of children and do not drink the ink.
Replacing an Empty or Low Ink Cartridge Be sure you have a new ink cartridge before you begin. Once you start the ink cartridge replacement procedure, you must complete all the steps in one session. Follow these steps to replace ink cartridges when the red or on: ink out light is flashing 1. Make sure the printer is turned on and not printing. The be on, but not flashing. power light should 2. Lower the output tray and open the printer cover. 3. Press the ink button for one second.
■ If all the empty cartridges have been identified, the print head moves to the ink cartridge replacement position. 5. Open the cartridge cover. 6. Pinch the back tab of the empty cartridge as you lift it out of the printer. Don’t take the used cartridge apart or try to refill it.
Warning: If ink gets on your hands, wash them thoroughly with soap and water. If ink gets into your eyes, flush them immediately with water. 7. Before you remove the new cartridge from its package, shake it four or five times. 8. Remove the cartridge from its package and lower it into the cartridge holder. Push down gently until the cartridge is firmly seated. 9. Repeat steps 5 through 7 for each cartridge that you need to replace.
10. Close the cartridge cover. 11. Close the printer cover and press the ink button for one second. The printer moves the print head and begins charging the ink delivery system. The green power light flashes and the printer makes noise. Charging takes about one minute. When it’s finished, the power light stops flashing and stays on. Note: Never turn off the printer while the power light is flashing, unless the printer hasn’t moved or made noise for more than 5 minutes.
2. Follow the instructions on the screen to print the nozzle check pattern. Then examine the pattern for gaps in the lines. You need to replace only those cartridges whose colors show gaps in the line pattern, as shown below. 3. Make sure you have the correct replacement cartridges. Note: You must have the new ink cartridges before you continue. Once you start the ink cartridge replacement procedure, you must complete all the steps in one session. 4. Lower the output tray and open the printer cover. 5.
6. Open the cartridge cover. 7. Pinch the back tab of the cartridge as you lift it out of the printer. Don’t take the used cartridge apart or try to refill it. Warning: If ink gets on your hands, wash them thoroughly with soap and water. If ink gets in your eyes, flush them immediately with water. 8. Before you remove the new cartridge from its package, shake it four or five times.
9. Remove the cartridge from its package and lower it into the cartridge holder. Push down gently until the new cartridge is firmly seated. 10. Repeat steps 7 through 9 for each cartridge you want to replace. 11. Close the cartridge cover. 12. Close the printer cover and press the ink button for one second. The printer moves the print head and begins charging the ink delivery system. The green power light flashes and the printer makes noise. Charging takes about one minute.
Aligning the Print Head If your printouts contain misaligned vertical lines, or you see light or dark horizontal banding, you may need to align the print head. Note: Banding may also occur if your cartridges are low on ink or you need to clean the print head. 1. Turn on the printer. 2. Load several sheets of paper. 3. Windows: Right-click the printer icon on your taskbar (in the lower right corner of your screen). Select Print Head Alignment.
5. Look at the five sets of patterns in your printout. For each set, if you see a pattern with no visible vertical lines, enter its number in the corresponding box on the screen and click Next. If you can’t find a pattern without any vertical lines, select the best pattern and click Realignment. Then repeat this step. 6. Click Print to print the color vertical alignment sheet. You see this screen: Windows Macintosh 7. Look at the four sets of patterns in your printout.
8. Click Print to print a black horizontal alignment sheet. You see this screen: Windows Macintosh 9. In your printout, select the pattern with no gap or line between the rectangles. Enter its number in the box on the screen and click Next. If you can’t find an aligned pattern, choose the best pattern and click Realignment. Then repeat this step. 10. Click Print to print a color horizontal alignment sheet.
11. In your printout, find the pattern with no gap or line between the rectangles and enter its number in the box on the screen. If you can’t find an aligned pattern, choose the best pattern and click Realignment. Then repeat this step. 12. Click Finish to close the Print Head Alignment Utility. Cleaning the Printer To keep your printer working at its best, you should clean it several times a year. 1. Turn off the printer, unplug the power cord, and disconnect the cable. 2.
Transporting the Printer If you need to ship your printer, you must prepare it for transportation by removing the ink cartridges and packing the printer in its original box or one of a similar size. 1. Turn on the printer. 2. Remove any paper from the printer, then remove the paper support. 3. Open the printer cover. 4. Press the ink button. The print head moves to the ink cartridge replacement position, and the power light begins to flash.
6. Pinch the back tab of each cartridge as you lift it out of the printer. Remove all the cartridges. Store the ink cartridges in a plastic bag or container, making sure that the tops of the cartridges are facing up. Warning: If ink gets on your hands, wash them thoroughly with soap and water. If ink gets in your eyes, flush them immediately with water. 7. Close the cartridge cover and press the ink button. Wait until the print head locks in the far right position. (Don’t worry if the ink light is on.) 8.
11. Repack the printer and its attachments in the original box using the protective materials that came with them. Keep the printer level as you transport it. After transporting the printer, remove the tape securing the print head, reinstall the ink cartridges, and test your printer. If you notice a decline in print quality, clean the print head as described on page 41; if output is misaligned, align the print head as described on page 54.
Solving Problems See “Diagnosing Printer Problems” on page 63 to help determine what the cause of your printer problem may be. Then see these sections for solutions.
Printer Parts Paper support Sheet feeder Right edge guide Left edge guide Ink button Paper button Power button Output tray extension Output tray Printer cover Parallel port 62 USB port
Diagnosing Printer Problems First, check the printer’s lights (see below) or run a printer check (see “Running a Printer Check” on page 64). Lights Explanation Green flashes Red power light paper light on The printer is receiving a print job, charging ink, cleaning the print head, or ink is being replaced. Your paper ran out. Load more and press the paper button. Red paper light flashes Paper is jammed in the printer. Press the paper button to eject the jammed paper.
Running a Printer Check You can run a printer check to determine whether a problem comes from the printer or some other source. 1. Turn off your printer and computer. 2. Disconnect the printer’s interface cable. 3. Load letter-size paper in the printer. 4. Hold down the paper button, then press and release the power button. Continue holding down the paper button until the power light starts to flash, then release it.
Problems and Solutions Setup and Software Installation Problems The printer makes noise after ink cartridge installation. ■ When you install ink cartridges, the printer must charge its print head for a minute or so. Wait until it’s finished (the green power light stops flashing) before you turn off the printer, or it may use excess ink the next time you turn it on. ■ Make sure the ink cartridges are inserted completely and the ink cartridge cover is closed completely.
■ If you’re printing over a network, see your on-screen User’s Guide for instructions on configuring your printer for use on a network. ■ In Mac OS X, if you are using the Favorites column in Print Center, make sure your printer is selected as a Favorite. See your Mac Help for details. Printer Problems Only the green power light is on, but nothing prints.
Printing is too slow. Make sure your system meets the system requirements listed in “Windows System Requirements” or “Macintosh System Requirements” on page 77. If you’re printing a high-resolution image, you need more than the minimum requirements. You may also need to: ■ Clear space on your hard drive or run a defragmentation utility. ■ Close open programs that you’re not using. ■ Increase your system’s memory (RAM).
Quality Problems You see banding (light lines). 68 ■ Clean the print head nozzles; see “Cleaning the Print Head” on page 41 for instructions. ■ Select a higher Quality Option or Print Quality and turn off High Speed mode; see “Printing With Windows” on page 15 or “Printing With a Macintosh” on page 27. ■ Make sure the paper Type (Windows) or Media Type (Macintosh) setting matches your paper; see page 35 for guidelines. ■ Make sure the printable side of the paper is face up.
Your print is blurry or smeared. ■ Make sure your paper isn’t damp, curled, or loaded face down. ■ Use a support sheet with special paper, or try loading paper one sheet at a time. ■ Make sure paper meets the specifications listed in your on-screen User’s Guide. ■ Use EPSON papers for proper saturation and ink absorption. ■ Align the print head as described in “Aligning the Print Head” on page 54. ■ Remove each sheet from the output tray after printing.
Your printout is faint or has gaps. ■ Clean the print head nozzles; see “Cleaning the Print Head” on page 41 for instructions. ■ The ink cartridges may be old or low on ink; see “Checking the Ink Supply” on page 45. ■ Make sure the paper Type (Windows) or Media Type (Macintosh) setting matches your paper; see page 21 or page 35 for guidelines. ■ Make sure your paper isn’t damaged, old, dirty, or loaded face down. If it is, load new paper, face up. For best results, use genuine EPSON paper.
■ Try turning off PhotoEnhance.™ Also check if you’re using a special effect that alters image colors, like Sepia. ■ Try using Automatic mode (Macintosh only). See “Printing With a Macintosh” on page 27 for instructions. ■ Try changing the Gamma setting. See “Customizing Windows Print Settings” on page 19 or “Customizing Macintosh Print Settings” on page 33 to access the Advanced settings. ■ Your printed colors can never exactly match your on-screen colors.
Paper sheets don’t feed correctly or jam in the printer. ■ If paper doesn’t feed or multiple pages feed, remove it from the sheet feeder. Fan the edges of the sheets, reload them against the right side of the feeder, and slide the left edge guide snugly, but not too tightly, against the paper. Don’t load paper above the arrow on the left edge guide and make sure it is under the tabs on the left and right edge guides. ■ If paper jams, press the paper button.
You see incorrect characters. ■ Make sure the interface cable is securely connected at both ends and meets the system requirements in “Windows System Requirements” or “Macintosh System Requirements” on page 77. ■ Make sure your printer is selected in the Print window (Windows), is selected on the Page Setup and Print windows (Macintosh OS X), or is the active printer in the Chooser (Macintosh OS 8.6 to 9.x).
There are scratch marks on your print. If you’re printing on glossy photo paper, prints may be scratched if not handled properly. Don’t place objects on top of your prints, and be careful not to scratch them with your fingernails. For best results, frame your prints under glass. Uninstalling Printer Software You may need to uninstall then reinstall your printer driver and utilities if, for example, you upgrade your operating system.
3. In the Main Menu, click Install Printer Driver, then click Continue. 4. On the Installer screen, click the arrow in the Easy install list at the top and select Uninstall. Then click the Uninstall button at the bottom and follow the on-screen instructions. 5. Restart your Macintosh, then see the Start Here sheet to reinstall your software.
Where To Get Help EPSON provides technical assistance 24 hours a day through the electronic support services and automated telephone services listed below: Service Access World Wide Web From the Internet, you can reach EPSON Support at http://support.epson.com. At this site, you can download drivers and other files, look at product documentation, access troubleshooting information, and receive technical advice through e-mail.
Requirements and Notices Windows System Requirements To use your printer and its software, your system should have: ■ A Microsoft Windows compatible PC with a Pentium®-equivalent processor (233 MHz or faster recommended) ■ Windows XP, Windows Me, Windows 2000, Windows 98, or Windows NT 4.
Important Safety Instructions Before using your printer, read these safety instructions to make sure you use it safely and effectively: ■ Be sure to follow all warnings and instructions marked on the printer. ■ Use only the type of power source indicated on the printer’s label. ■ Use only the power cord that comes with this product and use the cord with this product only. Use of another cord may result in fire or electric shock. ■ Connect all equipment to properly grounded power outlets.
■ Unplug the printer and refer servicing to qualified service personnel under the following conditions: If the power cord or plug is damaged; if liquid has entered the printer; if the printer has been dropped or the case damaged; if the printer does not operate normally or exhibits a distinct change in performance. Adjust only those controls that are covered by the operating instructions. Ink Cartridge Safety Instructions ■ Keep ink cartridges out of the reach of children and do not drink the ink.
FCC Compliance Statement For United States Users This equipment has been tested and found to comply with the limits for a Class B digital device, pursuant to Part 15 of the FCC Rules. These limits are designed to provide reasonable protection against harmful interference in a residential installation. This equipment generates, uses, and can radiate radio frequency energy and, if not installed and used in accordance with the instructions, may cause harmful interference to radio or television reception.
Declaration of Conformity According to 47CFR, Part 2 and 15 for Class B Personal Computers and Peripherals; and/or CPU Boards and Power Supplies used with Class B Personal Computers: We: EPSON AMERICA, INC. Located at: MS: 3-13 3840 Kilroy Airport Way Long Beach, CA 90806 Telephone: (562) 290-5254 Declare under sole responsibility that the product identified herein, complies with 47CFR Part 2 and 15 of the FCC rules as a Class B digital device.
Epson America, Inc. Limited Warranty What Is Covered: Epson America, Inc. (“Epson”) warrants to the original retail purchaser that the EPSON printer covered by this limited warranty statement, if purchased new and used in the United States or Canada, conforms to the manufacturer’s specifications and will be free from defects in workmanship and materials for a period of one (1) year from the date of original purchase.
THE WARRANTY AND REMEDY PROVIDED ABOVE ARE EXCLUSIVE AND IN LIEU OF ALL OTHER EXPRESS OR IMPLIED WARRANTIES INCLUDING, BUT NOT LIMITED TO, THE IMPLIED WARRANTIES OF MERCHANTABILITY, NON-INFRINGEMENT OR FITNESS FOR A PARTICULAR PURPOSE. SOME LAWS DO NOT ALLOW THE EXCLUSION OF IMPLIED WARRANTIES. IF THESE LAWS APPLY, THEN ALL EXPRESS AND IMPLIED WARRANTIES ARE LIMITED TO THE WARRANTY PERIOD IDENTIFIED ABOVE. UNLESS STATED HEREIN, ANY STATEMENT OR REPRESENTATIONS MADE BY ANY OTHER PERSON OR FIRM ARE VOID.
Index A Accessories, 13, 44, 76 Advanced print settings Macintosh, 33 to 34 Windows, 19 to 20 Aligning print head, 54 to 57 Animated tutorials, 9 to 10 B Banding, 54 to 57 Blank pages, 72 Blurry print, 69 Borderless papers, 22 to 23, 37 Borderless printing Macintosh, 36 to 40 Windows, 22 to 25 C Cable, printer, 77 Cartridges, ink, see Ink cartridges Characters, incorrect, 73 Checking ink supply, 45 to 46 print head alignment, 54 to 57 Cleaning print head, 41 to 43 printer, 57 Color management, 19, 29 Colo
H Head cleaning utility, 41 to 43 Help, EPSON, 76 I Ink cartridges purchasing, 44 replacing empty, 45 to 50 replacing old, 44, 50 to 53 safety instructions, 46, 79 Ink supply, checking, 45 to 46 J Jams, paper, 72 L Light print, 70 Lights, 63 Loading paper borderless papers, 23, 37 envelopes, 12 single sheets, 11 to 12 special EPSON papers, 13 to 14 M Macintosh advanced print settings, 33 to 34 customizing print settings, 33 to 34 printing, 27 to 40 system requirements, 77 uninstalling printer software,
Printer cable, 77 check, 64 cleaning, 57 control panel, 63 noise, 65, 66 problems, 66 to 67 safety instructions, 78 to 79 transporting, 58 to 60 Printing borderless, 22 to 25, 36 to 40 Macintosh, 27 to 40 Windows, 15 to 25 Problems blank pages, 66, 72 blurry print, 69 characters, 73 colors, 70 to 71 faint print, 70 gaps in print, 68, 70 gloss, 71 grainy print, 70 inverted image, 72 margins, 73 multiple copies, 73 paper feeding, 71 to 72 print quality, 68 to 71 printer, 66 to 67 scratches, 74 slow printing,
W Warranty, 82 Windows advanced print settings, 19 to 20 default printer settings, 18 installing printer software, 10 printing, 15 to 25 system requirements, 77 uninstalling printer software, 74 to 75 Wrinkled paper, 71 to 72 88
Insdfrt.fm Page 1 Friday, September 12, 2003 4:04 PM EPSON Ink Jet Papers Use EPSON paper and inks to get the best results from your EPSON printer! EPSON papers are specially designed to work with EPSON quick drying inks. Premium Bright White Paper Premium Bright White Paper has a sleek, ultra-smooth surface, and 108+ brightness. This paper delivers crisp black text and vivid, colorful images. It’s perfect for everyday printing—especially two-sided documents.
Insdbck.fm Page 1 Friday, September 12, 2003 4:04 PM How To Order EPSON Ink and Paper To order EPSON ink cartridges and paper, call (800) 873-7766 or visit the EPSON Store at www.epsonstore.com (U.S. sales only). In Canada, call (800) 463-7766 for dealer referral. EPSON Ink Cartridges Black T043120 (high capacity)* T044120* Cyan T044220 Magenta T044320 Yellow T044420 *Availability of black ink cartridge types varies by location.