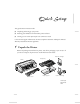
Quick Setup This guide contains instructions for: ◗ Unpacking and setting up your printer ◗ Installing your Windows® or Macintosh® printer software ◗ Viewing your on-screen Epson Stylus Color 1520 User’s Guide It also contains support information, the FCC Compliance Statement and Epson’s Limited Warranty and Software License Agreement. 1 Unpack the Printer Remove all packing material from the printer. Save all the packaging so you can use it if you need to transport the printer later.
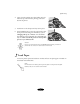
Quick Setup Place the printer flat on a stable desk near a grounded outlet. Leave plenty of room in back for the cables and for a stack of continuous paper, if you use it. Leave enough room in front for the paper support and output tray.
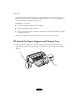
Quick Setup 2. Press the two notches at the back of the output tray onto the metal posts on the printer. Post Leg Post Leg 3. Flip down the legs on the underside of the output tray so it sits up on the paper support. 3 Plug the Printer In and Turn It On 1. First make sure the power is off. Check the P Operate button; it’s off when its surface is even with the button guards on each side. 2. Plug the power cord into a properly grounded outlet.
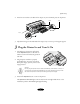
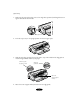
Quick Setup 4Install the Ink Cartridges Warning: If ink gets on your hands, wash them thoroughly with soap and water. If ink gets in your eyes, flush them immediately with water. 1. Open the cover. The Cover Open light comes on. 2. Open the ink cartridge packages. Remove the disposable yellow portion of the tape seal on top. Caution: You must completely remove the yellow portion of the tape seal or you will permanently damage the ink cartridge. 3. Pull up the ink cartridge clamps.
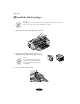
Quick Setup 4. Lower the ink cartridges into their holders with the labels face up and the arrows pointing toward the back of the printer. 5. Push down on the clamps until they lock in place. 6. Press the Alt button to return the print heads to their home position and charge the ink delivery system. Charging takes up to 7 minutes, with the Pause light flashing until it’s finished; then the Pause light stays on. Don’t turn off the printer or interrupt this process or you will waste ink.
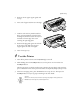
Quick Setup 1. Make sure the paper release lever is set to the single sheet position (the m single sheet icon appears beneath the lever handle. Single sheet icon 2. Lock the output tray in an upright position on the two upper posts. 3. Slide the right edge guide all the way left until it stops. Then slide the left edge guide to match the approximate width of your paper. Slide this guide to paper’s width Slide this guide left Move the center support midway 4.
Quick Setup 5. Slide out the rear paper support guide until it stops. 6. Fan a stack of paper and then even the edges. 7. Load the stack with the printable side face down. (The printable side is usually whiter and brighter.) Slide the stack all the way into the feeder, with one edge of the stack touching the right edge guide. 8. Slide the left edge guide against the left side of the paper. Then slide the rear paper support against the end of the paper. 9. Lower the output tray. 6 Test the Printer 1.
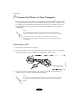
Quick Setup 7 Connect the Printer to Your Computer You can connect your Epson Stylus Color 1520 printer to either an IBM® compatible PC or an Apple® Macintosh. You’ll need a shielded parallel cable to connect directly to a PC or an Apple System Peripheral-8 serial cable to connect directly to a Macintosh. If your Macintosh doesn’t have a serial port, you’ll need the USB Adapter Kit (part number C-USB-PK4).
Quick Setup Connecting to a Macintosh 1. Turn off the printer and your Macintosh. 2. Connect your serial cable to the serial connector on the back of the printer. Note: If you don’t have a serial port on your Macintosh, use the USB Adapter Kit from Epson (part number C-USB-PK4). Connect the parallel connector on the adapter to the printer’s parallel port, and the USB connector to your Macintosh’s USB port. 3. Connect the other end of the cable to either the on your Macintosh.
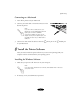
Quick Setup 3. Insert your Epson CD-ROM in your drive. You see the Epson Installation Program window: Note: If you don’t see this window, double-click My Computer, then double-click the Epson CD-ROM icon. Finally, double-click the SETUP.EXE icon. 4. Double-click Install Printer Software. 5. If you see a license agreement, click Accept to continue.
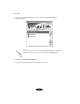
Quick Setup 6. If you see this screen, turn on your printer. Then click Stop searching. 7. Follow the on-screen instructions to finish installing the printer software. At the last screen, click OK. 8. On the Epson Installation Program window, double-click Install User’s Guide. The installer copies files to your computer. At the last screen, click Finish. 9. Double-click Register Your Product and follow the on-screen directions to register your printer. 10. When you’re finished, close your browser.
Quick Setup 3. Double-click the Epson CD-ROM icon in the Epson window. You see the Epson Installation Program window: 4. Double-click Install Printer Software. 5. Select a paper size and click OK. 6. When you see this prompt, click OK. 7. Double-click Install User’s Guide. The installer copies files to your Macintosh. 8. Double-click Register Your Product and follow the on-screen directions to register your printer. 9. When you’re finished, close your browser.
Quick Setup 3. Click the icon for the port where you connected your printer. (If your Macintosh has a combination printer/modem port, select the modem port icon.) 4. Turn on background printing if you want to use your Macintosh while you print. Note: Background printing may slow down your system while you print. Now you’re ready to print. See your on-screen Epson Stylus Color 1520 User’s Guide.
Quick Setup Where To Get Help Epson provides technical assistance 24 hours a day through the electronic support services and automated telephone services listed below. Service Access World Wide Web From the Internet, you can reach Epson Support at http://support.epson.com. At this site, you can download drivers and other files, look at product documentation, access troubleshooting information, and receive technical advice through e-mail.
Quick Setup FCC Compliance Statement For United States Users This equipment has been tested and found to comply with the limits for a Class B digital device, pursuant to Part 15 of the FCC Rules. These limits are designed to provide reasonable protection against harmful interference in a residential installation.
Quick Setup Epson America, Inc. Limited Warranty What Is Covered: Epson America, Inc. (“Epson”) warrants to the original end user customer of the Epson product enclosed with this limited warranty statement that the product, if purchased and used in the United States or Canada, conforms to the manufacturer’s specifications and will be free from defects in workmanship and materials for the period of two years from the date of original purchase.
Quick Setup THIS WARRANTY AND REMEDY PROVIDED ABOVE ARE EXCLUSIVE AND IN LIEU OF ALL OTHER EXPRESS OR IMPLIED WARRANTIES INCLUDING, BUT NOT LIMITED TO, THE IMPLIED WARRANTIES OF MERCHANTABILITY, NON-INFRINGEMENT OR FITNESS FOR A PARTICULAR PURPOSE. SOME LAWS DO NOT ALLOW THE EXCLUSION OF IMPLIED WARRANTIES. IF THESE LAWS APPLY, THEN ALL EXPRESS AND IMPLIED WARRANTIES ARE LIMITED TO THE WARRANTY PERIOD IDENTIFIED ABOVE.
Quick Setup Hardware. The term “Software” shall also include any upgrades, modified versions, updates, additions and copies of the Software licensed to you by Epson or its suppliers. The primary user of the computer on which the Software is installed or used may also install the Software on one home or portable computer, provided the home or portable computer is also for use only by the same user. 2.
Quick Setup the media for the Software or to refund your money upon returning the Software and Epson Hardware. Any replacement Software will be warranted for the remainder of the original warranty period or thirty (30) days, whichever is longer. If the above remedy fails for any reason, Epson’s entire liability for a breach of warranty shall be limited to a refund of the price paid for the Epson Hardware.
Quick Setup 9. Export Restriction You agree that the Software will not be shipped, transferred, or exported into any other country or used in any manner prohibited by the United States Export Adminstrative Act or any other export laws, restrictions or regulations. 10. Governing Law and General Provisions This Agreement shall be governed and construed under the laws in the State of California without regard to its conflict of laws rules.