Start.
Start.book Page ii Tuesday, October 3, 2000 5:14 PM Copyright Notice All rights reserved. No part of this publication may be reproduced, stored in a retrieval system, or transmitted in any form or by any means, electronic, mechanical, photocopying, recording, or otherwise, without the prior written permission of SEIKO EPSON CORPORATION. The information contained herein is designed only for use with this EPSON printer. EPSON is not responsible for any use of this information as applied to other printers.
Start.
Start.book Page ii Tuesday, October 3, 2000 5:14 PM ii EpsonNet WebManager System Requirements Supported Printers EpsonNet WebManager Functions Setting Up EpsonNet WebManager Installing and Starting the Software Uninstalling EpsonNet WebManager 19 19 20 20 21 22 23 INSTALLING THE WORKSTATION SOFTWARE Installing the Printer Driver in Windows 95, 98, 2000, or NT 4.
Start.
Start.book Page 1 Tuesday, October 3, 2000 5:14 PM Introduction Your EPSON Stylus Color 980N Professional Series printer is the ideal output device for business graphics, digital photographs, and more. It includes a built-in EpsonNet 10/100 Base TX Internal Print Server that lets your printer communicate using a variety of Ethernet protocols. The EpsonNet configuration software and additional utilities let you manage all your network printers, monitor printer status, and print across the internet.
Start.book Page 2 Tuesday, October 3, 2000 5:14 PM electronic copy of the Administrator’s Manual is included on the Printer Software CD-ROM, along with the EPSON Stylus Color 980 Reference Guide, which contains detailed instructions on using your printer. For instructions on viewing these guides, see below. For additional tips on loading paper, printing, cleaning the print head, and replacing ink cartridges, watch the Fix-It Flix printer movies as described on page 6.
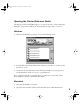
Start.book Page 3 Tuesday, October 3, 2000 5:14 PM Opening the Printer Reference Guide The Reference Guide is in HTML format, so you need a browser—such as Netscape® Navigator® 3.0 or later or Microsoft® Internet Explorer 3.0 or later—to view it. Windows 1. Insert the CD-ROM in your drive. You see the following screen: 2. Double-click View Printer Reference Guide (you may have to scroll down the menu list to see it). 3.
Start.book Page 4 Tuesday, October 3, 2000 5:14 PM 3. On the next screen, click either View Reference Guide (to view the guide) or Install Reference Guide (to copy it to your hard drive). If you copied the manual to your hard drive, you can access it at any time. Open the Epson Stylus Color 980 folder and double-click View Reference Guide.
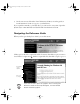
Start.book Page 5 Tuesday, October 3, 2000 5:14 PM Opening the Administrator’s Manual The Administrator’s Manual is in PDF format, so you need to use Adobe® Acrobat® to view it. If you don’t have Acrobat, you will be prompted to install it from the CD-ROM that came with your printer. Windows 1. Insert the CD-ROM in your drive. You see the following screen: 2. Double-click View Administrator’s Manual. 3. On the next screen, double-click Administrator’s Manual. The manual opens in the Adobe Acrobat window.
Start.book Page 6 Tuesday, October 3, 2000 5:14 PM Macintosh 1. Insert the CD-ROM in your drive. 2. Open the Online Guides folder, and double-click Administrator’s Manual.pdf. The manual opens in the Adobe Acrobat window. (If Acrobat is not already installed, follow the on-screen instructions to install it and then open the manual.) If you wish to copy the Administrator’s Manual to your hard drive, open the Online Guides folder on your CD-ROM and copy Administrator’s Manual.pdf to your hard drive.
Start.book Page 7 Tuesday, October 3, 2000 5:14 PM Setting Up Your Printer This chapter describes how to unpack and set up your printer. For more information on using and maintaining the printer, see the EPSON Stylus Color 980N Reference Guide as described on page 3. Unpacking the Printer Remove any packing material from the printer as described on the unpacking sheet in the printer box.
Start.book Page 8 Tuesday, October 3, 2000 5:14 PM Attaching the Paper Support Insert the paper support into the slots at the back of the printer’s sheet feeder.
Start.book Page 9 Tuesday, October 3, 2000 5:14 PM Installing the Ink Cartridges 1. Make sure the printer is turned off (the P power button should be up). Then plug the printer’s power cord into a grounded outlet. Don’t use an outlet controlled by a wall switch or timer, or one that uses the same circuit as a large appliance. This may disrupt the power, which can erase memory or even damage the power supply. Always use the P power button to turn the printer on or off.
Start.book Page 10 Tuesday, October 3, 2000 5:14 PM 4. Unwrap the ink cartridges. Then remove only the yellow part of the tape seal on the top, as shown. Don’t pull off the blue portion or remove the clear seal underneath the cartridge. To ensure the print heads charge correctly, install the ink cartridges that came with your printer. You must remove the yellow tape from the top of the cartridge or you will permanently damage it. It’s okay if a small corner of the yellow tape stays on the cartridge. 5.
Start.book Page 11 Tuesday, October 3, 2000 5:14 PM 6. Place the black ink cartridge in the holder with the label facing up and toward the back of the printer, as shown. Then close the clamp, making sure it clicks into place. If ink gets on your hands, wash them thoroughly with soap and water. If ink gets in your eyes, flush them immediately with water. 7. Press the X cleaning button to move the color ink cartridge holder into loading position. 8. Repeat steps 5 and 6 to install the color ink cartridge.
Start.book Page 12 Tuesday, October 3, 2000 5:14 PM Loading Paper 1. Open the output tray extensions. Slide the left edge guide so it’s a little wider than your paper. left edge guide output tray extensions 2. Load a stack of plain paper with the printable side up and place it against the right edge guide. Then slide the left edge guide to the paper’s left edge. Don’t load paper higher than the arrow, as shown below.
Start.book Page 13 Tuesday, October 3, 2000 5:14 PM Connecting the Printer to Your Network Connect your printer to an Ethernet network connection using a twisted-pair RJ45 “straight through” network cable: 1. Attach the network cable to the connector on the card. status sheet button twisted-pair connector 2. To initialize the card, turn on the printer while pressing down the status sheet button. Continue pressing the status sheet button for five seconds.
Start.
Start.book Page 15 Tuesday, October 3, 2000 5:14 PM Installing the Print Server Software The EpsonNet Internal Print Server supports IEEE 802.2, IEEE 802.3, Ethernet II, and Ethernet SNAP network protocols. Your users can print from Microsoft Windows, Apple Macintosh, UNIX, and IBM OS/2 applications. This chapter describes the print server software and includes instructions for installing some of the utilities.
Start.book Page 16 Tuesday, October 3, 2000 5:14 PM Where To Get More Information Here’s where you can get more information about your EpsonNet Internal Print Server: ■ Administrator’s Manual Provides detailed information about the print server, including a list of the printers that support it, configuration and printing instructions for the supported network environments, information about the software utilities, troubleshooting guidelines, and specifications.
Start.book Page 17 Tuesday, October 3, 2000 5:14 PM System Requirements Operating system Windows 95/98 Windows 2000 Server and Professional Windows NT 4.0 Server and Workstation CPU i486/DX (Pentium® or better recommended) Memory 8MB (for Windows 95/98) 16MB (for Windows 2000/NT 4.0) Hard disk space 8MB Installing EpsonNet WinAssist Before you install the software, make sure you set up the required protocols and services in your operating system.
Start.book Page 18 Tuesday, October 3, 2000 5:14 PM System Requirements Operating system System 7.1, 7.5x, Mac OS 7.6.x, 8.x, 9.x CPU 68030 or better processor Memory 6MB Hard drive space 13MB Installing EpsonNet MacAssist 1. Insert the CD-ROM in your drive. 2. Double-click the EpsonNet MacAssist Installer icon and follow the instructions on the screen.
Start.book Page 19 Tuesday, October 3, 2000 5:14 PM EpsonNet WebManager EpsonNet WebManager lets you monitor and control all your network printers. It supports Windows, Macintosh, and UNIX platforms and allows you to manage EPSON printers that support the printer MIB (RFC1759) standard. Although EpsonNet WebManager supports multiple network platforms, you can only install it in a Windows environment. Make sure you check the README file on the CD-ROM for the latest information.
Start.
Start.book Page 21 Tuesday, October 3, 2000 5:14 PM ■ Network settings Lets you change network interface settings. ■ Group management Helps you manage network printers more effectively. Setting Up EpsonNet WebManager You can set up the software and use it to manage your network printers in either of two ways: ■ Install EpsonNet WebManager and run it through a browser installed on the same computer. The EpsonNet WebManager server—running Windows 95, 98, 2000, and NT 4.
Start.book Page 22 Tuesday, October 3, 2000 5:14 PM ■ Install EpsonNet WebManager and run it through a browser installed on another computer in the network (a client).
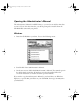
Start.book Page 23 Tuesday, October 3, 2000 5:14 PM To open EpsonNet WebManager from a client computer, open a browser and enter the IP address (or host name) of the server and port number (8090): http:// the IP address or host name of the server:8090/ for example: http://192.168.100.201:8090/ You see the main page: Click to view the online manual 4. To view the EpsonNet WebManager online manual, click the Help button in the main menu, then click Online Manual.
Start.
Start.book Page 25 Tuesday, October 3, 2000 5:14 PM Installing the Workstation Software Follow the instructions in this chapter to install the printer driver on each workstation from which you’ll be printing to the network. (If you’re on a Windows NT Server network, you won’t have to install the driver at each workstation; but see your Windows NT documentation to set up sharing.
Start.book Page 26 Tuesday, October 3, 2000 5:14 PM Installing the Printer Driver in Windows 95, 98, 2000, or NT 4.0 1. Insert the printer software CD-ROM. You see the Installation Program screen: If you do not see the screen, double-click the CD-ROM icon under My Computer. 2. Double-click Install EPSON Stylus COLOR 980N Printer Driver, and follow the on-screen instructions to install the software. Your printer is automatically set to your local port, LPT1.
Start.book Page 27 Tuesday, October 3, 2000 5:14 PM 2. Right-click the EPSON Stylus Color 980 printer icon. 3. Select Properties (in Windows 95 or 98) or Document Defaults (in Windows NT). 4. In Windows 95 or 98, click the Details tab. In Windows NT 4.0, click the Ports tab. 5. Click Add Port. 6. In Windows 95 or 98, click Browse and choose the server or EPSON_TCPIP_Printer that your printer is set up on. Then click OK. In Windows NT 4.
Start.book Page 28 Tuesday, October 3, 2000 5:14 PM Installing the Printer Driver on a Macintosh 1. Turn on your printer and your Macintosh and turn off any virus protection programs you may have. 2. Insert the printer software CD-ROM. 3. Double-click the Printer Driver Installer icon. 4. Follow the instructions on the screen and restart your computer. To use the printer or configure the printer’s Ethernet card, you need to select the SC 980 (AT) printer in the Chooser and make sure AppleTalk is turned on.
Start.book Page 29 Tuesday, October 3, 2000 5:14 PM Printing a Test Page If you have a Windows 95, 98, 2000, or NT 4.0 workstation, follow the steps below to test the printer and verify that the network is working correctly. Make sure the printer is turned on and a sheet of letter-sized paper is loaded. 1. Point to Start, Settings, and click Printers. 2.
Start.
Start.book Page 31 Tuesday, October 3, 2000 5:14 PM Using Status Monitor 3 for Windows EPSON Status Monitor 3, which installs automatically with the printer driver, lets you monitor a network printer from any workstation running Windows 95, 98, 2000, or NT 4.0. It gives you ink levels for the printer and notifies you if the printer has any problems. It does create network traffic, however, so you may want to limit the number of users who can monitor the printer.
Start.book Page 32 Tuesday, October 3, 2000 5:14 PM Selecting a Printer to Monitor To use EPSON Status Monitor 3, you have to select the printer you want to monitor. You do this in the printer’s Properties dialog box. Follow the steps below for your system: Windows NT 4.0 or 2000: 1. Click Start, point to Settings, then select Printers. 2. Right-click your EPSON Stylus Color 980 printer icon and select Properties. 3. When you see the Properties dialog box, click the Ports tab. 4.
Start.book Page 33 Tuesday, October 3, 2000 5:14 PM Windows 95 or 98: 1. Click Start, point to Settings, then select Printers. 2. Right-click your EPSON Stylus Color 980 printer icon and select Properties. 3. When you see the Properties dialog box, click the Details tab. 4. Click Add Port. You see the Add Port dialog box.
Start.book Page 34 Tuesday, October 3, 2000 5:14 PM 5. Click Browse, and then double-click the Epson_lpr icon. You see a list of Epson printers on your network. 6. Select the printer you want to monitor, then click OK to close the Browse for Printer dialog box. 7. Click OK to close the Add Port dialog box 8. Your printer’s name and network address appear in the Print to the following port box on the Details tab. Click Apply to apply the change. 9. Click OK to close the Properties dialog box.
Start.book Page 35 Tuesday, October 3, 2000 5:14 PM Turning Monitoring On and Off After Status Monitor 3 is installed, it automatically performs background monitoring whenever you print a document. If an error occurs, such as a paper out error, you’re automatically notified of the problem. However, background monitoring increases network traffic, so you may wish to turn it off at some or all workstations. See “Disabling Background Monitoring” on page 39.
Start.book Page 36 Tuesday, October 3, 2000 5:14 PM 4. When you see the Properties dialog box, click the Utility tab. 5. Click the EPSON Status Monitor 3 button to begin monitoring. You see the Status Monitor 3 window, as shown on page 31.
Start.book Page 37 Tuesday, October 3, 2000 5:14 PM Turning On Monitoring from a Shortcut Icon After selecting a printer to monitor (see page 32), follow these steps to create a shortcut icon for the printer on your Windows taskbar: 1. Click Start, point to Settings, then select Printers. 2. Right-click your EPSON Stylus Color 980 printer icon. 3.
Start.book Page 38 Tuesday, October 3, 2000 5:14 PM 6. Click Monitoring Preferences. 7. Click the Shortcut Icon box to select it, then select one of the three graphics to use as your shortcut icon. 8. Click OK to close the Monitoring Preferences dialog box. 9. Click OK to close the Speed & Progress dialog box, and then click OK to close the Properties dialog box. You now have a shortcut icon for the selected printer on your Windows taskbar.
Start.book Page 39 Tuesday, October 3, 2000 5:14 PM Disabling Background Monitoring To limit traffic on your network, you can turn off background monitoring at individual workstations. Follow these steps: 1. Select the printer for which you want to disable background monitoring, as described on page 32. 2. Click Start, point to Settings, then select Printers. 3. Right-click your EPSON Stylus Color 980 printer icon. 4.
Start.book Page 40 Tuesday, October 3, 2000 5:14 PM 7. Click Monitoring Preferences. 8. Deselect any of the events that are enabled. 9. Click OK to close Monitoring Preferences, then click OK again to close the Speed and Progress dialog box. 10. Click OK to close the Properties dialog box. Background monitoring is disabled on this workstation until you enable it again from the Monitoring Preferences dialog box.
Start.book Page 41 Tuesday, October 3, 2000 5:14 PM Where To Get Help If you need help with your printer, the EpsonNet Internal Print Server, or any of the included software, see the contact information below. EPSON Technical Support EPSON provides technical assistance 24 hours a day through the electronic support services and automated telephone services listed in the following table. Service Access World Wide Web From the Internet, you can reach EPSON Support at http://support.epson.com.
Start.
Start.book Page 43 Tuesday, October 3, 2000 5:14 PM Ordering EPSON Parts and Accessories You can purchase ink, paper, manuals, and accessories from the EPSON Store at (800) 873-7766 or visit the EPSON Store at www.epson.com (U.S. sales only). In Canada, please call (800) 873-7766 for dealer referral. For additional information on ordering ink and paper, see the inside back cover.
Start.
Start.book Page 45 Tuesday, October 3, 2000 5:14 PM Notices This chapter includes system requirements, safety instructions, legal notices, and other important information about your EPSON Stylus Color 980N. For information about UNIX and OS2, see your Administrator’s Manual. Windows System Requirements To use your printer and its software, your system should have: ■ An IBM® compatible PC with at least a 486/25 MHz processor (for Windows 95 or Windows NT 4.
Start.book Page 46 Tuesday, October 3, 2000 5:14 PM Macintosh System Requirements To use your printer and its software, your system should have: ■ An Apple Macintosh OS 7.
Start.book Page 47 Tuesday, October 3, 2000 5:14 PM ENERGY STAR Compliance As an ENERGY STAR Partner, EPSON has determined that this product meets the ENERGY STAR guidelines for energy efficiency. The EPA ENERGY STAR office equipment program is a voluntary partnership with the computer and office equipment industry to promote the introduction of energy-efficient personal computers, monitors, printers, fax machines, and copiers in an effort to reduce air pollution caused by power generation.
Start.book Page 48 Tuesday, October 3, 2000 5:14 PM ■ Unplug the printer and refer servicing to qualified service personnel if the power cord or plug is damaged; if liquid has entered the printer; if the printer has been dropped or the case damaged; if the printer does not operate normally or exhibits a distinct change in performance. Adjust only those controls that are covered by the operating instructions.
Start.book Page 49 Tuesday, October 3, 2000 5:14 PM FCC Compliance Statement For United States Users This equipment has been tested and found to comply with the limits for a Class B digital device, pursuant to Part 15 of the FCC Rules. These limits are designed to provide reasonable protection against harmful interference in a residential installation.
Start.book Page 50 Tuesday, October 3, 2000 5:14 PM End User Software License Agreement PLEASE SIGN AND RETURN ANY ACCOMPANYING REGISTRATION FORM TO RECEIVE REGISTRATION BENEFITS NOTICE TO USER: BY OPENING THE PACKAGE, INSTALLING, COPYING OR OTHERWISE USING THE ENCLOSED SOFTWARE, ALL OF THE TERMS AND CONDITIONS OF THIS CONTRACT ARE DEEMED ACCEPTED. The enclosed software product (the “Software”), contained on a CD-ROM or other media provided by Epson America, Inc.
Start.book Page 51 Tuesday, October 3, 2000 5:14 PM 7. U.S. Government Restricted Rights. The Software and Documentation are provided with RESTRICTED RIGHTS. Use, duplication, or disclosure by the Government is subject to restrictions set forth in subparagraph (c)(1)(ii) of The Rights in Technical Data and Computer Software clause at DFAR25.27-7013 or subparagraph (c)(1) and (2) of the Commercial Computer Software - Restricted Rights at 48 CFR 52.227-19, as applicable, and any amendments thereto. 8.
Start.book Page 52 Tuesday, October 3, 2000 5:14 PM Limited Warranty What Is Covered: Epson America, Inc. (“Epson”) warrants to the first end-user customer that the EPSON printer covered by this limited warranty statement, if purchased and used in the United States or Canada, conforms to the manufacturer’s specifications and will be free from defects in workmanship and materials for a period of one year from the date of original purchase.
Start.
Start.